May 13th, 2014
If you have been reading my posts this week, you probably know that I was in charge of my son’s back-to-school party this year. I can’t tell you how much fun my kids had watching and helping me with all the wonderful centerpieces. This was one of them! I found this idea on Pinterest and had to give it a try.
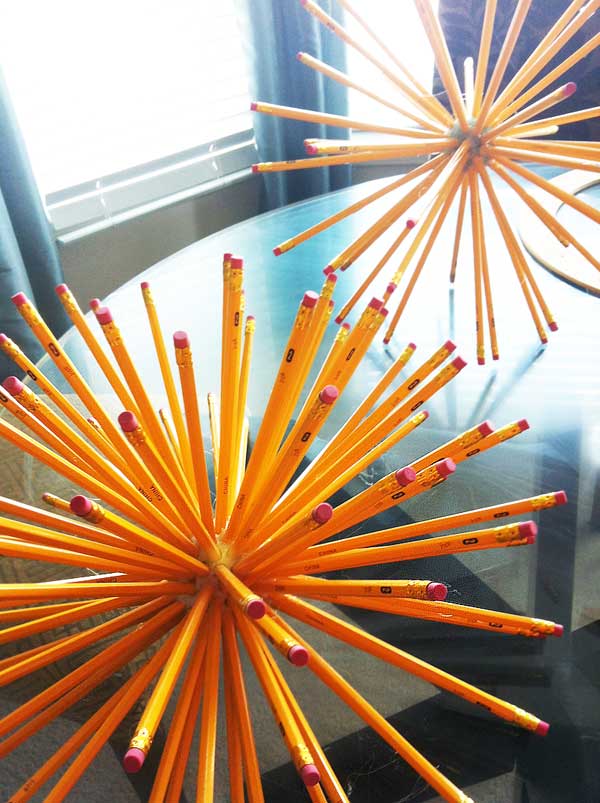
My only warning for anyone who wants to try this project is that yes it was easy, however, if you are short on time, this is probably not the project you want to tackle. It takes time for the hot glue to cool and for the pencils to set properly. I worked on this star burst over a period of a week and I worked on both of them at one time. My kids helped by holding the pencils in place as the glue dried, helping the pencil stick properly inside the hole. You can do two, three, or more pencil star bursts at one time, but make sure to wait for each pencil to “set” properly.
Simply purchase a styrofoam ball and create holes with your #2 unsharpened pencil. Add hot glue to the hole and place the pencil inside, holding it while the hot glue cools. You can do two to 3 pencils at one time, but it’s important to make sure they are properly set before moving on. You can do an entire ball as a star burst, or just do half a ball. I did two and it was nice to see multi-sized starbursts on the table. You can also paint the ball yellow, prior to inserting the pencils. I did not do that but wished I thought of it prior to making the starburst. Good thing that kids don’t care!
I did three other projects this year which include (pictured) Tissue Ball Centerpieces, Custom Crayon Teacher’s Wreath, and “Welcome Back” Crayon and Pencil Sign.
· Posted in Back To School, Crafts, Parties ·
May 13th, 2014
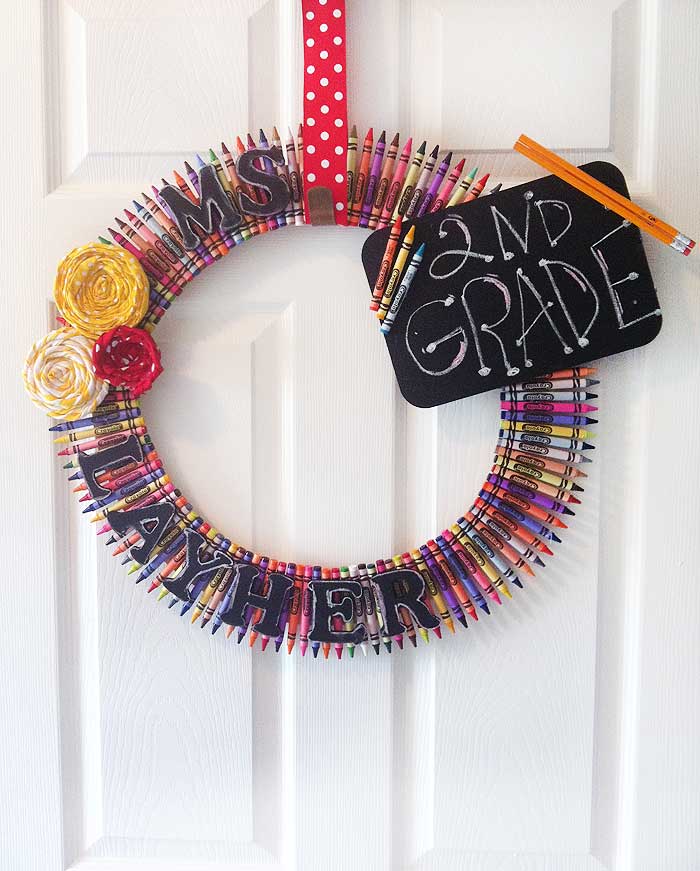
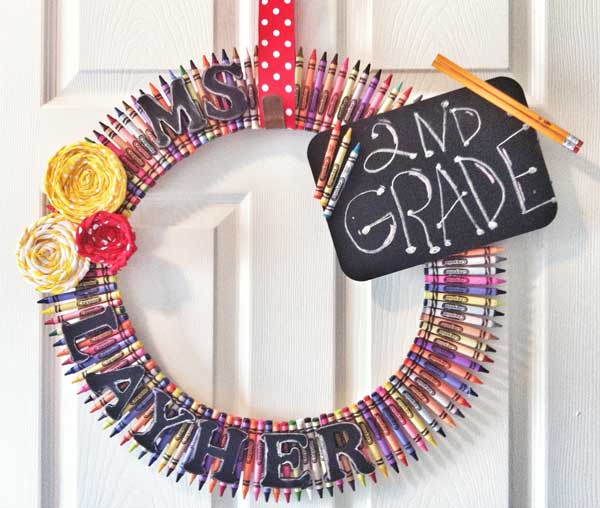
In approximately two hours, I will be at school with my youngest boy, registering him for classes and meeting our new teacher, Ms. Layher! It is her first year teaching second grade, so I thought I would bring her something special to start off her year in her new classroom! This wreath is all the rage on Pinterest. I’ve seen it created with pencils, crayons, chalkboard, and other creative additions. This is my wreath and below are some tips on how I created it. Trust me, if you like the photo, wait until you see it in person. And yes, it is SUPER EASY!!
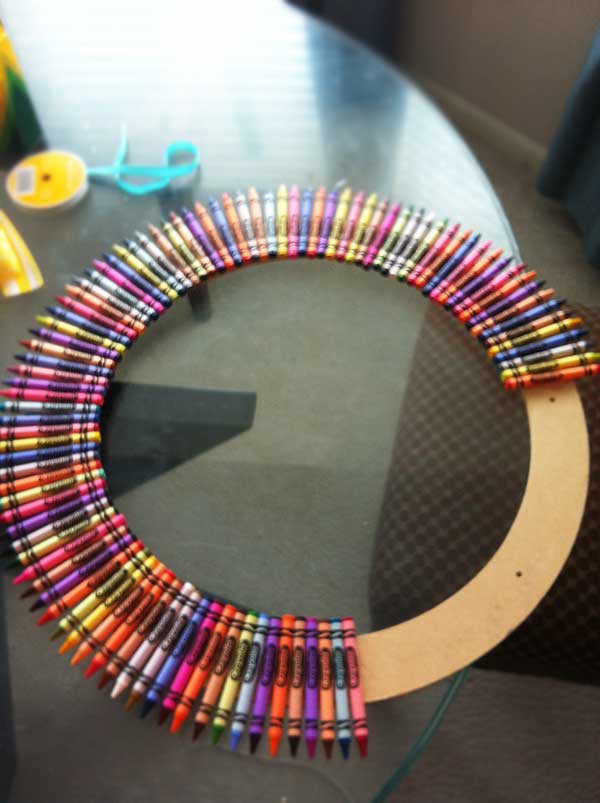
First, I purchased a flat wreath form. It is one of the least expensive forms to buy, around $4.99 at Michael’s. I’ve seen people use all sorts of other wreath forms as well. I hot glued crayons to the wreath, making sure to keep the “crayola” logo facing up. When the logos are lined up, it forms a nice black band around the wreath and lining up all the graphic elements on the crayons make the wreath look clean and tidy!
Believe it or not, that is the hard part! Once you hot glued all the crayons, you can then add accessories which can be reflective of your teacher (or yourself, if you are creating this wreath for your front door). I do not know much about our new teacher, other than her name. So, I used chalkboard letters to customize her wreath. I also purchased a small rectangular chalkboard where I wrote “2nd Grade”. This creates a custom look, but will also give her the opportunity of changing the message depending on her mood.
I also added some ribbon flowers which I created by twisting ribbon into a circular shape and hot gluing it. If you don’t feel like going through the trouble of making ribbon flowers, just purchase some silk flowers, like colorful daisies, and use them instead.
In need of more ideas, check out Pinterest for more creative ways on embellishing your crayon wreath. This wreath can be made for your front door, a back to school party, or a great teacher’s gift!
· Posted in Back To School, Crafts, Parties ·
May 12th, 2014
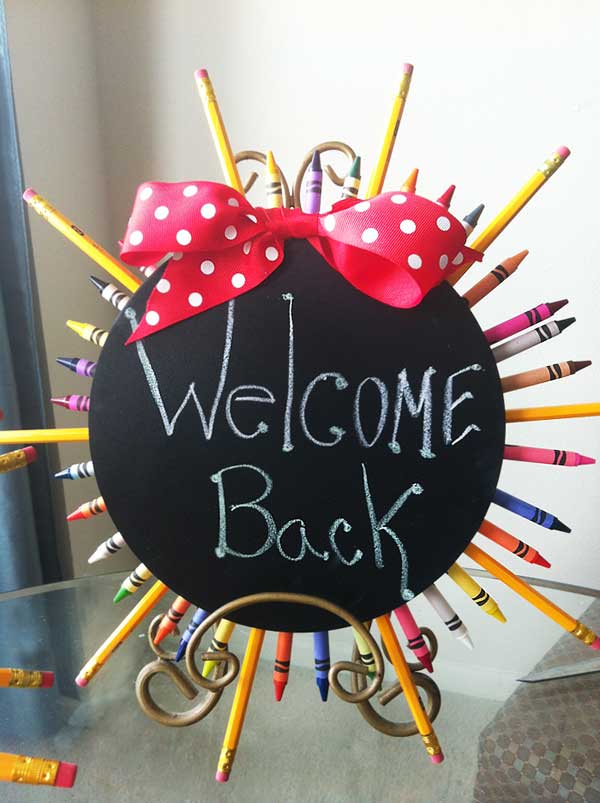
This year, I was in charge of the Back-To-School Party for my 2nd grader! It was so much fun and I created some fun centerpieces as well as an adorable wreath for his teacher that is all the rage on Pinterest. Since we had a buffet at our party, I thought it was cute to create a fun little sign to jazz the buffet up. Here is my sign and how I made it.
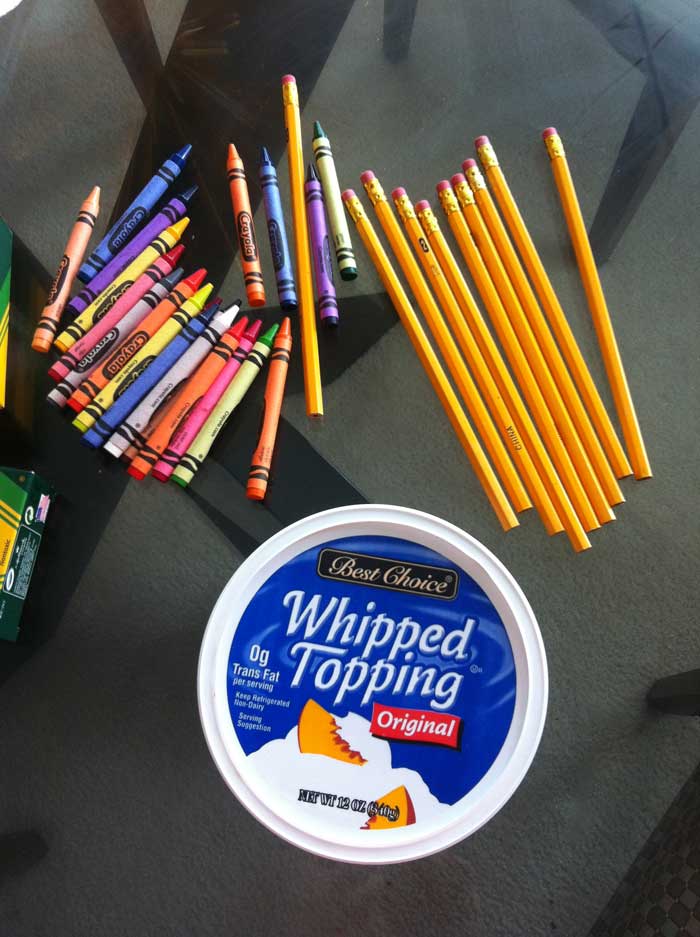
First, I purchased pencils and crayons at Target. They were at an incredible price of $1.00 for 24 pencils and .50 for a box of crayons. Then I needed a round object. Any will do. I found a lid from a whipped topping container. But really, any round object will work… even cardboard.
Then, I simply hot glued my pencils in a star burst pattern on the lid. Then, filled in the empty areas with crayons. Everything needs to be hot glued very thoroughly. Lastly, I hot glued the round chalkboard to the pencils, added a ribbon bow, and wrote “Welcome Back” on the chalkboard. Done!

· Posted in Back To School, Crafts, Fall Season, Parties ·
May 12th, 2014
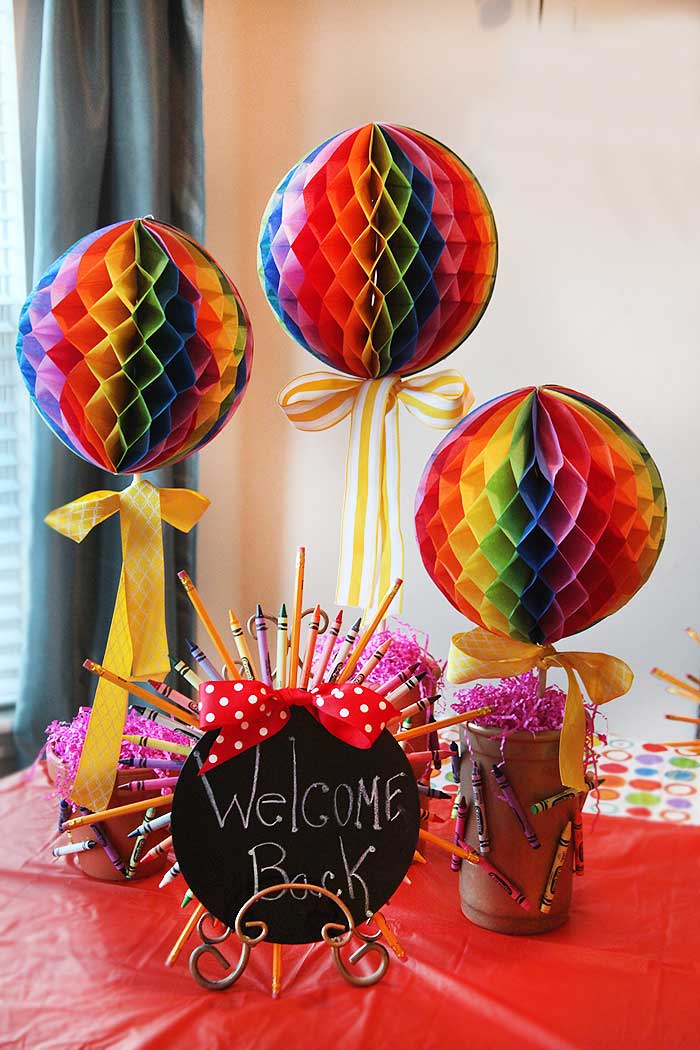
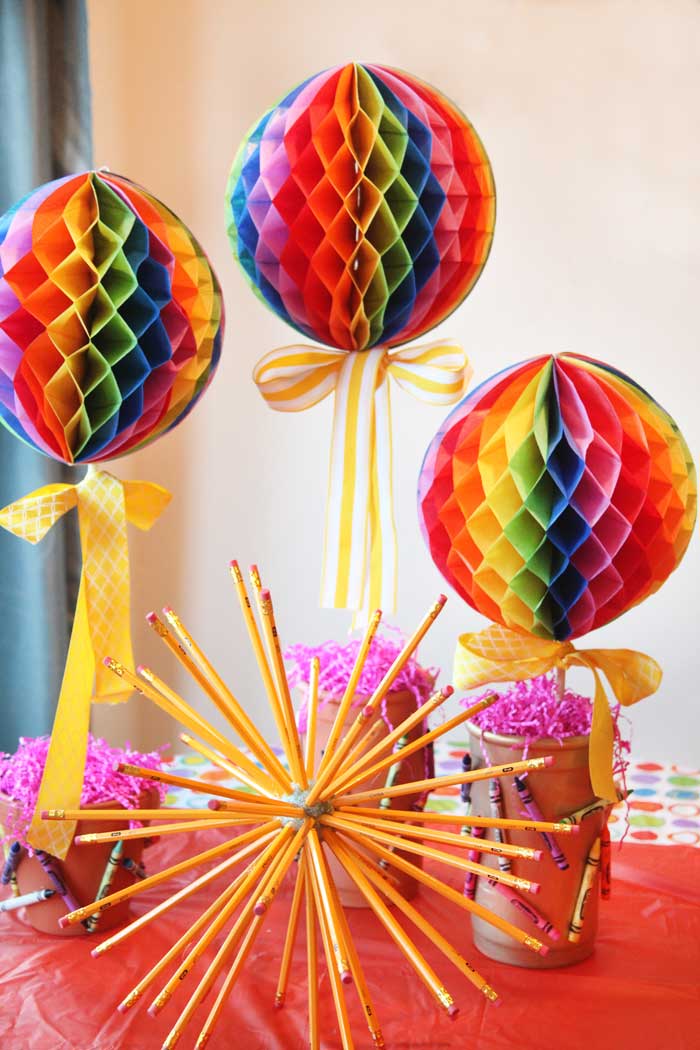
I always get excited at the beginning of the school year! Meeting new teachers, reconnecting with old friends… there is so much excitement for so many different reasons. This year, I was in charge of organizing my youngest boy’s 2nd grade back-to-school party and I wanted to do something fun. I didn’t really have a theme or a “vision”, I just wanted to make something universal, fun, and cheerful. Plus, it had to be cheap… no money in the budget for decorations, so I was on my own. I went with a rainbow color theme because I figured it was gender neutral and easy to work with. I also went through my closets to see if I could find items from past projects and lo and behold, I found ribbon, terra cotta containers, Easter grass, and styrofoam… I’m set! Last but not least, I took advantage of the big back-to-school sales going on and purchased pencils and crayons at ridiculously low prices.
For my centerpieces, I purchased pop-up tissue balls at Target in the party section. They were around $2.00 each. I also purchased a ton of crayons which were 2 boxes of 24 for .50 (48 total). I also purchased a round chalkboard for my “Welcome Back” centerpiece and that was the most expensive at $3.00 from Michael’s. My last purchase were wooden sticks, which were about .50 at Michael’s. The sticks were needed so I could transform my tissue ball (which is meant to be hung) into a topiary.
From there, I started to improvise. I used terra cotta containers and stuffed styrofoam inside each one. You can also use oasis squares. I stuck the wooden sticks into the styrofoam and took out the tissue balls from the wrappers. Once you are ready to put the tissue balls on, make sure that you wrap them around the stick and glue the ends of the tissue balls together. I used the thinnest sticks I could find at Michael’s…. sorry, skewer sticks won’t work. You can paint the sticks… but why bother… kids don’t care!
To cover up the styrofoam, I hot glued paper Easter grass to it. Last but not least, I tied some yellow ribbon around the neck of the wooden stick and had my boys hot glued crayons all round the terra cotta container just for fun!
This was a super easy project for centerpieces and I have to tell you, it will inspire you to create other things with those fabulous tissue balls.
For more details on how I made the “Welcome Back” sign and the 2nd grade teacher’s wreath, check out my other post.
· Posted in Back To School, Crafts, Parties ·
May 9th, 2014
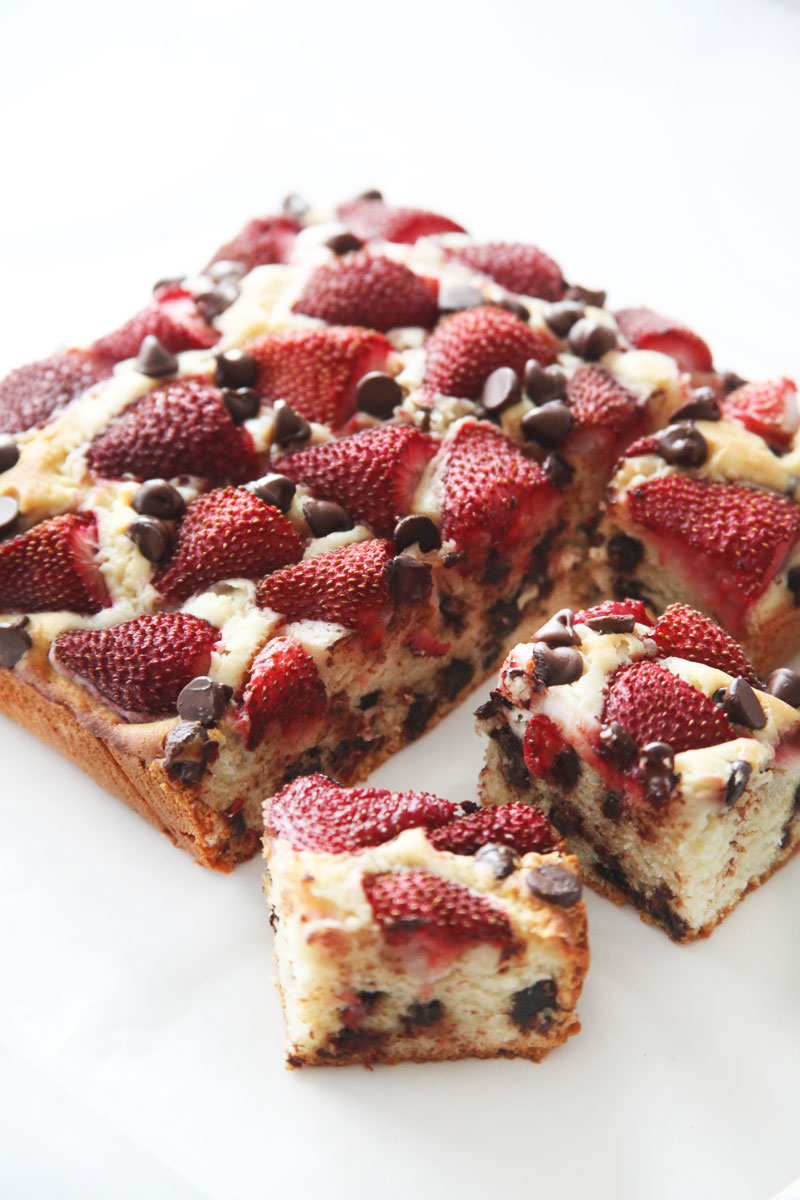
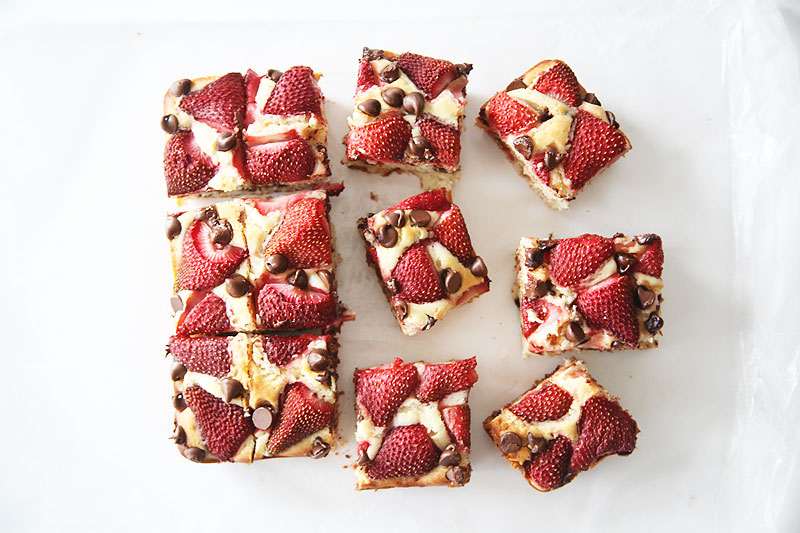
I want you to prepare yourself for a dessert that’s not only beautiful but absolutely delicious! This strawberry chocolate chip cake is fabulous alone or with a scoop of ice cream. I made it for my husband because I realized I had a lot of strawberries left over and wanted to bake something delicious. I found this recipe on Pinterest which led me to Julia’s Album. She has a great web site with many great recipes. I think she originally got it from Martha Stewart and tweaked it a bit. Of course, I have tried many things on Pinterest that turned out to be disasters, but not this time! My cake turned out fabulous! Julia used a springform pan, I just used a 9×9 square pan. Mine turned out beautiful but I’m sure it would turn out even better in the springform.
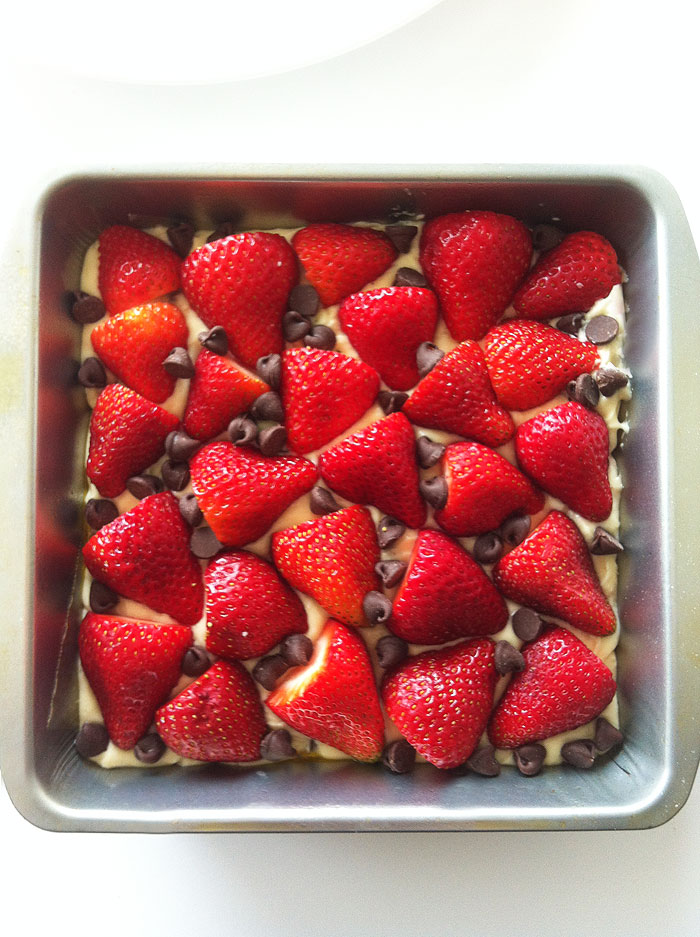
This is what the cake looked like going into the oven.
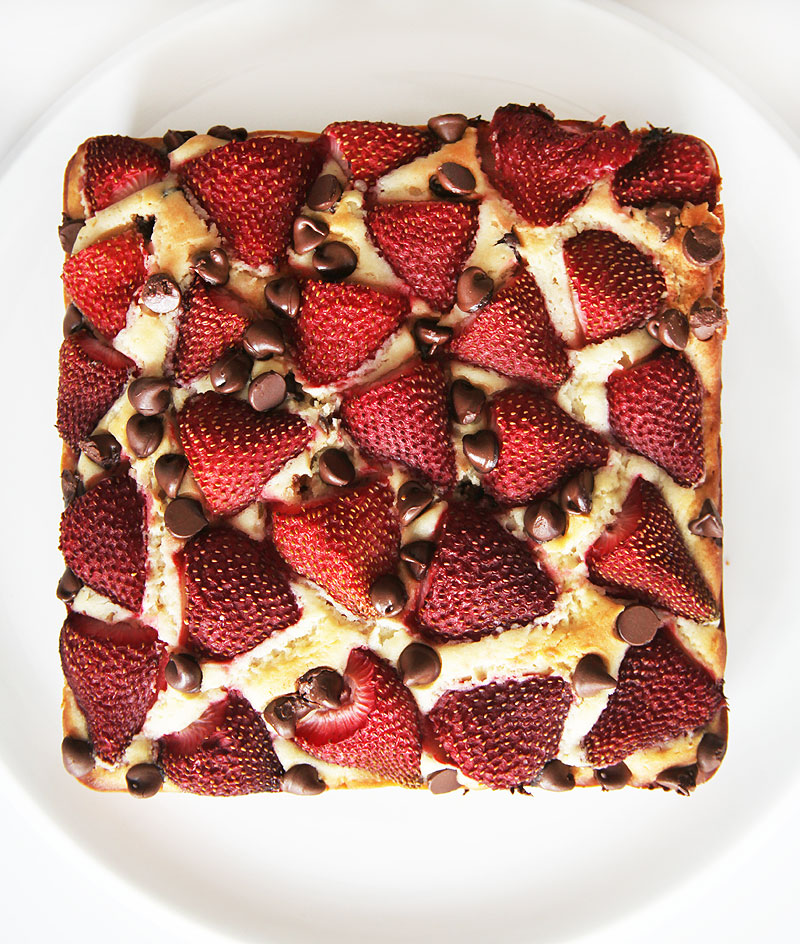
This is what it looked like when it came out of the oven. Obviously the strawberries are a little less vibrant, but still delicious!
Ingredients
- 1 and 1/2 cups all-purpose flour
- 1 and 1/2 teaspoons baking powder
- 1/8 teaspoon salt
- 3 tablespoons unsalted butter, softened
- 3 tablespoons Greek yogurt
- 1 cup sugar
- 1 large egg
- 1/2 cup milk
- 1 teaspoon pure vanilla extract
- 1/3 cup chocolate chips plus more for sprinkling the top of cake
- 1 pound strawberries, hulled and halved
Instructions
- Heat oven to 350°F. Line the bottom of a 9×3-inch springform pan with parchment paper and spray cooking spray. Or you can use a 9×9 brownie pan and spray with cooking spray.
- Sift flour, baking powder, and salt together into a medium bowl.
- In a separate large bowl, combine butter, Greek yogurt, and 1 cup sugar and, using electric mixer, beat on medium-high speed until light and fluffy – no more than 2 minutes.
- Reduce speed to medium, mix in the egg, beat until light and fluffy. Then mix in milk, vanilla.
- Keeping the mixer speed low, mix in the flour mixture, gradually, just until combined. Do not over mix.
- Fold in chocolate chips into the batter. Transfer batter to springform pan. Arrange strawberries on top of the cake, cut sides down and close together. Place chocolate chips in spaces in between.
- Bake cake for about 1 hour until the top is golden brown and the tester comes out clean. In the last 5-10 minutes of baking, you can take the cake out of the oven and sprinkle some more chocolate chips on top, pressing them lightly into the top of the cake (the top of the cake will already be baked and a bit crusty) – it will make for a nice presentation. Return to the oven for 5-10 more minutes, to allow chocolate to melt a bit and look even nicer!
- When the cake is done baking, let it cool (still in the baking pan) on a wire rack. After cake has cooled for about 40 minutes, release the cake from the springform pan. At this point, if the cake is cool enough, you can slide your hand under the cake, between the parchment paper and the bottom portion of the springform pan and move the cake with the parchment paper attached to its bottom onto a cake plate easily.
Notes
Adapted from: Martha Stewart
Storage tips: Because strawberries tend to make any desserts overly moist, this cake is best kept refrigerated. When refrigerated, it keeps very well for at least 1 week, and tastes just as fresh! It tastes pretty good cold, and you can also microwave it for 10 or so seconds to melt the chocolate chips.
Freezing tips: This cake freezes very well. Cool the cake completely. Tightly wrap the cake in plastic wrap, make sure it’s airtight. Freeze for up to 1 month.
· Posted in Decadent Desserts, Pinned it - Tried it, Recipes ·
May 3rd, 2014
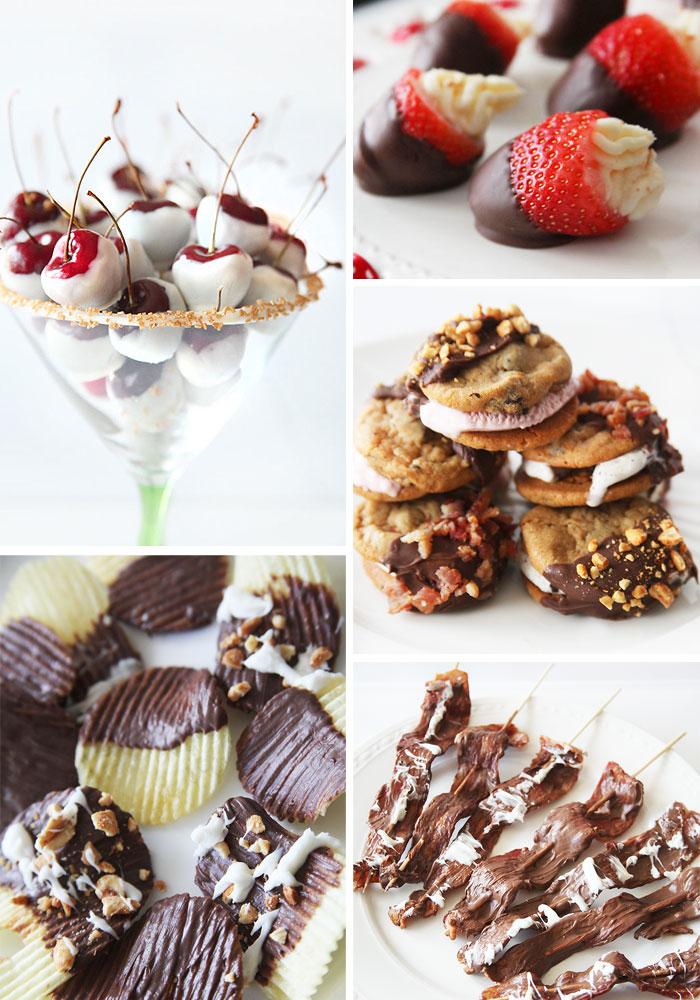
I’m going to admit something to you… I have a fail safe party secret which ALWAYS works… I mean ALWAYS! Chocolate covered anything! Some people resort to chips and dip, I resort to chocolate and it has never failed me yet. So the next time you get the urge to entertain, try covering these foods in chocolate. Trust me, you’ll thank me later!
Chocolate covered cherries
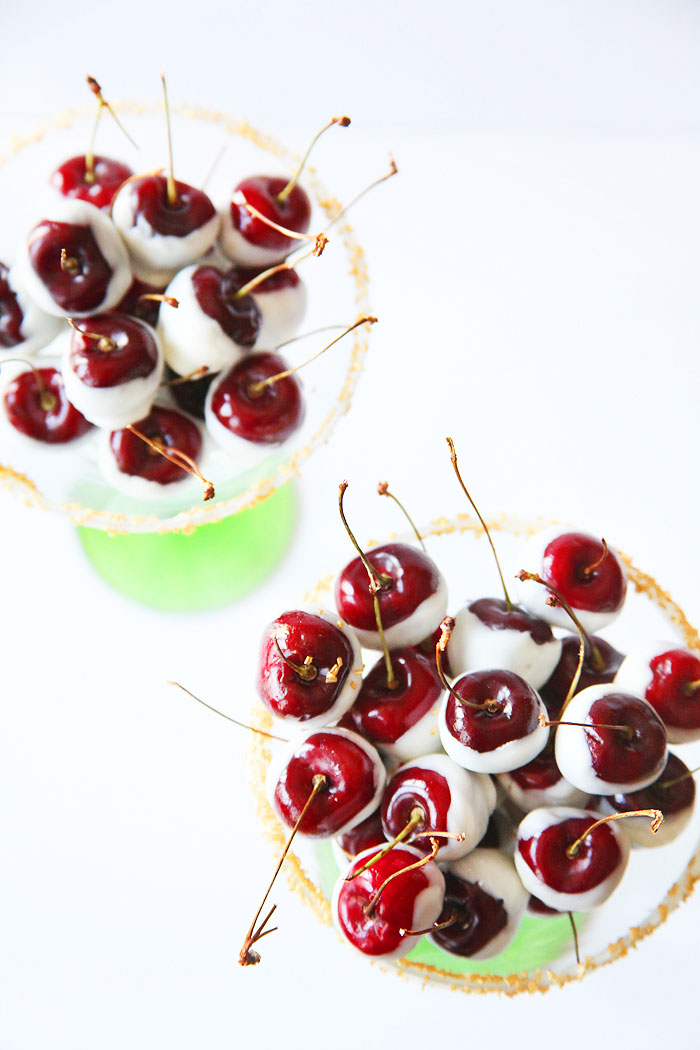
Super easy and absolutely delicious. Cover these beauties in white or dark chocolate and you won’t be able to eat just one. Serve them in a martini glass for a beautiful presentation.
Chocolate Covered Ice Cream Sandwiches
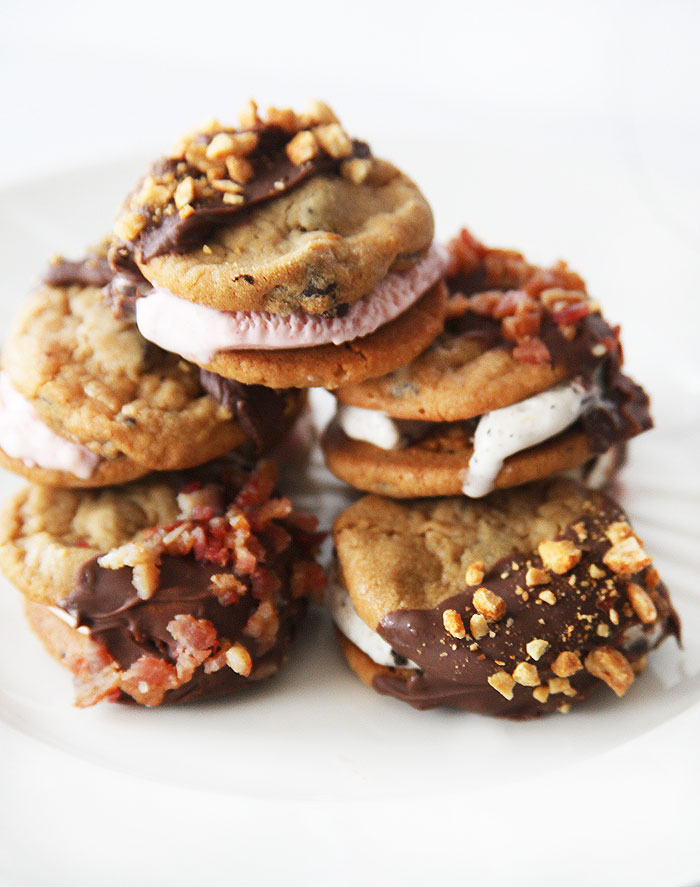
Hold on to your hats! As if ice cream sandwiches weren’t enough, now you can dip them in delicious milk or dark chocolate for an added special touch and what’s a party if you don’t make your guests feel special. Just make your sandwiches and freeze for four hours. Melt chocolate and quickly dip the sandwiches in the chocolate and put back in the freezer. I placed all my sandwiches on parchment paper in the freezer. The sandwiches picture above were for a dinner party we had a few weeks back. I also dipped them in bacon and peanuts…. yes, I’m crazy!
Chocolate Covered Potato Chips
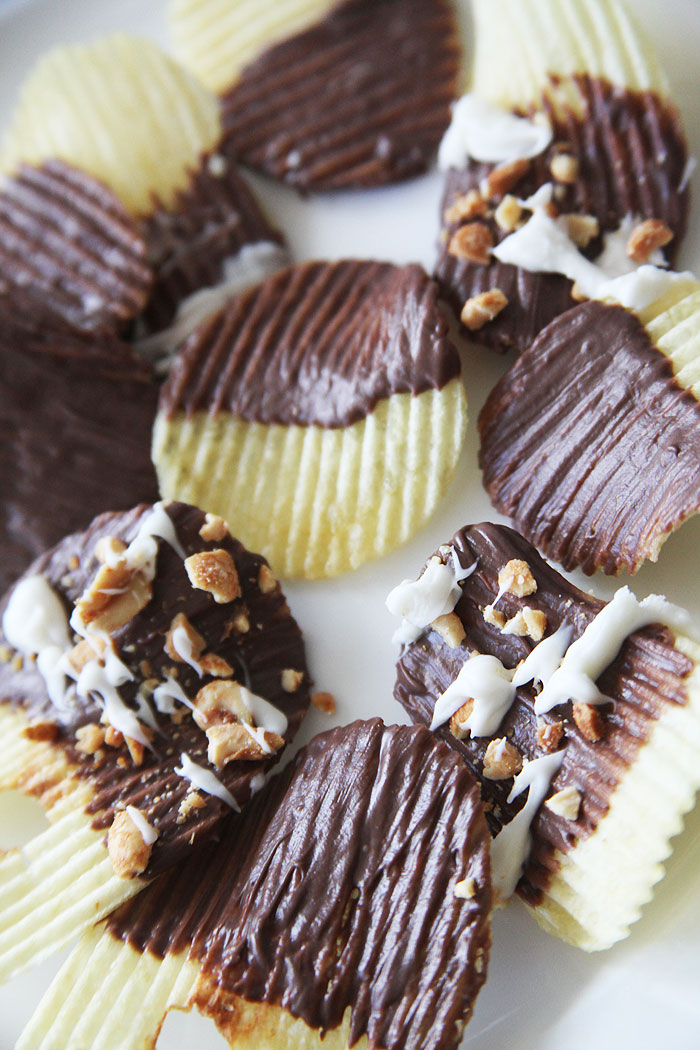
I know, I know… pure sin! However, chocolate covered potato chips seem to have a great combination of the “salty and sweet” that people enjoy. Plus, it’s unique and who doesn’t want to do something “out of the box” at a party?! Trust me, your guests may look at you funny initially, but they’ll be praising your efforts after they try it! Just brush a little chocolate on a thick potato chip. I suggest using the kettle brand or the rippled versions. I wouldn’t dip the chips, a light brushing seems to have a nice effect without overpowering the chip as dipping may do.
Chocolate Covered Bacon
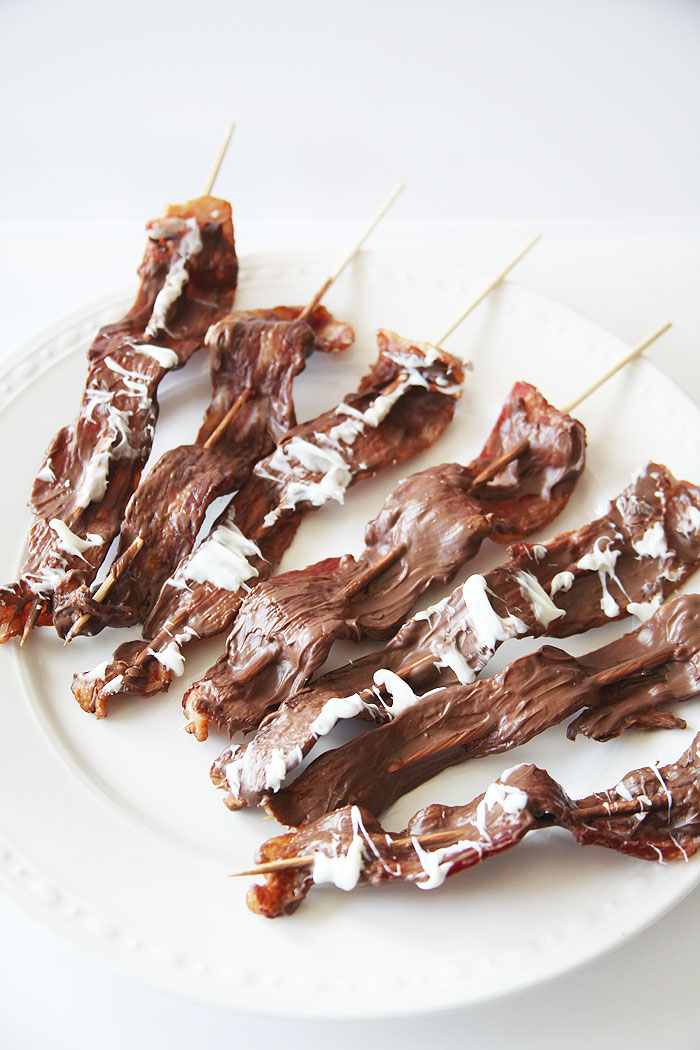
Hold on to your hats! What’s the hottest food trend? Chocolate covered bacon, of course! I prefer to brush my bacon with chocolate instead of dipping it. I find that brushing it gives it just the right balance. Although some people fully dip the bacon and love it! You’ll have to try it yourself and discover your preference! Just make your bacon as you normally would. I prefer to bake mine and for an added sweetness, I sprinkle a generous amount of brown sugar on the bacon before placing it in the oven.
Chocolate Covered Strawberries

This classic will never fail you. You can ask my friends, no one has ever NOT had chocolate covered strawberries at least once while hanging out at my house. Simply put, they are the magic dessert that always seems to look beautiful and taste sensational. I prefer to dip my strawberries in dark chocolate, it’s the best combination of wonderfully sweet strawberries with a slightly bitter taste of the dark chocolate. Pure perfection!! And if you really want to go crazy, stuff the strawberries with cheesecake filling. Your guests will never forget it!! Here’s the recipes.
· Posted in Decadent Desserts, Parties, Recipes, Uncategorized ·
May 1st, 2014
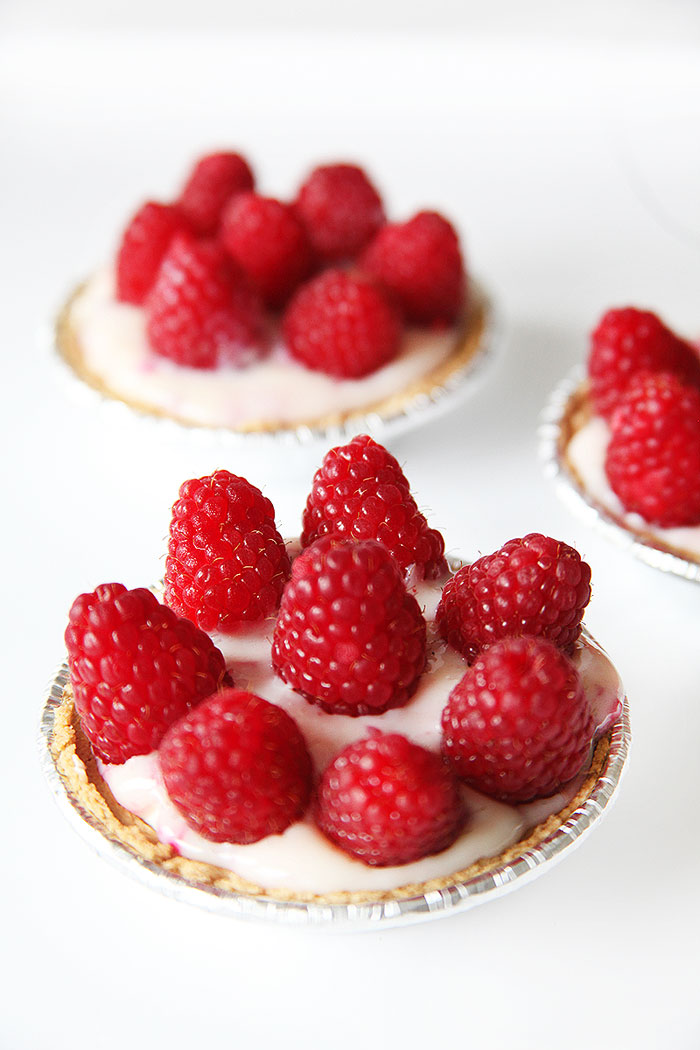
Looking for something to celebrate? How about because it’s friday… it’s summer… and it’s the first day of August?! Still not excited? What about the fact that today is National Raspberry Cream Pie Day… yep, thought that would get your attention! Today we celebrate beautiful raspberries in a delicious pie crust resting inside (or out) of a delicious cream pie filling. Okay, I have to be honest, I’ve never made a raspberry cream pie before, so I had to look for an easy recipe. And here’s the good news… I found one! I had to tweak it a bit, but it worked out! I created mini-pies, that way I wouldn’t have to cut into it and everyone would receive a beautiful little mini-pie instead of a piece of pie that tends to get a bit sloppy! I think they worked out and I highly recommend the recipe! Enjoy…
INGREDIENTS:
2 (14 ounce) cans sweetened condensed milk
4-5 tablespoons lemon juice
12 oz fresh raspberries
6-8 ounces cream cheese, softened
12 mini graham cracker pie crusts
PREPARATION
- Whisk sweetened condensed milk and lemon juice together in a bowl; gently fold in raspberries.
- Gently spread cream cheese onto the bottom and sides of graham cracker crusts using a spatula or the back of a teaspoon. The secret here is to make sure you purchase good crusts and that your cream cheese is WELL softened. Otherwise, your pie crust will crack. Divide raspberry mixture between the mini pie crusts… about 2 Tablespoons per crust. Top with some fresh raspberries.
- Refrigerate until set, at least 3 hours.
· Posted in Decadent Desserts, Food Holidays, Recipes, Trends ·
|
|
|