May 16th, 2015
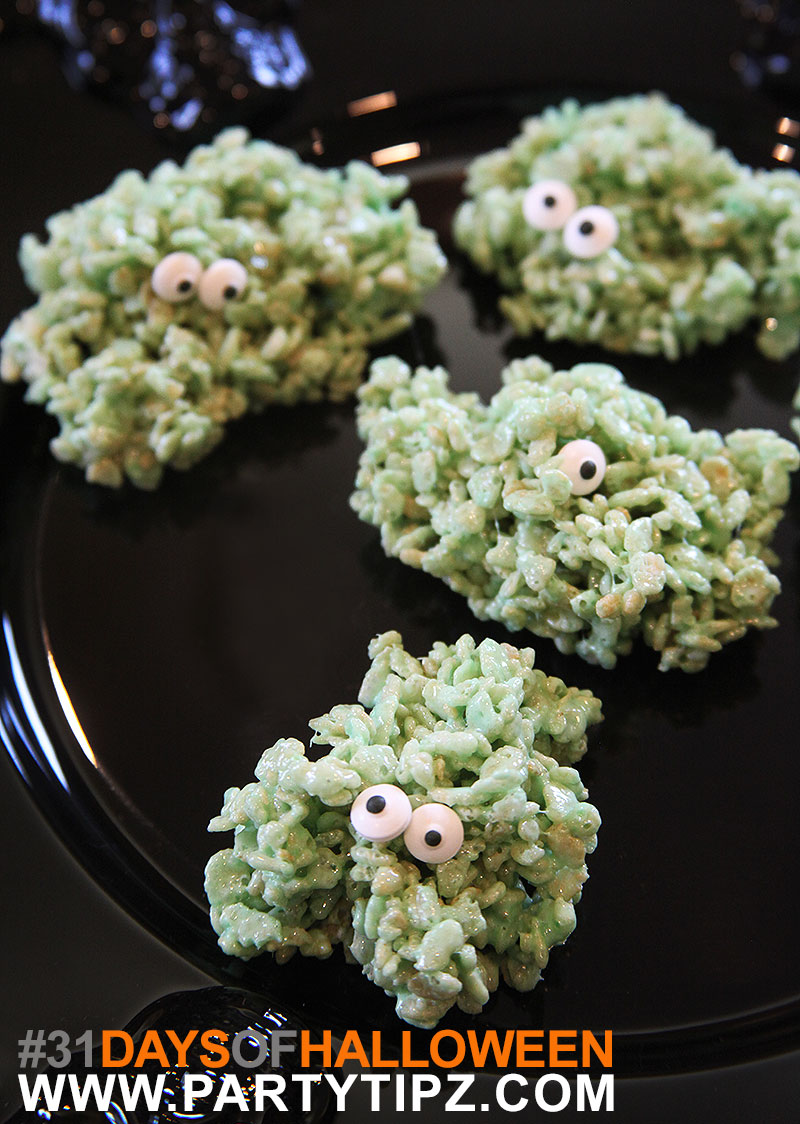
Get ready for one of the cutest ideas for your Halloween party! These Green Monsters were a huge hit at my party. Even with a buffet full of cupcakes and cakes, my guests seemed to gravitate to the plates that showcased these little guys. They are also very simple, which is right up my alley!
Monster Rice Krispie Treats
4 tbsp butter
1 bag of mini marshmallows
6 cups rice cereal
5-10 drops green food coloring (depending on how green you would like your monsters to be)
“eyeball” candy (available at Micheal’s or Jo-Ann’s in the baking section)
1. Microwave butter in a large bowl for 30 seconds.
2. Add Marshmallows to bowl and stir
3. Microwave mixture for 45 seconds. Stir and add food coloring. Microwave an additional 45 seconds.
4. Stir marshmallow mixture well and add rice cereal.
5. Use two spoons to create “lumps” of cereal on wax paper. Add monster eyes.
6. Allow to harden and enjoy!
· Posted in 31 Days of Halloween, Halloween, Recipes ·
May 15th, 2015
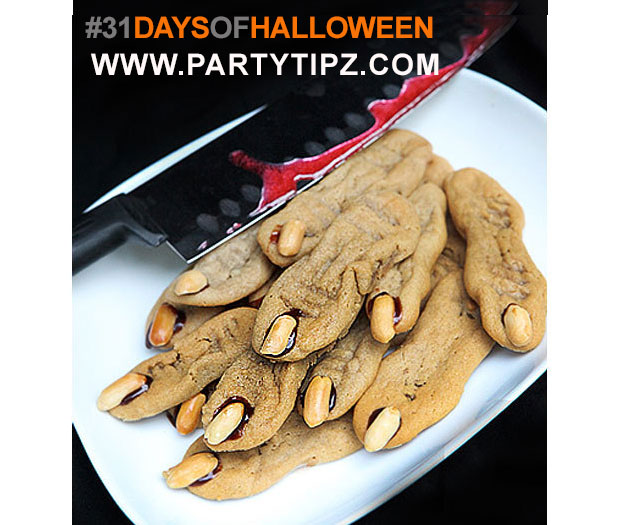
“Witches’ Claws” are without a doubt the hottest dessert this Halloween. You can find the recipes in almost any book or magazine. The drawback is that they all require quite a few ingredients, not to mention kneading and mixing. Not ours! We found a fun and simple way to create a similar dessert, but with a twist! And since the cookies flatten after you take them out of the oven, it was very fitting to call them Monster Road Kill, since they look like someone ran over them! Either way, they are delicious and spooky!!
Ingredients
- 1 pkg Peanut butter refrigerated cookie dough (nothing with chips or chunks in it)
- 1/4 cup Peanuts
- Chocolate syrup or chocolate icing
Preparation
Cut the cookie dough just as you would to make round cookies, then cut the cookie circle in half. Form a long cylinder with your fingers or roll the dough between the palm of your hands to form something that looks like a fat snake or worm (great task for kids!). Arrange the cookies on a cookie sheet and if you wish, create indentations where the knuckles are. Bake according to package directions. The cookies will flatten as they bake, turning out looking as if something ran over them on the road. Once the cookies are ready and have cooled, make the gnarly fingernail by taking half a peanut and adhering it to the tip of the cookie with chocolate syrup or chocolate icing. That’s it, you’re done!
· Posted in 31 Days of Halloween, Halloween, Recipes ·
May 14th, 2015
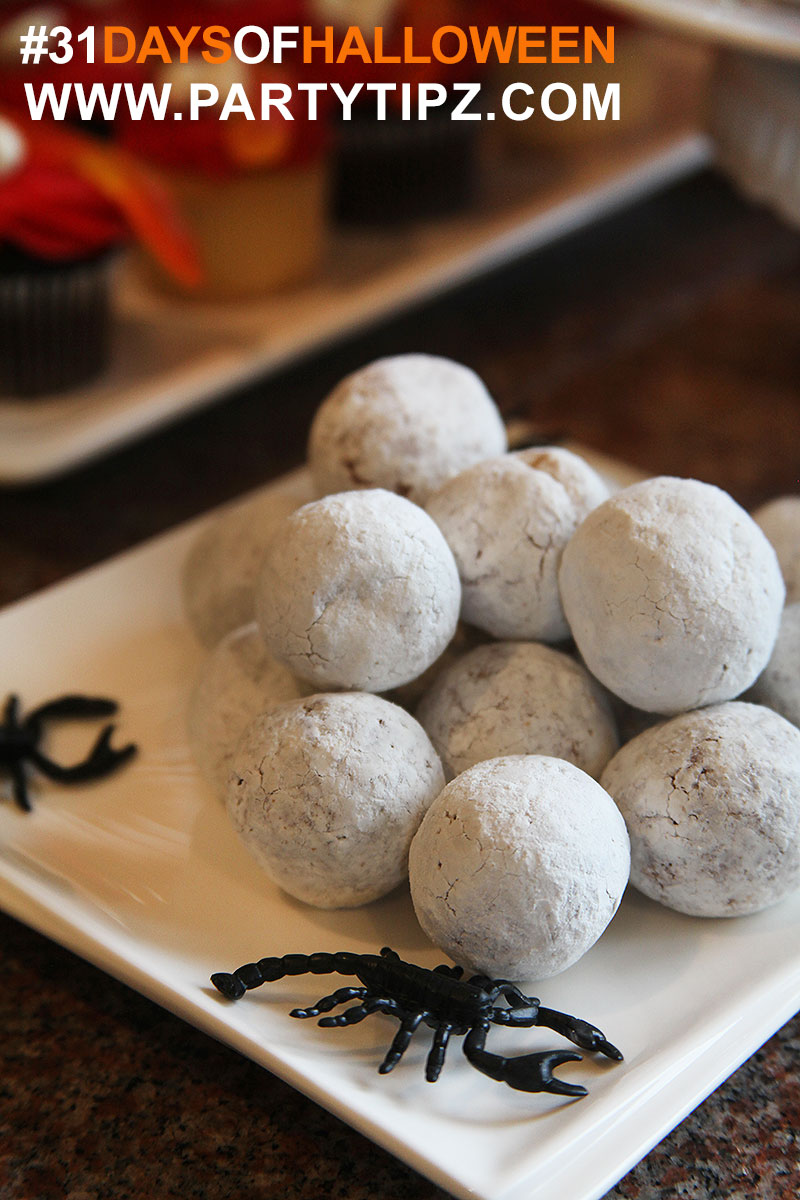
Ahhh… the power of suggestion!! That’s what I love most about Halloween. Merely suggesting that something may be something else can have a powerful impact on how your guests perceive the food that you are serving. Ketchup becomes blood, guacamole becomes puke, hotdogs wrapped in breadsticks become mummies. I can go on and on!
Well, these scorpion eggs are no exception. Simply taking a few powdered donut holes, arranging them on a plate and adding either gummy or plastic scorpions to them immediately transforms them from cute little powdered pastries to scary scorpion eggs! The irony is that I have no idea what a scorpion egg actually looks like, and I will assume that neither do many of my guests, especially if they are kids. But I guarantee, that no one will shy away from partaking in this unique delicacy! In fact, this was one of the most popular items at my recent Halloween taste test kitchen! Enjoy!
· Posted in 31 Days of Halloween, Halloween, Recipes ·
May 13th, 2015
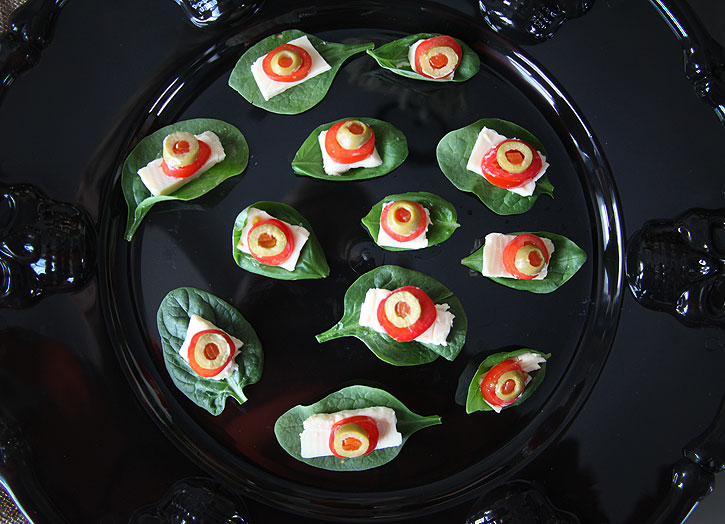
I found a great idea for “Monster Eyes” on the web. My favorite part about this appetizer plate? This recipe is pretty much “guilt-free”! The original recipe included a basil leaf, mozzarella cheese, a slice of a grape tomato, and a slice of olive. To add a little zing, you can drizzle a bit of balsamic vinegar on top.
Of course, I had to experiment a bit more and maybe shave off just a few extra calories. I added my own twist by using spinach leaves (I have both spinach and basil leaves in the below photo) and substituting mozzarella cheese with a flavored SKINNY COW cheese slice. You can eat this whole plate and not even think about the calorie content!! DONE!!
· Posted in 31 Days of Halloween, Guilt Free Party Snacks, Halloween, Low Carb, Parties, Recipes ·
May 12th, 2015
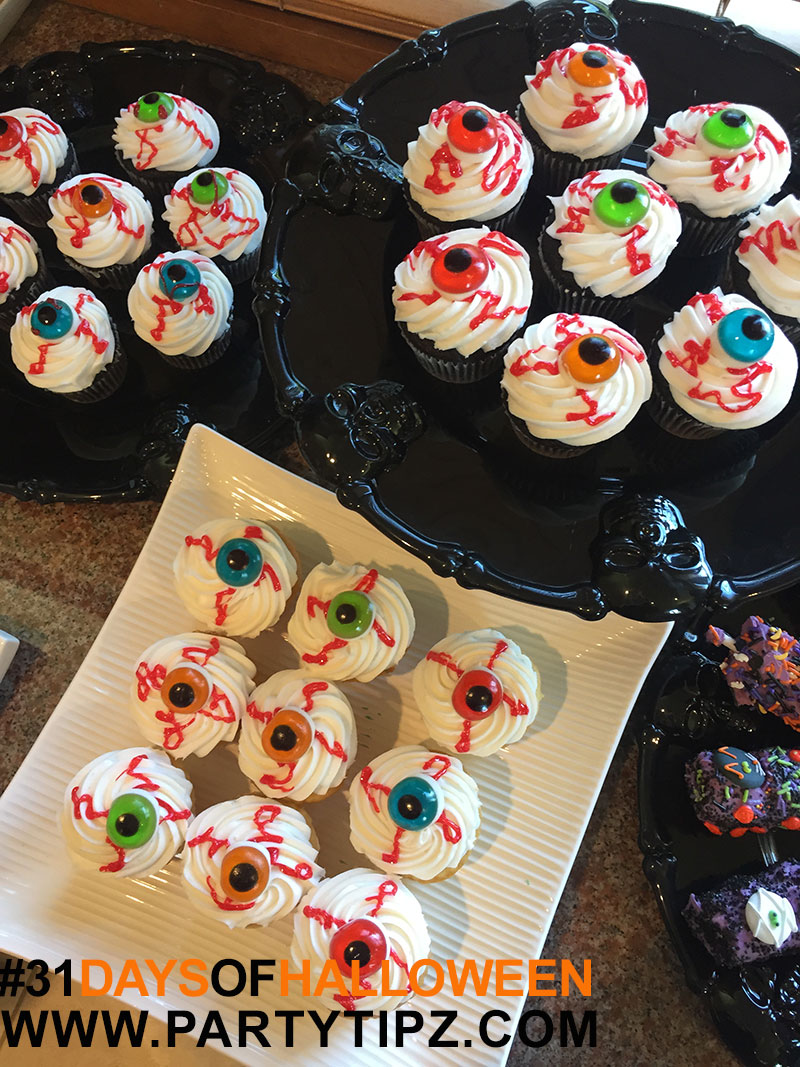
Looking for the perfect dessert for Halloween? This is it!! Out of all my taste test kitchens, these EYEBALL CUPCAKES were simple to make and disappeared within minutes. I purchased the gummy eyeballs from Michael’s but if you are looking to make a lot of cupcakes, your best bet is to order them online. Oriental Trading Company has a a good selection of gummy eyeballs at a fair price.
If you are feeling super crafty, you can create your own gummy eyeballs. I found a great video which goes through the process step by step. Visit Cooking With Karma, she makes it look so easy!
Last but not least, I tried to simplify this recipe as much as possible. If you follow my version, you should be done with this recipe in 5-10 minutes. The biggest time saver is that I purchased ready-made cupcakes from Sam’s. I purchased 30 cupcakes for $15 which comes to $.50 per cupcake. But if you LOVE to bake, making your own cupcakes and icing is just fine. I also tried this idea on cupcakes with yellow frosting, it looked even MORE creepy! No Halloween party is complete without these easy cupcakes, so go for it and make your own!
INGREDIENTS:
12-24 Ready-made Cupcakes
12-24 Gummy candy eyes
1 tube of ready-made icing (purchased at Micheal’s or Jo-Ann’s)
PREPARATION
Remove the gummy eyeballs from their packaging and place them on top of each iced cupcake. Take your tube of icing and create a bloodshot look. Get creative, it’s hard to mess up on this project. You are done!
· Posted in 31 Days of Halloween, Halloween, Recipes ·
May 11th, 2015
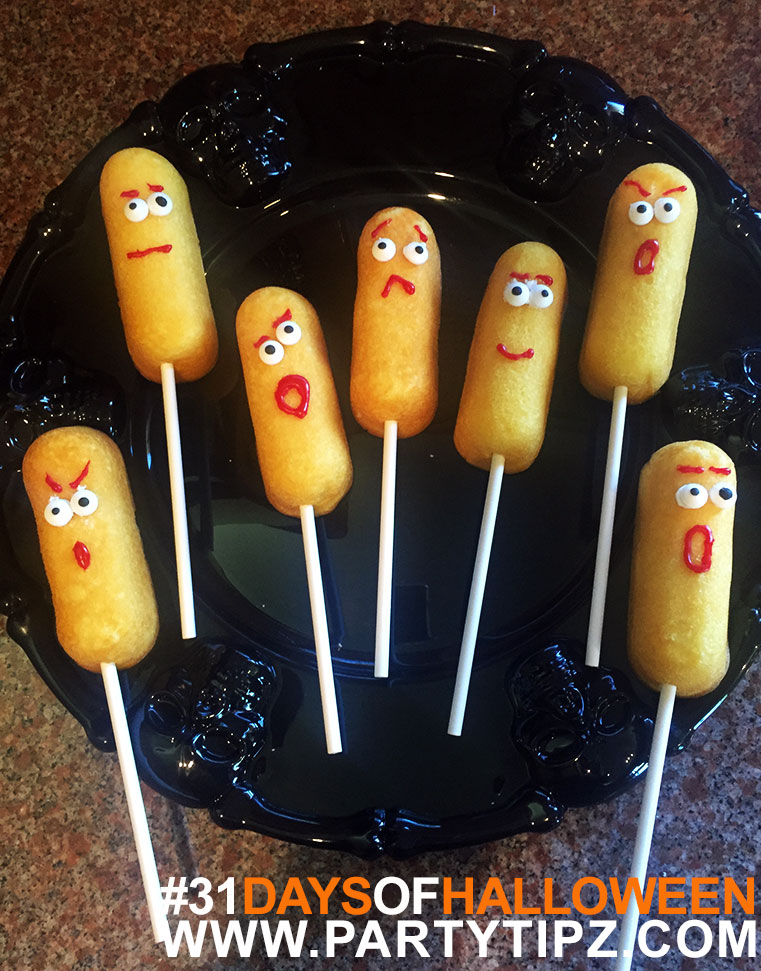
During a recent Halloween Taste Test Kitchen I had the exciting idea of making Mummy Twinkies. If you have seen this project on Pinterest, you may know that you cover a Hostess Twinkie or Little Debbie’s Cloud Cakes in white candy coating, add some googley eyes, and voila, you’ve created a mummy! It seemed so easy on Pinterest.
Well, it wasn’t so easy for me, in fact, it was a disaster! I’m sure it was my fault and I probably didn’t follow directions, but the candy coating just didn’t want to work with me that day. If I ever have a Pintastrophe page, I will add that project to it.
So, here I am, 15 minutes before my taste test group is scheduled to arrive and I’m staring at these Cloud Cakes thinking… what do I do now?
Whipping out my trusty googley eyes, popsicle sticks, and red icing, I quickly created some scary faces on my Cloud Cakes and displayed them on a Halloween plate. The kids LOVED them! So, I will consider them a success.
If you have little time or your kids want to try a fun and easy project during Halloween! Try this… there’s nothing to cook, bake, or melt!
· Posted in 31 Days of Halloween, Halloween, Recipes ·
May 10th, 2015
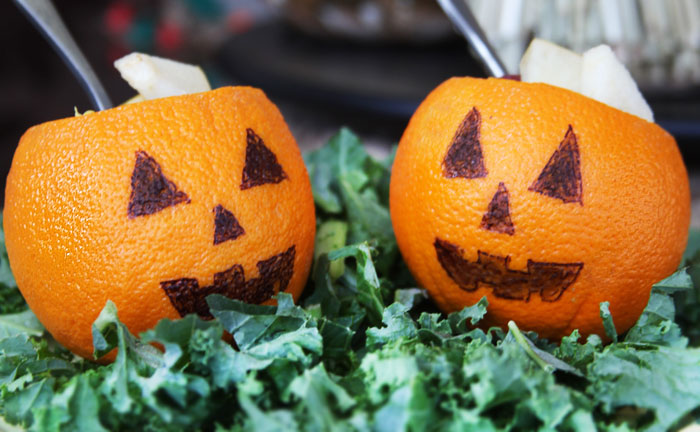
Are you ready for an easy (and healthy) Halloween treat?! These wonderful fruit cups are made with oranges and… as you can guess… various fruit. I made these two jack-o-lantern fruit cups this evening for dinner and served them to my boys. Surprise! Surprise! I was officially the”Coolest Mom Ever”! Needless to say, after such a positive reaction, I made sure to add this to my recipe collection.
Making the Jack-O-Lanter was incredibly easy. I cut the top off each orange and scooped out the insides into a separate bowl. I washed the oranges, made sure they were completely dry, and drew jack-o-lantern faces on each with a permanent marker. I put the discarded oranges in a blender and blended until the entire orange was nothing but juice. In a separate bowl, I cut up apples, grapes, pears, mandarin oranges, and bananas. I poured some of the orange juice over the salad (use as much as you like) and refrigerated the salad for about an hour. Once the salad is chilled, I spooned it into the oranges and served.
If you are having a party and planning on serving many kids, you can place the jack-o-lanterns on a bed of kale to make it look like they are sitting in a “pumpkin patch”. It’s a beautiful presentation!
· Posted in 31 Days of Halloween, Halloween, Parties, Recipes ·
May 9th, 2015
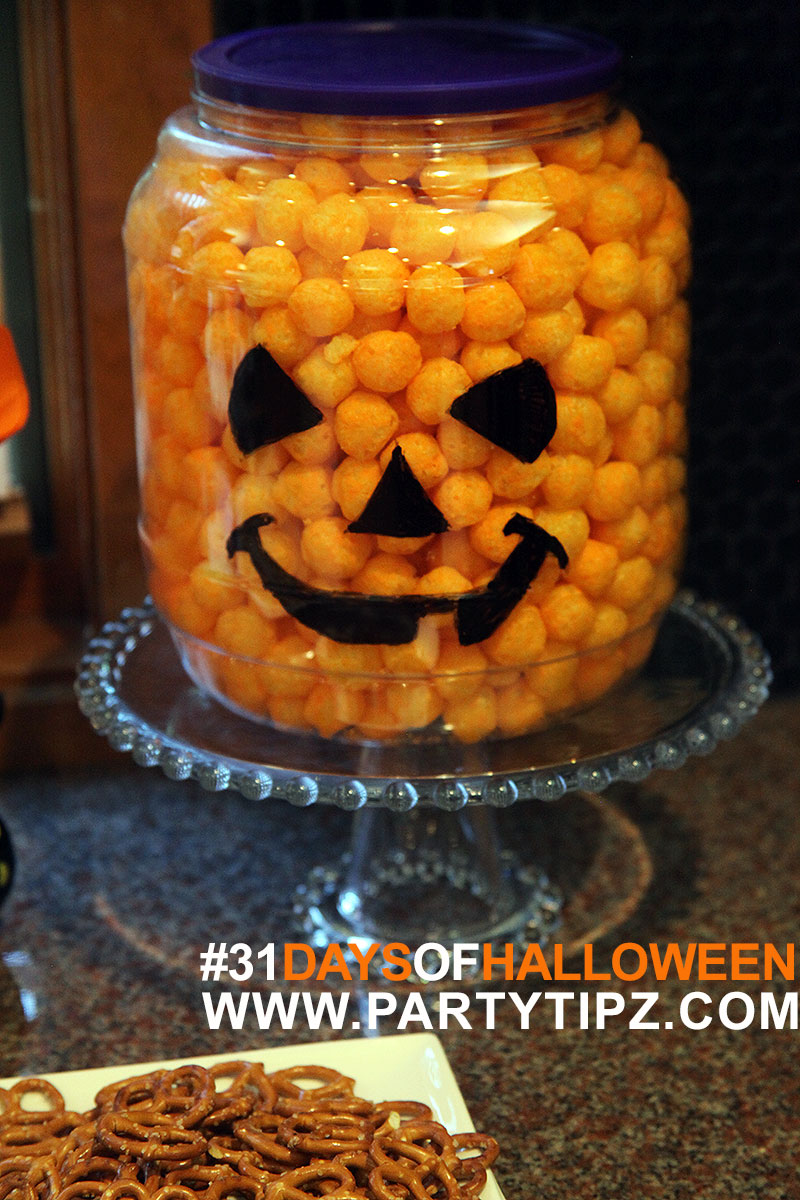
Sometimes, you just have one of those days. You need a Halloween themed snack but you just don’t have the time to prepare it… well, you know what? That’s OK! Because I have the perfect addition to your Halloween table and all you need is a sharpie… you’re welcome!!
Purchase a round container of cheese puffs, they are nice and orange, perfect for a Jack-O-Lantern. Next, find a Jack-O-Lantern face that you like and want to paint on your plastic cheese puffs container. You can find something on the web or magazines. Something that has eyes, a nose, and a mouth. They can be “evil” or “happy”, whatever you like.
If you are feeling confident about your art skills, you can just draw the face with a black permanent marker or a sharpie directly on the cheese puffs container. If you are feeling less confident and want to be able to erase any mistakes, use a black “dry erase” marker first. Draw your face, get it the way that you like it and then go over it with a permanent marker.
This project is easy and will make a great statement on your Halloween table!
· Posted in 31 Days of Halloween, Halloween ·
May 8th, 2015
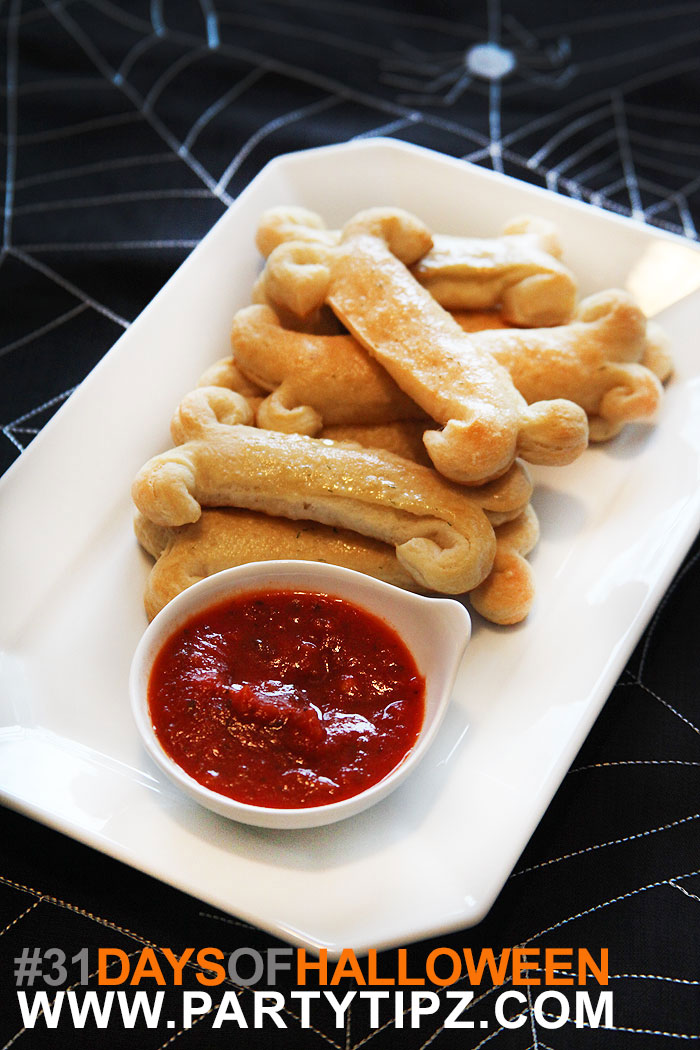 This may be the most classic Halloween food that there is, breadsticks made to look like bones. Let me just say, if you are having a Halloween party, whether it’s for kids, teens, or adults, this absolutely is a MUST for your table. It’s easy and delicious and requires very little skill. Below are the bones I created on my very first try. Trust me, it’s a “no fail”. Just make sure to serve them fresh, unless you want for people to gnaw on them like croutons, which could be a whole different kind of snack! This may be the most classic Halloween food that there is, breadsticks made to look like bones. Let me just say, if you are having a Halloween party, whether it’s for kids, teens, or adults, this absolutely is a MUST for your table. It’s easy and delicious and requires very little skill. Below are the bones I created on my very first try. Trust me, it’s a “no fail”. Just make sure to serve them fresh, unless you want for people to gnaw on them like croutons, which could be a whole different kind of snack!
Ingredients
- 1 pkg Refrigerated Breadstick Dough
- 3 tbsp Butter
- 1/2 tsp Garlic Salt
- Dried Dill, Rosemary, or any herb of your choosing
Preparation
Remove the breadstick dough from package and cut in half. With scissors, simply cut the ends of the breadsticks and roll them to the sides to make them look like bones. Place on a cooking sheet and prepare according to package instructions.Remove from oven and brush with melted butter, sprinkle with garlic salt and your favorite dried herb. You can also add parmesan cheese.
Presentation
Serve on a platter with Marinara sauce (the chunkier the better). Makes for a great looking display on your Halloween table.
· Posted in 31 Days of Halloween, Halloween, Parties, Recipes ·
May 3rd, 2015
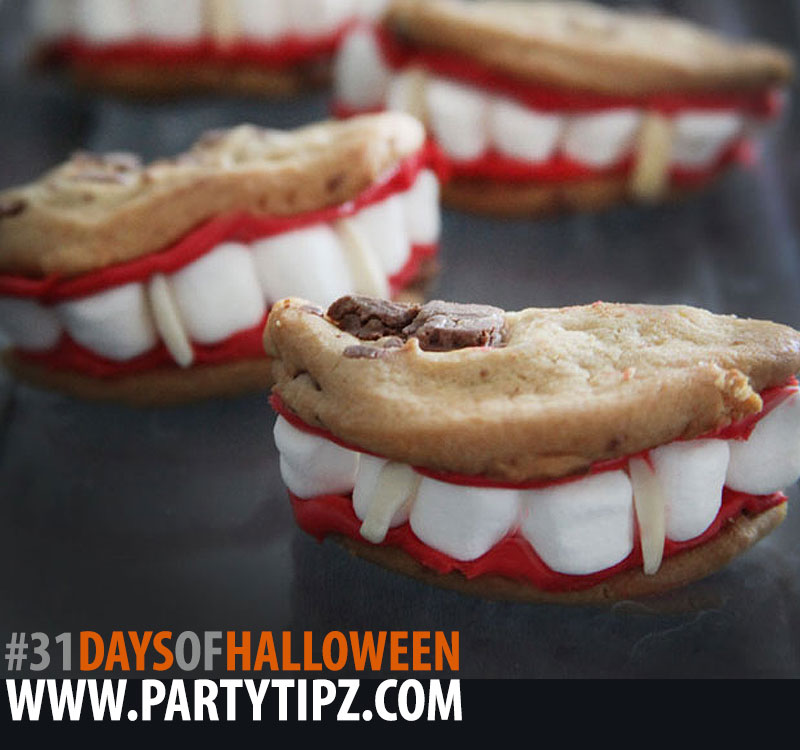
This is by far one of the most popular Halloween treats. If you are on Pinterest, you know exactly what I’m talking about. These are wonderful because they are SUPER easy and need little skill. And this is why I love them. All you need are soft cookies, red icing, mini-marshmallows and almond pieces.
Ingredients
- 12 soft cookies (any flavor)
- 1 container red icing (you can use chocolate as well)
- 36 mini-marshmallows
- 12 Almond pieces for fangs
Preparation
If you will make your own cookies, make sure you bake them so they are still soft and moist. If you will buy cookies from the store, just purchase the “soft baked” ones, not the crunchy versions. You can use any cookie flavor… it tastes great no matter which one you use. You can also use chocolate frosting, if you don’t want the red gums. Just break or cut the cookie in half. Spread the red icing on each cookie. Place the marshmallows on the bottom cookie half and sandwich the other half on top. Then, just stick the almond pieces to create the fangs and you are all set! Trust me, it will be a HIT at your next Halloween party!
· Posted in 31 Days of Halloween, Halloween, Recipes ·
|
|
|