December 19th, 2016
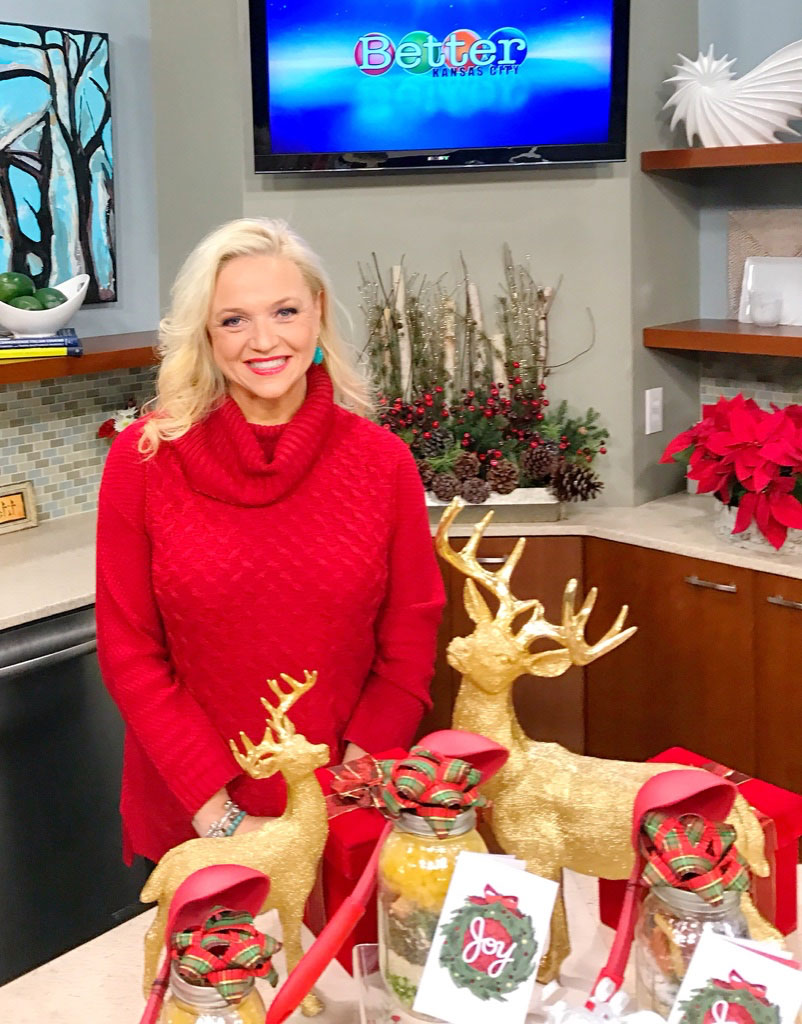 December 2016 on Better Kansas City December is always a wonderful time of year… Christmas lights, holiday parties, reuniting with family, seeing old friends, making new friends, lots of opportunities to use the fireplace, holiday cards, egg nog, cake, and food, food, food!!!
I think we can agree, December is a month that may be hazardous to the waistline, so when I was invited to come up with some fun ideas for KCTV’s Channel 5 Better Kansas City, I thought I would develop a gift that was straight from my heart AND kitchen but also a healthy alternative to cookie or hot cocoa mix in a jar.
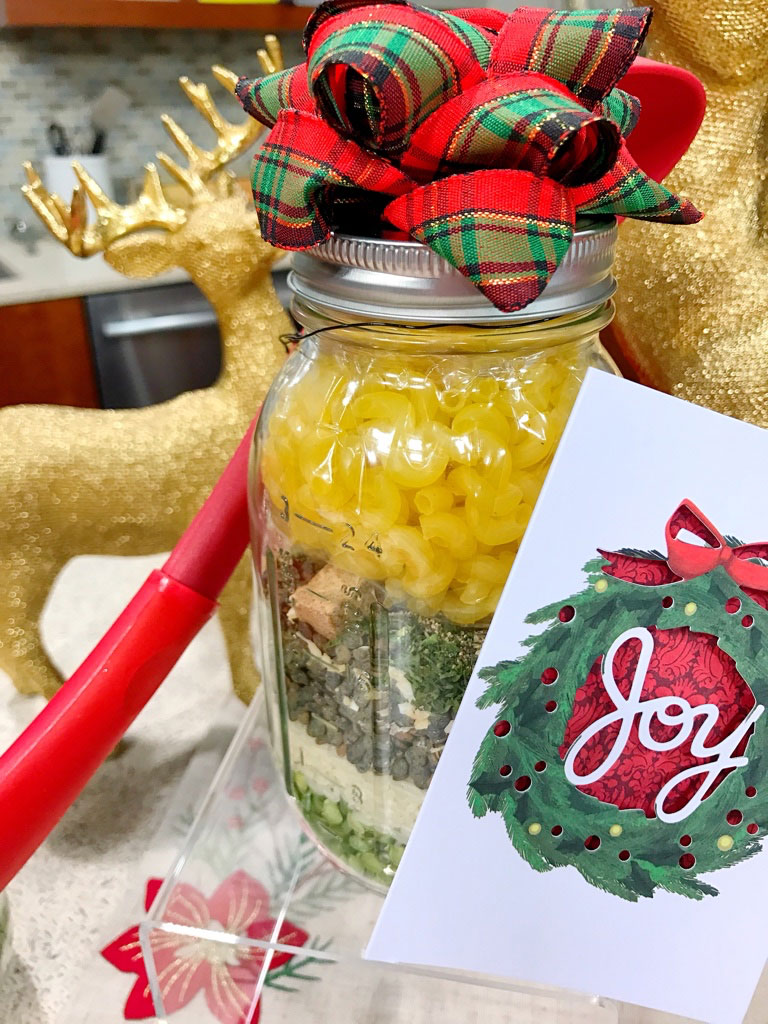 Soup in A Jar – Great Holiday Gift! PROTEIN PACKED PEA & LENTIL SOUP:
Hold on to your hats, because this soup packs a massive amount of fiber, protein, and magnesium! So easy, delicious, and super healthy! Substitute the beef bouillon cubes for vegetarian cubes, to turn this soup vegan/vegetarian friendly.
1 Cup Dried Split Peas
1/2 Cup uncooked white rice
1/2 Cup lentils
3 Tbsp Minced Onion
3 Tbsp Dried Parsley
3 tsp salt
1/2 tsp pepper
3 beef bouillon squares
1/2 – 1 cup of elbow pasta (pack in a zip lock bag since it will be the last
step in preparation)
DIRECTIONS
1.In a wide mouth 1 quart jar, start layering the peas, rice, and lentils.
Then add the onion, parsley, salt, pepper, bouillon cubes and bagged pasta.
2. Seal with a lid, and place a gift bow on top. Attach a gift card with
ribbon that reads: Add Contents of Jar To 4-5 Quarts of Water. Bring to a boil
and then simmer for 45 minutes, add pasta, simmer for another 15 minutes and enjoy. To elevate this soup recipe, add two stalks of chopped celery, two sliced carrots, 1 cup of shredded cabbage and two cups of diced tomatoes.
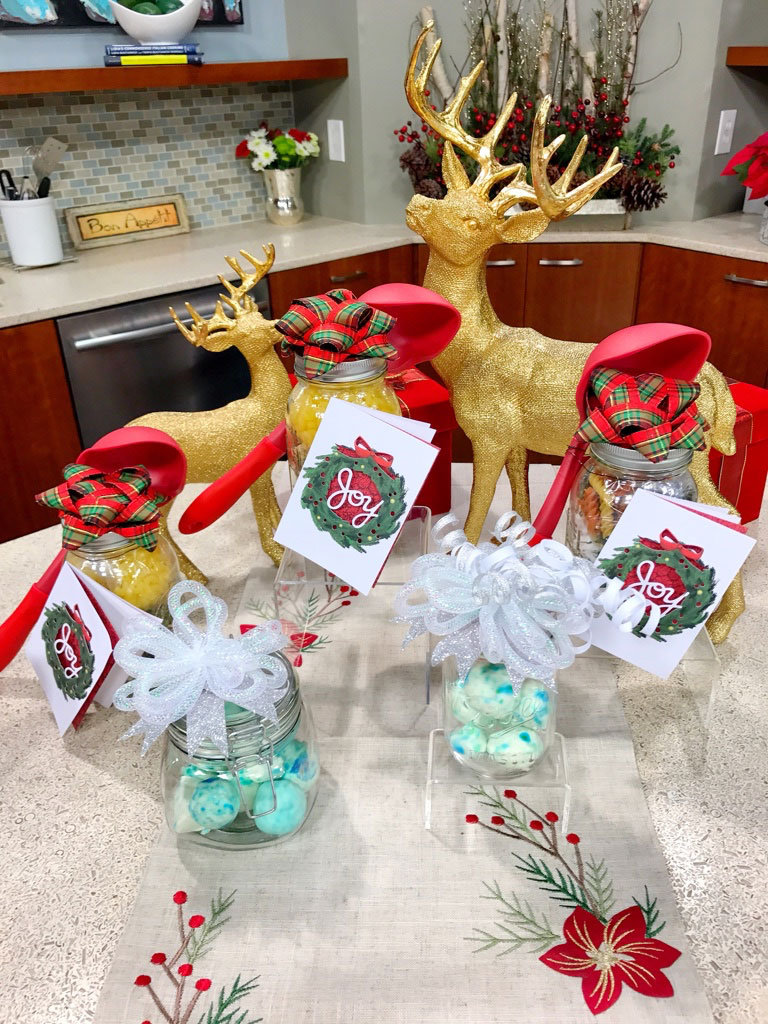
VAPOR RUB SHOWER BOMB
3 tablespoons of VapoRub
1 cup of corn starch
Blue and green food coloring (optional)
3 tablespoons of water
Mixing bowl
Wax paper
Spoon
DIRECTIONS
1. In a bowl add in the three tablespoons of VapoRub. You can use any variety of VapoRub you wish.
2. Stir in the cup of corn starch. Mix well. You will notice that the
VapoRub takes a little time to soften. Continue to stir until it becomes a
thick paste.
3. Add in the two tablespoons of water. The goal is to make a paste that can
easily be manipulated with your hands, since you will be creating balls out
of it. Once you see that your mixture is thick enough to work with, it may
be a good time to stop. If you pick it up and try to shape it and it falls
apart, it needs a little water. If it can’t hold a shape, it has too much
water, so add more cornstarch.
4. When your mixture is the right consistency, add several drops of green
and blue food coloring. Continue to stir. This step makes the Shower bombs look like they have mint and spearmint in them, a little visual trick. But if you prefer to omit the food coloring, feel free.
5. Once the color is mixed in well, scoop the mixture into your hand. It
will have a play dough feel to it. Knead it into a ball and set on a piece
of wax paper. For a square look, pack the mixture into an ice cube tray and freeze. When frozen, cut each rectangle in two to create smaller squares.
6. Place in a freezer for 20-30 minutes and then put in a jar. If this is
a gift, include direction on the gift tag to place directly on the drain of
the bathtub while taking a shower. You don’t want the ball to be floating
in the bathtub water during the shower, since it can make the bathtub slick.
Placing it directly on the drain will make sure that it will melt directly
in the drain.
· Posted in Christmas, Crafts, Food Holidays, TV Appearances, TV Spots ·
May 17th, 2014
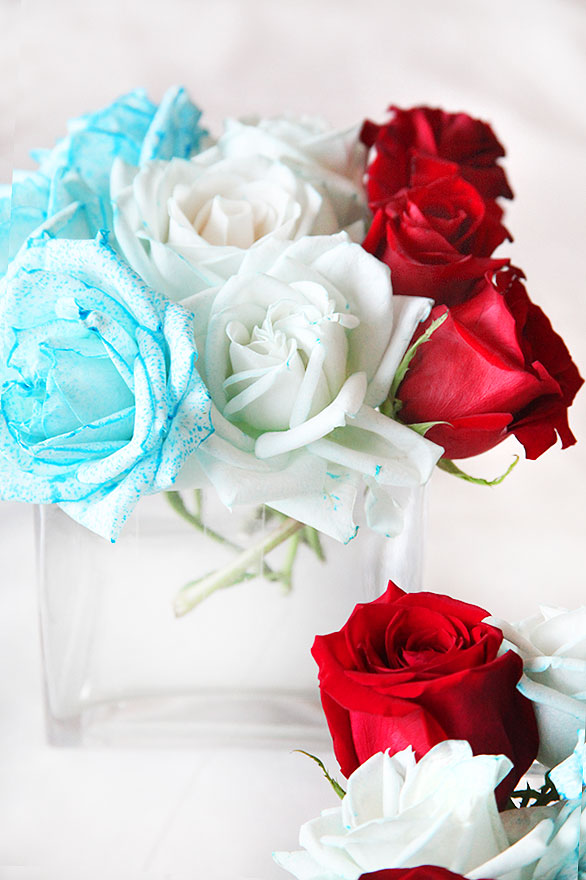
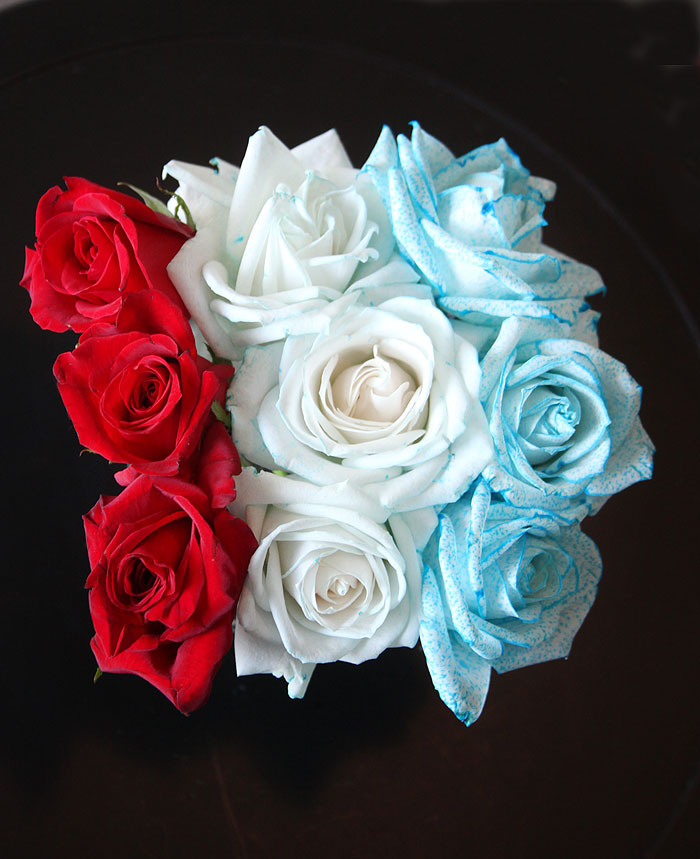
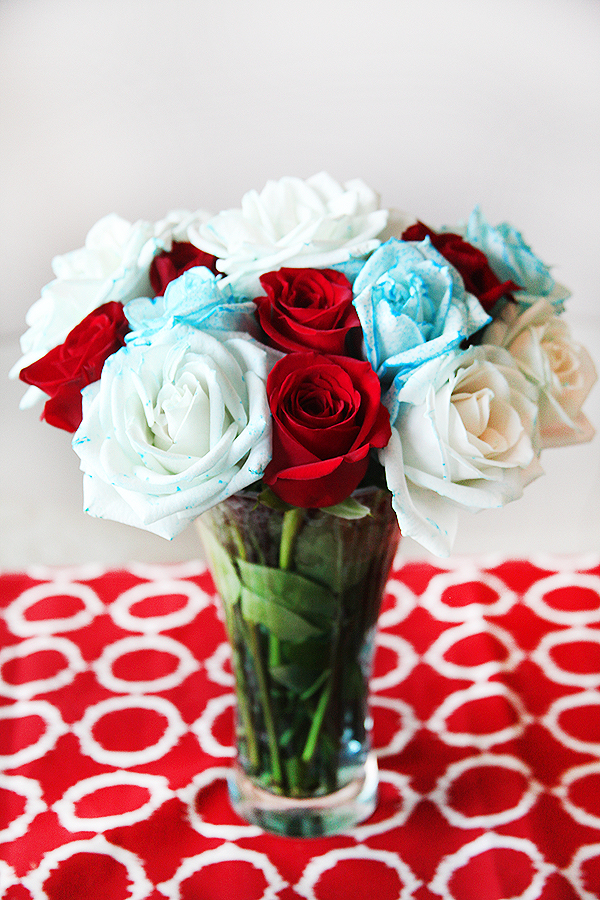
Looking for a blue flower and just can’t find it? Here’s the solution. Stem dye your flowers to get the color you want! The color that I wanted was blue since I was trying to come up with a pretty 4th of July centerpiece. I used roses, one of the easiest flowers to stem dye. And here is how I did it.
Purchase white roses. Fill a vase, which will accommodate the number of roses you purchased without crowding them, with a nice amount of water. Place 10, 20, or more drops of food coloring in the water. The goal is to make your water very dark with the blue food coloring… as dark as you can get it. Cut the stems of your roses to the length you would like to use in your centerpiece. Place the white roses inside the blue water and wait about 24 hours. If you start seeing blue coloring on the rim of your rose petals, pat yourself on the back because things are progressing just as you want them to! Within 24 hours, you should have a beautiful blue rose.
Here is the progression of how my roses went from white to blueish. As you can see, within hours, my roses starting getting the blue dye on the outer rims of their petals and then, they started to get bluer and bluer.
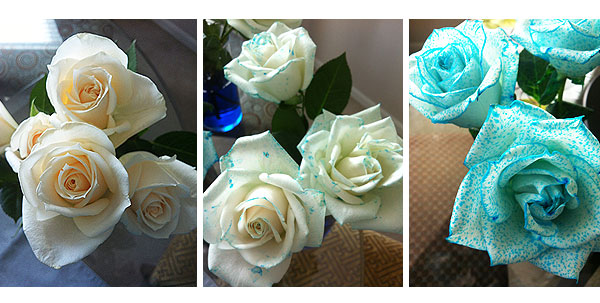
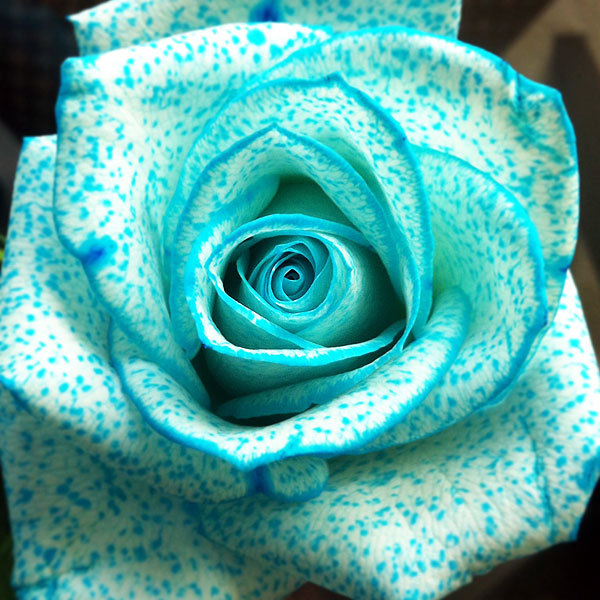
Just a warning, the rose will never become fully blue, just a fun speckled look that will still show some of the original white. The roses kind of look like they have blue freckles.
You can also get creative and use some roses that have become mostly blue with roses that only have a little bit of blue on the rims of their petals. This is what I did for my centerpieces. Most importantly use food coloring (gel or liquid) ONLY… no clothes dye or other dyes. They will just kill the flowers.
Of course, last but not least, enjoy all the wonderful comments you will get from your work and your beautiful arrangement.
· Posted in 4th of July, Crafts, Flowers, Fourth of July ·
May 13th, 2014
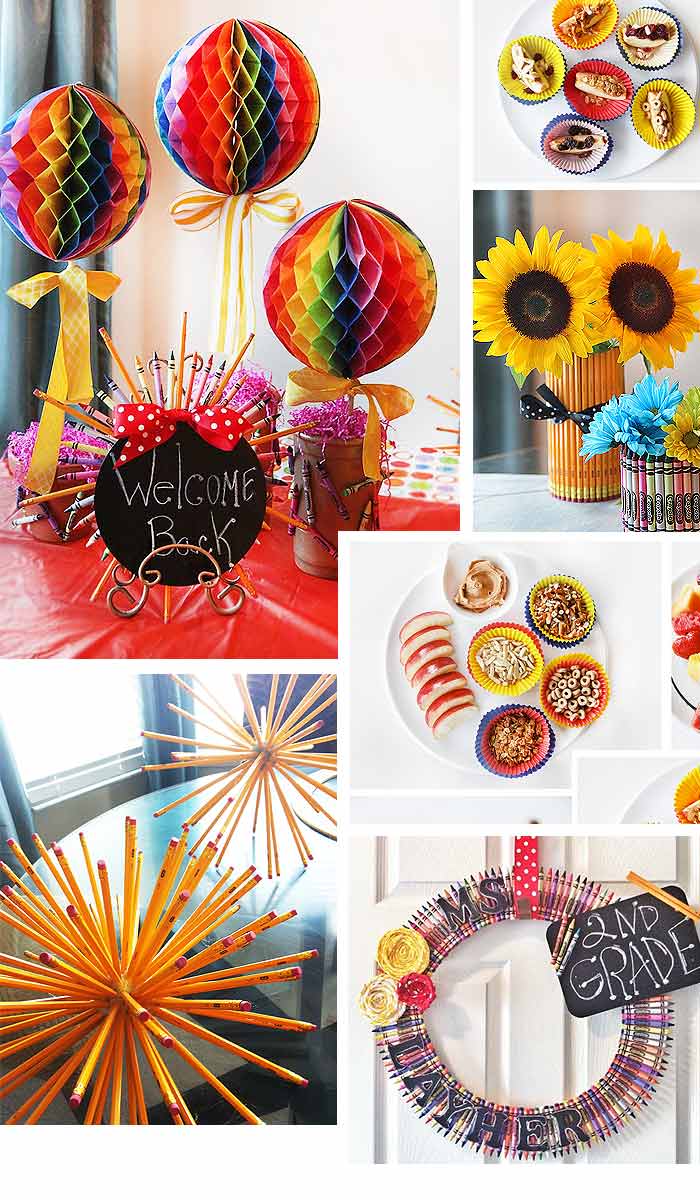
Looking for some fun back to school party ideas! I’ve been busy this year with some fun projects. I hope they inspire you to create something wonderful!
· Posted in Back To School, Crafts, Dollar Store, Fall Season, Parties, Uncategorized ·
May 13th, 2014
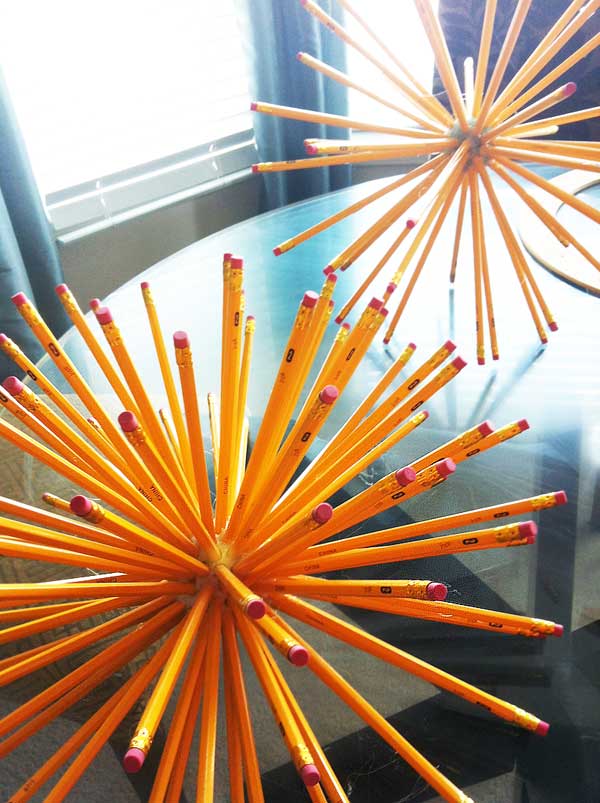
If you have been reading my posts this week, you probably know that I was in charge of my son’s back-to-school party this year. I can’t tell you how much fun my kids had watching and helping me with all the wonderful centerpieces. This was one of them! I found this idea on Pinterest and had to give it a try.
My only warning for anyone who wants to try this project is that yes it was easy, however, if you are short on time, this is probably not the project you want to tackle. It takes time for the hot glue to cool and for the pencils to set properly. I worked on this star burst over a period of a week and I worked on both of them at one time. My kids helped by holding the pencils in place as the glue dried, helping the pencil stick properly inside the hole. You can do two, three, or more pencil star bursts at one time, but make sure to wait for each pencil to “set” properly.
Simply purchase a styrofoam ball and create holes with your #2 unsharpened pencil. Add hot glue to the hole and place the pencil inside, holding it while the hot glue cools. You can do two to 3 pencils at one time, but it’s important to make sure they are properly set before moving on. You can do an entire ball as a star burst, or just do half a ball. I did two and it was nice to see multi-sized starbursts on the table. You can also paint the ball yellow, prior to inserting the pencils. I did not do that but wished I thought of it prior to making the starburst. Good thing that kids don’t care!
I did three other projects this year which include (pictured) Tissue Ball Centerpieces, Custom Crayon Teacher’s Wreath, and “Welcome Back” Crayon and Pencil Sign.
· Posted in Back To School, Crafts, Parties ·
May 13th, 2014
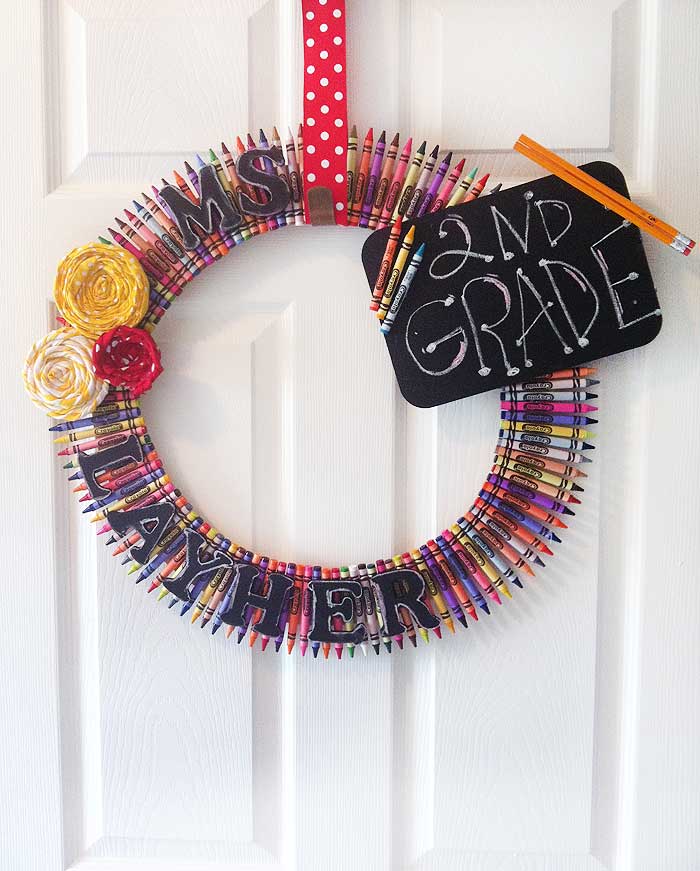
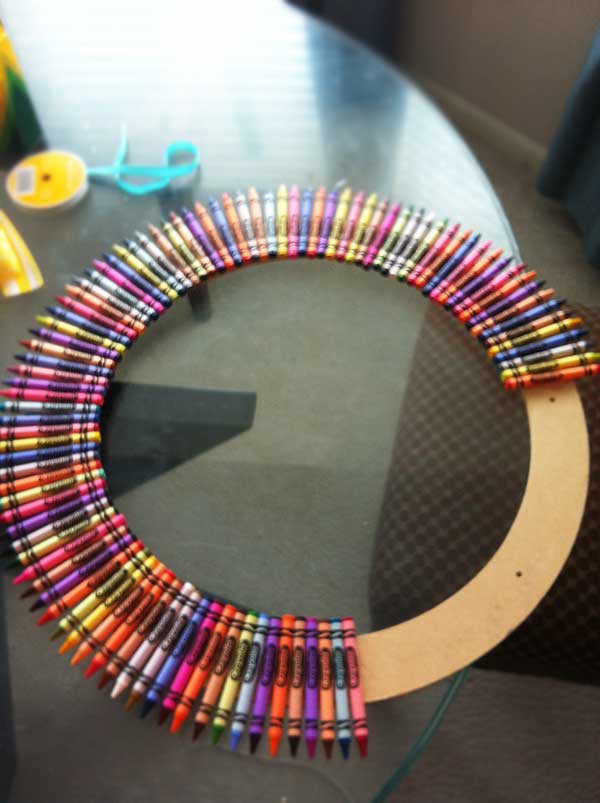
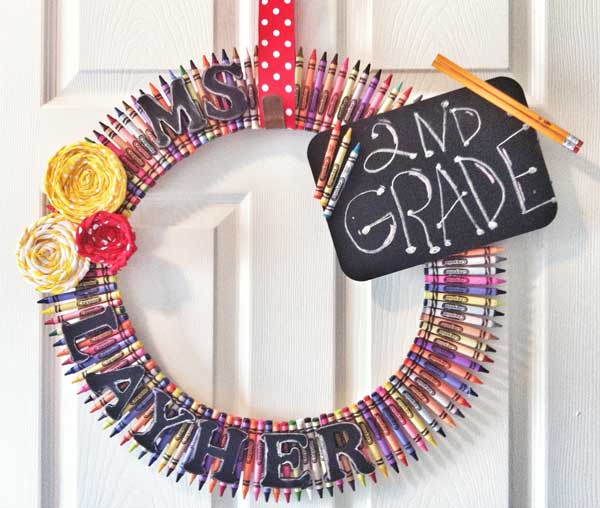
In approximately two hours, I will be at school with my youngest boy, registering him for classes and meeting our new teacher, Ms. Layher! It is her first year teaching second grade, so I thought I would bring her something special to start off her year in her new classroom! This wreath is all the rage on Pinterest. I’ve seen it created with pencils, crayons, chalkboard, and other creative additions. This is my wreath and below are some tips on how I created it. Trust me, if you like the photo, wait until you see it in person. And yes, it is SUPER EASY!!
First, I purchased a flat wreath form. It is one of the least expensive forms to buy, around $4.99 at Michael’s. I’ve seen people use all sorts of other wreath forms as well. I hot glued crayons to the wreath, making sure to keep the “crayola” logo facing up. When the logos are lined up, it forms a nice black band around the wreath and lining up all the graphic elements on the crayons make the wreath look clean and tidy!
Believe it or not, that is the hard part! Once you hot glued all the crayons, you can then add accessories which can be reflective of your teacher (or yourself, if you are creating this wreath for your front door). I do not know much about our new teacher, other than her name. So, I used chalkboard letters to customize her wreath. I also purchased a small rectangular chalkboard where I wrote “2nd Grade”. This creates a custom look, but will also give her the opportunity of changing the message depending on her mood.
I also added some ribbon flowers which I created by twisting ribbon into a circular shape and hot gluing it. If you don’t feel like going through the trouble of making ribbon flowers, just purchase some silk flowers, like colorful daisies, and use them instead.
In need of more ideas, check out Pinterest for more creative ways on embellishing your crayon wreath. This wreath can be made for your front door, a back to school party, or a great teacher’s gift!
· Posted in Back To School, Crafts, Parties ·
May 12th, 2014
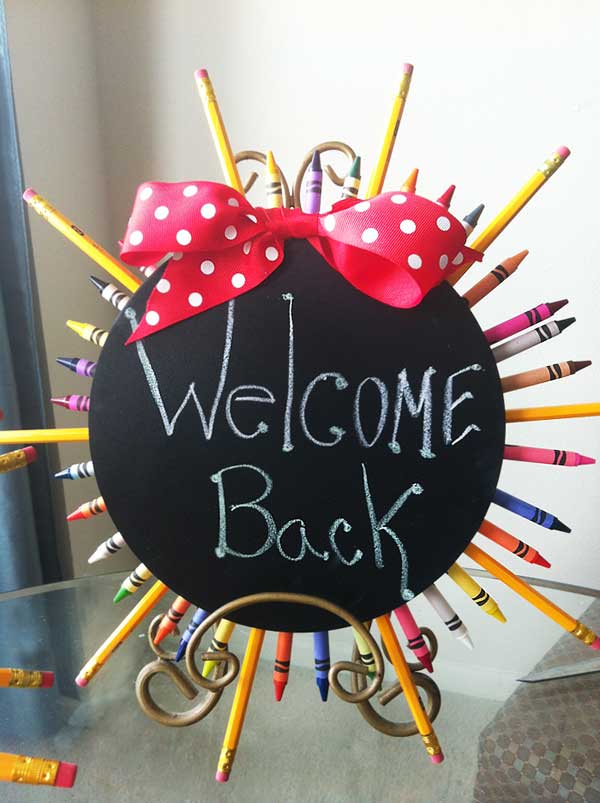
This year, I was in charge of the Back-To-School Party for my 2nd grader! It was so much fun and I created some fun centerpieces as well as an adorable wreath for his teacher that is all the rage on Pinterest. Since we had a buffet at our party, I thought it was cute to create a fun little sign to jazz the buffet up. Here is my sign and how I made it.
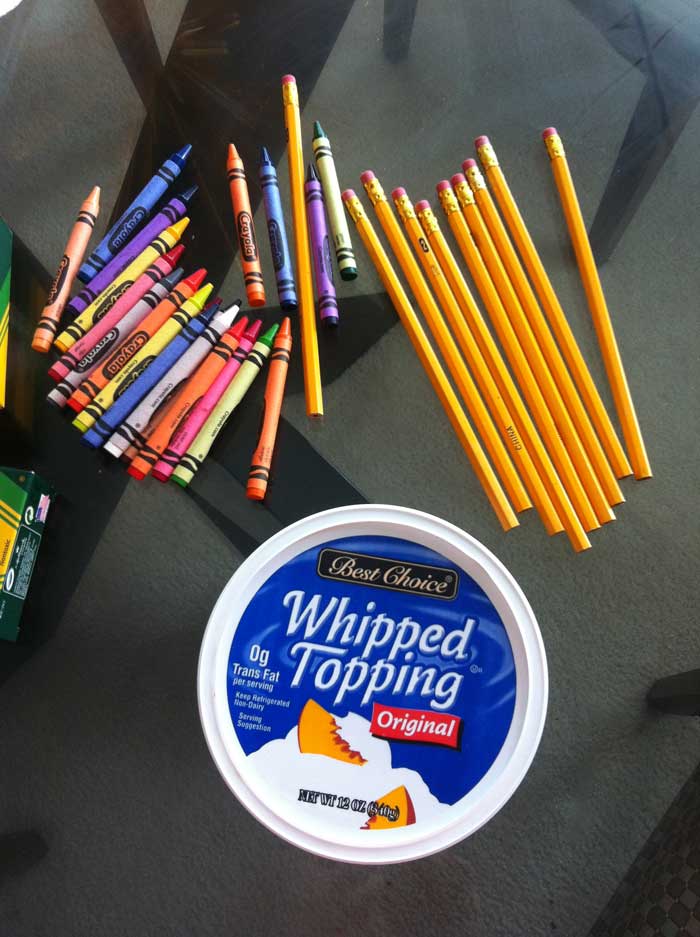
First, I purchased pencils and crayons at Target. They were at an incredible price of $1.00 for 24 pencils and .50 for a box of crayons. Then I needed a round object. Any will do. I found a lid from a whipped topping container. But really, any round object will work… even cardboard.
Then, I simply hot glued my pencils in a star burst pattern on the lid. Then, filled in the empty areas with crayons. Everything needs to be hot glued very thoroughly. Lastly, I hot glued the round chalkboard to the pencils, added a ribbon bow, and wrote “Welcome Back” on the chalkboard. Done!

· Posted in Back To School, Crafts, Fall Season, Parties ·
May 12th, 2014
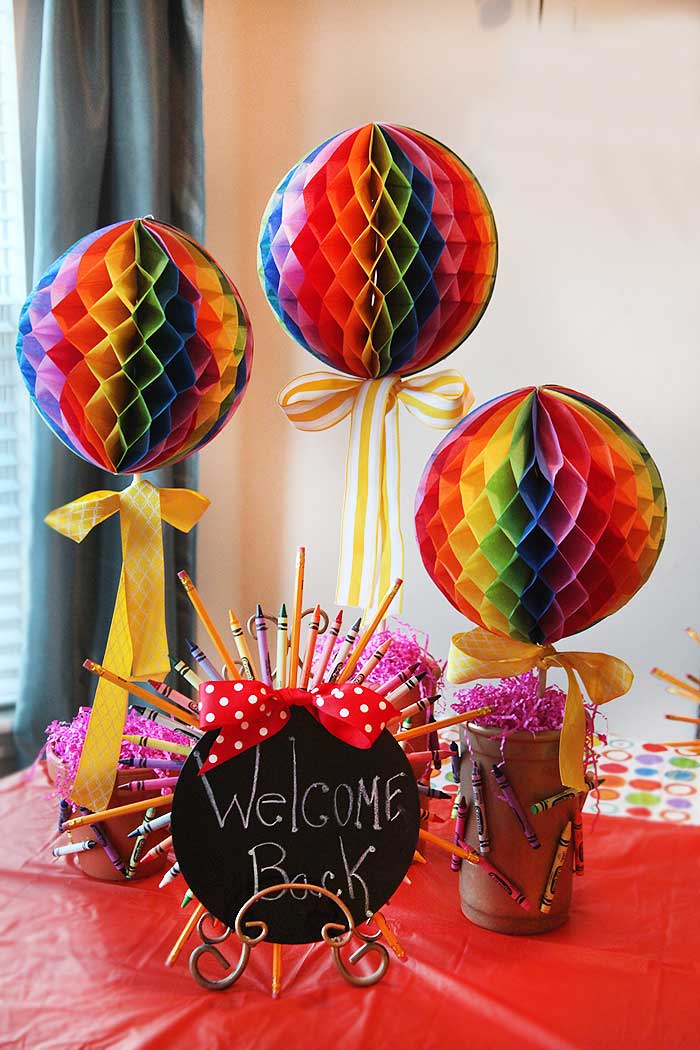
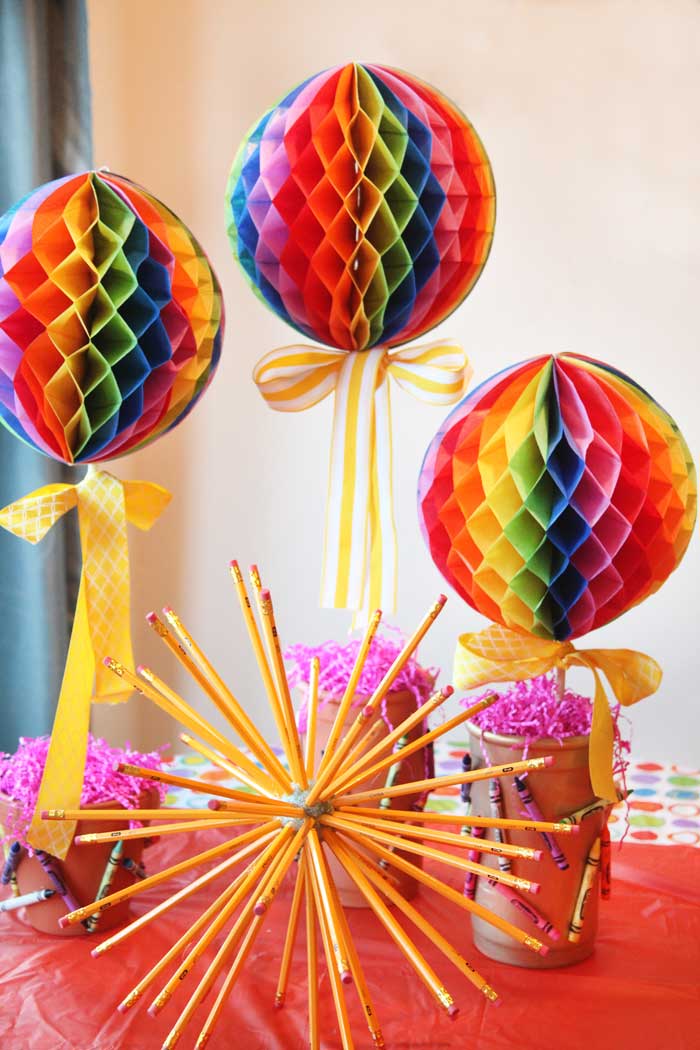
I always get excited at the beginning of the school year! Meeting new teachers, reconnecting with old friends… there is so much excitement for so many different reasons. This year, I was in charge of organizing my youngest boy’s 2nd grade back-to-school party and I wanted to do something fun. I didn’t really have a theme or a “vision”, I just wanted to make something universal, fun, and cheerful. Plus, it had to be cheap… no money in the budget for decorations, so I was on my own. I went with a rainbow color theme because I figured it was gender neutral and easy to work with. I also went through my closets to see if I could find items from past projects and lo and behold, I found ribbon, terra cotta containers, Easter grass, and styrofoam… I’m set! Last but not least, I took advantage of the big back-to-school sales going on and purchased pencils and crayons at ridiculously low prices.
For my centerpieces, I purchased pop-up tissue balls at Target in the party section. They were around $2.00 each. I also purchased a ton of crayons which were 2 boxes of 24 for .50 (48 total). I also purchased a round chalkboard for my “Welcome Back” centerpiece and that was the most expensive at $3.00 from Michael’s. My last purchase were wooden sticks, which were about .50 at Michael’s. The sticks were needed so I could transform my tissue ball (which is meant to be hung) into a topiary.
From there, I started to improvise. I used terra cotta containers and stuffed styrofoam inside each one. You can also use oasis squares. I stuck the wooden sticks into the styrofoam and took out the tissue balls from the wrappers. Once you are ready to put the tissue balls on, make sure that you wrap them around the stick and glue the ends of the tissue balls together. I used the thinnest sticks I could find at Michael’s…. sorry, skewer sticks won’t work. You can paint the sticks… but why bother… kids don’t care!
To cover up the styrofoam, I hot glued paper Easter grass to it. Last but not least, I tied some yellow ribbon around the neck of the wooden stick and had my boys hot glued crayons all round the terra cotta container just for fun!
This was a super easy project for centerpieces and I have to tell you, it will inspire you to create other things with those fabulous tissue balls.
For more details on how I made the “Welcome Back” sign and the 2nd grade teacher’s wreath, check out my other post.
· Posted in Back To School, Crafts, Parties ·
|
|
|