If you’ve never heard of tapenade, it’s a Provençal name for a dish consisting of puréed or finely chopped olives, capers, and anchovies. Its name comes from the Provençal word for capers, tapenas.
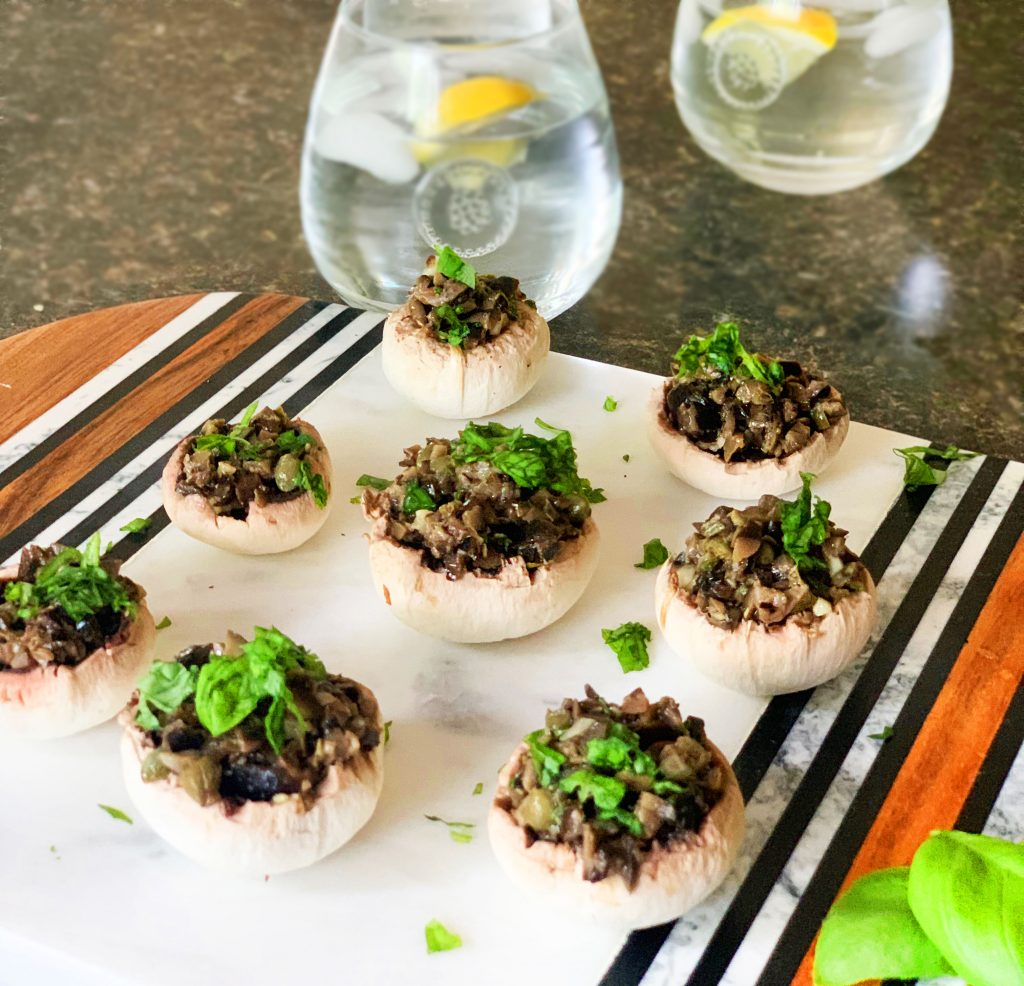
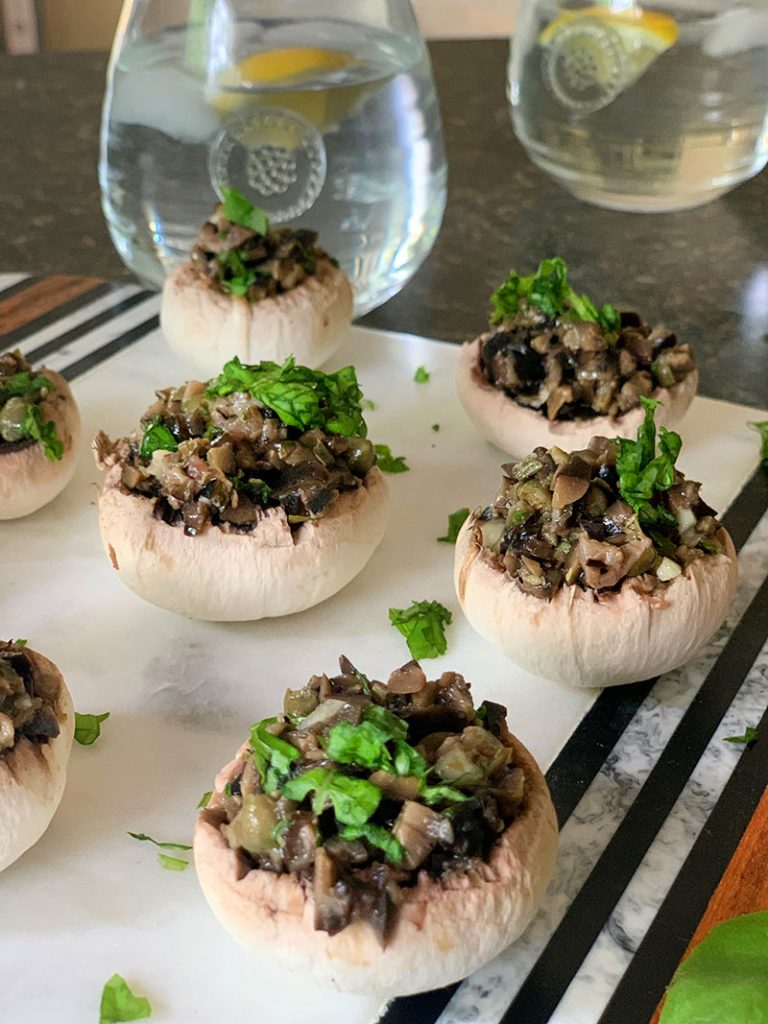
Black Olive Tapenade Stuffed Mushrooms
What I love most about this dish is that it is easy to make, healthy, and can be used as a filling or a dip. You can also easily make it vegan (simply omit the anchovies) and still maintain the integrity of the recipe.
I was inspired to create this dish while visiting St. George, Utah and enjoying lunch at a local restaurant named Xetava. Their tapenade was served with Lavash crackers and I fell in love with it. So, when I got back home to St. Louis, my first thought was to try re-creating the recipe but adding my own twists. The beautify of tapenade is that it is very customizable and you don’t even have to have the exact measurements to make it. Just know that black olives (you can use green as well or mix the two) are going to be your main foundation. I typically start out by using a full cup of olives which I rough chop, and add ingredients little by little tasting and chopping the mixture as I go. If I’m throwing a party, I’ll add just one clove of garlic for flavor. If I’m making the tapenade for myself, to have for lunch, I can add up to three cloves of garlic… I LOVE GARLIC! I do the same with lemon juice. I can add the juice of a half a lemon if I’m making the appetizer to take to a party or add the entire lemon if I’m making it for myself. Just depends on how I’m feeling that day or who I will be serving it to.
The key to this recipe is to taste as you go. Once you hit your perfect flavor, you can finish it and serve. And don’t forget to put your own twists on this recipe. Some people add roasted peppers, sun dried tomatoes, and so much more. Don’t be afraid to try new ingredients, herbs, and seasonings. This dish allows you to customize as much as you like.
Most people use a food processor to make this. However, I just chop by hand as I go. Each time I add an ingredient, I mix it into the mixture and continue chopping. By the time I add the last ingredient, my tapenade is chopped to the consistency I want. To see all my techniques for this recipe, here’s a link to a full video.
Last but not least, I decided to omit the bread and instead, serve the tapenade in mushrooms (these mushrooms are fresh, not cooked). It makes for a filling dish that not only tastes fabulous but also good for you. If you omit the anchovies, this dish becomes vegan. If you’ve never worked with mushrooms, watch the video, which I linked above. It will show you tips on working with mushrooms.
Below is the recipe as I like to make it, but feel free to add more or less of each ingredient… if you hate anchovies, don’t use them. If you love capers, use more. Same goes for any of the ingredients listed below. As long as you are using olives as your foundation… you are good!
1 cup of black or green olives 2-3 anchovies 1/4 cup of capers Juice of 1/2 lemon 2 cloves of garlic 1/4 cup of chopped fresh basil 1/4 cup of olive oil 10-12 fresh mushrooms (peeled and cored)
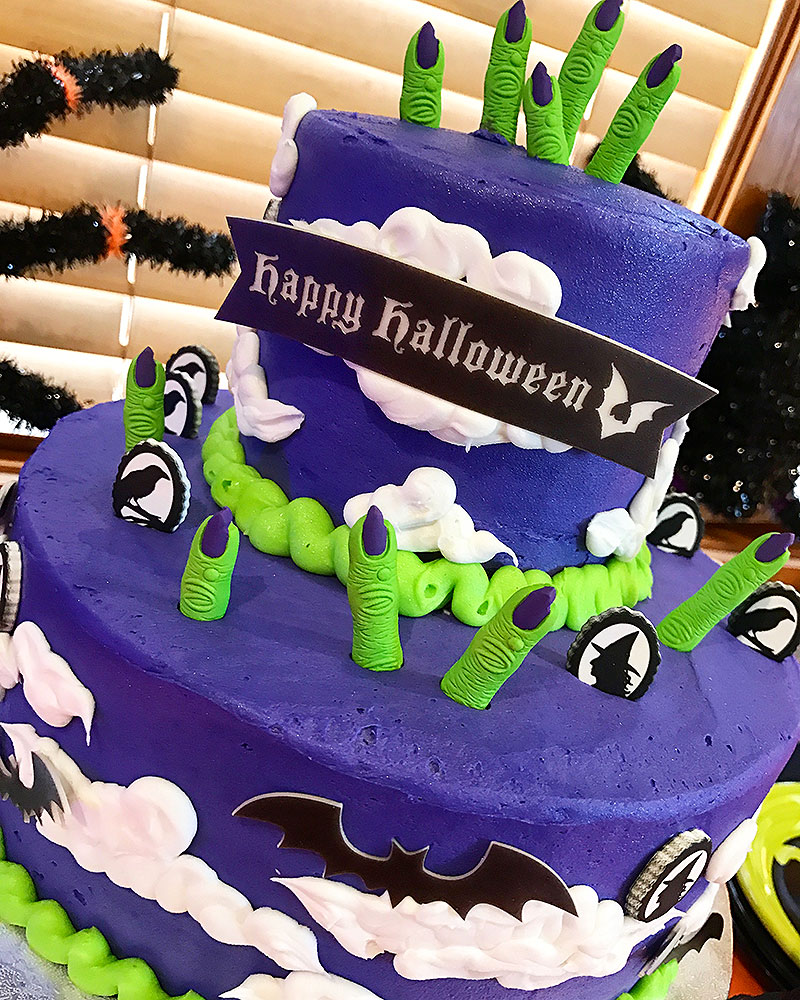
Loving this beautiful Halloween Cake with Green and purple witches fingers.
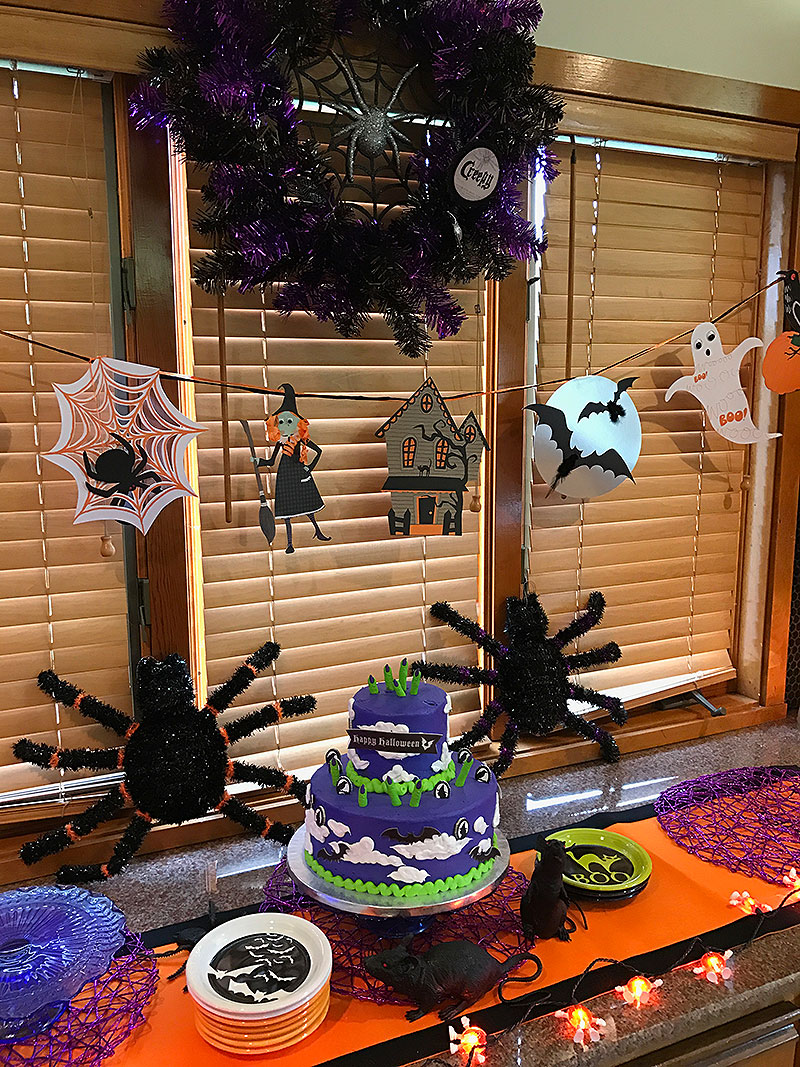
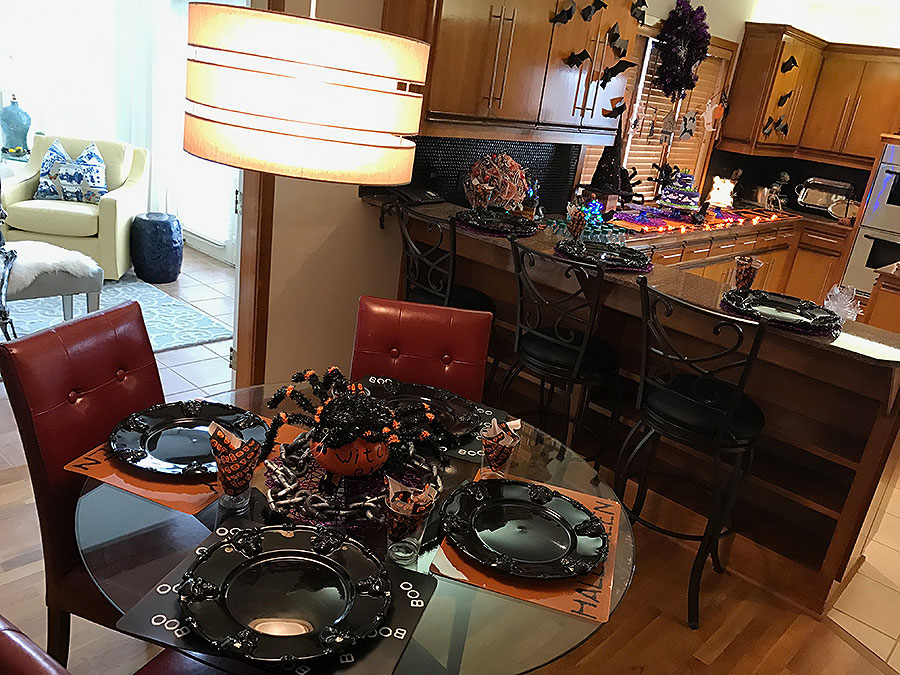
I have thrown fun Halloween parties for many years. I usually throw a party every week in October… yes, every Friday, I will have some sort of a Halloween party. I like to call them “taste testing parties” since the guests are bombarded with fun Halloween goodies and they get to choose their favorites. Sometimes I create all the items for the buffet, but most of the time, other parents bring their creations and we all just watch the kids devour their favorites. It has become one of my most fun and exciting events which I look forward to. As you will see, I try not to do anything super scary, although I have been known to create some gory dishes on occasion (like my severed fingers hot dogs, which is a Pinterest favorite!).
Here are some fun photos from one of my parties, which I like to call Purple Witch’s Finger Cake (shown above). You may say… “Why Arina, I had no idea you were a cake baker!” Well, rest assured… I AM NOT!!! If you know me, you know that I am well aware of my limits. Throwing a party for 60 children means I do as much outsourcing as possible. This cake was ordered from Sam’s and I simply chose it from one of their cake catalogs, available in the bakery section.. It came with the purple, green, and white frosting, clouds and bats. The cake bakers did a great job making a two tiered cake. There were times when I would order the three tiered ones, but they always came out crooked, so I stick with the two tiered cakes.
To customize it to be a Witch’s Cake, I went to Michael’s and purchased the fingers and witch silhouettes separately. I have NO idea how the colors came out so perfectly, but even if they didn’t match, … my motto is and will always be… kids don’t care! I was very happy with the cake and so was everyone else. Oh, and it was soooo affordable, only $40!
Cake with fun Halloween plates, my friend Heidi gifts me with every year.
My sons’ decorations.
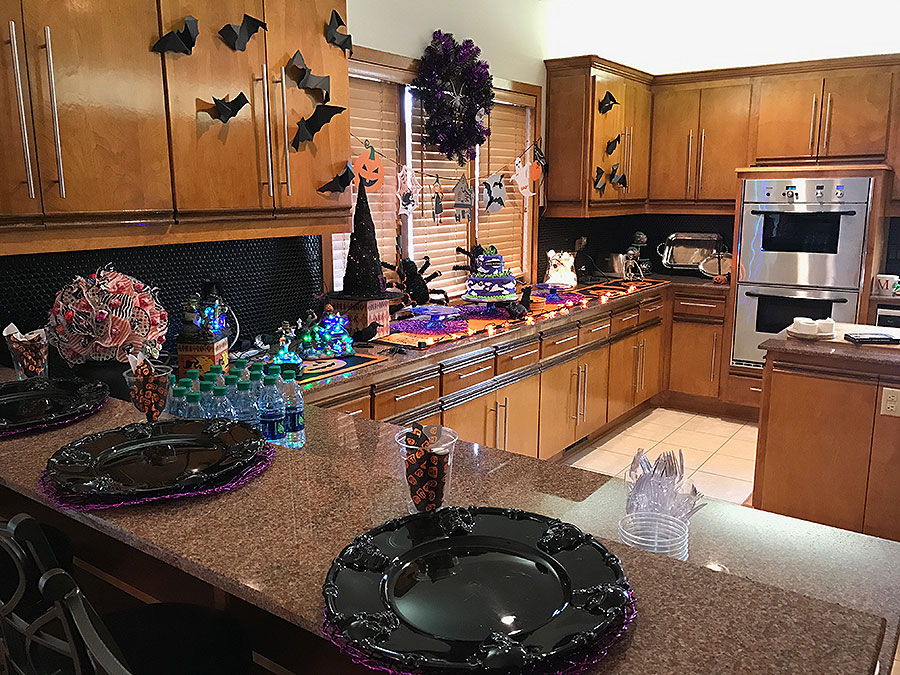
Buffet set-up for Halloween Party
I typically do a buffet set-up and provide the cake and a few other dishes. Then, the parents of the guests bring their favorites. Parents are always invited to the parties and are encouraged to stay and enjoy the festivities.
Here are some of the fun and creative Halloween inspired desserts created by my guests’ parents.
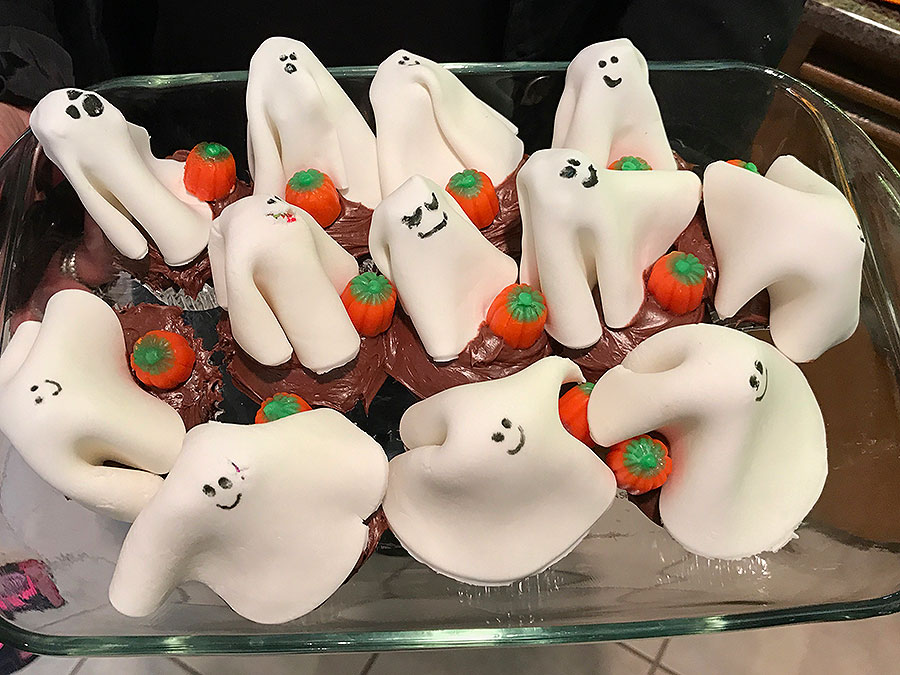
Adorable cupcake ghosts created by my friend Deborah.
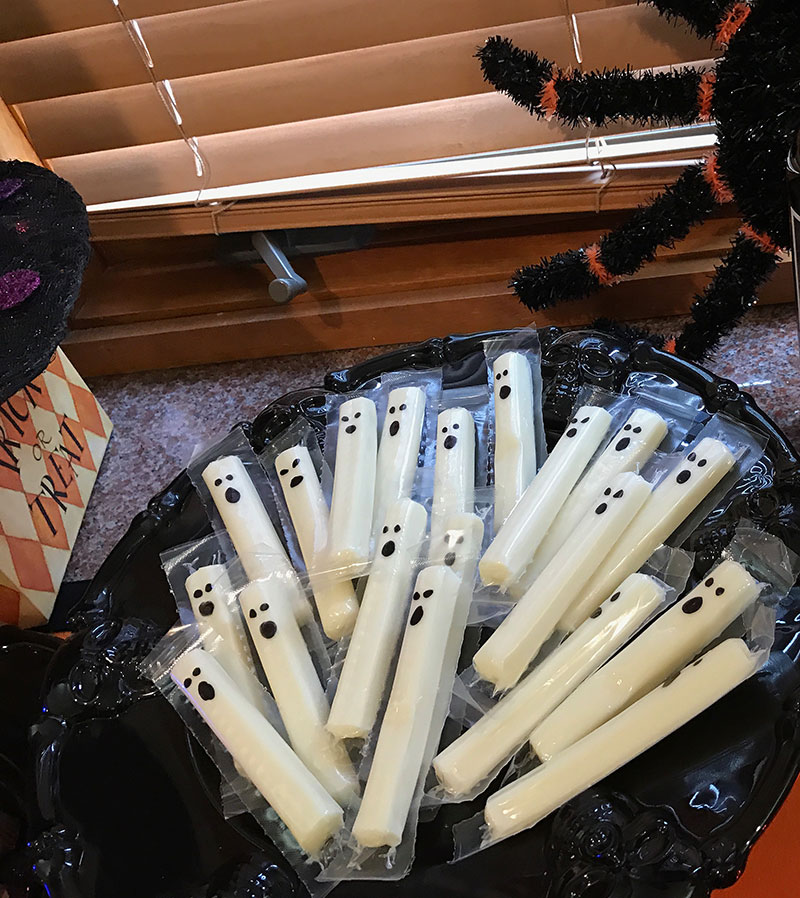
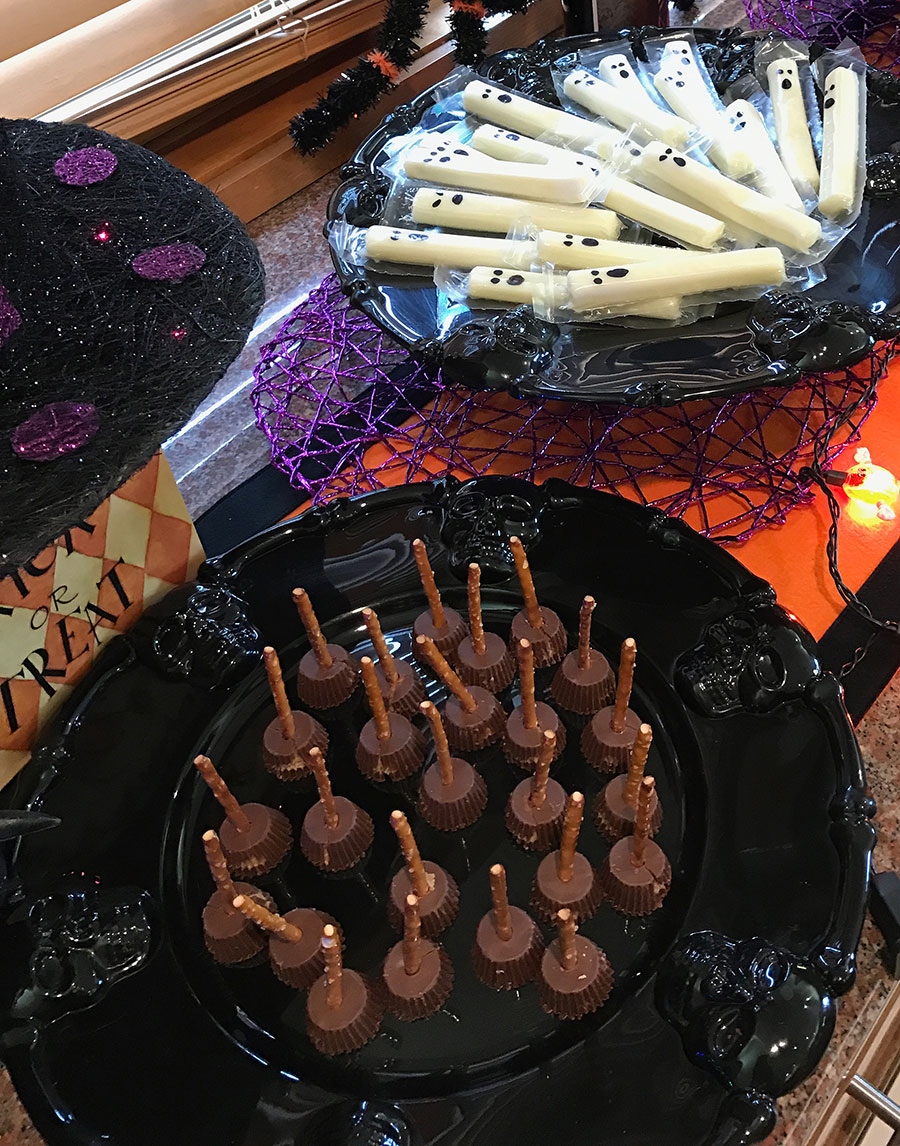
Cheese Stick Ghosts… so clever and easy!
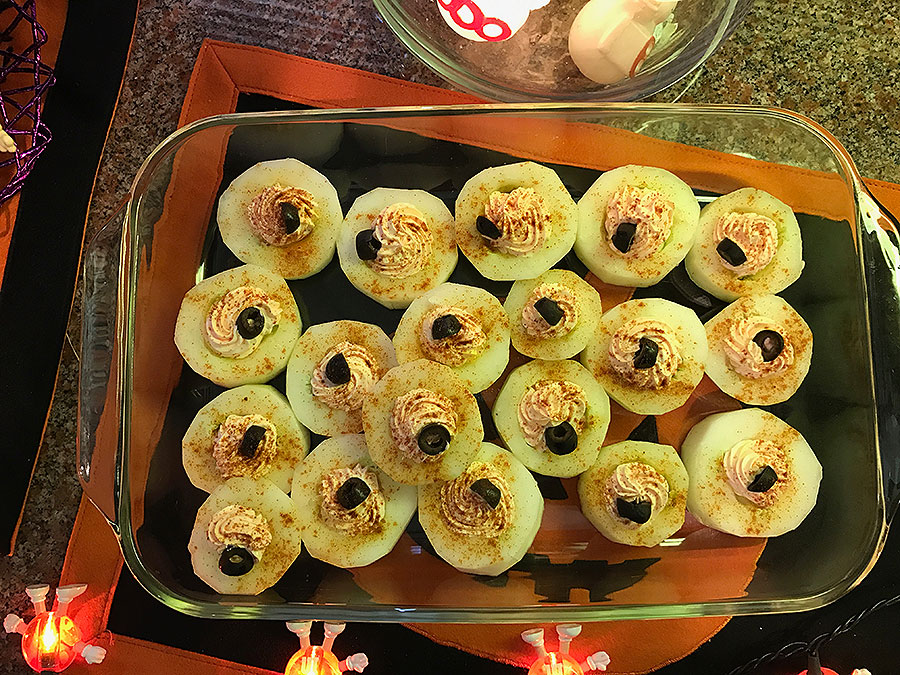
My friend Nina prepared these wonderful and healthy cucumber eyes made with cucumber slices, cream cheese, and black olives. She sprinkled a bit of cumin for the “red”
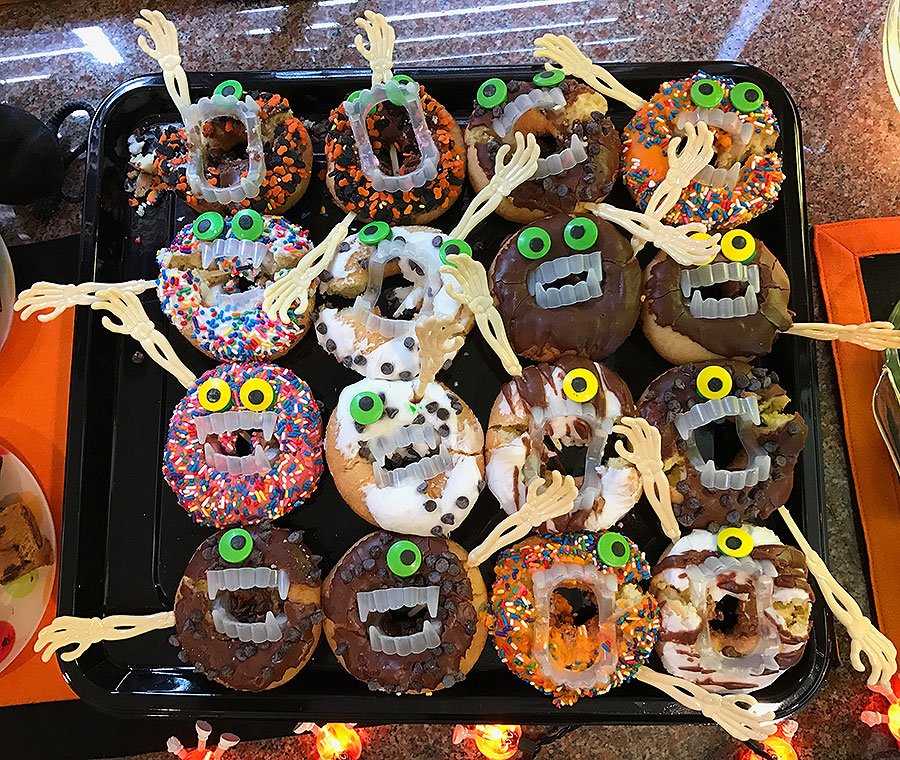
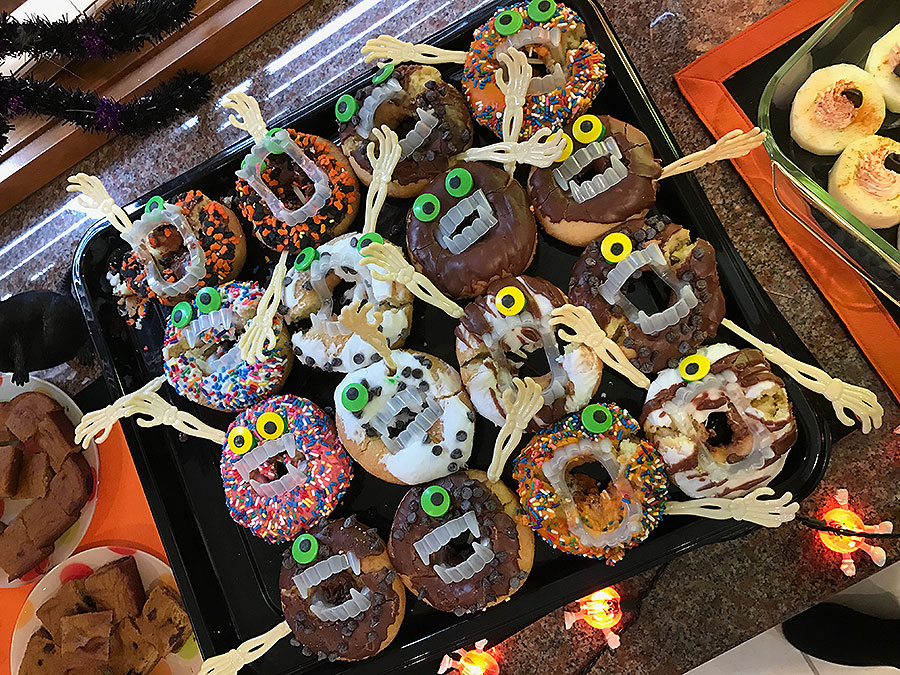
These wonderful Donut Monsters were created by my friend Maureen, who is incredibly creative and no stranger to wonderful Halloween parties. Apparently, they took her no time to create. She purchased ready-made donuts, then stuck fake teeth and skeleton arms inside them and some candy eyes. That’s it! The kids loved playing with the fake teeth afterwards and took them all home as favors.
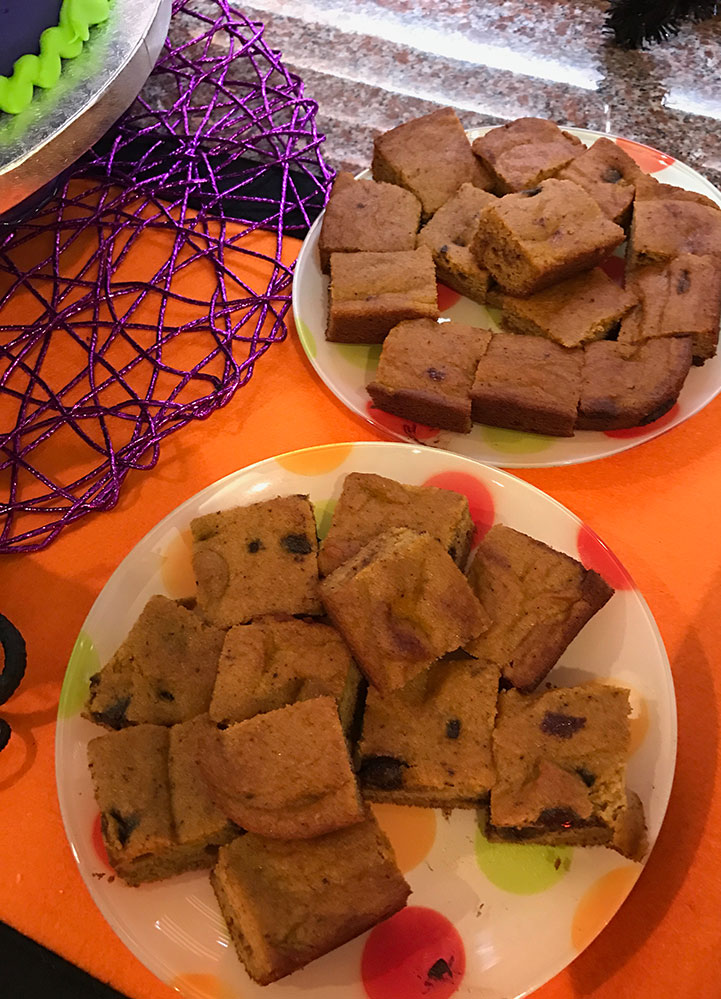
Yummy and healthy pumpkin bread, prepared by my friend Dana.
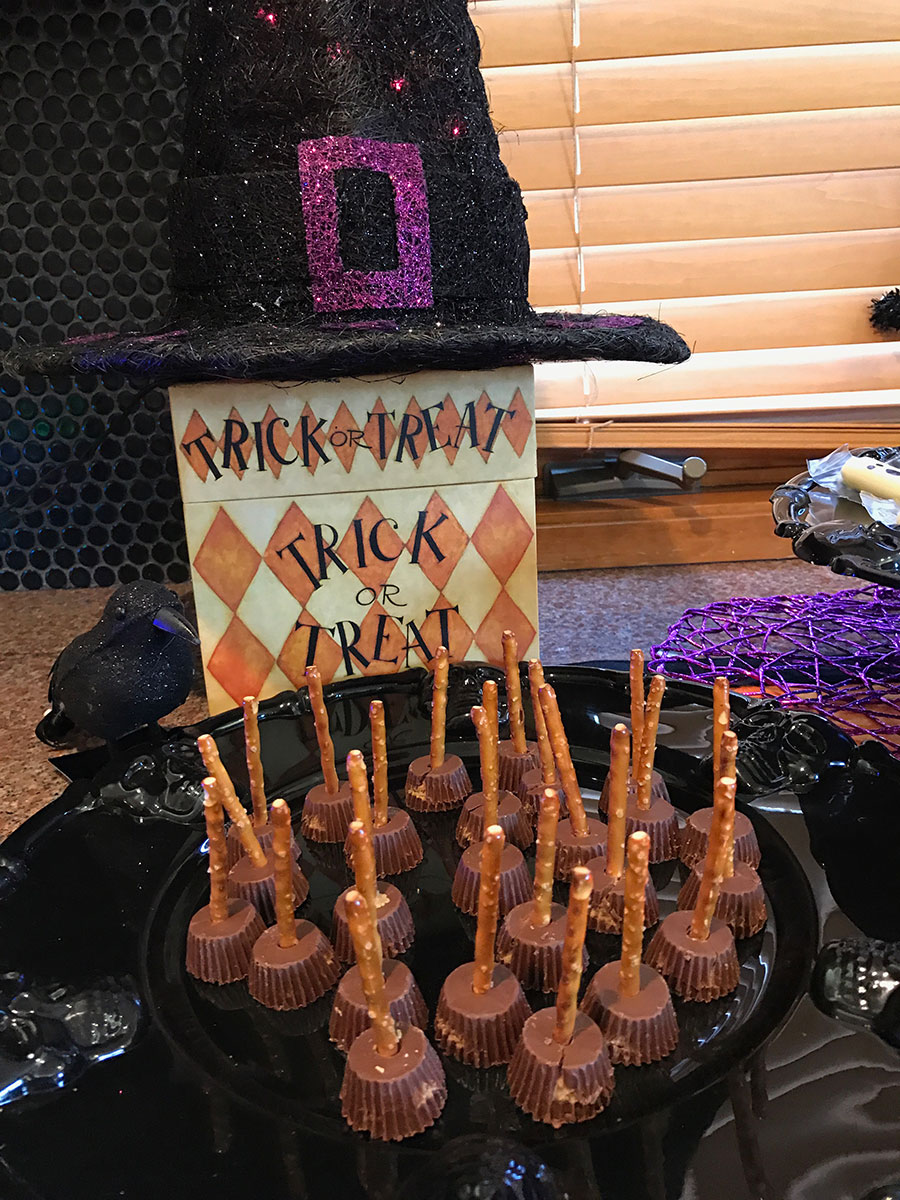
This is such a wonderful and easy Halloween dessert, created by my friend Nicole. They are witch’s brooms. Two ingredients … Reece’s Peanut Butter Cups and Pretzel sticks… you’re done!
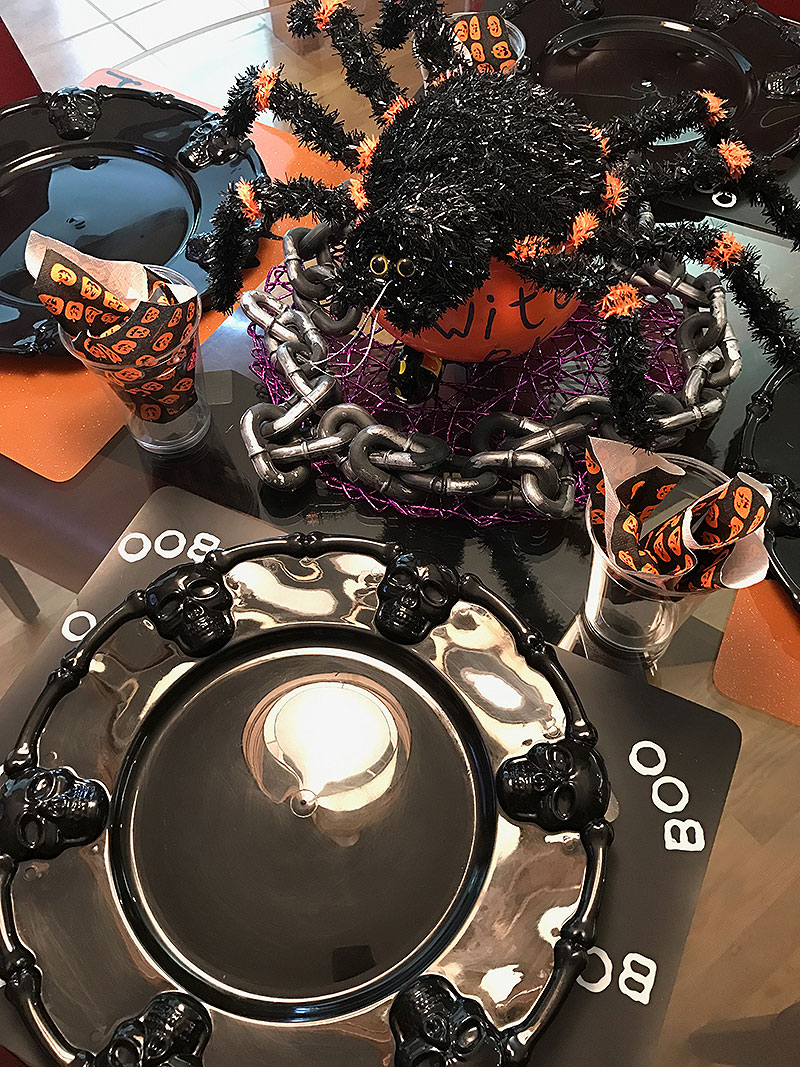
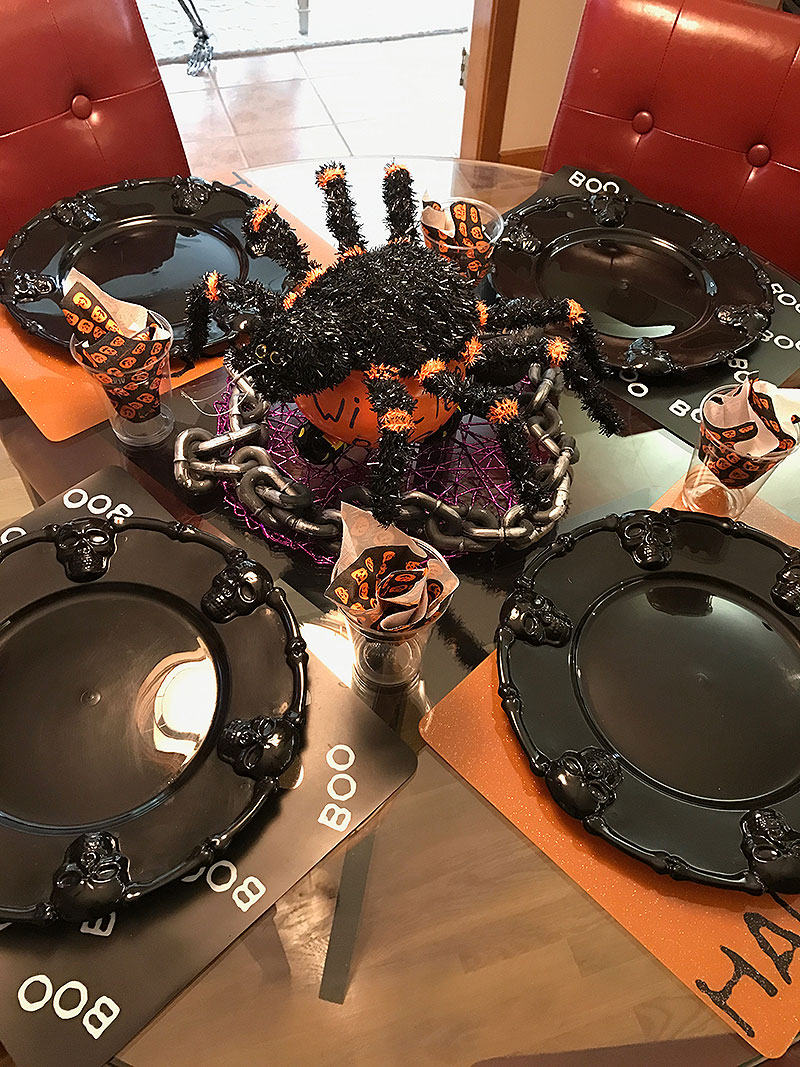
This skeleton appears in different parts of the house at every party. At this party, he’s hanging out in the sunroom!
I re-use many of my decorations at each Halloween Party. As I said, kid’s don’t care and there is really no reason for me to keep buying decorations when I have plenty stored away from my previous parties. Sometimes, I even get decorations gifted to me by other moms who’s kids may no longer be living at home. I truly believe that re-puposing and re-using, as well as borrowing is the best way to decorate for a party.
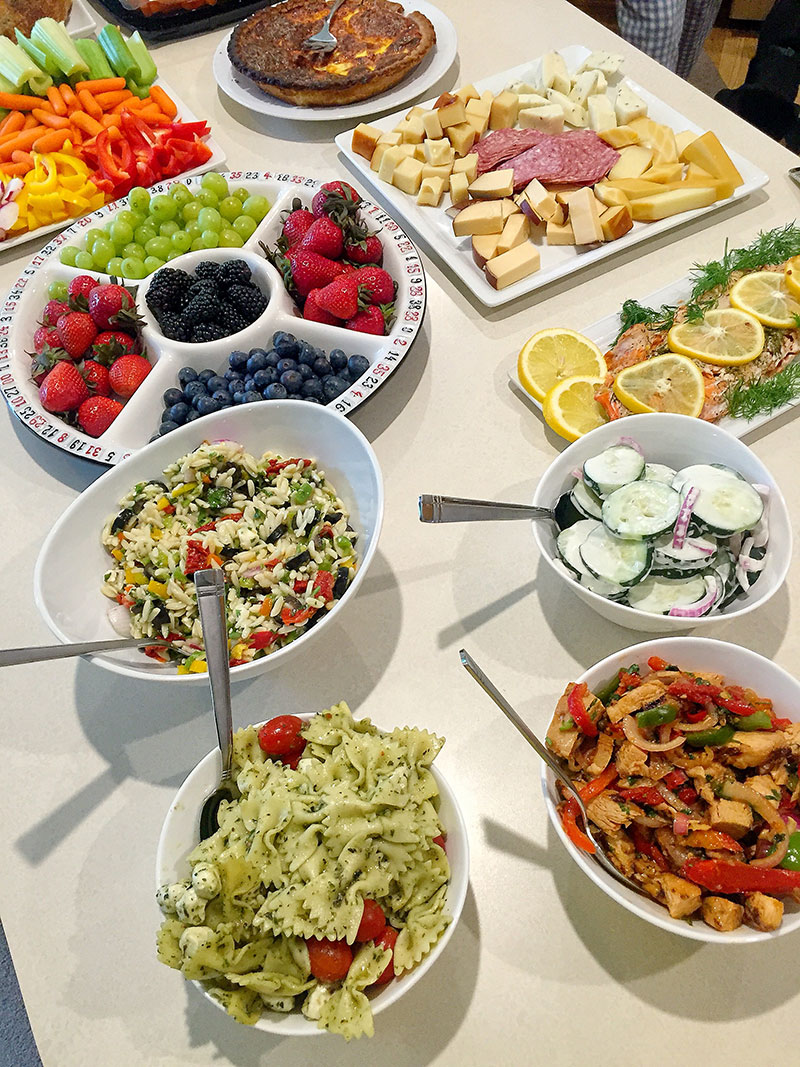
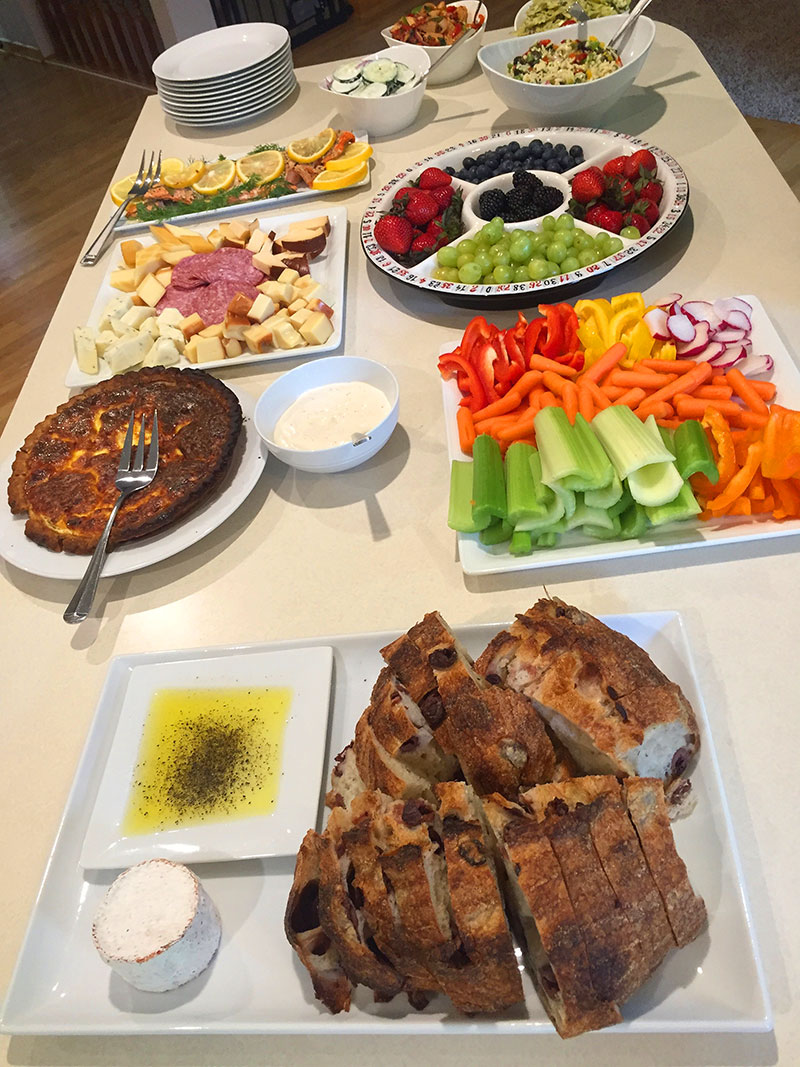
Robin’s beautiful Girls Game Night Buffet filled with a variety of food items to accommodate various dietary options.
I treat invitations to parties a lot like invitations to dance, I NEVER SAY NO! Unless we have a conflict that evening or we’re out of town, I try my best to attend, bring something delicious, and have a fabulous time. However, there are caveats. Brace yourselves, I’m about to share something crazy… I’m not a big fan of game nights… there… I said it! Most people love game nights, but I’m a bit more complicated than most people, especially if the host does not want to disclose what game we’re playing… I guess you can call me a bit of a control freak!
But recently, a friend of mine sent me an invitation to her Girls Game Night. As I always do, I asked “What can I bring?”. She asked me to bring a fruit platter and my mind was immediately at ease because at that moment I knew… FOOD WILL BE SERVED!!
Party food is my weakness, I will show up practically anywhere to partake in delicious party fare. I love seeing what hosts have put together in order to impress their guests or what menu they feel is relevant to their occasion. Yes folks, this is my passion. I especially love appetizers. You can even ask our friends. If you expect my family to come over for dinner, brace yourselves because we will clean off all your appetizer plates, my children included. I’m sure we are breaking some or even ALL the rules of being a good guest, but that’s just the way we are. We may take a few bites from your dinner buffet, but your appetizer set up will disappear! This goes the same when you come to our house for dinner. Most guests are shocked at how many appetizers we put out and truth be told, if we could JUST serve appetizers, we would! So, when I was invited to a party where I knew most of the food will be appetizers (like a game night), there was NO WAY I was going to miss out on that! Plus, Robin is one of those stealth hostesses. She never talks about entertaining, but come to one of her parties, you will be amazed at how she entertains like a pro!
Robin’s Girls Game Night was fabulous. First of all, I have to give her credit, she knew her guest list well. This all female group was sure to have some dietary restrictions. Carb free, gluten sensitivities, vegetarian, and we’re just talking about ME. But there were also guests who just wanted to eat healthy and avoid red meat. Yet again, Robin handled everything like a pro.
Here are the five tips I learned from her party.
DON’T OMIT THE CARBS! Unless you know that every person you are inviting is on a carb-free plan, don’t forget to set a few delicious carbohydrates on the buffet. They help fill people up, plus… they are delicious!
Robin’s beautiful Girls Game Night Buffet filled with a variety of food items to accommodate various dietary options.
2. CONSIDER AN INTERESTING SELECTION OF SALADS. Salad for a game night? Yes, especially when you want to keep it healthy. I’m not a big fan of just finger food on game night, simply because I hate having to clean my game board or game pieces of powdered cheese or red sauce. I’ve read on various blogs that if you can’t eat it with your fingers or a stick, the food item should not be served on game night. I disagree! Having food items which can be eaten with a fork is totally OK. In fact, it gives people the opportunity to take a break, step away from the game table and serve themselves. I loved Robin’s idea of serving pasta, cucumber, and Mediterranean style salads.
Girl’s Game Night Buffet… loved the fruit and vegetable platters. A must at any party!
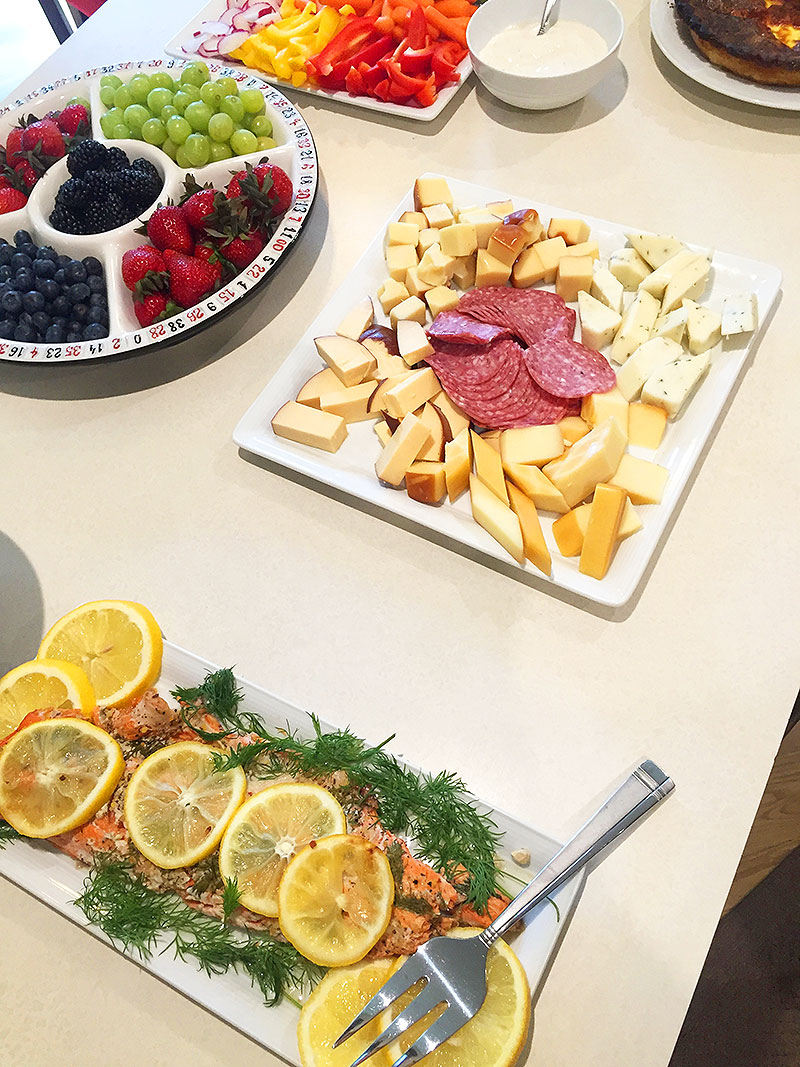
3. VEGGIE + FRUIT PLATTER ARE ALWAYS WELCOMED. No matter the guest list, a fruit and vegetable platter is a must. These platters can accommodate any guest and bring beautiful color to the table.
4. CHEESE, CHEESE, CHEESE. This is another great platter to incorporate into any game night buffet. It appeals to the low-carb guest and it’s wonderful accompanied with a complementary wine, if you are planning on serving alcohol.
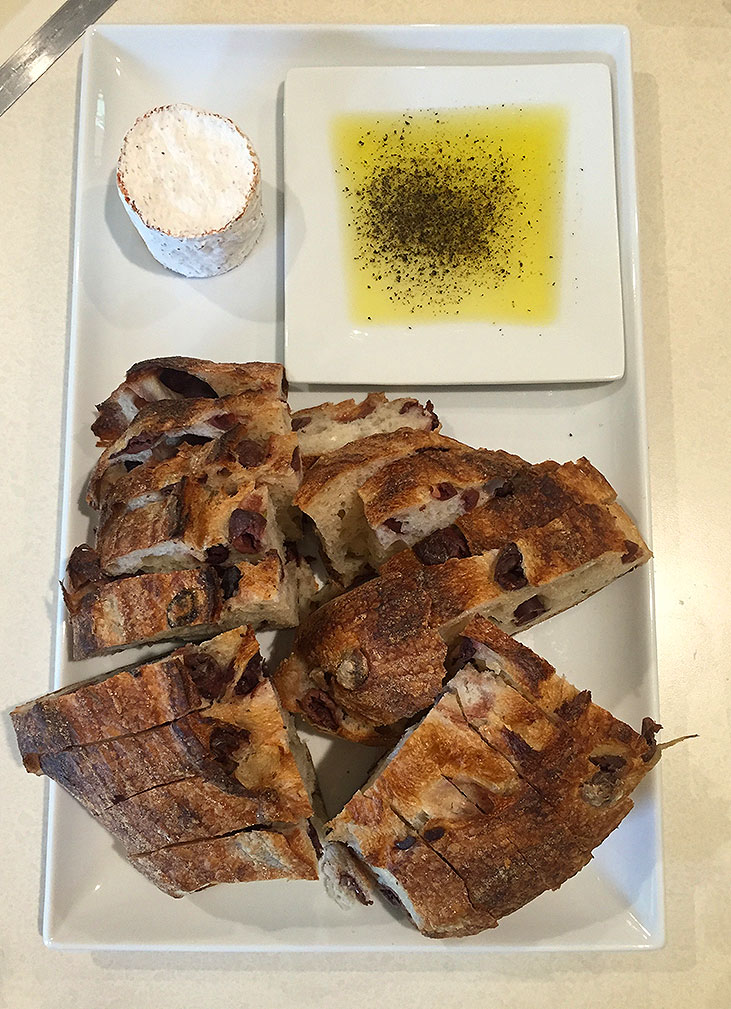
5. SURPRISE YOUR GUESTS WITH SOMETHING UNIQUE. There’s a significant difference between a girls game night and a super bowl party! You don’t have to think potato skins, chicken wings, pigs in a blanket, meatballs, or the many expected dishes during a sports game night. Women love to be surprised with a unique and healthy dish, something they may even try to prepare on their own in the future. Robin served salmon which paired wonderfully with the hand-crafted olive bread, salads, and vegetables. The presentation was so beautiful and the salmon disappeared! We all wanted the recipe!
As always, I had a wonderful time on Better Kansas City on KCTV 5! For this show, I made delicious vegan and vegetarian salads that would be perfect for your Easter celebration or any celebration for that matter! If there is anything I have learned while prepping for parties, it’s to make as many dishes ahead of time as possible. I can’t tell you how much easier it makes things on the day of the event. These salads are perfect for just that! Each one is made from delicious ancient grains that are rich, filling, and good for you. And if the fact that they are delicious and healthy is not enough for you, what if I told you that the longer they stayed in the refrigerator, the better they taste?! So now you see why I LOVE these salads and hope you will too!
Lisa and I after our segment. Love her!!!
Santa Fe Quinoa Salad (lowest bowl), Mint and Green Beans Barley Salad (middle bowl), and Feta and Mint Orzo salads (top bowl) (all are on the left) and Santa Fe Quinoa Salsa with chips and bread (right)
RECIPES
Santa Fe Quinoa Salad
You can't get more perfect than Quinoa, With its mild flavor, light crunch
and impressive protein content, quinoa is the perfect gluten-free and
non-GMO substitute for pasta, rice or couscous. The below salad is fabulous
for any party and can be prepared ahead and stored for up to three days or
more!

Serves 6-8

Six cups of cooked Quinoa
1 can of black beans
1 cup of cilantro
1 cup of frozen corn or one can of canned corn
1 cup of red pepper (chopped)
1/4 cup of chopped red onion
1 cup of chopped tomatoes
1 avocado

Dressing
1/2 cup Olive oil
2 Garlic Cloves Minced
1 teaspoon of cumin
2 tblsp of lime juice
1 tsp honey
salt and pepper to taste

Instructions
In a bowl combine your black beans, red pepper, corn, onion, cilantro, and
cooked quinoa.

Whisk together the lime juice, olive oil, garlic, cumin, pepper and honey
together and toss over bean and corn mixture.

Refrigerator for at least 15-20 minutes

When ready to serve, add your tomato, cilantro, and avocado. Gently toss and
combine well.

If you plan on refrigerating this salad for a couple of day, leave out the
tomatoes and avocados until right before serving.

You can serve this just as a salad or add just a bit of quinoa and instead
serve the "salad" with crackers or chips, more like a dip.

Orzo and Feta Salad with Lemon and Mint

Orzo is a delicious pasta which takes this spring and summer salad to a
whole new level.  Orzo is simple to prepare, is small in size, and has a
wonderful ability to soak in flavors from other ingredients.  It's a perfect
addition to soups, pilafs, and SALADS!!

Serves 2-4

4 cups of cooked orzo
1 cup finely diced yellow bell pepper
2 finely diced large cucumbers (remove seeds)
4-6 oz of Feta cheese
4 tbsp minced fresh mint leaves


Dressing
1/3 cup of minced shallots
1/4 cup of Olive oil
3 tbsp of fresh lemon juice
1 minced garlic clove
1/2 teaspoon of finely grated lemon zest
salt and pepper to taste

Combine the ingredients for the dressing... olive oil, shallots, lemon
juice, garlic, lemon zest and salt and pepper.  Mix until well blended.

For the salad combine cooked orzo, yellow bell pepper, cucumbers, mint, and
feta cheese.

Pour salad dressing over salad and toss well.  You can serve immediately or
for an even more intense flavor, let sit for 1-2 hours at room temperature.


If you plan on making this salad a few days before eating, leave the mint
off until right before serving.

Spring and Summer Barley Salad with Mint and Green Beans

Whole grain barley is a healthy high-fiber, high-protein whole grain
boasting numerous health benefits. When cooked, barley has a chewy texture
and nutty flavor, similar to brown rice. Although soup is the most popular
way to eat barley, it was wonderful for salads as well.

4 cups of cooked barley
1 cup of green beans (steamed and cut into one inch pieces)
1/4 cup plus 3 tablespoons extra virgin olive oil
2 shallots (minced)
3 (about 1 cup) ounces white mushrooms (stems discarded and sliced thin).
2 fresh lemons (juiced)
2 tbsp minced fresh mint
2 tbsp minced fresh flat leaf parsley
salt and pepper to taste

Heat 3 tbsp of olive oi in a small pan and cook the shallots unitl softened.
Add the sliced mushrooms and cook until mushrooms have given off their
liquid and it has evaporated. Add lemon juice and parsley. Salt and pepper
to taste and let cool.

When mixture is cool, pour over the barley and set aside.  Whisk together
the remaining olive oil with the juice from one lemon. Pour the mixture over
barley and toss everything until well blended.
As always, hanging out with the wonderful people at Better Kansas City is always a treat! On yesterday’s Valentine’s Day inspired show I showed Lisa Teachman a few fun recipes. May I quickly add that I feel proud that I was the reason she tried beets for the first time! You gotta love it when you can inspire people to try a fun recipe or experience a new foods!
My three recipes included a Beet Hummus (Brace yourself… this stuff is AH-MAZING!!!), No Bake Paleo Cookies, and home-made chocolates filled with fun and healthy ingredients. So, without further delay, here are the recipes. Enjoy!!
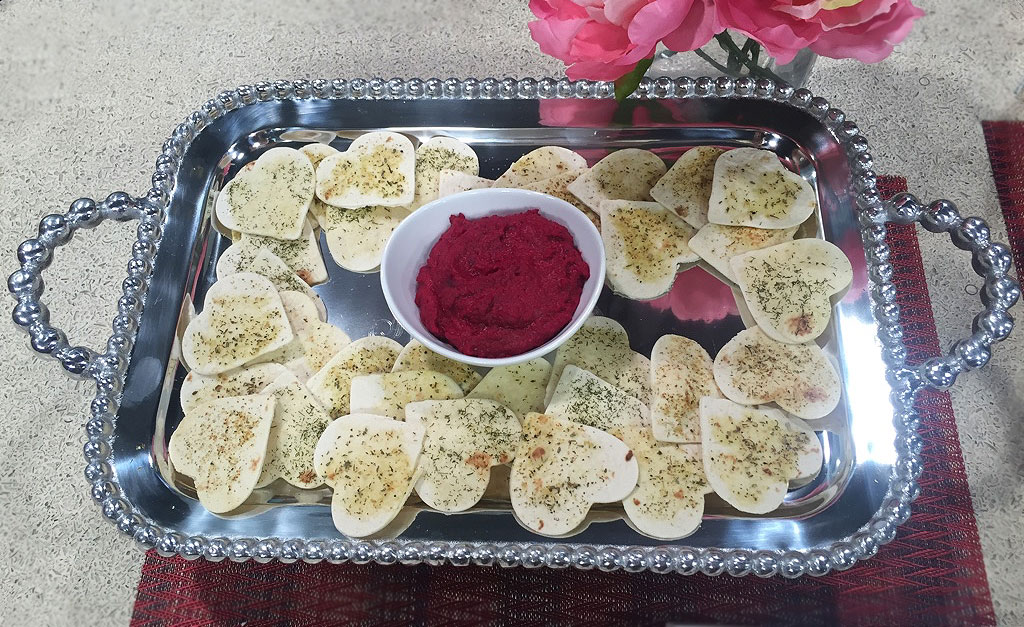
ROASTED BEET HUMMUS + BAKED HEART TORTILLA CHIPS
1 cup of roasteded beets (directions to roast below)
1 15 oz. can white kidney beans (mostly drained)
zest of one large lemon
juice of half a large lemon
healthy pinch salt and black pepper
2 large cloves garlic, minced
1/4 cup extra virgin olive oil
1. Slice beets into thick slices and toss in olive oil with a generous portion of salt, pepper, and your favorite dried and/or fresh herbs. I love to toss mine with dried rosemary and oregano. Roast at 400 for approximately 15-20 minutes.
2. Let beets cool and place them in a food processor. Add, olive oil, beans, lemon zest and juice, garlic, Process all ingredients until very smooth. Follow my three step rule… Process, scrape, taste. Adjust ingredients according to your taste. I love extra lemon in my hummus, so I may add a bit more as I process. Then, again… Process, scrape, taste. Do this a total of three times and you should have your perfect hummus!
3. Serve hummus with warm pita bread, chips, crackers, or vegetables. Store extra hummus in an airtight container for up to a week.
For the above photo I used large tortillas which I cut out as hearts (with a heart cookie cutter). Then, I brushed each heart with olive oil, sprinkled with dried dill, oregano, and garlic salt. Baked at 375 in the oven for about 10-15 minutes… keep an eye on the tortilla chips so they don’t burn. Let cool and serve alongside your beet hummus. These baked tortilla chips are so much healthier than the store-bought fried alternative!
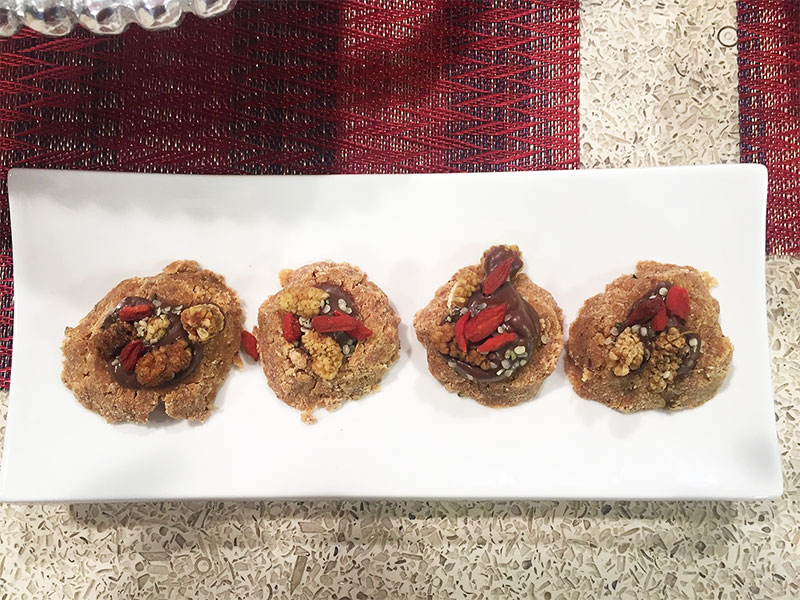
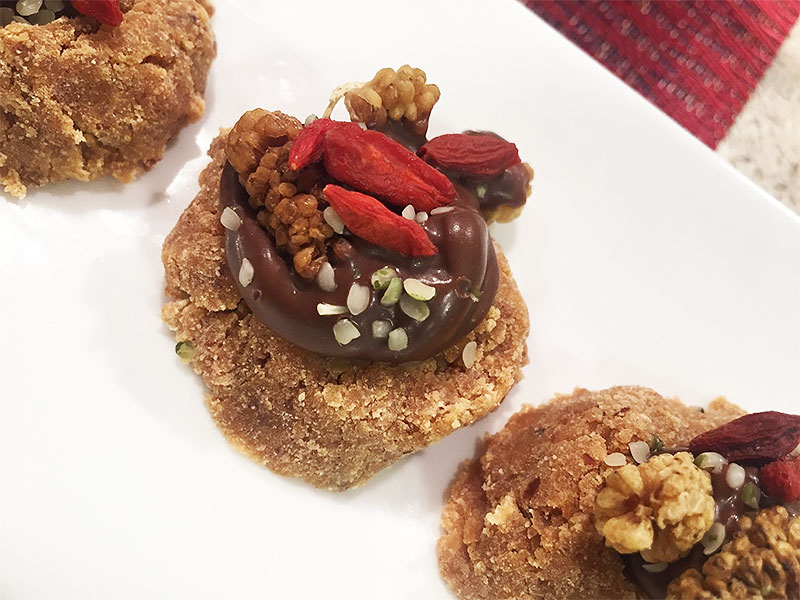
PALEO NO BAKE THUMBPRINT COOKIES
1 cup coconut flour sifted
2 T almond flour
1/4 cup coconut palm sugar
pinch cinnamon
1/4 cup almond butter
1/4- 1 cup Almond Milk
Dark chocolate
Goji Berries
Hemp Seeds
Instructions
In a large mixing bowl, combine coconut flour,almond flower, and coconut palm sugar, and cinnamon. Make sure all the dry ingredients are mixed well.
Stir in the almond butter until the dough is crumbly. Using a tablespoon at a time, add the almond milk until a very thick batter is formed. Make golf sized balls with the dough and press down in the center of each to create a small ditch. Place the balls on a lined baking pan. Fill with dark chocolate and top off with god berries and hemp seeds. Refrigerate until time to serve.
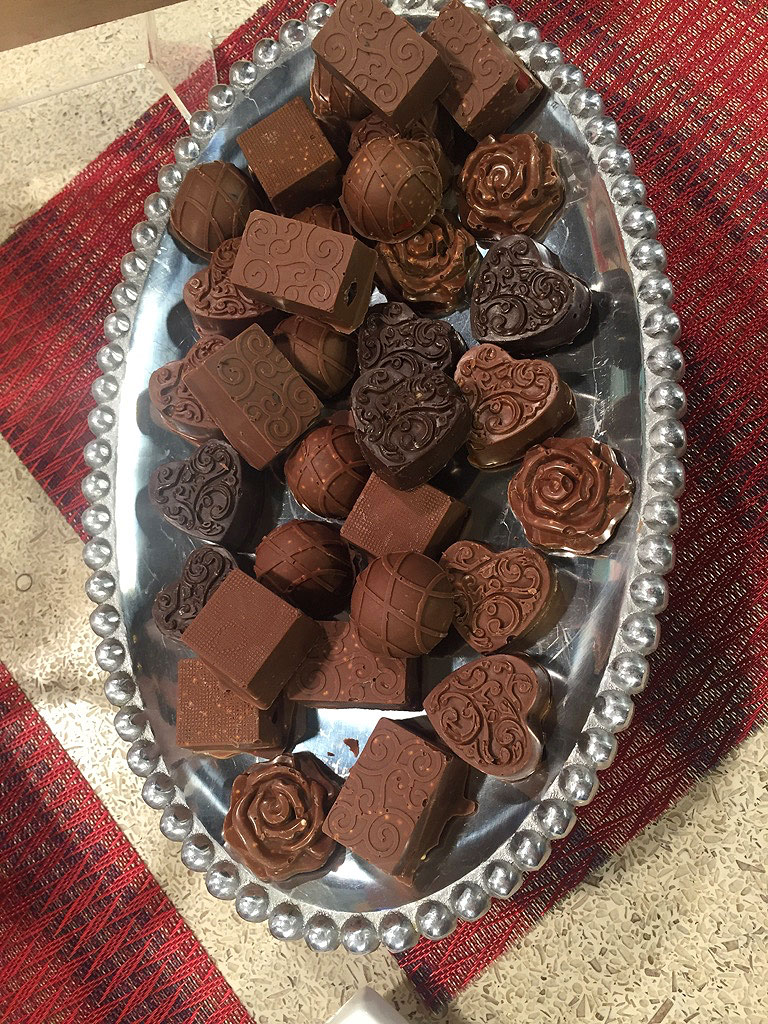
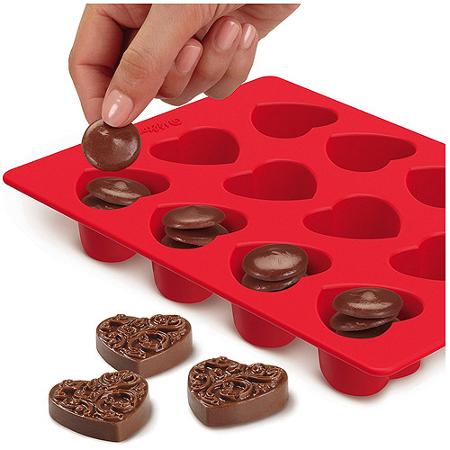
QUINOA POWER CHOCOLATES
Any kind of chocolate Chocolate or candy melts
1/2 cup of toasted Quinoa (toasting instructions below)
Small heart molds or candy molds. I purchased mine at Michael’s in the baking section
Make chocolate with your favorite recipe or melt chocolate chips or candy melts.
Add toasted Quinoa to chocolate and mix well. Fill the heart molds with the chocolate and quinoa mixture. Cool in refrigerator until fully set. Pop out and enjoy.
HOW TO TOAST QUINOA : Toast quinoa in medium saucepan over medium-high heat, stirring frequently, until quinoa is very fragrant and makes continuous popping sound, 10-15 minutes. Transfer quinoa to bowl and set aside. Store extra quinoa in an airtight container.
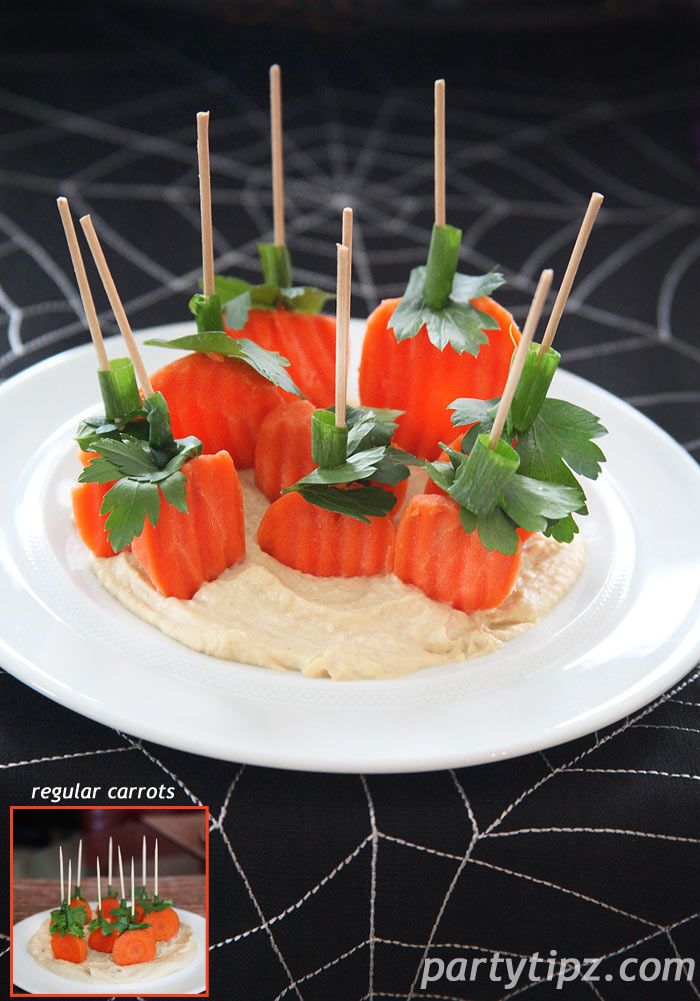
I am ending 31 Days of Halloween off with a BANG!! This healthy veggie platter was a hit at a recent party I attended. It was fun and funny! And best of all… HEALTHY!!! Happy Halloween Everyone!
Seriously, how can you not fall in love with this great idea for an appetizer? It’s easy to put together and fun for guests to nibble on. All you need are carrots, parsley, green onion, toothpicks, and hummus.
A few years ago I posted this recipe (on the bottom left) but then realized that you can use pre-cut and bagged carrots (main image) instead of cutting them yourself. Best part? The pre-cut and bagged carrots have ridges and are different shapes, a lot like pumpkins. Still yummy but now you can save a step and not have cut the carrots!!!!
Ingredients
1 pkg Hummus
2 carrots
1 green onion
1 bunch fresh parsley
toothpicks
Preparation
Just slice the carrots, take some parsley leaves and attach them to the carrot with a toothpick. Slide a piece of green onion over the toothpick to have a look of a stem and arrange on a bed of hummus. Told ya it was simple! Thanks to the folks at Disney magazine for inspiring me with this recipe.
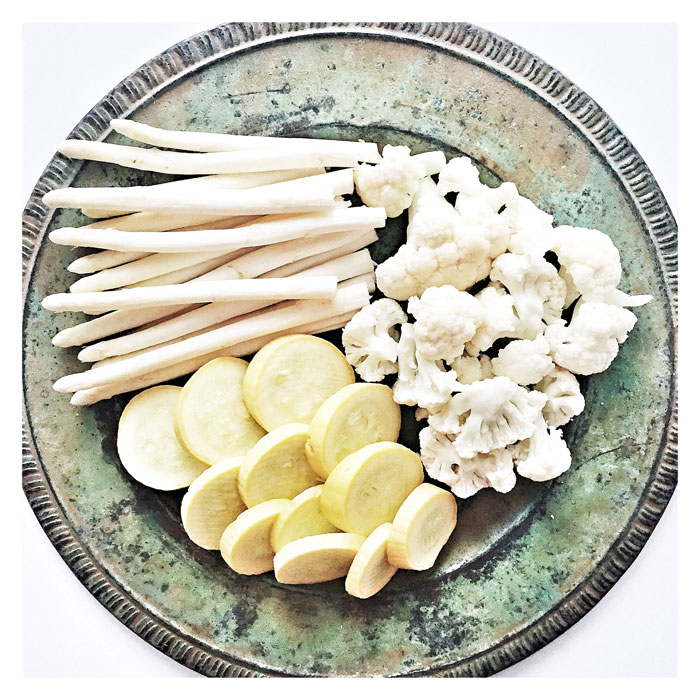
If you think that vegetable platters need to be an assortment of colors, I beg to differ. I served this all white crudités at last year’s holiday party and it was a hit! Most people are so impressed to see that vegetables come in all sorts of different colors, like white asparagus. It’s one of those “surprise” elements I like to incorporate into all my parties. Alternatively, creating a colorful veggie plate with purple cauliflower or heirloom tomatoes, also gets “oohs and aahhs” from guests!
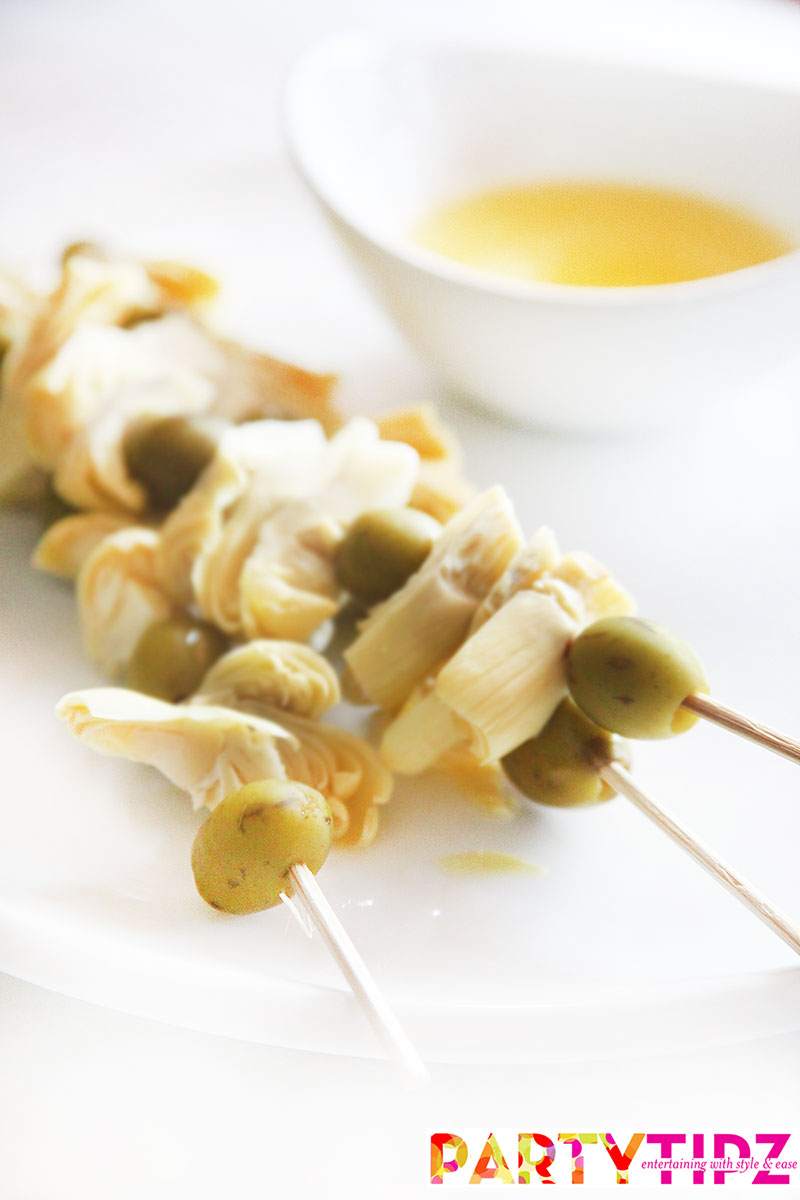
Join the latest trend of salad on a stick! Great for BBQs and picnics and beautiful to serve at any party any time of the year!
Ingredients
1 can Green Olives
1 can quartered artichoke hearts
skewers
For the Lemon Butter
Juice of 1 lemon
1/2 stick of butter
Preparation
Drain the olives and artichoke hearts. Skewer an olive and follow with 2-3 artichoke pieces… repeat the process until you get to the end of the skewer and then top off with an olive. Plate the finished skewers. To make dressing, melt the butter and add the lemon juice. Mix well. Brush a little bit of the butter dressing on each finished skewer, making sure that each olive and artichoke have a little bit of dressing. Serve the remainder of the dressing on the side.
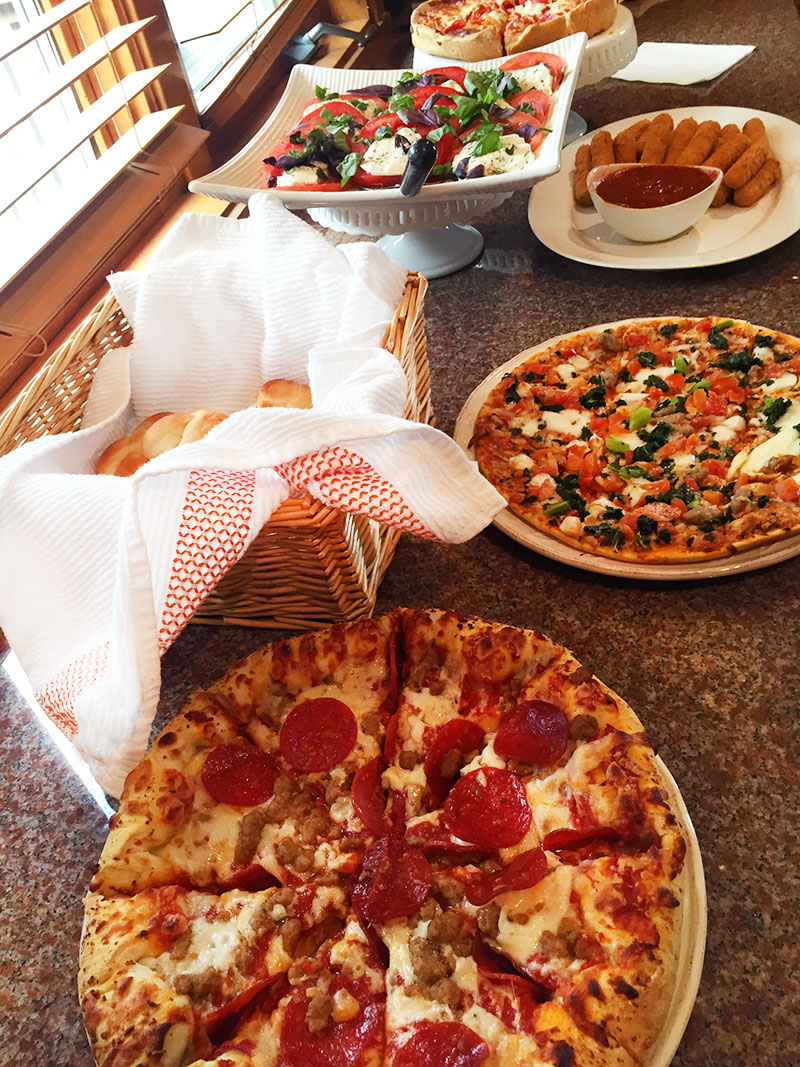
Recently, we had the pleasure of hosting a new family at our school. It is always exciting to meet new students and their parents, so I was thrilled when asked to be a buddy family. We set up a dinner date on a Friday night and although I thought I would have plenty of time to prepare, my day got away from me and I realized that after I picked up my children and stopped at the store for all the necessities, I would only have an hour to prepare a meal for seven.
Since Pizza night is typically Friday night at our house, I thought, why not stick with the theme and keep it simple. Initially I thought of asking my husband to pick up pizza on this way home, but I actually wanted to impress this new family and since there was no time to make my own pizza, I thought I would offer them a variety of pizza flavors and styles. I picked up a meat lover’s D’Giorno pizza, a California Pizza Kitchen Vegetarian Thin crust, and an Uno’s Chicago style pizza. Then, I thought… if we went to a Pizzeria, what other items would be on the menu. Mozzarella sticks, garlic bread sticks, and salad… of course! I picked up garlic knots at the store and threw together a quick and easy Caprese salad.
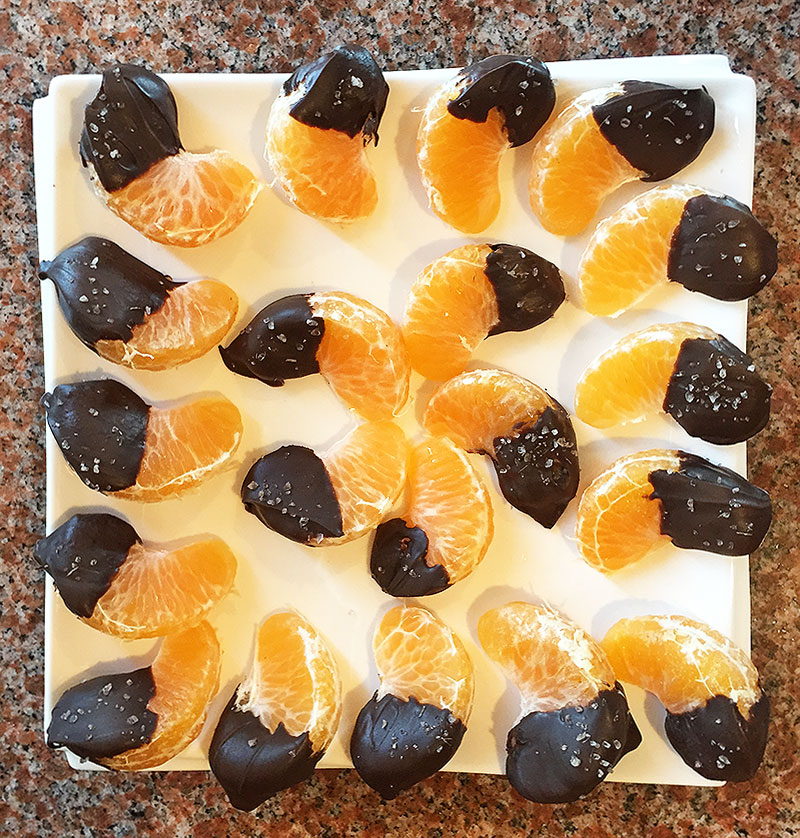
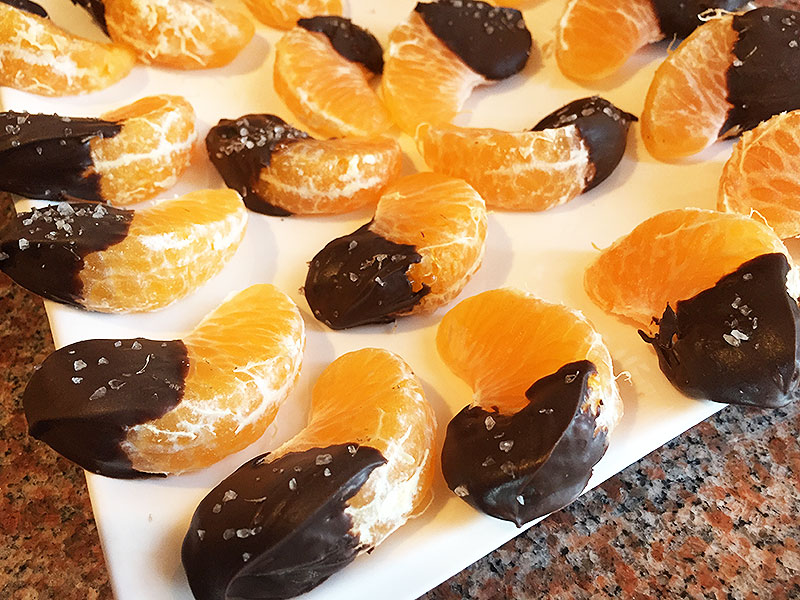
Last but not least, I wanted to impress them with something sweet, but didn’t want to go overboard since they mentioned they would bring dessert (which happened to be the most delicious Gelato I’ve ever had). I asked my son to quickly cover some clementines in chocolate and sprinkle lavender sea salt on top! They loved it! For the recipe… click here.
I was so thrilled at how easy everything was to make and my dinner was ready in less than an hour!