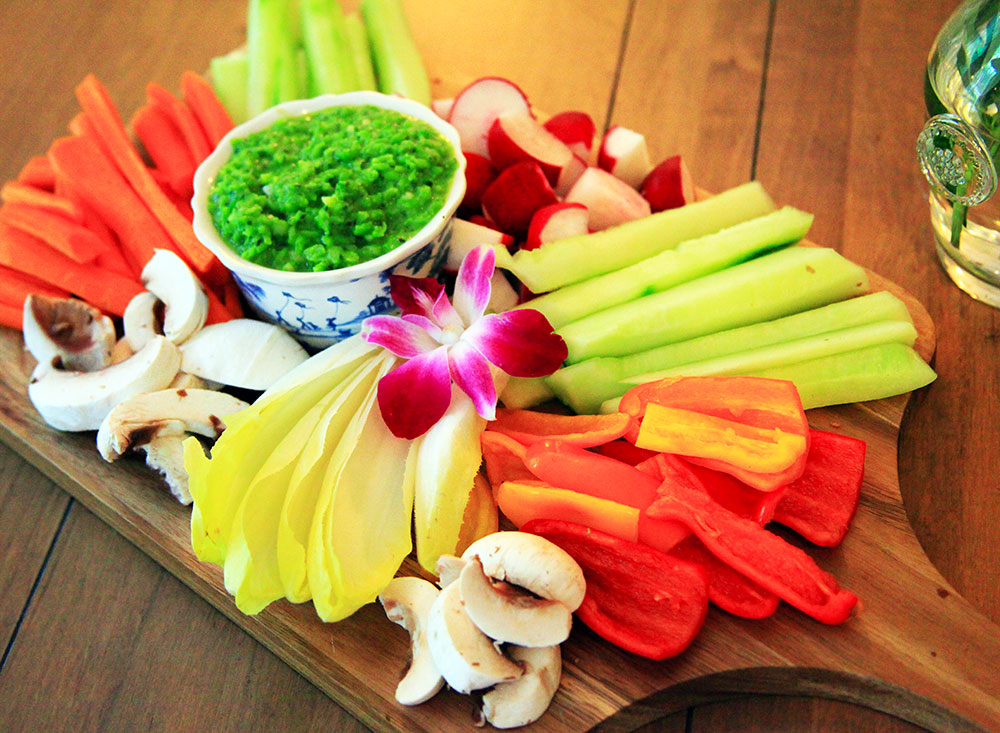
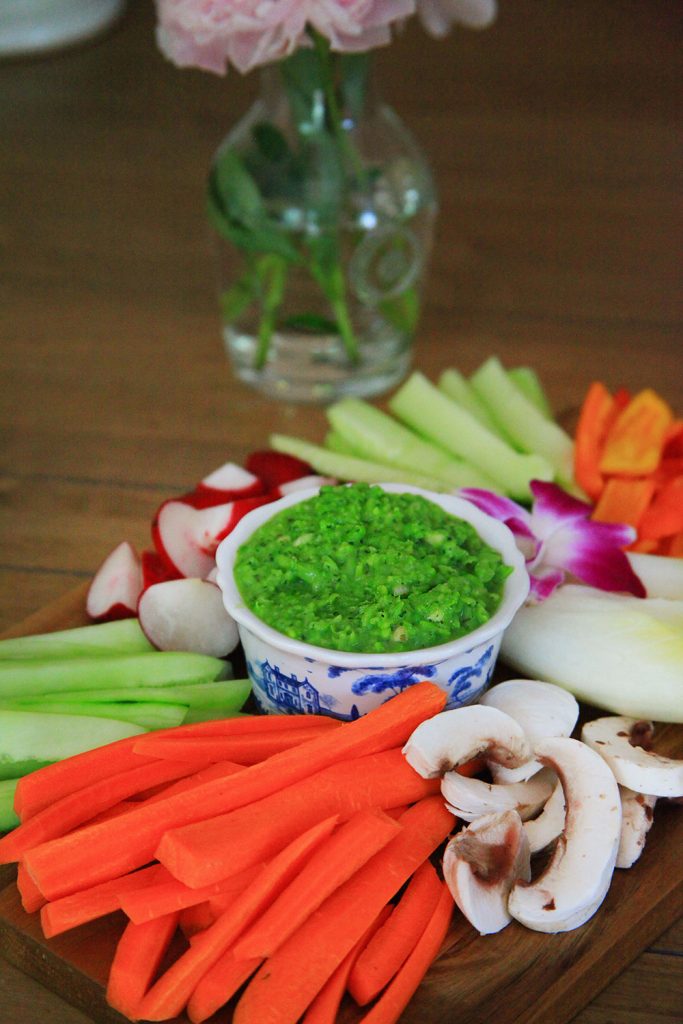
I love trying new things, especially when it comes to dips. This sweet pea hummus surprised me on so many levels. Firstly, it’s made out of sweet peas instead of chic peas, which gives it a sweet and lovely taste. Secondly, it is super easy to make… you don’t have to soak or prep anything. In fact, it took me less time to make the dip than it did prepping the vegetables for the veggie board.
I used a Vitamix, but feel free to use a food processor instead. In fact, I think you will be happier with the texture if you like your dips a bit more chunky rather than creamy.
Another thing I love about this recipe, is its very customizable. Feel free to play with the ingredients as much as you like. I used mint for my herbs, but try it with basil or rosemary and see if you prefer those herbs more. Also, I recommend you use fresh herbs instead of dried. Unfortunately, we are going through challenging times now and my grocery store does not always have all the items I need. But that’s okay… this dip is very forgiving. I also love to use the juice of a whole lemon in my dip, but I recommend you start with a half a lemon and evaluate the taste. When it comes to peas, use the frozen variety (instead of canned) and follow package instructions on cooking them.
Recipe ingredients
Last but not least, salting this dip is the biggest thing you should consider. I did not use an entire TBSP of salt, however, I do salt my dips strongly. Although it may taste salty when I try it on its own, once you dip vegetables into it, you need some seasoning to make it stand apart from the veggie. If you are using salted crackers or chips, you can ease up on the salt. But if you are serving raw veggies, you may want to add some kick to it with more salt than usual or even a spice or two for some extra heat.
For a full video of this recipe, click below:
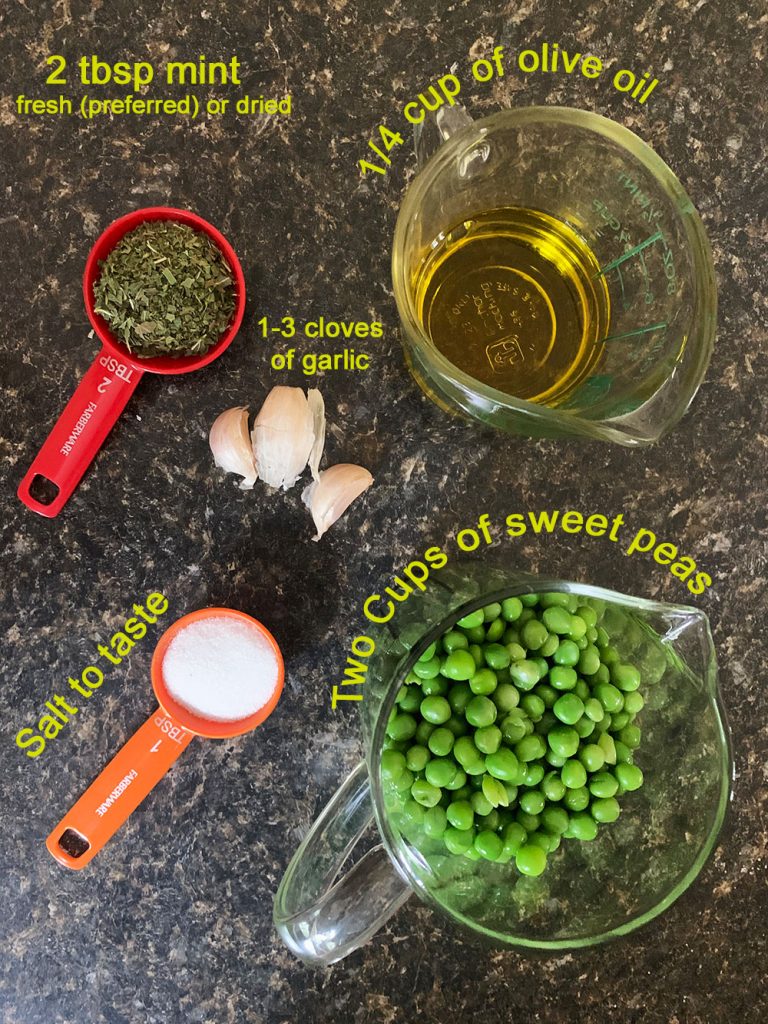
2 cups of sweet peas (Frozen peas are best for this recipe)
1/4th cup of olive oil
2 TBSP mint (Fresh mint is preferred but you can use dried mint if fresh is not available)
1-3 Cloves of garlic (Depending on your garlic tolerance)
Salt to taste (Be ready to use a lot if you are planning on dipping veggies into the dip. If you are using salted crackers or chips, you will need a lot less salt.)
Juice of a half a lemon
Prepare the frozen sweet peas according to package instruction.
Once the peas are prepared and cooled, put them in either a food processor or a Vitamix with a bit of olive oil, garlic and mint.
Start pulsing and add olive oil if necessary. Start salting as you are pulsing. Stop and scrape the mixture.
Periodically taste the mixture to see how much salt you need. Make it slightly salty if you are serving with veggies and less salty for crackers.
Add lemon juice. Feel free to add more lemon if you find it necessary.
Once the mixture is at the texture and taste you prefer, empty it into a dip bowl and enjoy.
If you’ve never heard of tapenade, it’s a Provençal name for a dish consisting of puréed or finely chopped olives, capers, and anchovies. Its name comes from the Provençal word for capers, tapenas.
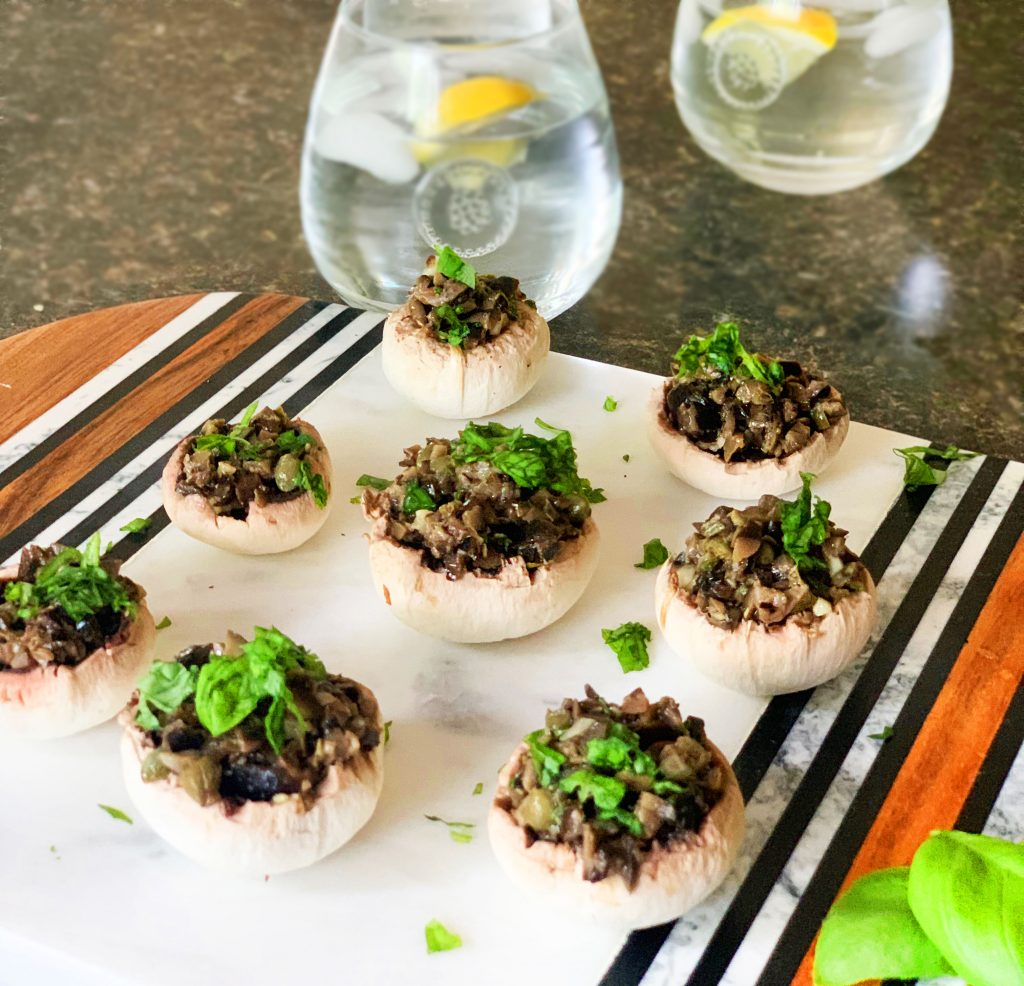
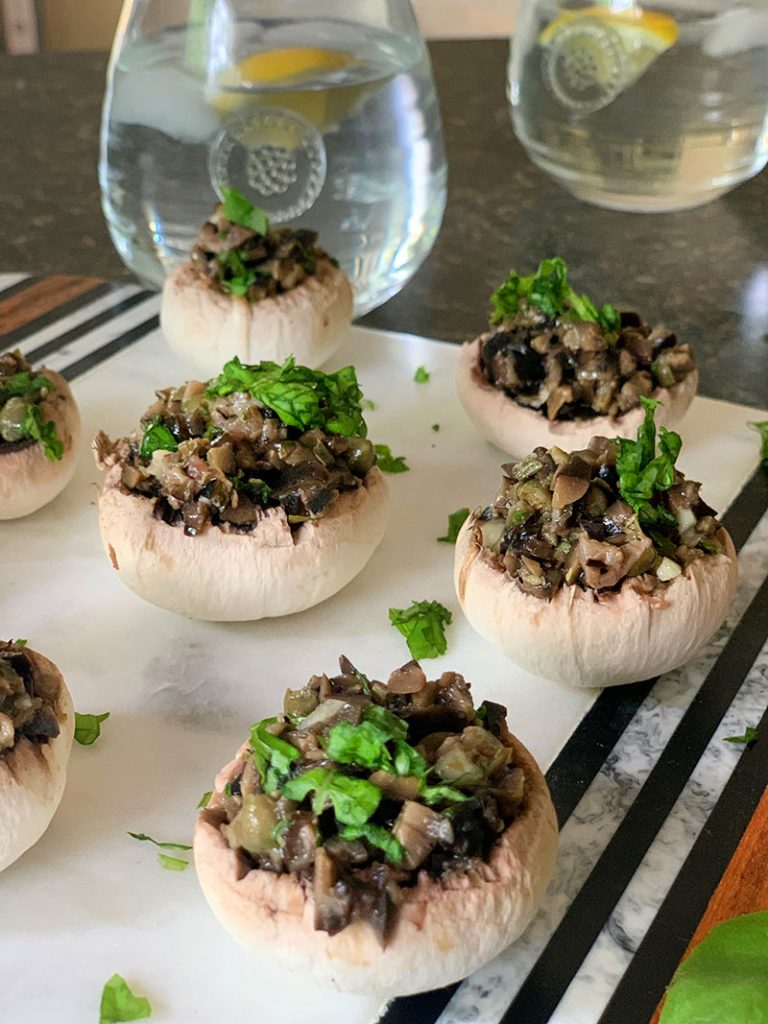
Black Olive Tapenade Stuffed Mushrooms
What I love most about this dish is that it is easy to make, healthy, and can be used as a filling or a dip. You can also easily make it vegan (simply omit the anchovies) and still maintain the integrity of the recipe.
I was inspired to create this dish while visiting St. George, Utah and enjoying lunch at a local restaurant named Xetava. Their tapenade was served with Lavash crackers and I fell in love with it. So, when I got back home to St. Louis, my first thought was to try re-creating the recipe but adding my own twists. The beautify of tapenade is that it is very customizable and you don’t even have to have the exact measurements to make it. Just know that black olives (you can use green as well or mix the two) are going to be your main foundation. I typically start out by using a full cup of olives which I rough chop, and add ingredients little by little tasting and chopping the mixture as I go. If I’m throwing a party, I’ll add just one clove of garlic for flavor. If I’m making the tapenade for myself, to have for lunch, I can add up to three cloves of garlic… I LOVE GARLIC! I do the same with lemon juice. I can add the juice of a half a lemon if I’m making the appetizer to take to a party or add the entire lemon if I’m making it for myself. Just depends on how I’m feeling that day or who I will be serving it to.
The key to this recipe is to taste as you go. Once you hit your perfect flavor, you can finish it and serve. And don’t forget to put your own twists on this recipe. Some people add roasted peppers, sun dried tomatoes, and so much more. Don’t be afraid to try new ingredients, herbs, and seasonings. This dish allows you to customize as much as you like.
Most people use a food processor to make this. However, I just chop by hand as I go. Each time I add an ingredient, I mix it into the mixture and continue chopping. By the time I add the last ingredient, my tapenade is chopped to the consistency I want. To see all my techniques for this recipe, here’s a link to a full video.
Last but not least, I decided to omit the bread and instead, serve the tapenade in mushrooms (these mushrooms are fresh, not cooked). It makes for a filling dish that not only tastes fabulous but also good for you. If you omit the anchovies, this dish becomes vegan. If you’ve never worked with mushrooms, watch the video, which I linked above. It will show you tips on working with mushrooms.
Below is the recipe as I like to make it, but feel free to add more or less of each ingredient… if you hate anchovies, don’t use them. If you love capers, use more. Same goes for any of the ingredients listed below. As long as you are using olives as your foundation… you are good!
1 cup of black or green olives 2-3 anchovies 1/4 cup of capers Juice of 1/2 lemon 2 cloves of garlic 1/4 cup of chopped fresh basil 1/4 cup of olive oil 10-12 fresh mushrooms (peeled and cored)
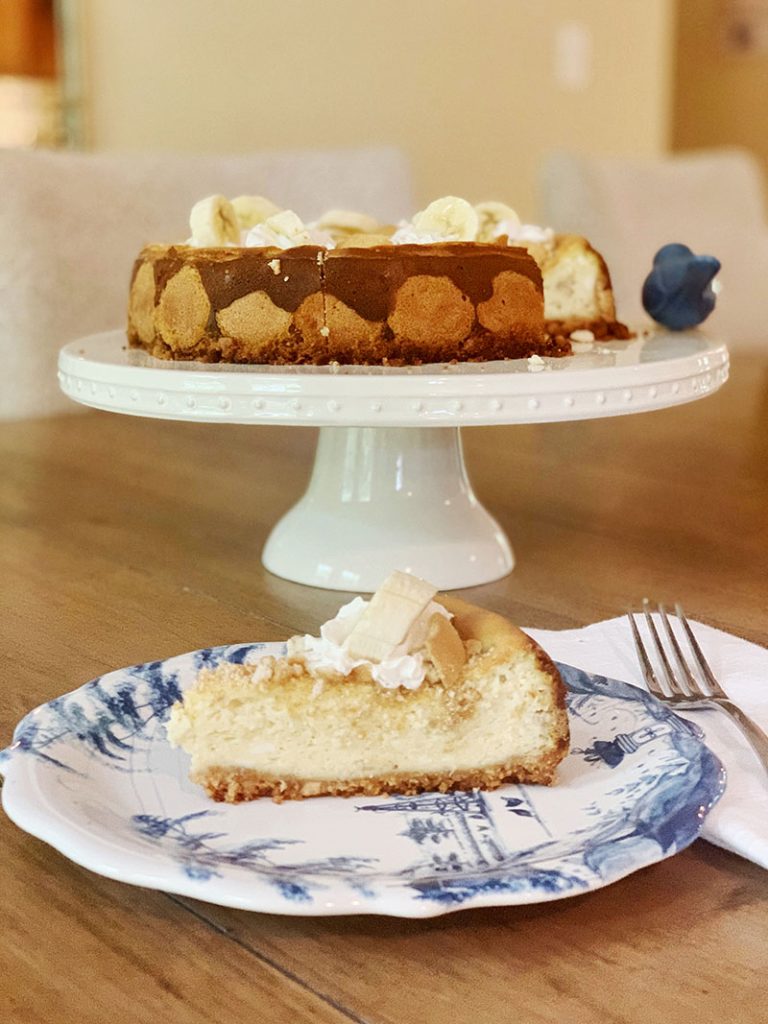
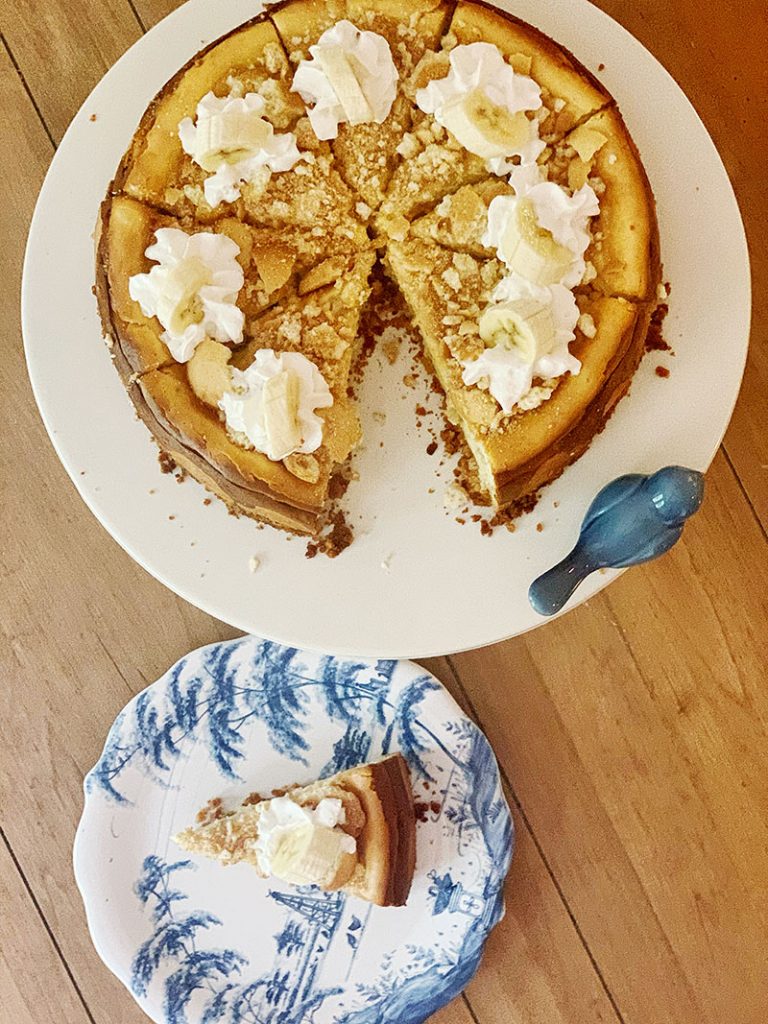
There are few things that get me excited more than cheesecake. It’s one of my favorite guilty pleasures and to be honest, one of the easiest desserts I have ever made. Sure, it takes a bit of time to bake, cool, and set but since I love to prepare most of my party food a day or two prior to the actual party, cheesecakes are the ideal make ahead dessert. And once you’ve figured out the basic techniques, you can go crazy with the flavors with just a few tweaks here and there.
Makes for a beautiful cake.
Best of all, this particular cheesecake is a bit “out of the box” since it incorporates bananas. Plus, it’s so easy to decorate. With a bit of whipped cream (home made or store bought), lemon soaked bananas, and vanilla wafers, you will be able to create a gorgeous dessert without having to be a professional cake decorator.
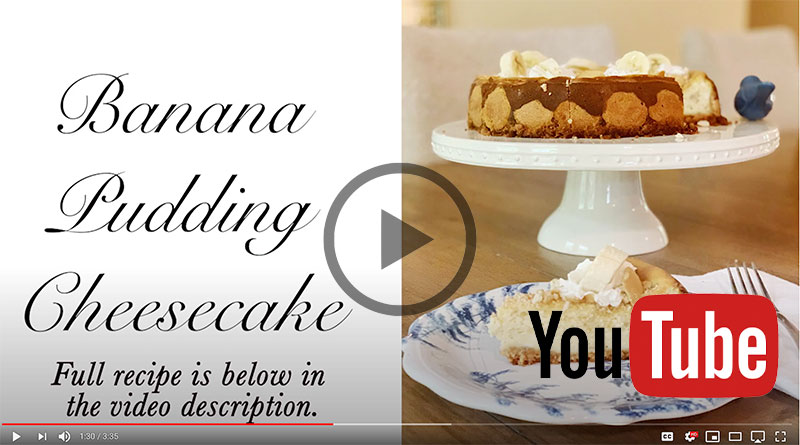
If you are visual, you will enjoy watching my YouTube tutorial where I show you all the preparation techniques. The link is below. Enjoy!
1 1/2 Cups Finely Crushed Vanilla Wafers 1/2 Cups of crushed cashews 1/4 Cup of melted butter 19 Vanilla Wafers (or enough to fit entirely around your springform pan) 3-4 Ripe bananas (diced) Juice of one lemon 2 Tbsp of brown sugar 3 (8-oz) packages of cream cheese, softened 1 Cup of granulated sugar 3 Large eggs 2 tsp of vanilla extract 1/2 cup of crushed/broken vanilla wafers
Garnishes: Sweetened whipped cream, vanilla wafers, sliced bananas tossed in lemon juice
Preheat oven 350 degrees. In a food processor, process vanilla wafers, cashews, and melted butter. Once it is well blended, press mixture onto the bottom of a greased and floured springform pan. Stand 17-19 vanilla wafers around the springform pan, pressing gently into crust to secure. Put the springform pan on a baking sheet (to prevent butter from leaking on to the bottom of your oven) and bake 8-10 minutes. Cool completely for approximately 30 minutes.
Combine bananas and lemon juice in a small sauce-pan. Add brown sugar and cook over medium heat stirring constantly until the sugar has melted into the mixture, approximately 1-2 minutes.
Beat cream cheese at low to medium speed. Make sure your cream cheese is softened since it will help prevent cracks in the cream cheese during the baking process. Once the cream cheese is ready, gradually add eggs, beating until blended. Make sure to add eggs one at a time and wait until each egg has fully blended into the mixture. Add vanilla. Add the cooked banana mixture. Pour batter into the prepared crust.
Bake at 350 (on a baking sheet) for 55-65 minutes or until center is almost set. Remove cheesecake from oven; gently run a knife around the edge of cheesecake to loosen. Let cool for 20-30 minutes then sprinkle the top of cheesecake with crushed wafers. Remove cheesecake from springform pan. Cool completely for an hour. Place in refrigerator, cover, and chill for 8 hours.
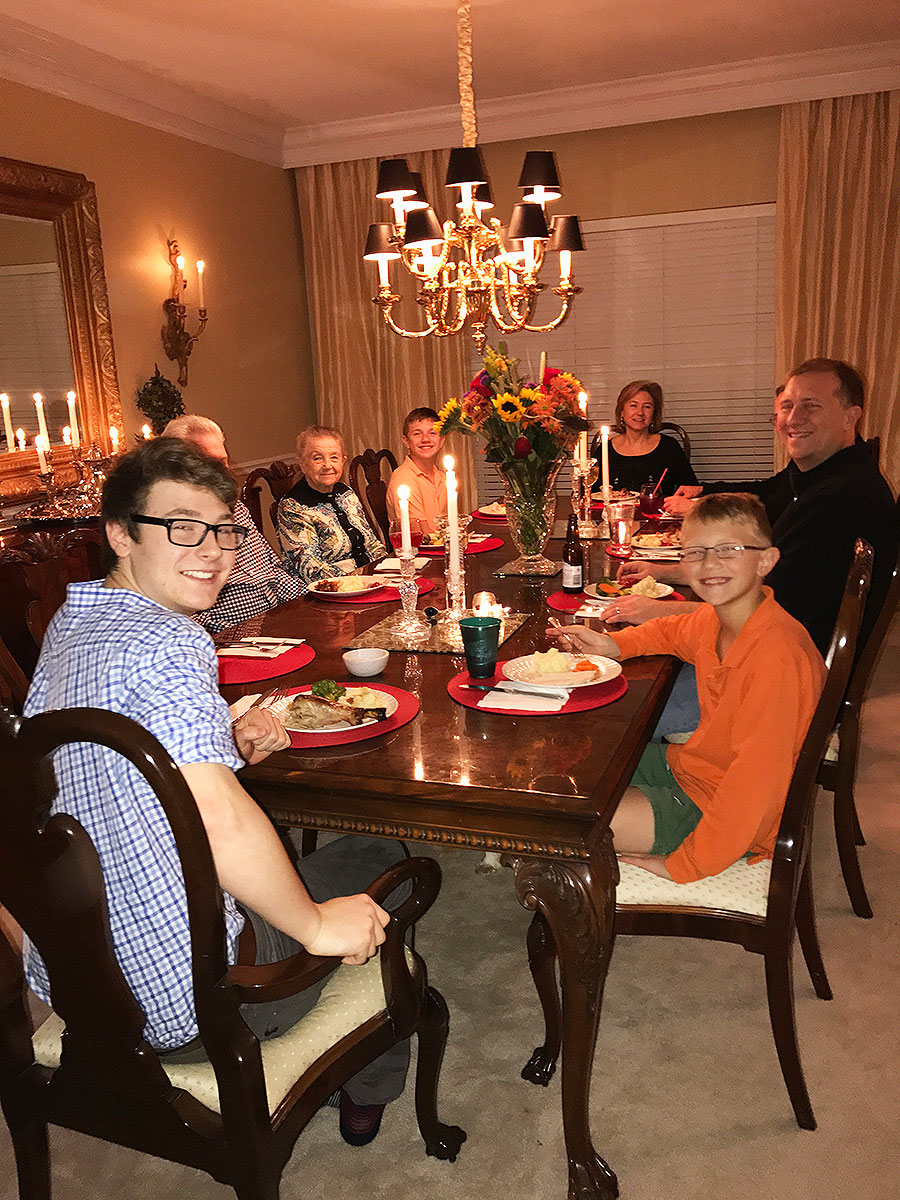
Each year, my sister Anna, volunteers to host Thanksgiving and our family gathers at her home to celebrate the holiday. Anna is a wonderful hostess, I’ve said this many times. She and I are always stealing each other’s ideas and recipes. Unlike me, Anna does things very simply with a relaxed feel but always seems to WOW her guests. She never seems to stress over the details. Even the few times she’s asked me for help, Anna always seems relaxed and at ease while I’m running around stressing over pretty much everything. Nevertheless, we always seem to pull off a great party and when working together, we make a good team.
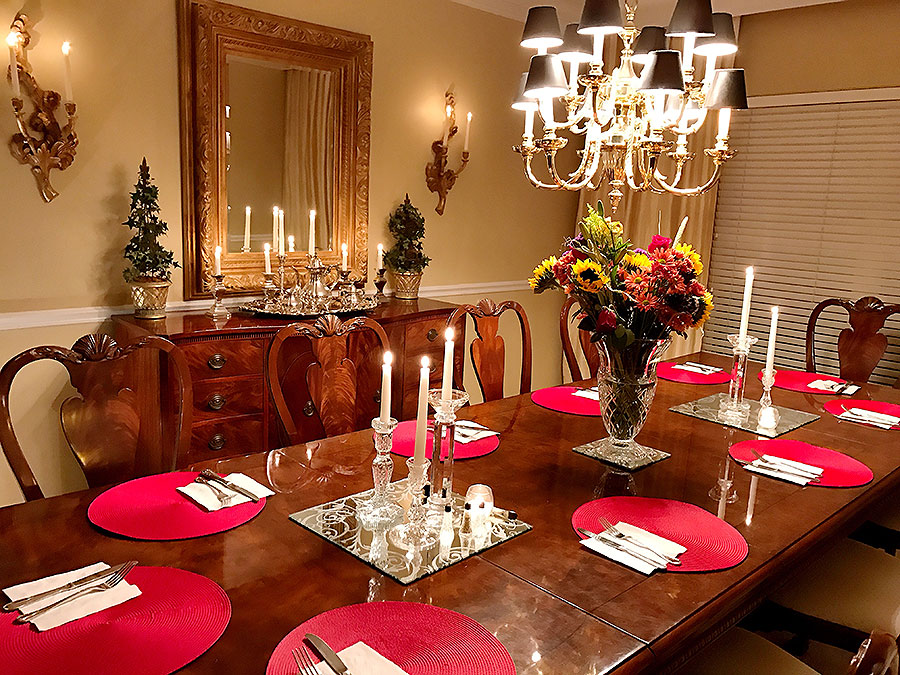
During this particular celebration, her table was simple with red placemats and a bouquet of fresh flowers. However, she added candlelight as her main decor element, creating a soft, warm, and quiet atmosphere. She used different style and height crystal candleholders which were set on mirror tiles to reflect the light. She also placed some candles in her silver candleholders on the back buffet. Last but not least, she added some votives to bring various levels of height. It looked so beautiful.
Candlelight Everywhere
This look was very minimal but definitely brought the WOW factor.
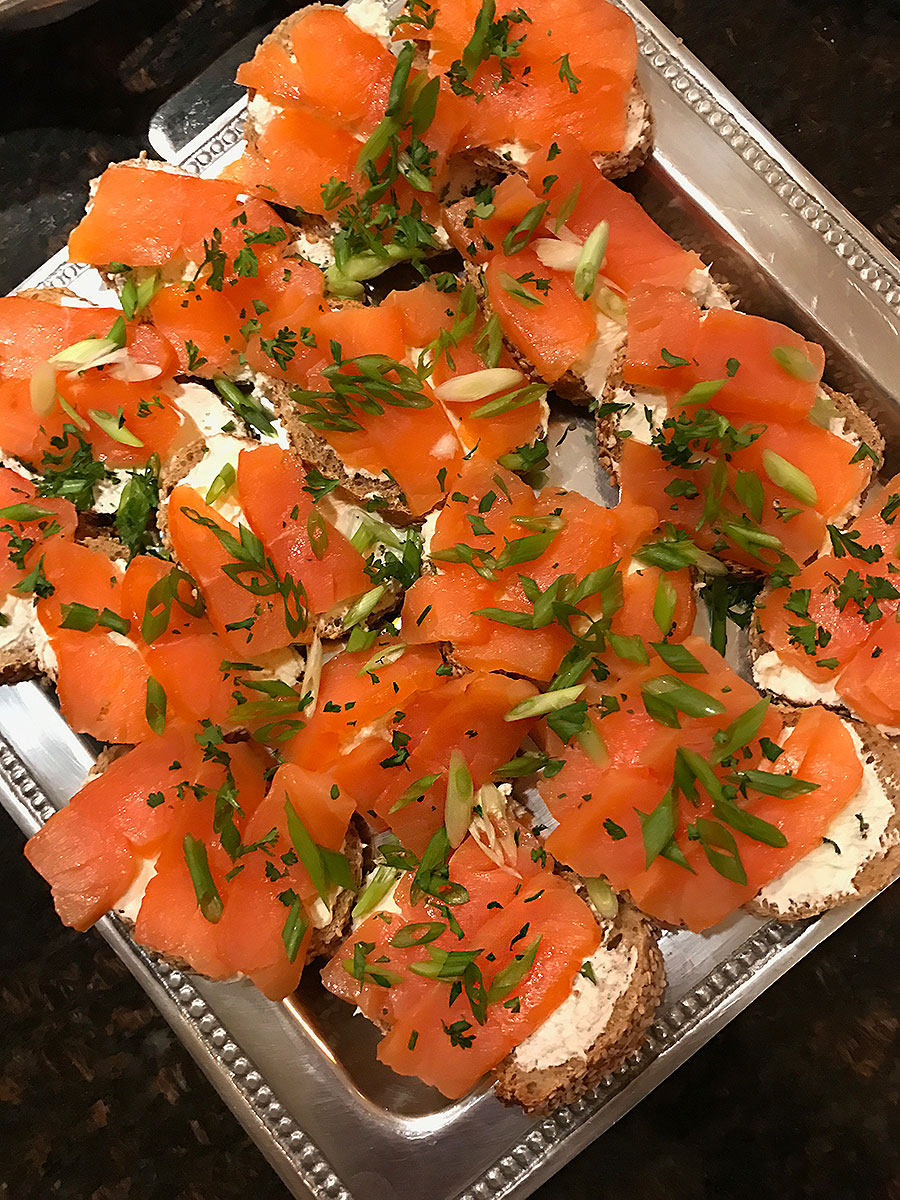
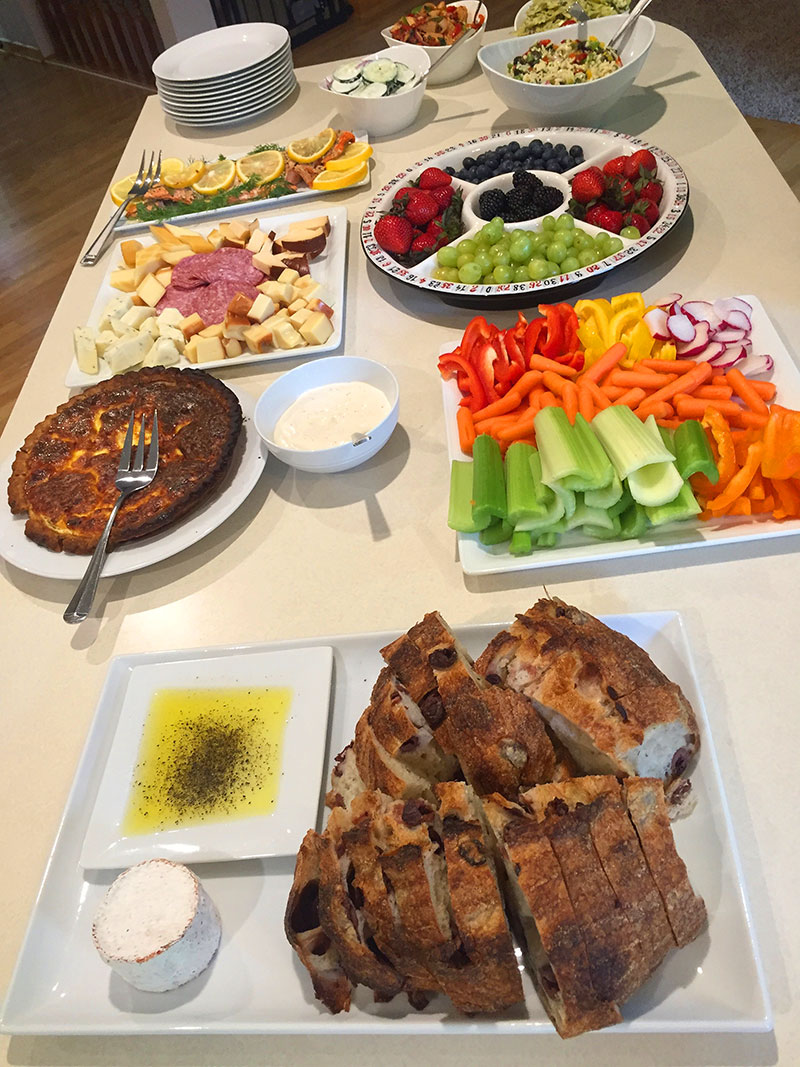
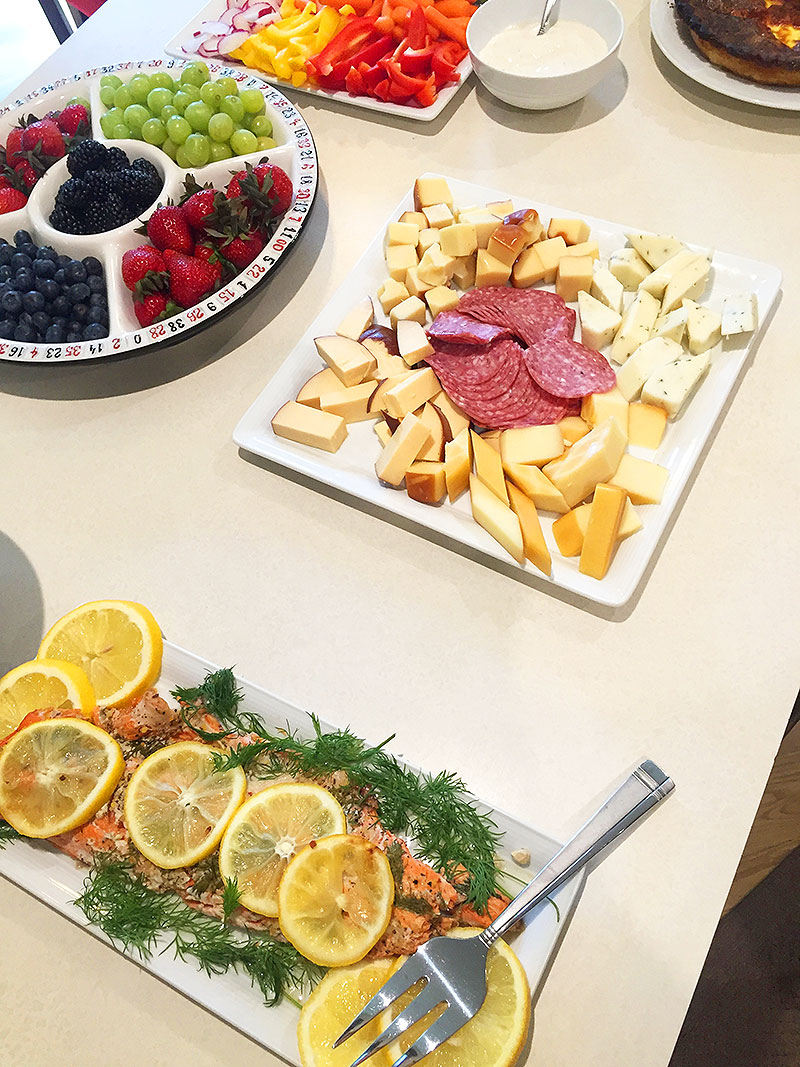
Smoked Salmon Appetizers
It’s no secret, our family is ALL ABOUT THE APPETIZERS… Anna always prepares a wonderful appetizer spread that is easy and festive. Above are the smoked salmon appetizers which she serves at practically every function. They are served on small pieces of bread, smothered in plain cream cheese and topped off with a generous slice of smoked salmon. She finishes by sprinkling green onion on top and watches them disappear off the plate in a matter of minutes.
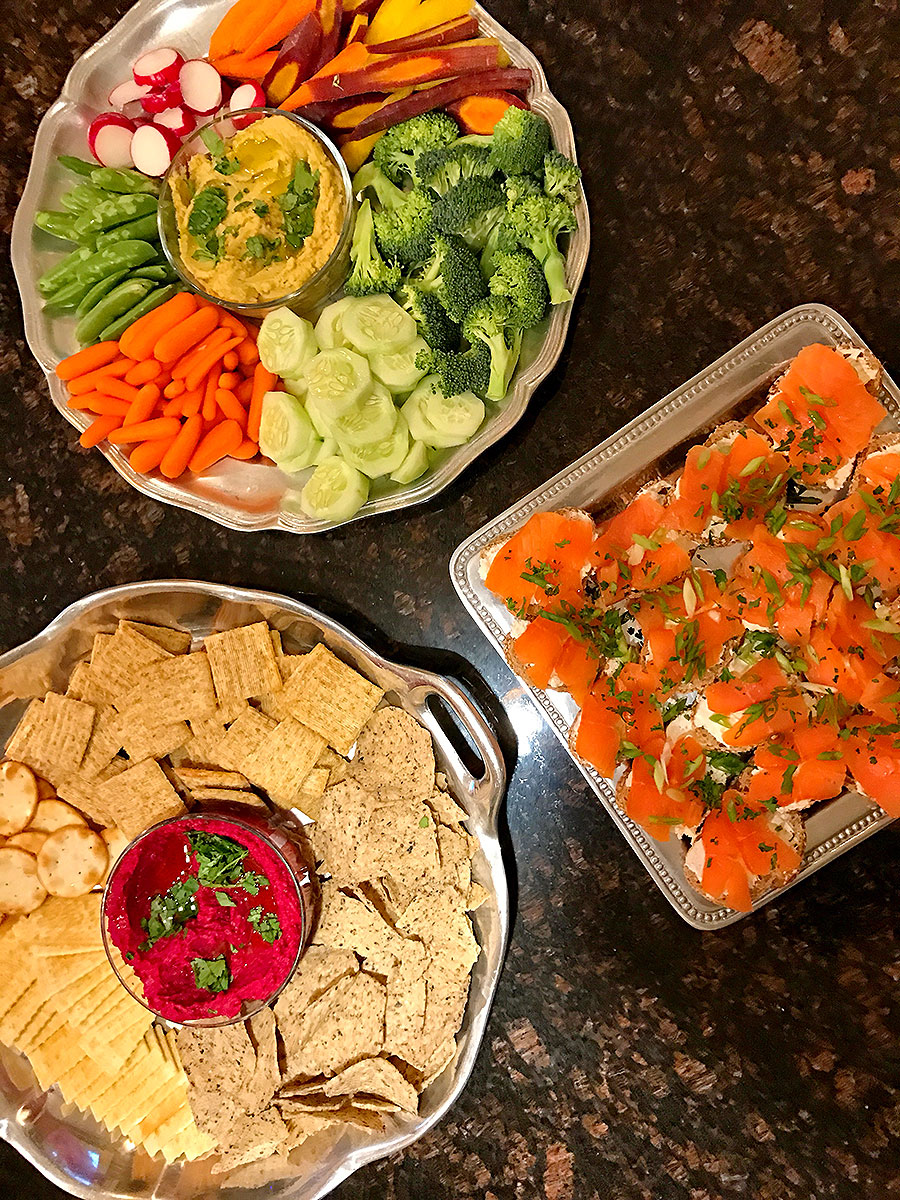
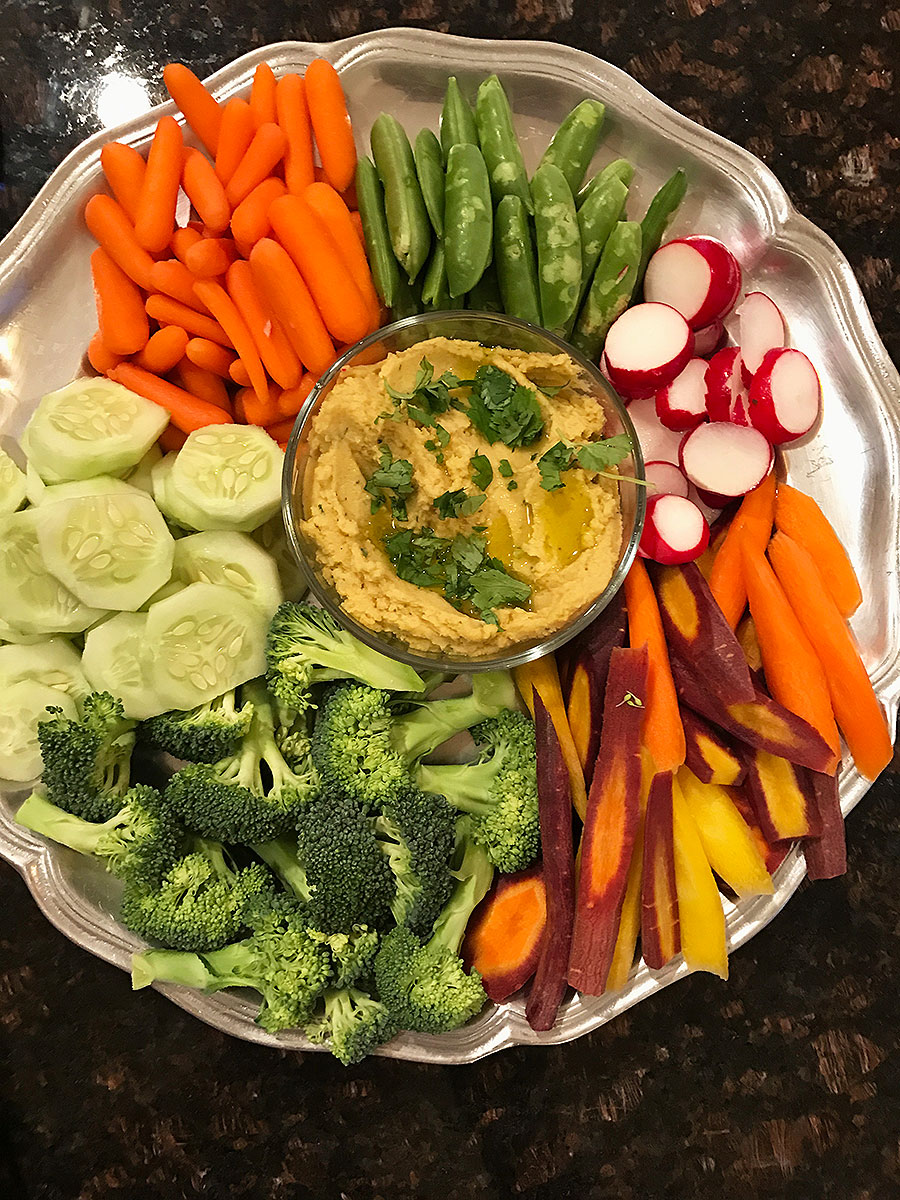
Veggie Plate and Hummus Dip
I’m always in charge of the veggie plates and dip.
Veggie Plate and Basil Hummus
This veggie plate featured my favorite basil hummus which I make for practically EVERY occasion.
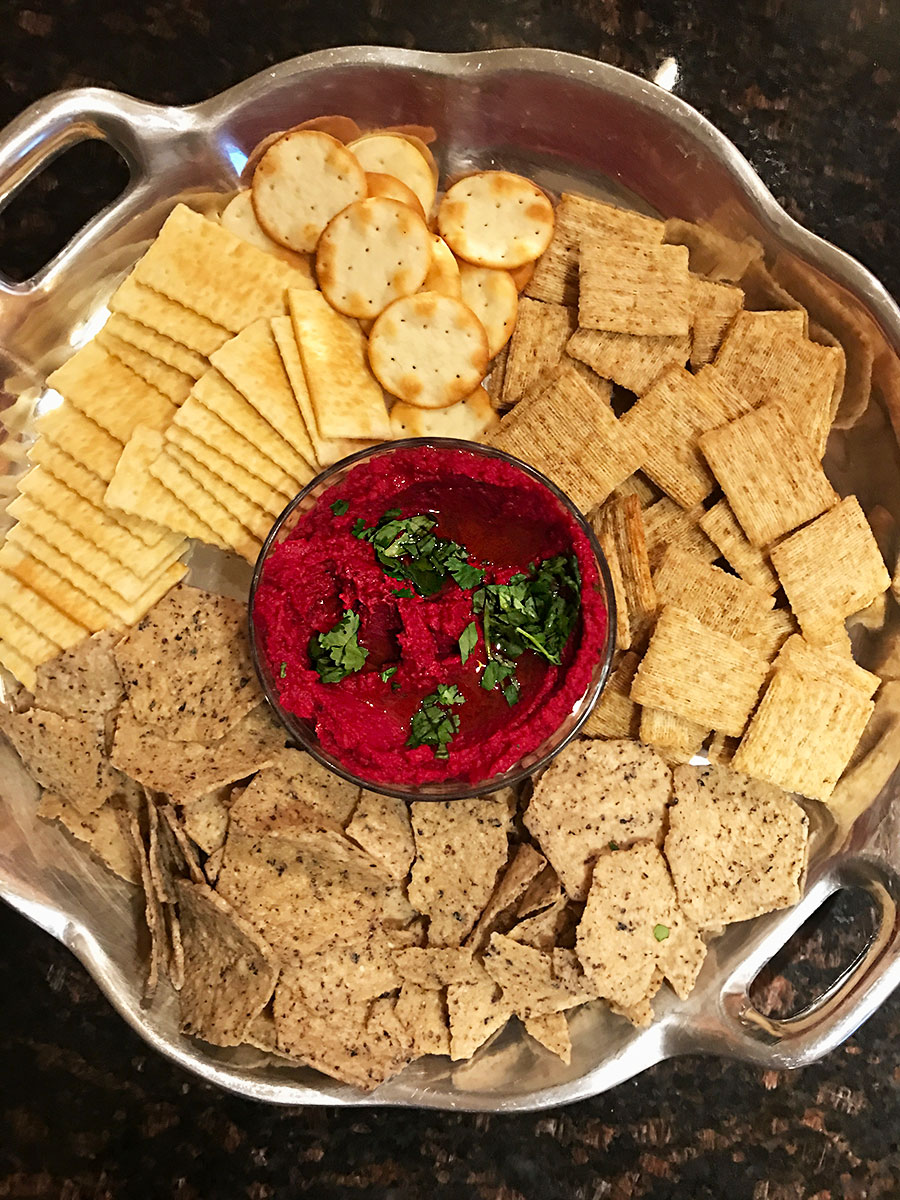
I also love bringing my beet hummus which adds a vibrant color to an otherwise boring cracker bowl.
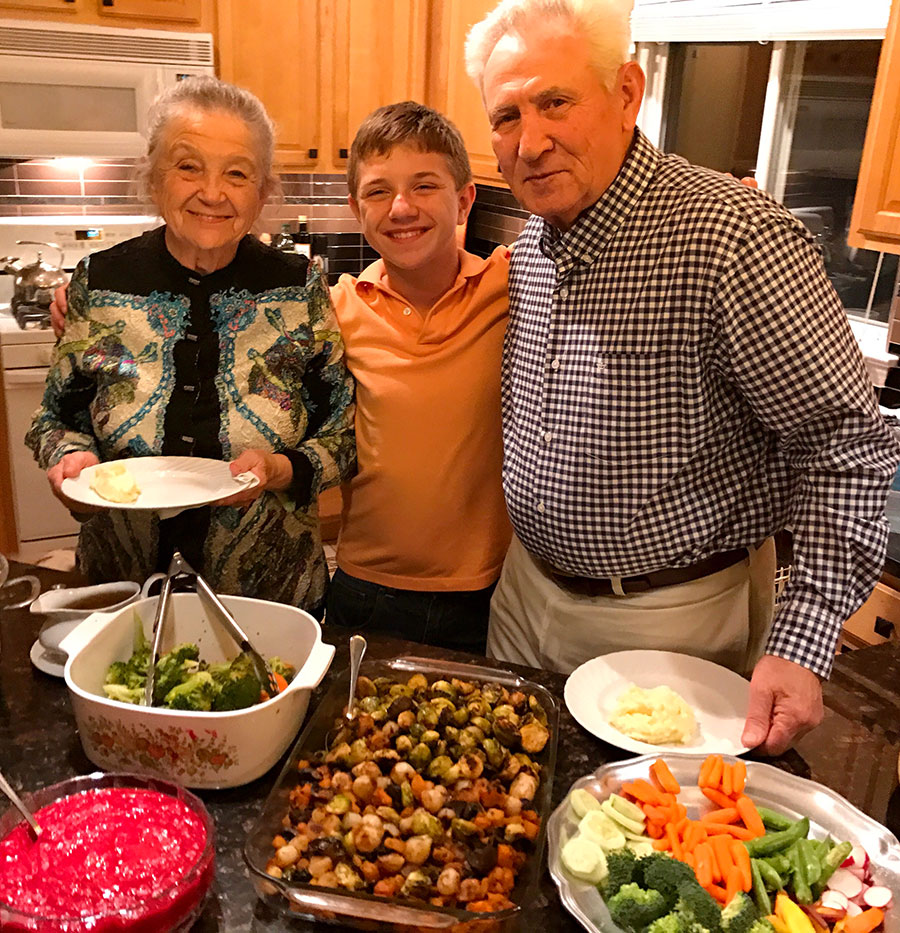
The dinner is typically traditional with turkey, cranberry source, her famous mixed roasted vegetables, and of course, mashed potatoes. Here’s my son and my parents enjoying her delicious buffet.
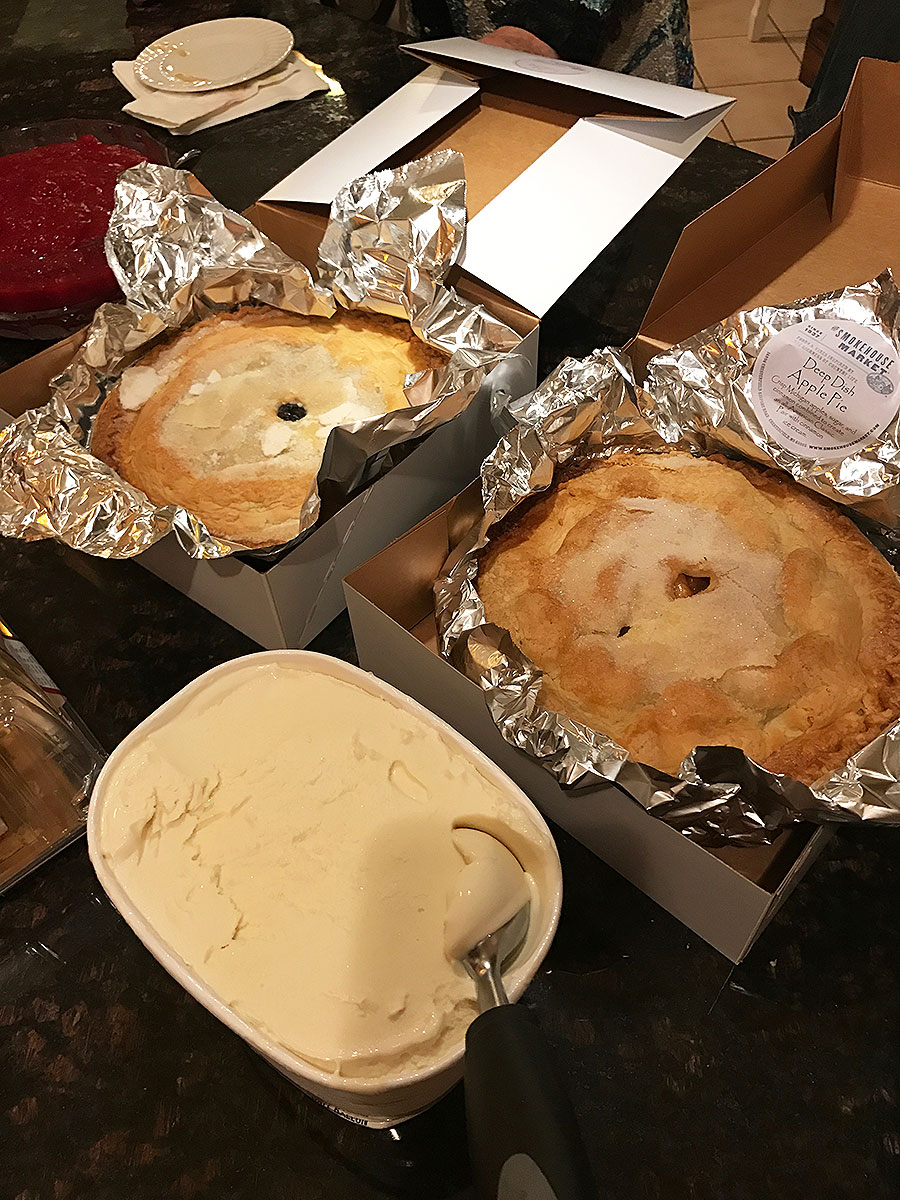
Last but not least, the dessert always comes from The Smoke House Market, which is a wonderful store in Chesterfield, Missouri. It is affiliated with Annie Gunns, which is a famous steak house in St. Louis, and sells many of their freshly prepared food creations. Their pies are in HIGH DEMAND during the holidays and since my niece worked there, we always had fresh pies for Thanksgiving… with a bit of vanilla ice cream on top.
All in all, my sister does a fantastic job with Thanksgiving. And I’m alway impressed with how beautifully and seamlessly she executes this annual celebration.
Recently, I attended a SPOOKY book club which was beautifully organized by a mom from our school. “How did you do all this, Mini”, everyone asked. Mini wasn’t secretive about how she was able to create such a fabulous buffet while being a working mom…. she outsourced everything!
As a hostess who loves to outsource myself, I always keep an eye out for great places to contact when I am throwing my own shindig. Mini contacted Straub’s, which is a local supermarket that specializes in gourmet food. The book we discussed was Educated by Tara Westover, which is a wonderful book… I highly recommend it! But I have to admit, the highlight to my evening was the beautiful way Mini entertained her room full of guests and the delicious accompaniments to the wonderful book discussion.
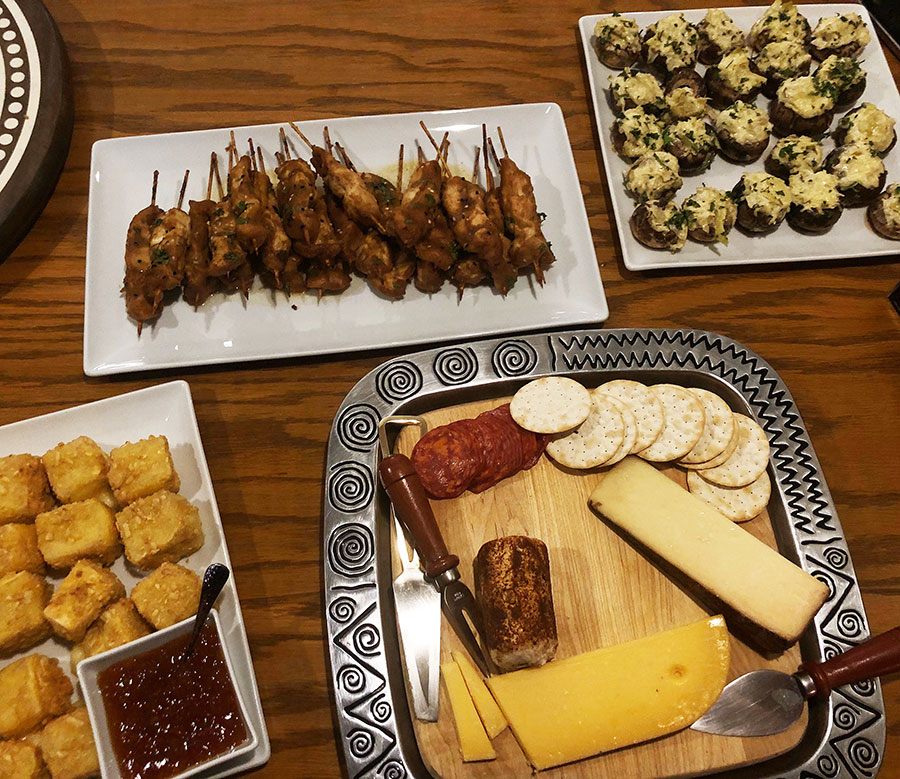
I loved the stuffed mushrooms and the melted cheese with chutney. The chicken skewers were also easy to eat and delicious. However, my favorite part of the appetizer buffet was the Bloody Eye Punch. It was a mixture of juices topped of with a little champagne.
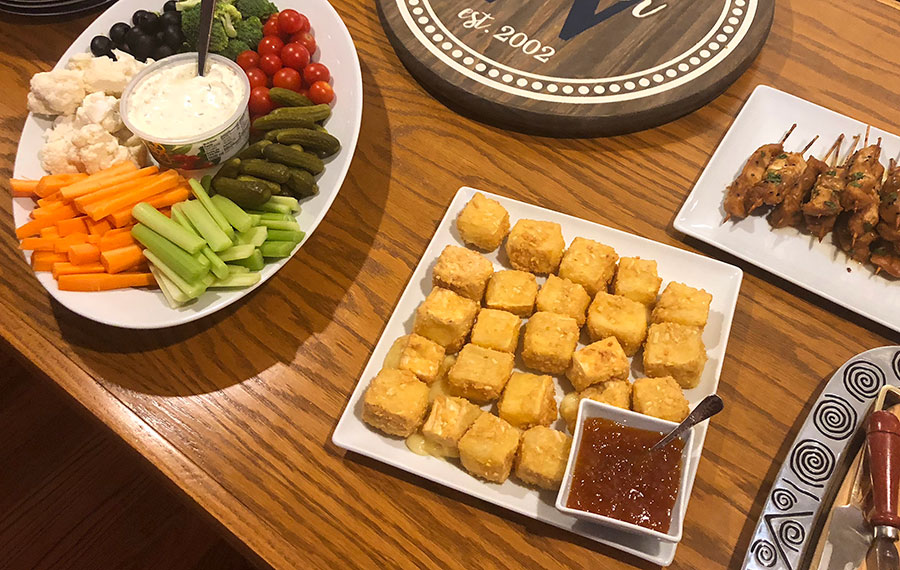
Robin’s beautiful Girls Game Night Buffet filled with a variety of food items to accommodate various dietary options.
I treat invitations to parties a lot like invitations to dance, I NEVER SAY NO! Unless we have a conflict that evening or we’re out of town, I try my best to attend, bring something delicious, and have a fabulous time. However, there are caveats. Brace yourselves, I’m about to share something crazy… I’m not a big fan of game nights… there… I said it! Most people love game nights, but I’m a bit more complicated than most people, especially if the host does not want to disclose what game we’re playing… I guess you can call me a bit of a control freak!
But recently, a friend of mine sent me an invitation to her Girls Game Night. As I always do, I asked “What can I bring?”. She asked me to bring a fruit platter and my mind was immediately at ease because at that moment I knew… FOOD WILL BE SERVED!!
Party food is my weakness, I will show up practically anywhere to partake in delicious party fare. I love seeing what hosts have put together in order to impress their guests or what menu they feel is relevant to their occasion. Yes folks, this is my passion. I especially love appetizers. You can even ask our friends. If you expect my family to come over for dinner, brace yourselves because we will clean off all your appetizer plates, my children included. I’m sure we are breaking some or even ALL the rules of being a good guest, but that’s just the way we are. We may take a few bites from your dinner buffet, but your appetizer set up will disappear! This goes the same when you come to our house for dinner. Most guests are shocked at how many appetizers we put out and truth be told, if we could JUST serve appetizers, we would! So, when I was invited to a party where I knew most of the food will be appetizers (like a game night), there was NO WAY I was going to miss out on that! Plus, Robin is one of those stealth hostesses. She never talks about entertaining, but come to one of her parties, you will be amazed at how she entertains like a pro!
Robin’s Girls Game Night was fabulous. First of all, I have to give her credit, she knew her guest list well. This all female group was sure to have some dietary restrictions. Carb free, gluten sensitivities, vegetarian, and we’re just talking about ME. But there were also guests who just wanted to eat healthy and avoid red meat. Yet again, Robin handled everything like a pro.
Here are the five tips I learned from her party.
DON’T OMIT THE CARBS! Unless you know that every person you are inviting is on a carb-free plan, don’t forget to set a few delicious carbohydrates on the buffet. They help fill people up, plus… they are delicious!
Robin’s beautiful Girls Game Night Buffet filled with a variety of food items to accommodate various dietary options.
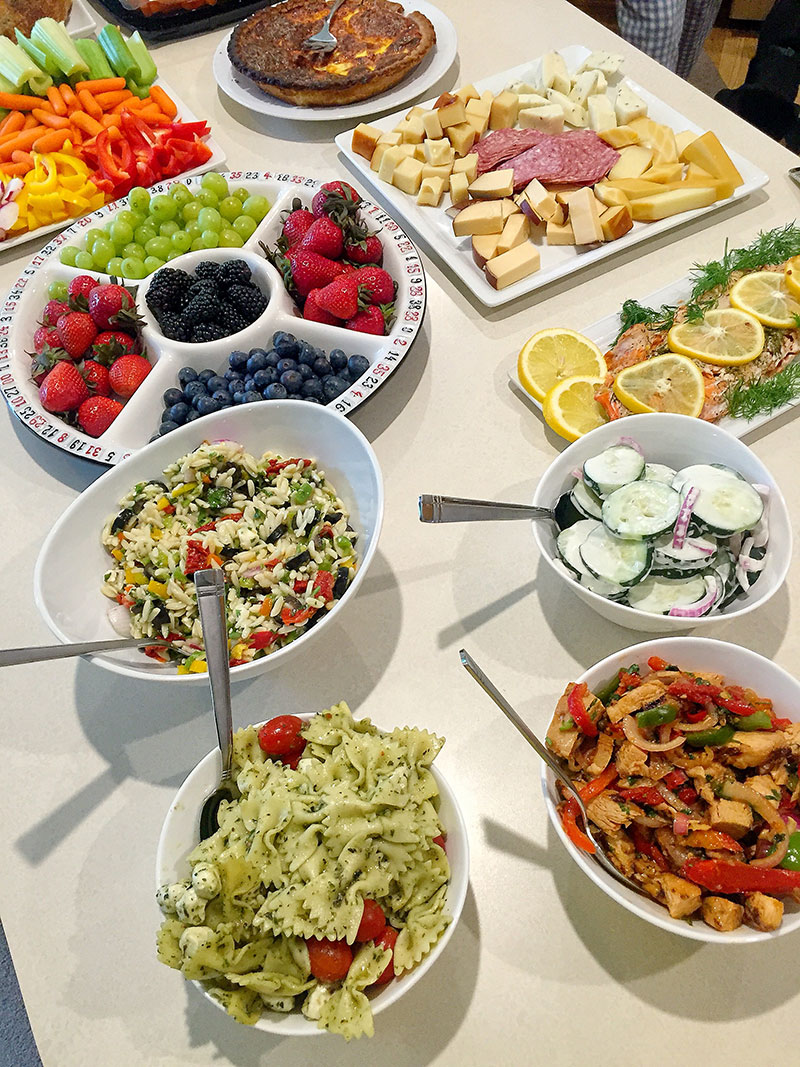
2. CONSIDER AN INTERESTING SELECTION OF SALADS. Salad for a game night? Yes, especially when you want to keep it healthy. I’m not a big fan of just finger food on game night, simply because I hate having to clean my game board or game pieces of powdered cheese or red sauce. I’ve read on various blogs that if you can’t eat it with your fingers or a stick, the food item should not be served on game night. I disagree! Having food items which can be eaten with a fork is totally OK. In fact, it gives people the opportunity to take a break, step away from the game table and serve themselves. I loved Robin’s idea of serving pasta, cucumber, and Mediterranean style salads.
Girl’s Game Night Buffet… loved the fruit and vegetable platters. A must at any party!
3. VEGGIE + FRUIT PLATTER ARE ALWAYS WELCOMED. No matter the guest list, a fruit and vegetable platter is a must. These platters can accommodate any guest and bring beautiful color to the table.
4. CHEESE, CHEESE, CHEESE. This is another great platter to incorporate into any game night buffet. It appeals to the low-carb guest and it’s wonderful accompanied with a complementary wine, if you are planning on serving alcohol.
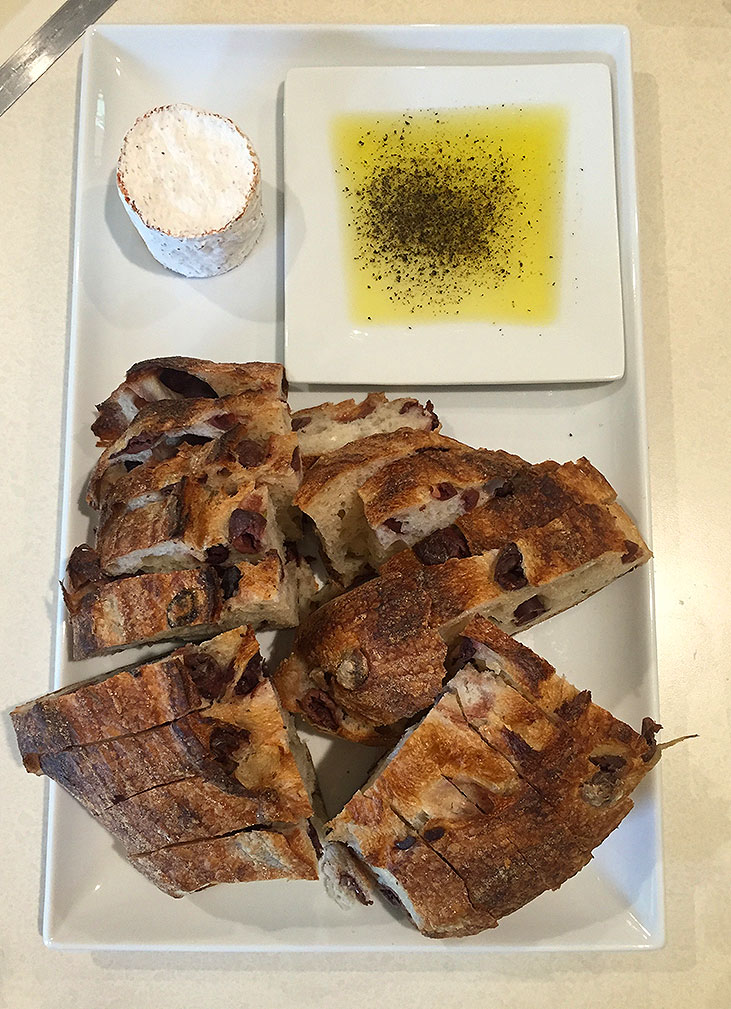
5. SURPRISE YOUR GUESTS WITH SOMETHING UNIQUE. There’s a significant difference between a girls game night and a super bowl party! You don’t have to think potato skins, chicken wings, pigs in a blanket, meatballs, or the many expected dishes during a sports game night. Women love to be surprised with a unique and healthy dish, something they may even try to prepare on their own in the future. Robin served salmon which paired wonderfully with the hand-crafted olive bread, salads, and vegetables. The presentation was so beautiful and the salmon disappeared! We all wanted the recipe!
I am ending 31 Days of Halloween off with a BANG!! This healthy veggie platter was a hit at a recent party I attended. It was fun and funny! And best of all… HEALTHY!!! Happy Halloween Everyone!
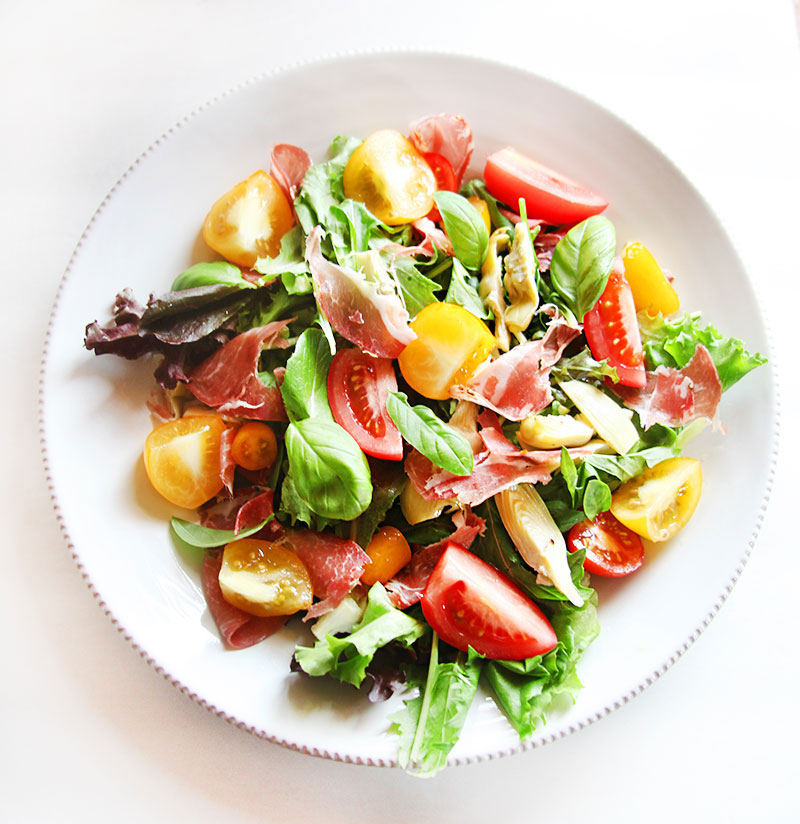
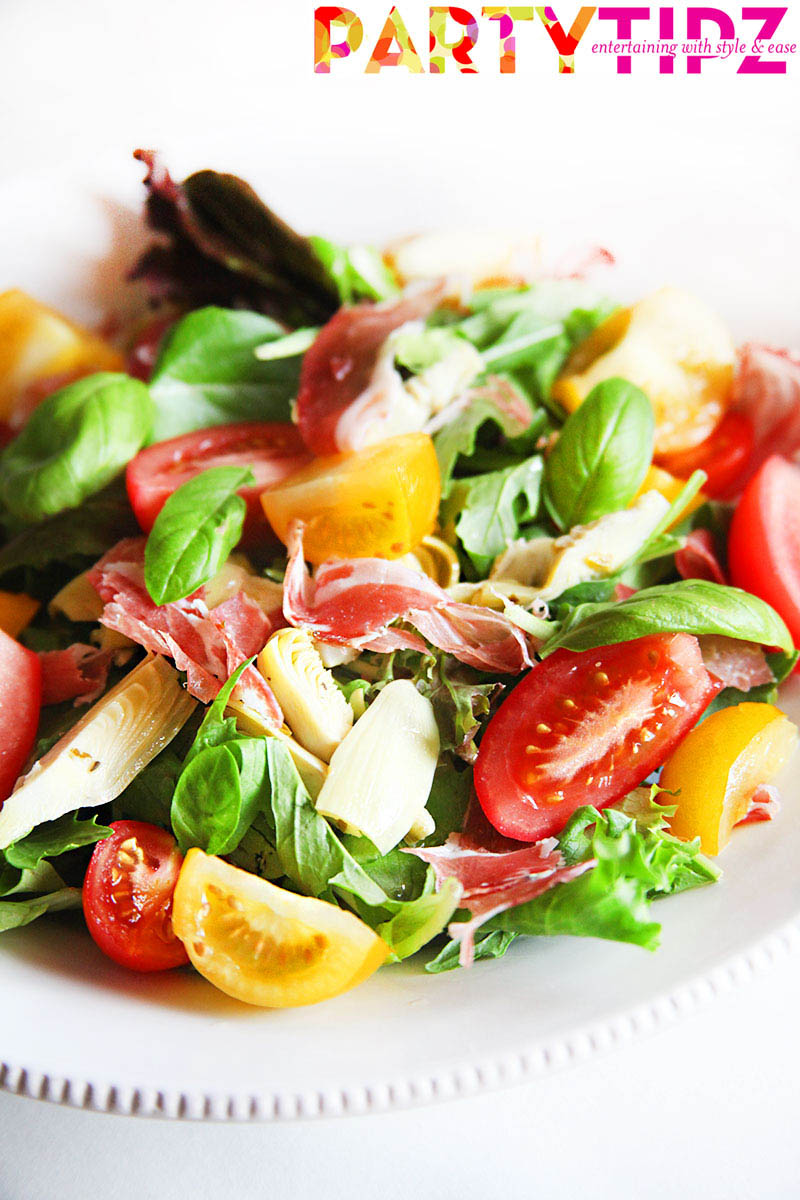
Delicious and unique! This salad is a great treat for brunch, lunch, or dinner!
Ingredients
1 can/jar Marinated Artichoke Hearts
4 small tomatoes (yellow, red, or both)
2 oz Prosciutto
1 large handful of basil leaves
1-2 cups Mixed greens
Dressing
3 tbsp Extra virgin olive oil
1 tbsp white wine vinegar
1 garlic clove crushed
1/2 tsp mild mustard
1 tsp honey
salt and pepper to taste
Preparation
Thoroughly drain and cut the artichoke hearts into quarters and place in a serving bowl. Cut the tomatoes into wedges and cut prosciutto into thin strips. Place a bed of greens in a bowl and add the tomatoes, artichokes and prosciutto. Keeping a few basil springs whole for garnishing, tear the remainder of the leaves into small pieces and add to the bowl containing the other salad ingredients.To make dressing, place all the ingredients in a screw top jar and shake vigorously until they are well blended. Pour over salad, garnish with basil and enjoy with crusty bread!
This salad is perfect for anytime. It is bursting with flavor and a treat for anyone who likes a salad bidding to be a meal!
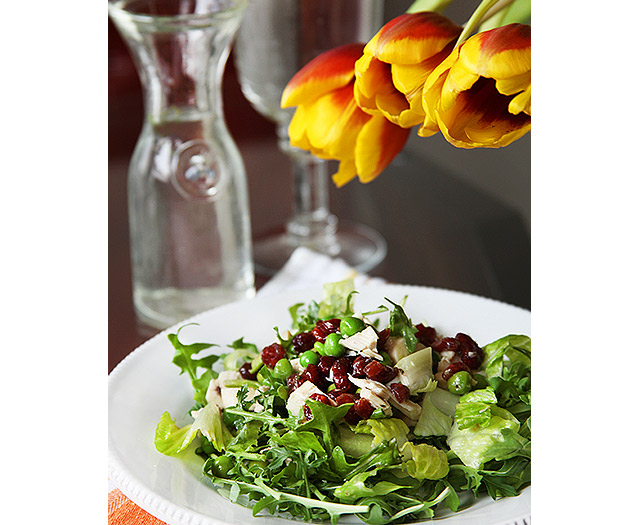
Ingredients
1 medium smoked chicken (available at any grocery store)
1 cup dried cranberries
1 cup frozen peas
2 ripe avocados
1 lemon
1 head lettuce
1 bag arugula
To Make Dressing
3 tbsp olive oil
2 tbsp walnut oil
3 tbsp lemon juice
2 tbsp fresh mixed herbs (a mixture of fresh herbs such as parsley, lemon thyme, mint, etc.)
Salt and Pepper
Preparation
Divide and carve the chicken cutting to make bite sized pieces for the salad. Cover the divided and cut chicken and store in refrigerator.Put the cranberries in a bowl of water and let stand, covered, for 30-45 minutes.
Meanwhile, blanche the frozen peas and refresh them under cold water.
Slice or cube the avocados and squeeze lemon juice on them to prevent discoloration.
Combine the lettuce and arugula and toss with avocados and peas. Add the chicken.
Combine all the dressing ingredients and shake well. Add salt and pepper to taste and shake well again until all the ingredients are well blended and taste the way you want.
Drain the cranberries and mix them with the dressing, then pour over salad and serve immediately.
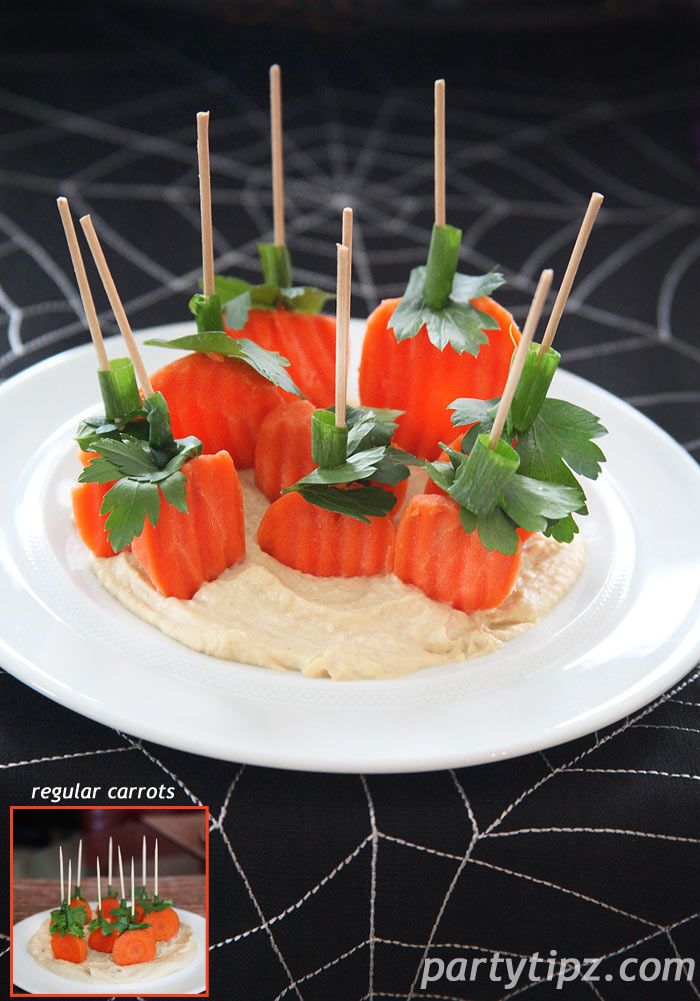
Seriously, how can you not fall in love with this great idea for an appetizer? It’s easy to put together and fun for guests to nibble on. All you need are carrots, parsley, green onion, toothpicks, and hummus.
A few years ago I posted this recipe (on the bottom left) but then realized that you can use pre-cut and bagged carrots (main image) instead of cutting them yourself. Best part? The pre-cut and bagged carrots have ridges and are different shapes, a lot like pumpkins. Still yummy but now you can save a step and not have cut the carrots!!!!
Ingredients
1 pkg Hummus
2 carrots
1 green onion
1 bunch fresh parsley
toothpicks
Preparation
Just slice the carrots, take some parsley leaves and attach them to the carrot with a toothpick. Slide a piece of green onion over the toothpick to have a look of a stem and arrange on a bed of hummus. Told ya it was simple! Thanks to the folks at Disney magazine for inspiring me with this recipe.