February 26th, 2013
I love stores that have beautiful displays… such as Pottery Barn, William Sonoma, Mary Tuttle’s, and a few other local boutique. It seems like very few stores offer inspirational displays anymore. So, when I walk into a store and see stunning inspiration… my camera quickly pops out! Here are some photos which I took last week at Pottery Barn, Pottery Barn Kids, and Mary Tuttle’s.
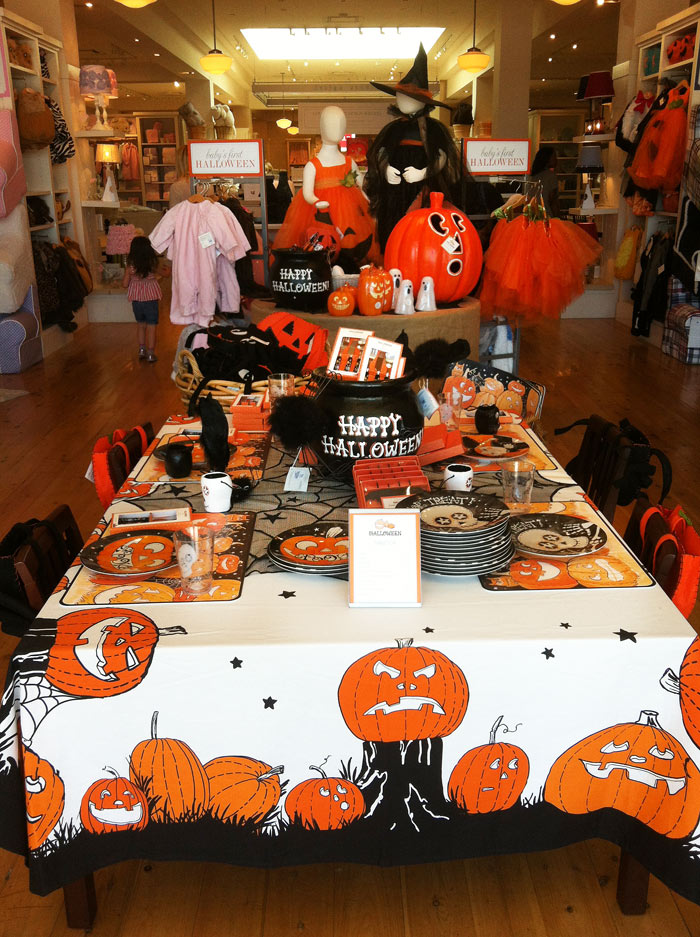
Adorable Children’s Table at Pottery Barn Kids
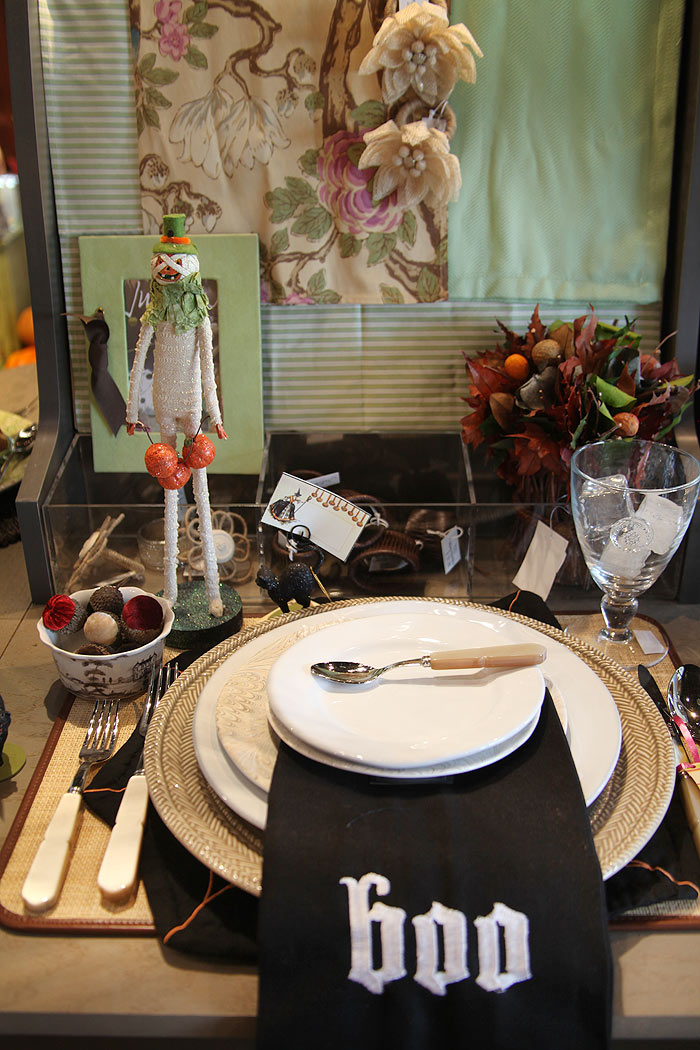
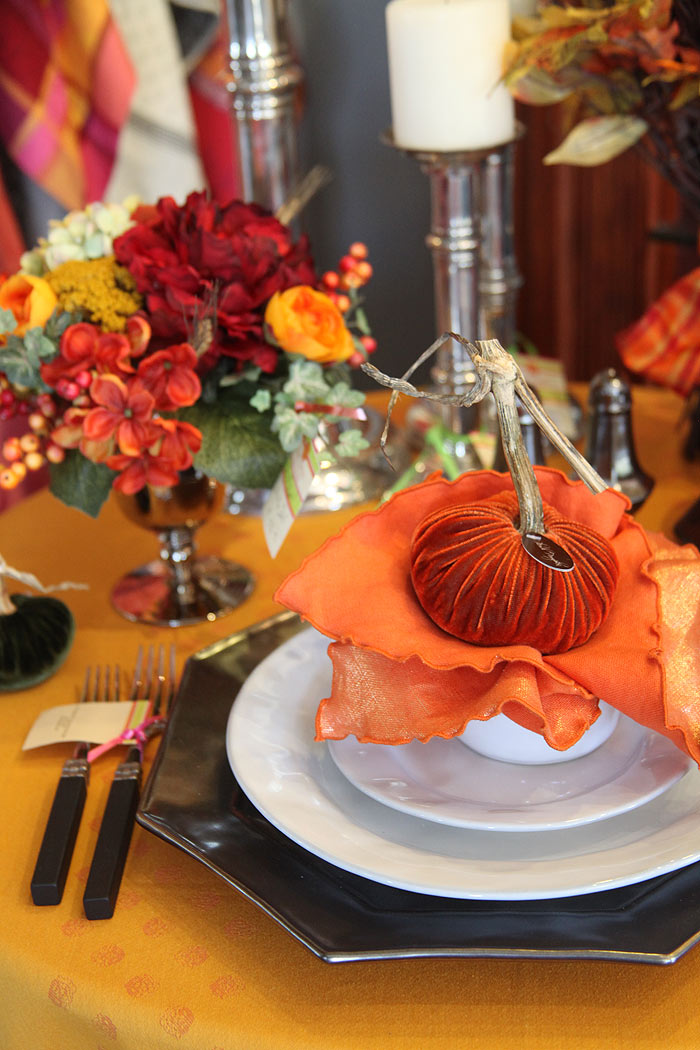
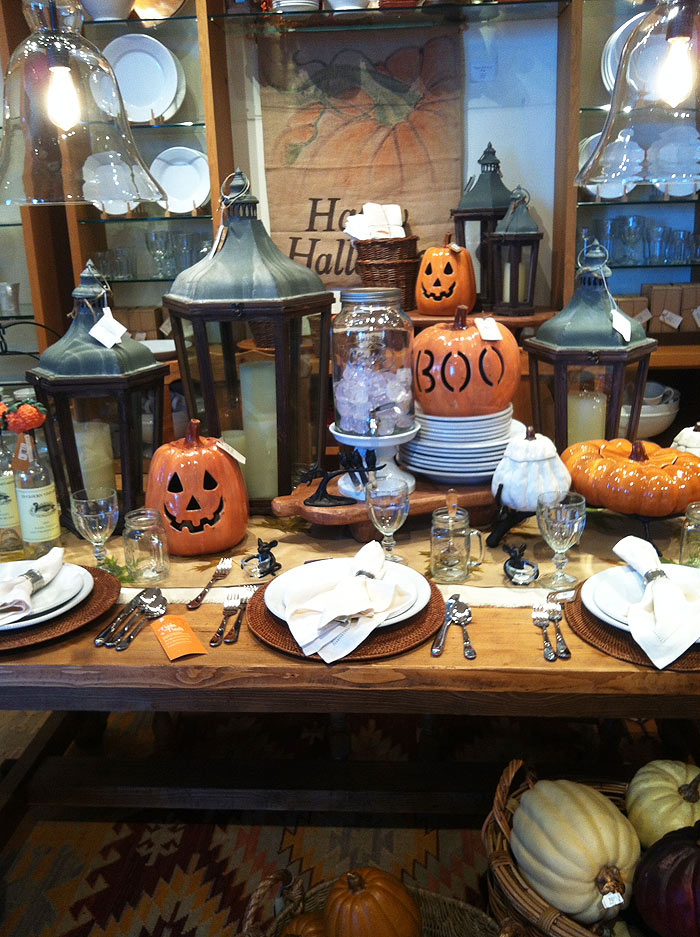
Gorgeous Halloween placesetting with Juliska plates and cute “boo” napkins – Mary Tuttle’s
I love this armoire display… would love to do this in the kitchen and create different displays based on season – Mary Tuttle’s

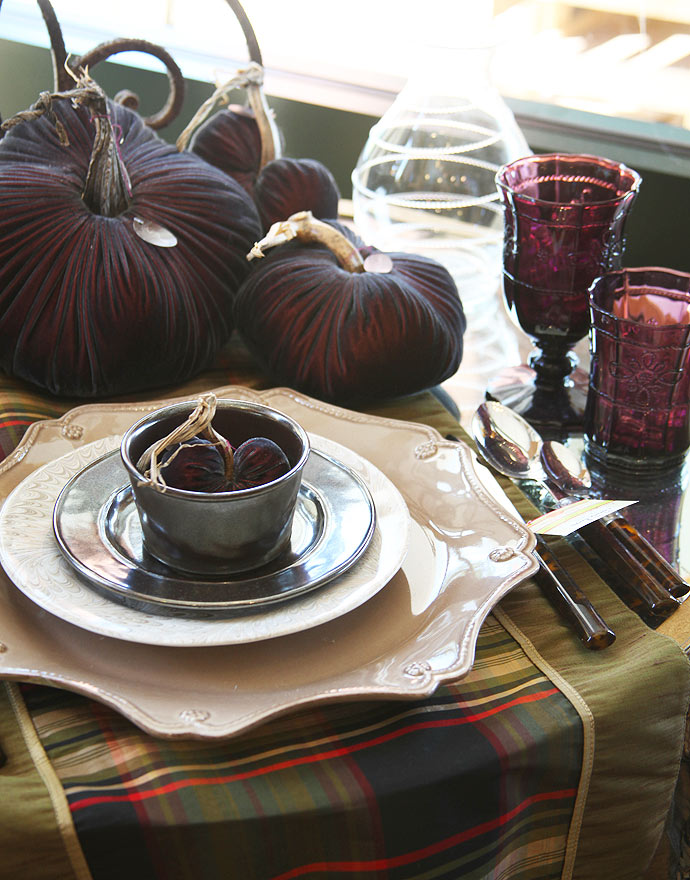
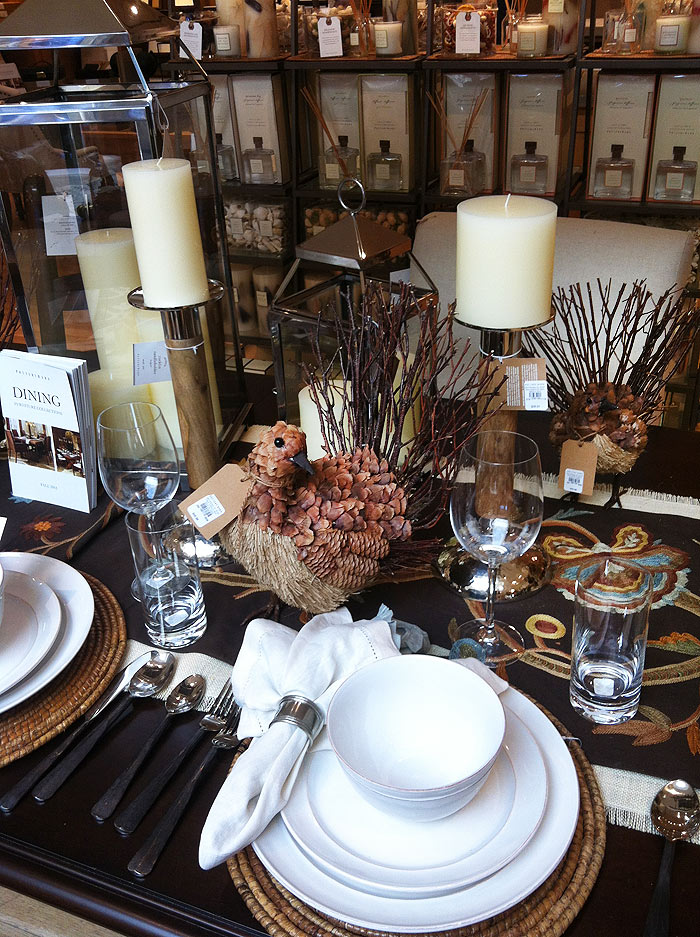
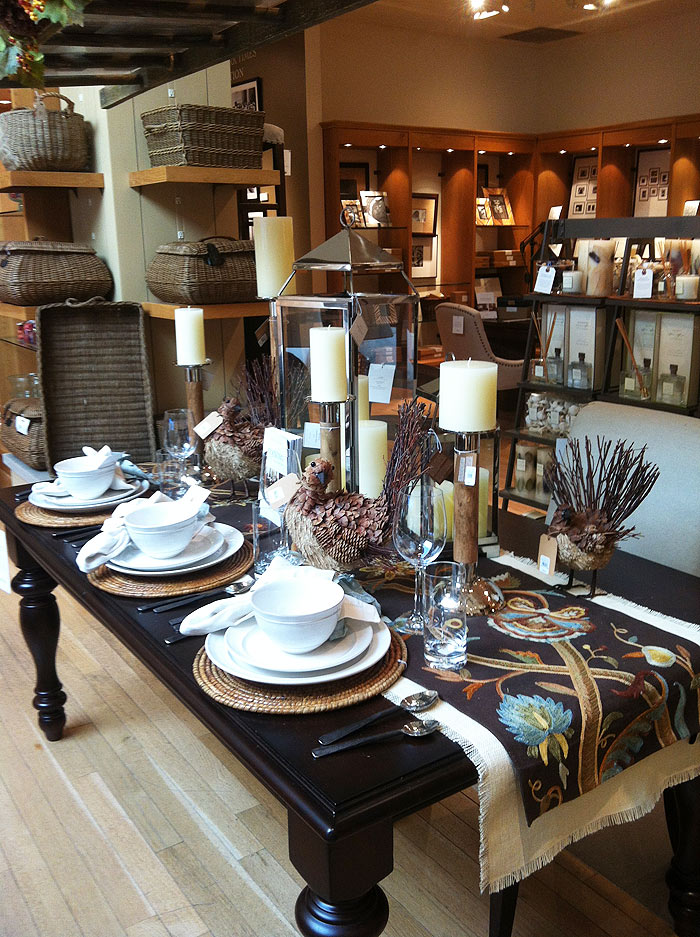
I love this color combination of gray (platinum), light tan, and plum… Mary Tuttle’s
What a dramatic plate cover!! Mary Tuttle’s
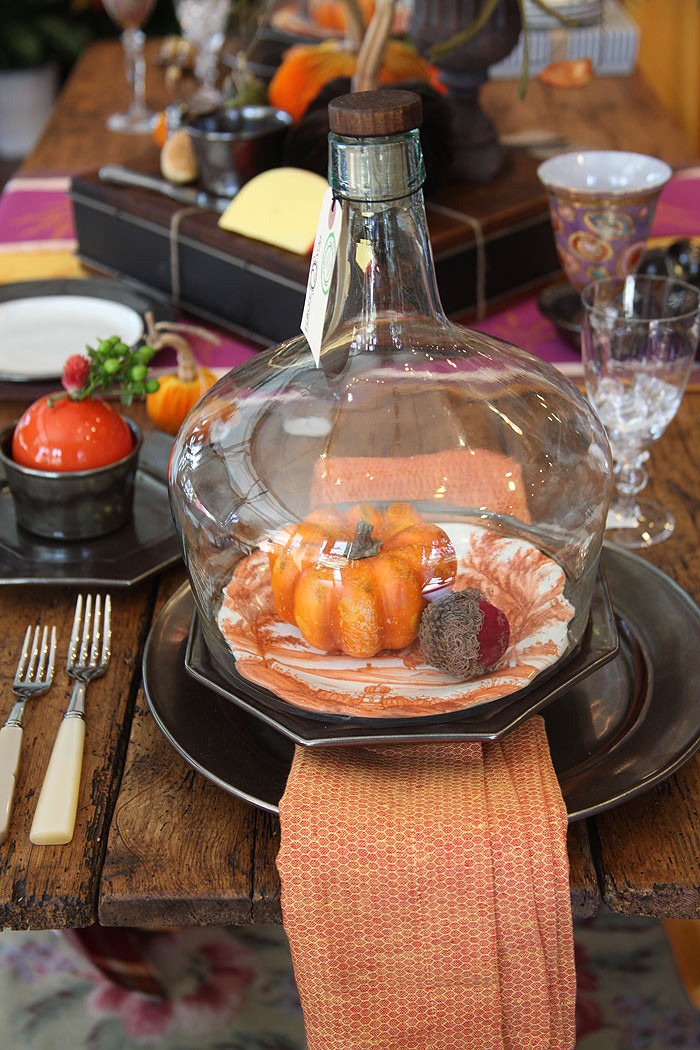
Love, love, love all these fall colors together! Mary Tuttle’s
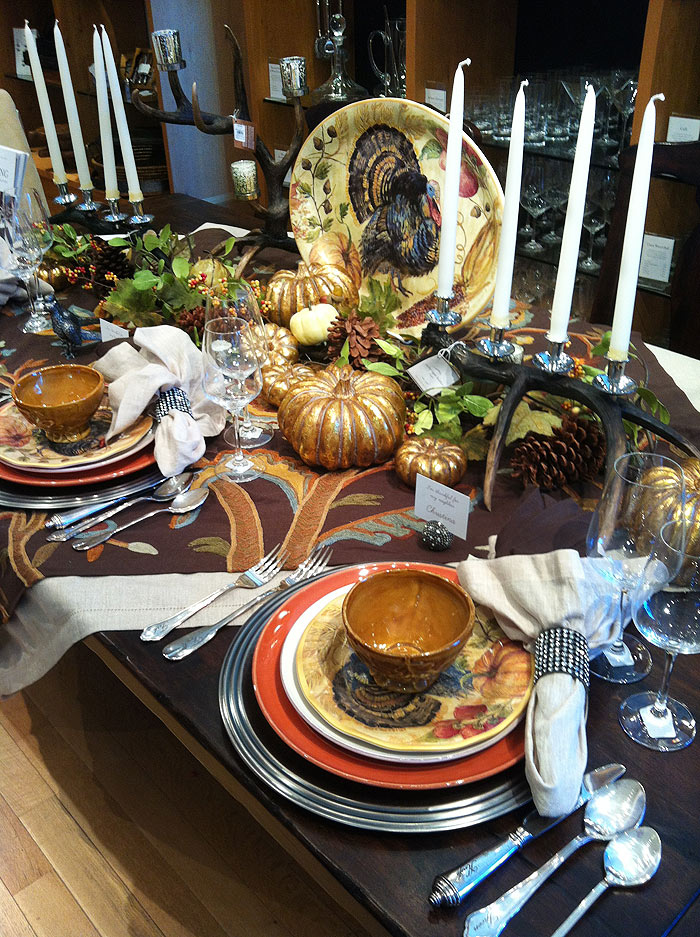
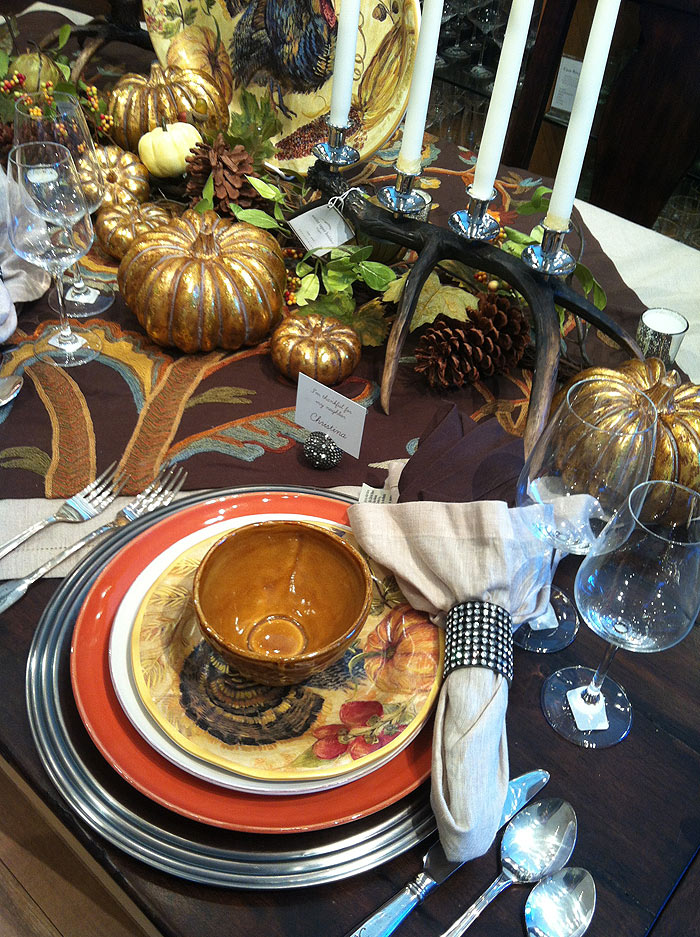
Stunning Thanksgiving table at Pottery Barn – Lots of bling! I always think that Thanksgiving tables should be rustic, never would have thought to incorporate rhinestones and gilded pumpkins.
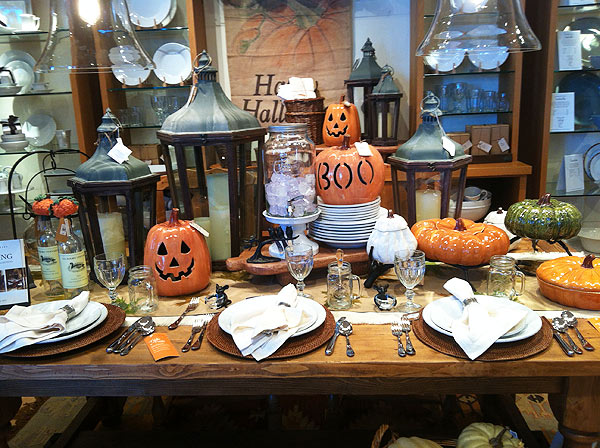
Another rustic and fun Halloween table from Pottery Barn. I love the lanterns and the extra large Mason jars.
Rustic Thanksgiving table from Pottery Barn – This is more my style
· Posted in Uncategorized ·
February 24th, 2013
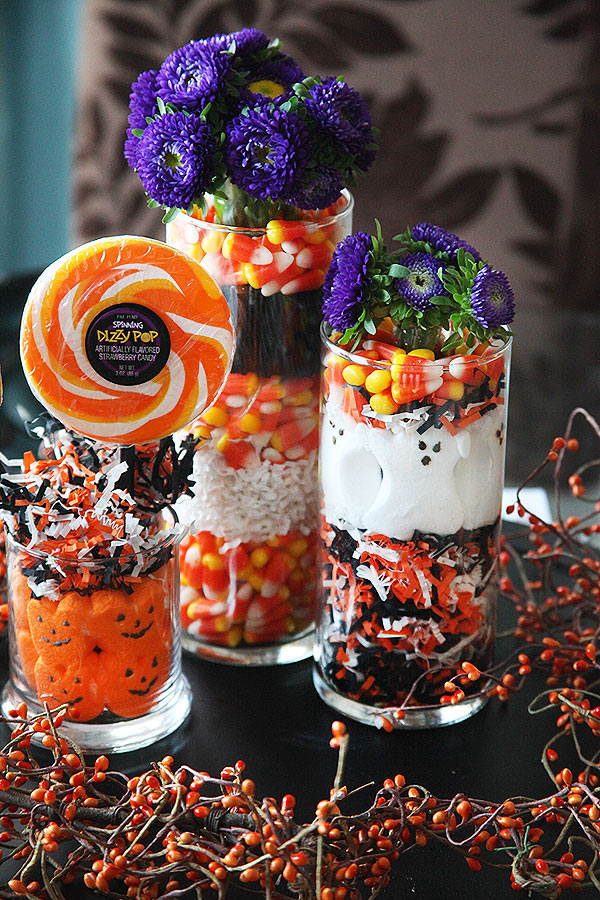
The boys and I had way too much fun this weekend!! After going to the dollar store, I picked up some fun supplies to make PEEPS centerpieces. I got the Dizzy Pop, candy corn, licorice and vases at the dollar store and picked up shredded paper, flowers, and PEEPS at various other stores. It took the kids and I about 10 minutes to create this fun arrangement. All we did was put a smaller cylinder bud vase inside the cylinder vases (just for the vases where we wanted to put the flowers) and then dropped candy corn, shredded paper, and PEEPS in between the empty layer between the narrow bud vase and the larger cylinder vase. Then, we put the flowers inside the small bud vase. You’ll notice that the bud vase doesn’t have much room for flowers, but if you use one or two large flowers (sunflowers or gerber daisies) they will look wonderful as well! I used the purple flowers because I thought they would be a nice contrast with the orange and yellow.
· Posted in Uncategorized ·
February 19th, 2013
It was my husband’s birthday today and the kids and I decided to make him a Halloween inspired sweet and yummy treat! He loves Peeps and since the Halloween Peeps are officially in the stores, a Peep Kabob was definitely in order! This was our result! The kids dipped and embellished the strawberries, while I made the brownie. Once everything was ready, we skewered everything including the Peep… and viola!!! You don’t even need a “real” recipe. All you need are Peeps, chocolate covered strawberries (with Halloween sprinkles), a brownie piece and another Peep… DONE!!!

· Posted in Uncategorized ·
February 19th, 2013
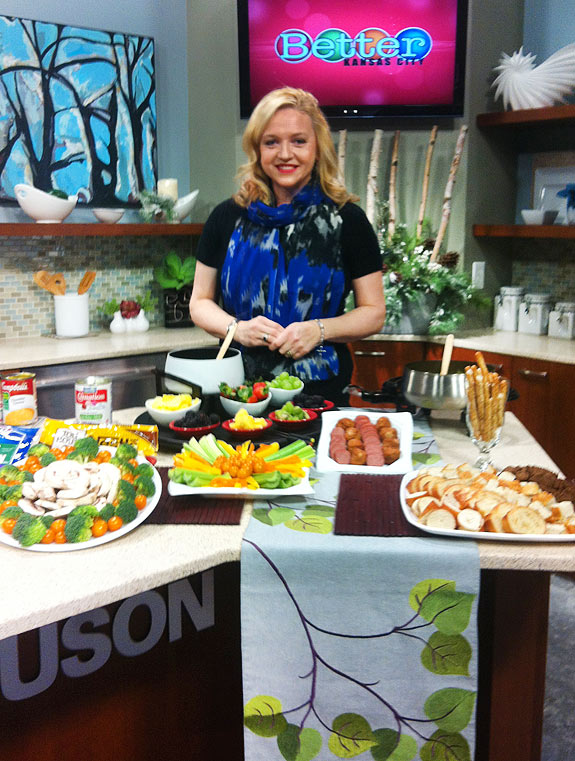
Imagine being able to throw a party without spending all your time cooking! Sound impossible? Not with Fondue! This fabulous way of entertaining has been around for hundreds of years and is a boon for the novice or busy host — Here are five easy tips on helping you to create your very own Fondue party which I shared on Better Kansas City. To see the video, please click here.
TIP #1 KNOW THE HISTORY
No doubt, people will ask you where Fondue came from and why it exists. As a gracious host, you should be able to give a quick run down of what is Fondue and how it came to be. The easiest way of explaining it is to say that it has been around for over 400 years and was generally viewed as a peasant dish since it was an easy way of eating stale bread and cheese. Fondue is derived from a french word meaning “to melt” and is traditionally served in a communal pot (caquelon) over a portable stove (chaud), and eaten by dipping long-stemmed forks with bread into the cheese. Although the Swiss are generally known as the originators of this dish, the Italians and French also love Fondue.
TIP #2 KNOW THE ETIQUETTE AND RULES
As with anything which has been around for hundreds of years, there are certain etiquette rules and general guidelines you need to follow when creating your Fondue Soiree! However, all the rules are easy and infused with a bit of European humor and flair! As a host of the party, it’s always encouraged you give your guests a quick run-down of these rules since most people may not be familiar with them
- 1. If you are a woman at the table who drops her bread in the fondue pot, you must kiss the two party guests sitting to each side of you.
- 2. If you are a man who drops his bread in the fondue pot, you must buy a round of drinks or even a bottle of wine for every guest at the table.
- 3. If you drop two pieces of bread (gender not relevant), you must host the next fondue party.
- 4. Double dipping is never allowed, so make sure you have as much cheese on your dipping fork as you need, the first time around.
- 5. Dip your food in a figure 8 pattern, it continues to mix the cheese, keeping it creamy for the other guests and gives you the most efficient “dip”!
- 6. Most important… fondue forks are only to transport your food from the fondue pot to your plate, not to eat off!
TIP #3 KEEP IT HEALTHY BY KEEPING IT SIMPLE!
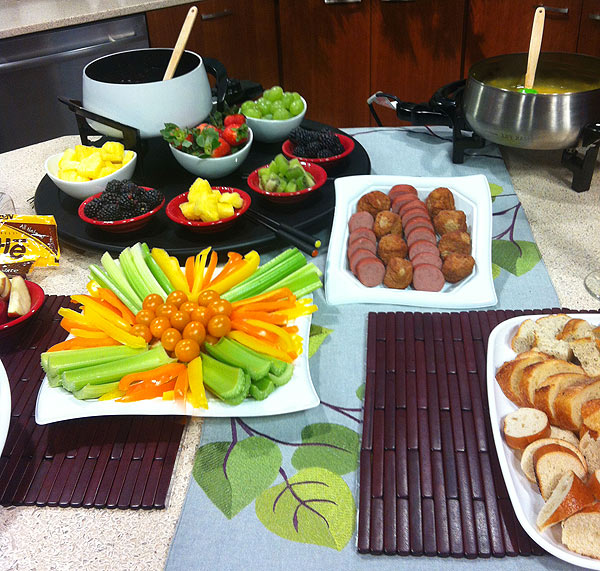
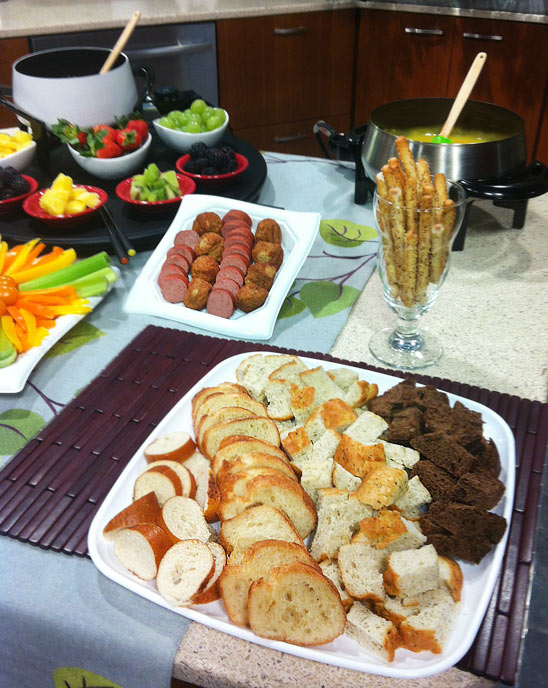
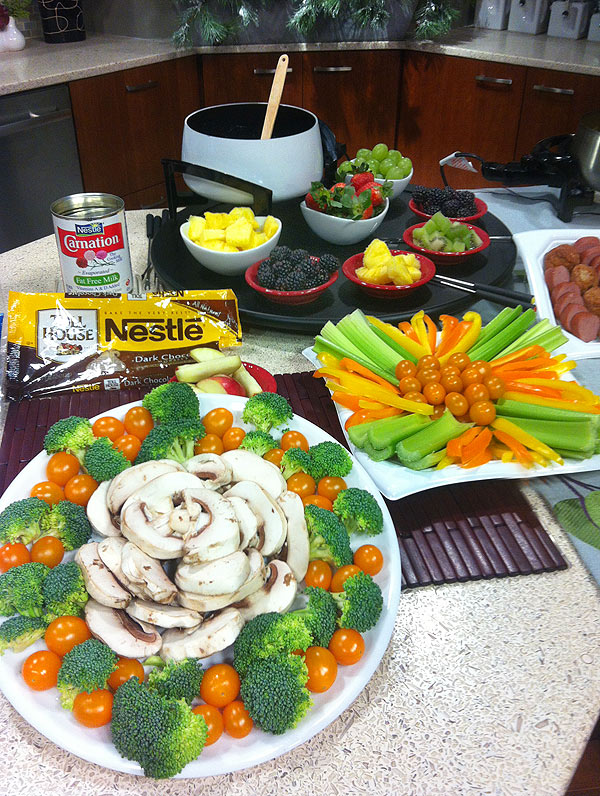
If this is your first Fondue party or if it’s been a while since you’ve thrown a fondue party, make sure you use the easiest Fondue recipes and accompaniments. Don’t overwhelm yourself with complicated ingredients which will detract you from focusing on your guests. Start off with things and ingredients that you know… like cheese, bread, vegetables, chocolate, and fruit. Simplicity is the origin of Fondue, so you won’t be compromising anything by keeping it simple. Once you get more experienced with all the intricacies, you can expand on what you already know with more complex fondue recipes.
Keeping it simple can also help you keep it healthy. If saving calories is important for you and your guests, you may consider altering from a traditional fondue to a more modern and healthy version. Creating an authentic fondue requires a myriad of cheeses, which are not necessarily healthy. Instead, consider creating fondue from two cans of heart healthy cheese soup, 1/2 cup of fat free shredded cheese, and 1/2 cup of regular shredded cheese. You’ll save an enormous amount of calories and sodium while enjoying the delicious fondue on top of vegetables, lean turkey sausage, and turkey meatballs. For dessert, a chocolate fondue comprised of 1 bag of dark chocolate morsels and 1/4 – 1/2 cup of fat free evaporated milk, will take your breath away!
TIP #4 ALWAYS PREPARE AHEAD!
The beauty of Fondue is that there is nothing to cook! However, don’t let this benefit keep you from doing what all good host and hostesses know… prepare ahead! Do as much of the preparation the day before and just focus on preparing the fondue on the “day of”. This means, cut up your vegetables and arrange your meats. For items which tend to “turn” quickly, such as fruit, prepare those an hour prior to your guests arriving and drizzle with lemon juice to prevent discoloration, then refrigerate. The goal is to have everything prepared so all you have to do is remove the platters from the refrigerator and serving when guests arrive.
TIP #5 DRINKS TO ACCOMPANY FONDUE
The good news is that, like fondue, choosing the right drinks are super easy. Traditionally the wine that was used to prepare the fondue, is also served to accompany it… that’s probably the only major rule. White wine is typically the choice, but that has changed over the years to be practically anything. Now, people put beer in their fondue and also drink it to accompany the meal. Brandy or kirsch is a traditional accompaniment since it’s said to help the digestion process. However, don’t feel stifled, practically any drink can be accompanied with the fondue.
· Posted in Uncategorized ·
February 11th, 2013
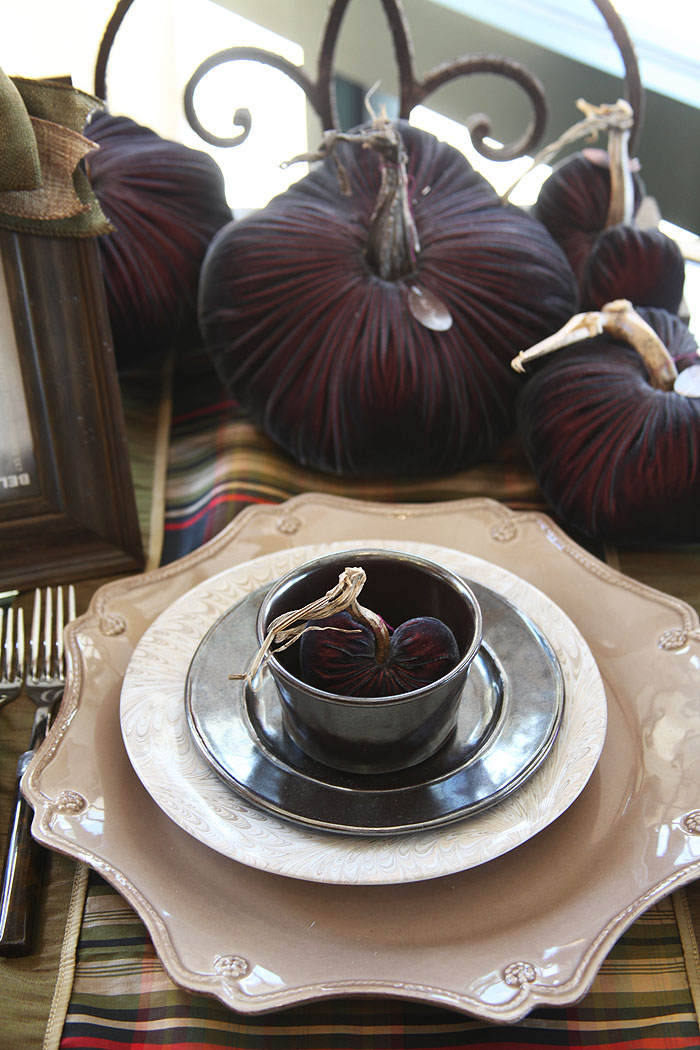
Although I try to think out of the box (occasionally ), I’ve never been one to change successful color palates. I mean, who could argue that oranges and reds aren’t the perfect colors to decorate with for fall?! So when I found this set-up for a table setting at my favorite retailer, I thought… YES!!!! It is a pewter and plum with a touch of tan. I just had to post it because it’s so “out of the box” but still representative of fall!!
· Posted in Uncategorized ·
February 1st, 2013
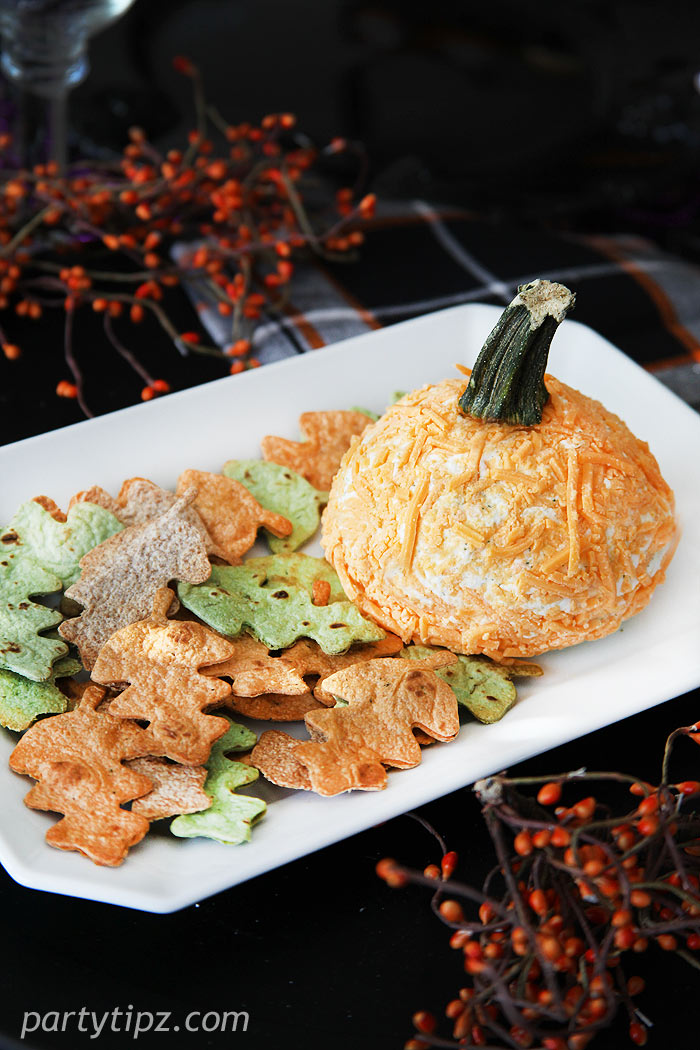
Fall entertaining is upon us and delicious comfort food is the perfect addition to any gathering. This cheese ball, made to look like a small pumpkin, will get everyone excited. Plus, it’s truly one of the easiest things to make and you can even prepare it ahead of time and whip it out when guests arrive. I also bought a variety of tortillas which I made into “leaf chips” by using a leaf cookie cutter to cut out the leaf shapes. Then I sprayed the chips with cooking spray (or you can brush them with olive oil), salt them, and bake them in 400 degree oven, about 5-7 minutes or until crisp. Lastly, leave them out for a day… they’ll get even more crispy and be perfect for the day of the party! So, without further delay… here’s the recipe!
INGREDIENTS
2 (8 oz) Packages of Cream Cheese (you can use fat free cream cheese for a “guilt free” delight!)
1 packet of Onion Soup Mix or Ranch Dressing mix
2 tsp of Paprika (I usually do this just for color for the outside of the pumpkin)
2 cups of shredded cheddar cheese (this is optional… I add this for interest and to give the pumpkin that orange color)
For a pumpkin stalk, you can use a broccoli, green bell pepper or a celery stem. I used the stem from a real pumpkin which I cut out and washed. It was more authentic!
Chips, crackers, or toast
PREPARATION
In a medium bowl, mash cream cheese. Mix the dressing or soup mix and cheddar cheese into the cream cheese. Spoon the mixture into a sheet of plastic wrap and shape into a ball. Refrigerate until firm… the longer the better. I would make this a day or two ahead of time. Carefully remove the seran wrap.
Place the stem on top and put on a serving platter. Surround the pumpkin cheese ball with chips, crackers, veggies, or fruit. For an extra touch, you can also roll the ball in crushed nuts.
· Posted in Uncategorized ·
May 29th, 2012
Photography By Arina Lanis
Big thanks to our Test Kitchen testers — Lena and Kristi
Ahhh, Mother’s Day… I love this holiday! When I was younger and without children, I have to admit, I didn’t pay much attention to this day. I’m ashamed to say that I would send my mom some flowers and call it a day! But after the birth of my children and experiencing the role of a “mom”, I realized that this day is so much more special than I could have ever imagined. I feel blessed to have an incredible mom and privileged to experience the most important role in my life, motherhood! Without a doubt, I have grown to honor and love this holiday.
This year, I decided to come up with some great and easy (of course) recipes that are perfect to enjoy on Mother’s Day (for those of you cooking for your moms) or to all the moms out there looking for recipes which can be enjoyed year round. Our delicious “EASY LEMON CHEESECAKE” is absolutely unforgettable! The “HEART BISCUITS” are super simple and will be a hit at your table. They are great for Mother’s Day, Father’s Day, Valentine’s Day, or anytime you want to show a little love at the table. The “MINTY PEACH BELLINIS” will be a hit… I promise. This drink is sweet, light, and refreshing! The “HAIL CAESAR APPETIZERS” are always a favorite. Last but not least, the “LAYERED YOGURT CHICKEN SALAD” is a meal in itself! Your guests will love you for feeding them something healthy, filling, and unforgettable. Enjoy!!


· Posted in Uncategorized ·
May 21st, 2012
This is by far one of the most popular Halloween treats in 2012. If you are on Pinterest, you know exactly what I’m talking about. These are wonderful because they are SUPER easy and need little skill. And this is why I love them. All you need are soft cookies, red icing, marshmallows and almond pieces.
If you will make your own cookies, make sure you bake them so they are still soft and moist. If you will buy cookies from the store, just purchase the “soft baked” ones, not the crunchy versions. You can use any cookie flavor… it tastes great no matter which one you use. You can also use chocolate frosting, if you don’t want the red gums.
Just break or cut the cookie in half. Spread the red icing on each cookie. Place the marshmallows on the bottom cookie half and sandwich the other half on top. Then, just stick the almond pieces to create the fangs and you are all set! Trust me, it will be a HIT at your next Halloween party!

· Posted in Uncategorized ·
April 19th, 2012
I have to admit, few chefs on TV can “cook from the heart” like Lidia Bastianich. Everything about her is authentic… from her Italian roots to the mouth watering cuisine. Is it true that everything tastes better with an Italian accent?
I’ve watched Lidia’s shows on PBS for as long as I can remember and after each show I vow to make one of her dishes. She just makes it look so easy! Now that I live in Kansas City, I had to visit her restaurant… Lidia’s Kansas City. Here are some photos from our visit.
Her restaurant is contemporary but homey. High ceilings, earthy colors, white linen, and of course, incredible food! The front of the restaurant has a beautiful garden, which is the perfect first impression. Inside, you will find a beautiful fireplace, wood beamed ceilings and so much more!
We came for Sunday brunch with friends. The brunch was three courses. The anti-pasta and dessert were available on the self-serve buffet. However, you had to order off can you order cialis online the brunch menu for your main dish. I chose the octopus salad and absolutely LOVED it. It was a wonderful brunch and perfect fuel for the afternoon of museum hopping we had on the agenda.

· Posted in Uncategorized ·
April 13th, 2012
Halloween is a wonderful time of the year! Especially when I look through photos of some of the fun things I have made over the years. I found these two photos as I was going through my old photos. Over the years, I have fallen in love with Halloween for so many reasons. Below is a centerpiece I made when I was showcasing many different centerpiece ideas for Halloween on Great Day St. Louis, a local TV show. This was one of them. The goal was to create something that was SUPER easy and that the kids could help you put together. I had my kids draw on small pumpkins… polka dots, stripes, dots, etc. and arranged them on a dessert tray. I topped the arrangement off with a black feather boa and done!!

Another fun thing I created last year was this candy corn wreath. It was super easy! I wrapped a foam wreath in black duct tape and hot glued the candy corn to the wreath. I need to dry the candy for one week to get all the moisture out, which was the hardest part of the project since I wanted to snack on them every time I walked by them. But I resisted and had all the necessary candy to get the wreath finished. However, I have a WARNING for you! If you are planning to show off your candy corn wreath outside, make sure it’s a cool and dry day. I stored my wreath for the entire year and when I took it out of storage, it looked great! However, we had a humid and hot day (the 70’s) and I forgot to take down the wreath. Guess what happened? The candy melted and dripped all over my door. So my best advice is to enjoy this wreath indoors!

· Posted in Uncategorized ·
|
|
|