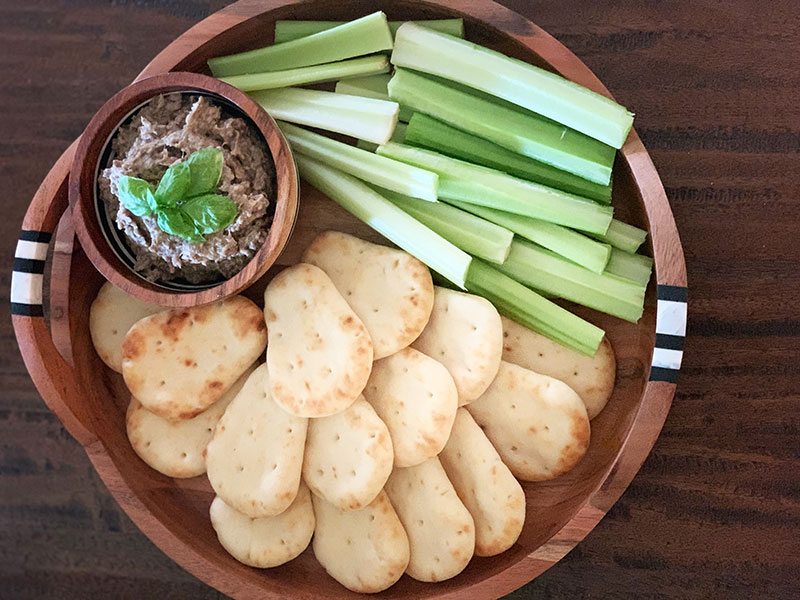
I have to admit something… I HATE paté! Well, goose, duck, chicken, or beef paté that is. As a Russian immigrant, I grew up around a lot of “spreads” made from various animal products, paté included, which I had a hard time eating. Since these foods are part of my culture and were served at most parties and celebrations, I learned to tolerate them… until one fateful day, when I began taking the initiative and saying “no thank you”. No easy feat, since rejecting what is offered to you may risk offending the host… and that is a major no-no at any party… especially a Russian party.
Fast forward to many years later, living a vegan and vegetarian lifestyle has offered me many “outs” simply because everyone knows I don’t eat meat. And while going through these crazy COVID times, I have been spending more time than usual watching TV and Youtube learning vegan and vegetarian recipes from all around the world. So, when I saw a Polish chef talk about his mushroom paté I was completely intrigued. Of course… why not make paté out of something other than liver??!
Although I wasn’t completely in love with the Polish chef’s version, this gave me the opportunity to do some experimenting. My goal was to find a recipe that was a good “base”as well as low-fat. The least amount of ingredients in the least amount of time. From there, I can add ingredients for interest, but if I chose not to, the paté would still be delicious. I also wanted my base recipe to be vegan and low-fat with the option of leveling up to vegetarian or higher in fat count, if I chose to.
So, here it is. This is my recipe for a vegan paté made with mushrooms. I love the taste and hope you do too.
If you want to add some more flavor, consider a couple of tablespoons of balsamic vinegar. Or, for a keto friendly version, you can substitute nuts for bread crumbs. If you prefer a vegetarian option (lactose-ovo), you can add a half a cup of plain yogurt or sour cream, this should really make the spread creamy.
Also, there are so many other great recipes available on the web and Youtube, so if you really want to develop something specific to your taste, go ahead and explore as I did. Enjoy!
16 ounces white mushrooms, cleaned and sliced
1 Onion (of your choice. I prefer red but white is fine too)
1 cup bread crumbs
4 garlic cloves, minced
3 tablespoon fresh basil leaves
4 tbsp Olive Oil
1 teaspoon salt, or to taste Juice of
1 Lemon Black pepper, to taste Instructions
Spray pan with olive oil (about 1 tbsp) Add onions and cook until they are transparent about 5-7 minutes. Add mushrooms and cook them until all water has dissolved and the mushrooms are tender and cooked… about 7-15 minutes. The key is to make sure there is no water left in the pan. Remove the mushrooms and onions from the skillet and let cool for a bit. To the cooked mushrooms and onions, add 1 tbsp of olive oil as well as the garlic, basil, and breadcrumbs. Some people also add a bit of balsamic vinegar but that is optional. Transfer the mushroom mixture to a food processor or a vitamix. Process everything while slowly adding the rest of the olive oil. Blend the mixture until it’s as smooth as you like it — anywhere from coarse and chunky, to a very smooth paste. Season the pâté with salt and pepper. Garnish with fresh herbs, if desired. Serve immediately with veggies, bread and/or crackers, or chill for later.
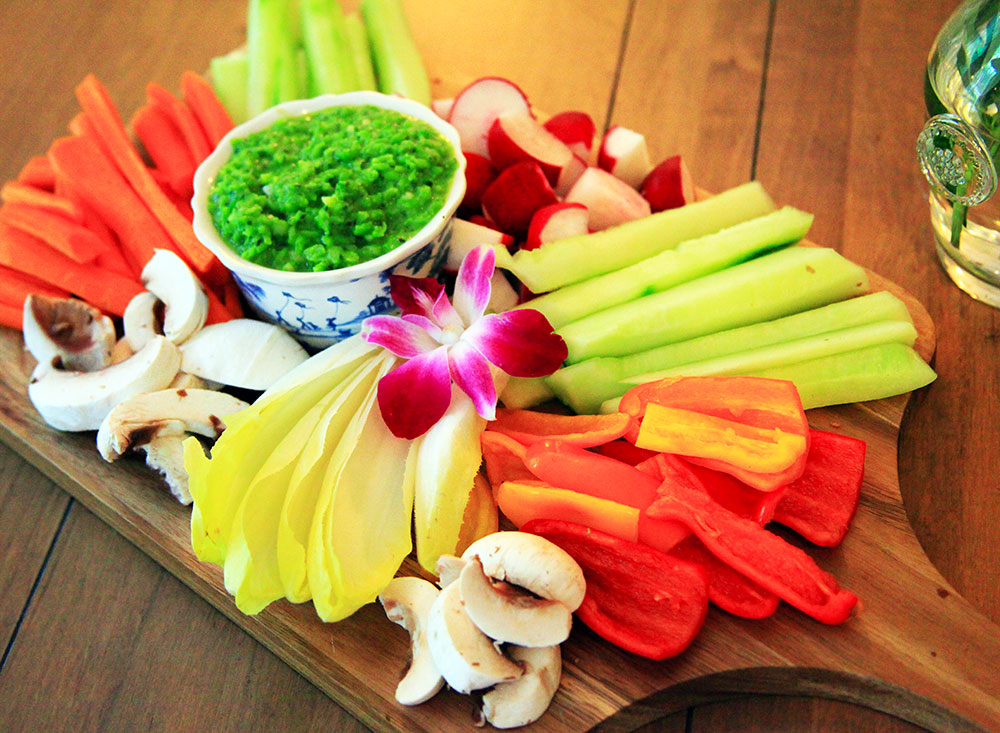
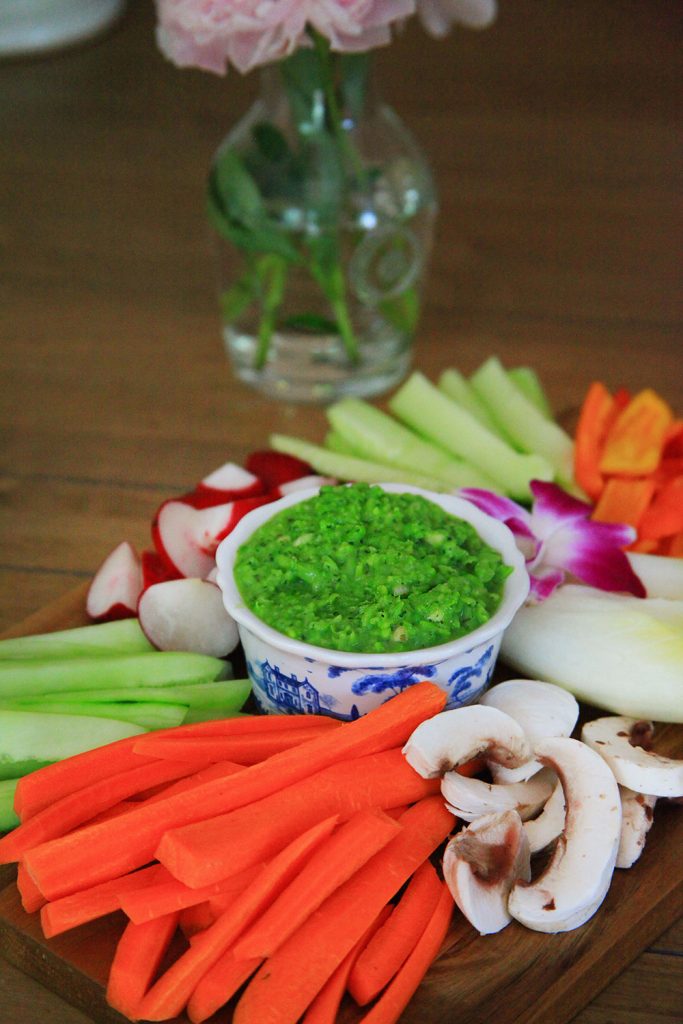
I love trying new things, especially when it comes to dips. This sweet pea hummus surprised me on so many levels. Firstly, it’s made out of sweet peas instead of chic peas, which gives it a sweet and lovely taste. Secondly, it is super easy to make… you don’t have to soak or prep anything. In fact, it took me less time to make the dip than it did prepping the vegetables for the veggie board.
I used a Vitamix, but feel free to use a food processor instead. In fact, I think you will be happier with the texture if you like your dips a bit more chunky rather than creamy.
Another thing I love about this recipe, is its very customizable. Feel free to play with the ingredients as much as you like. I used mint for my herbs, but try it with basil or rosemary and see if you prefer those herbs more. Also, I recommend you use fresh herbs instead of dried. Unfortunately, we are going through challenging times now and my grocery store does not always have all the items I need. But that’s okay… this dip is very forgiving. I also love to use the juice of a whole lemon in my dip, but I recommend you start with a half a lemon and evaluate the taste. When it comes to peas, use the frozen variety (instead of canned) and follow package instructions on cooking them.
Recipe ingredients
Last but not least, salting this dip is the biggest thing you should consider. I did not use an entire TBSP of salt, however, I do salt my dips strongly. Although it may taste salty when I try it on its own, once you dip vegetables into it, you need some seasoning to make it stand apart from the veggie. If you are using salted crackers or chips, you can ease up on the salt. But if you are serving raw veggies, you may want to add some kick to it with more salt than usual or even a spice or two for some extra heat.
For a full video of this recipe, click below:
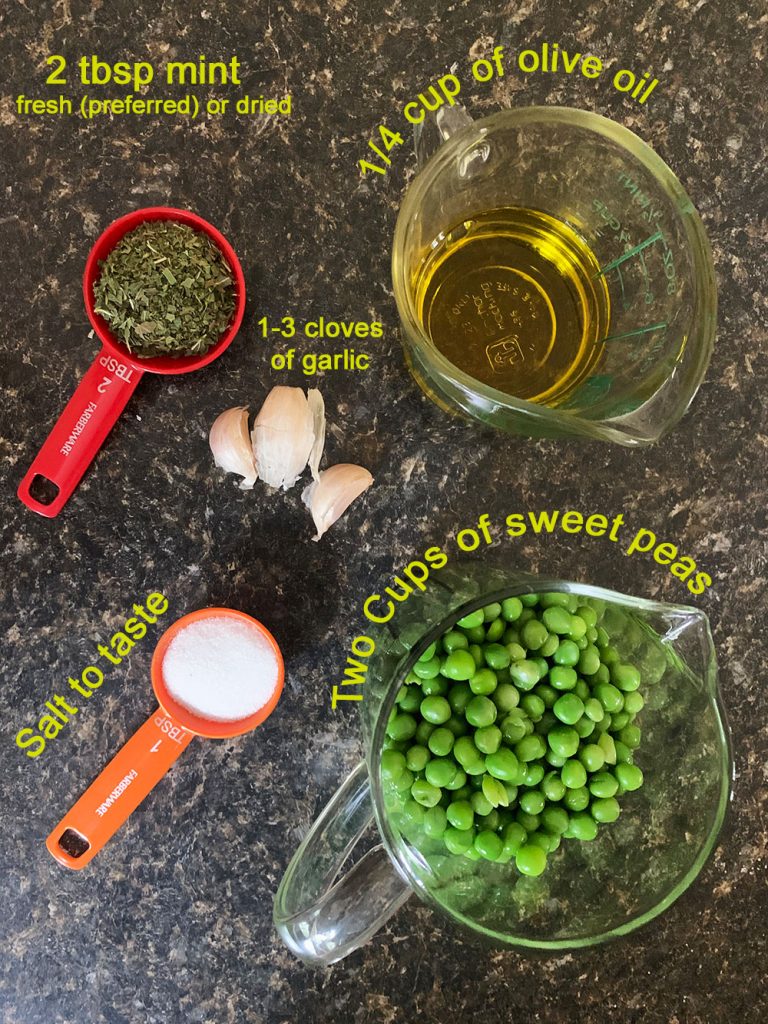
2 cups of sweet peas (Frozen peas are best for this recipe)
1/4th cup of olive oil
2 TBSP mint (Fresh mint is preferred but you can use dried mint if fresh is not available)
1-3 Cloves of garlic (Depending on your garlic tolerance)
Salt to taste (Be ready to use a lot if you are planning on dipping veggies into the dip. If you are using salted crackers or chips, you will need a lot less salt.)
Juice of a half a lemon
Prepare the frozen sweet peas according to package instruction.
Once the peas are prepared and cooled, put them in either a food processor or a Vitamix with a bit of olive oil, garlic and mint.
Start pulsing and add olive oil if necessary. Start salting as you are pulsing. Stop and scrape the mixture.
Periodically taste the mixture to see how much salt you need. Make it slightly salty if you are serving with veggies and less salty for crackers.
Add lemon juice. Feel free to add more lemon if you find it necessary.
Once the mixture is at the texture and taste you prefer, empty it into a dip bowl and enjoy.
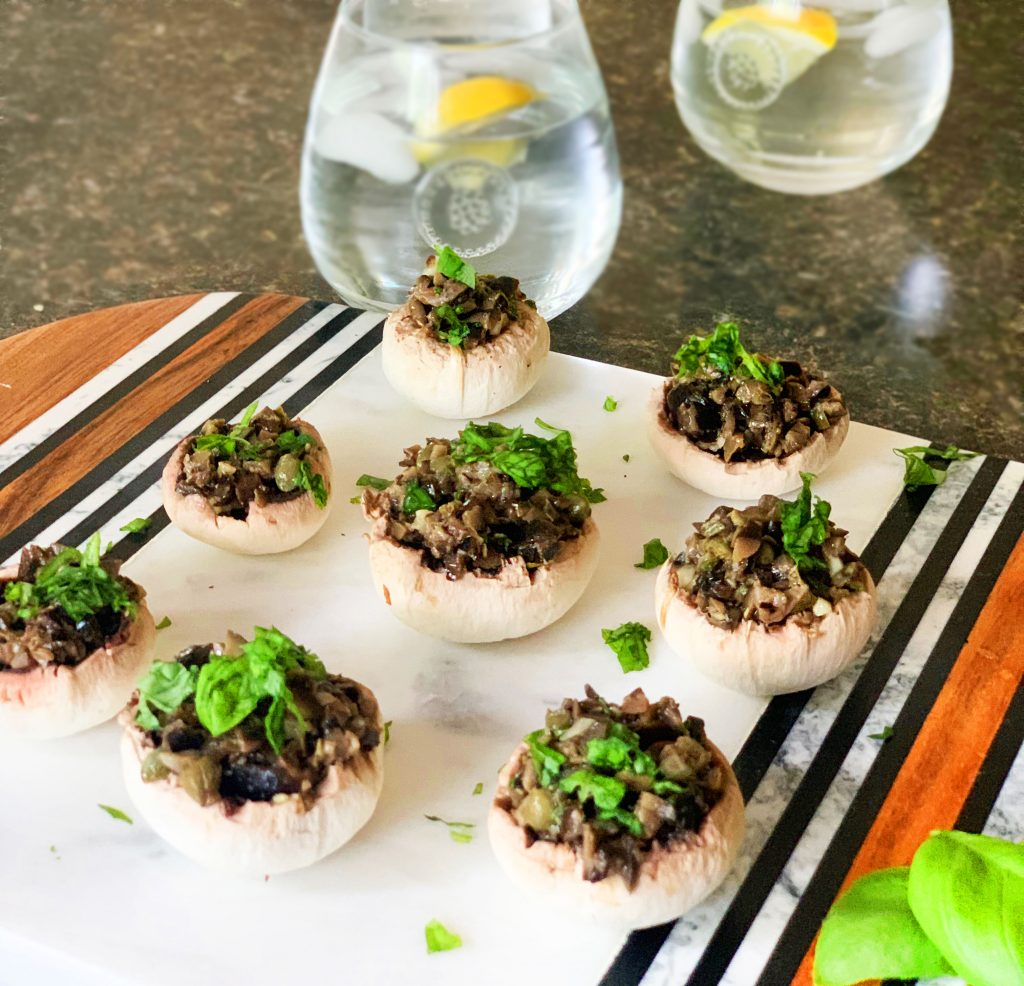
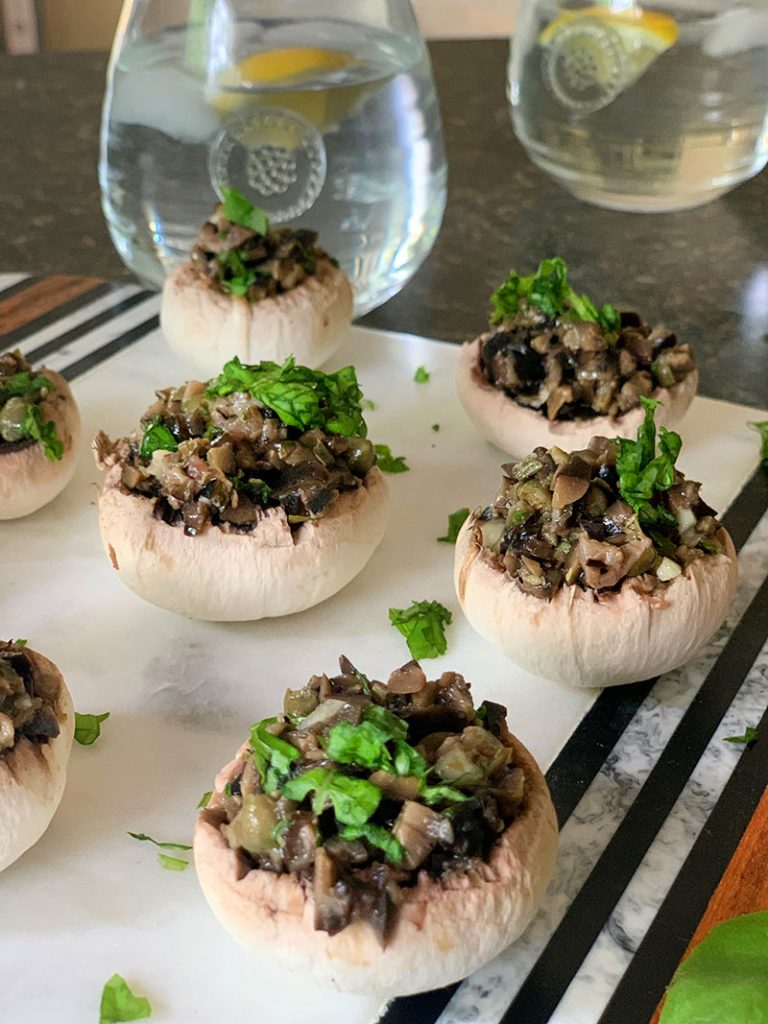
If you’ve never heard of tapenade, it’s a Provençal name for a dish consisting of puréed or finely chopped olives, capers, and anchovies. Its name comes from the Provençal word for capers, tapenas.
Black Olive Tapenade Stuffed Mushrooms
What I love most about this dish is that it is easy to make, healthy, and can be used as a filling or a dip. You can also easily make it vegan (simply omit the anchovies) and still maintain the integrity of the recipe.
I was inspired to create this dish while visiting St. George, Utah and enjoying lunch at a local restaurant named Xetava. Their tapenade was served with Lavash crackers and I fell in love with it. So, when I got back home to St. Louis, my first thought was to try re-creating the recipe but adding my own twists. The beautify of tapenade is that it is very customizable and you don’t even have to have the exact measurements to make it. Just know that black olives (you can use green as well or mix the two) are going to be your main foundation. I typically start out by using a full cup of olives which I rough chop, and add ingredients little by little tasting and chopping the mixture as I go. If I’m throwing a party, I’ll add just one clove of garlic for flavor. If I’m making the tapenade for myself, to have for lunch, I can add up to three cloves of garlic… I LOVE GARLIC! I do the same with lemon juice. I can add the juice of a half a lemon if I’m making the appetizer to take to a party or add the entire lemon if I’m making it for myself. Just depends on how I’m feeling that day or who I will be serving it to.
The key to this recipe is to taste as you go. Once you hit your perfect flavor, you can finish it and serve. And don’t forget to put your own twists on this recipe. Some people add roasted peppers, sun dried tomatoes, and so much more. Don’t be afraid to try new ingredients, herbs, and seasonings. This dish allows you to customize as much as you like.
Most people use a food processor to make this. However, I just chop by hand as I go. Each time I add an ingredient, I mix it into the mixture and continue chopping. By the time I add the last ingredient, my tapenade is chopped to the consistency I want. To see all my techniques for this recipe, here’s a link to a full video.
Last but not least, I decided to omit the bread and instead, serve the tapenade in mushrooms (these mushrooms are fresh, not cooked). It makes for a filling dish that not only tastes fabulous but also good for you. If you omit the anchovies, this dish becomes vegan. If you’ve never worked with mushrooms, watch the video, which I linked above. It will show you tips on working with mushrooms.
Below is the recipe as I like to make it, but feel free to add more or less of each ingredient… if you hate anchovies, don’t use them. If you love capers, use more. Same goes for any of the ingredients listed below. As long as you are using olives as your foundation… you are good!
1 cup of black or green olives 2-3 anchovies 1/4 cup of capers Juice of 1/2 lemon 2 cloves of garlic 1/4 cup of chopped fresh basil 1/4 cup of olive oil 10-12 fresh mushrooms (peeled and cored)
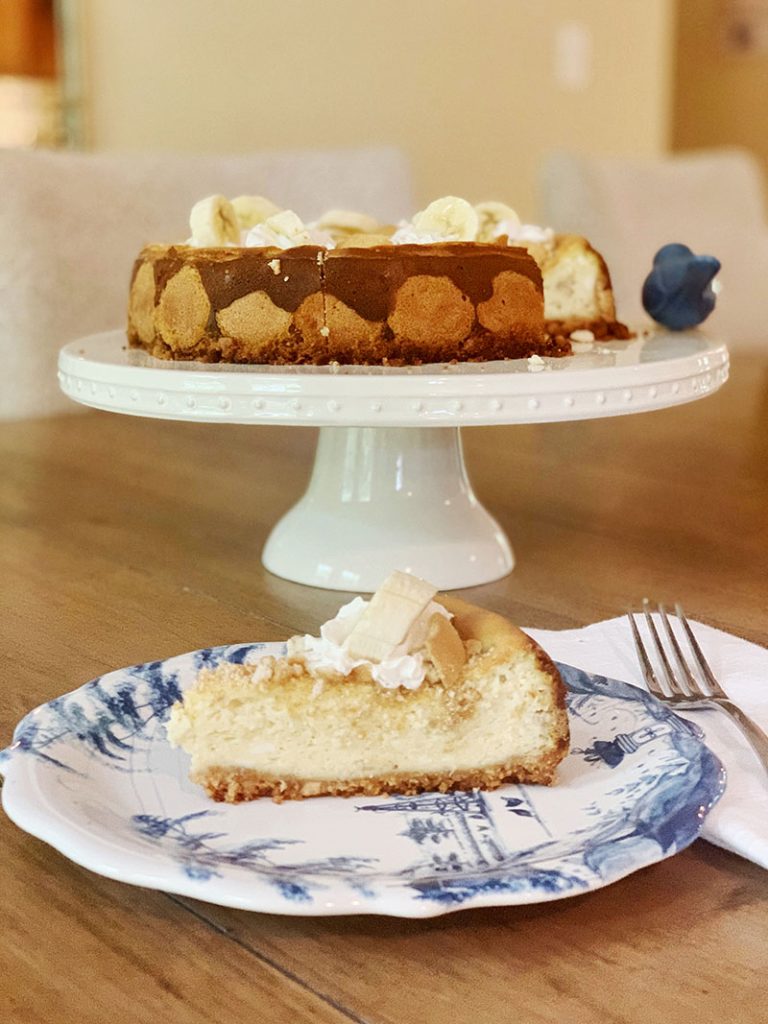
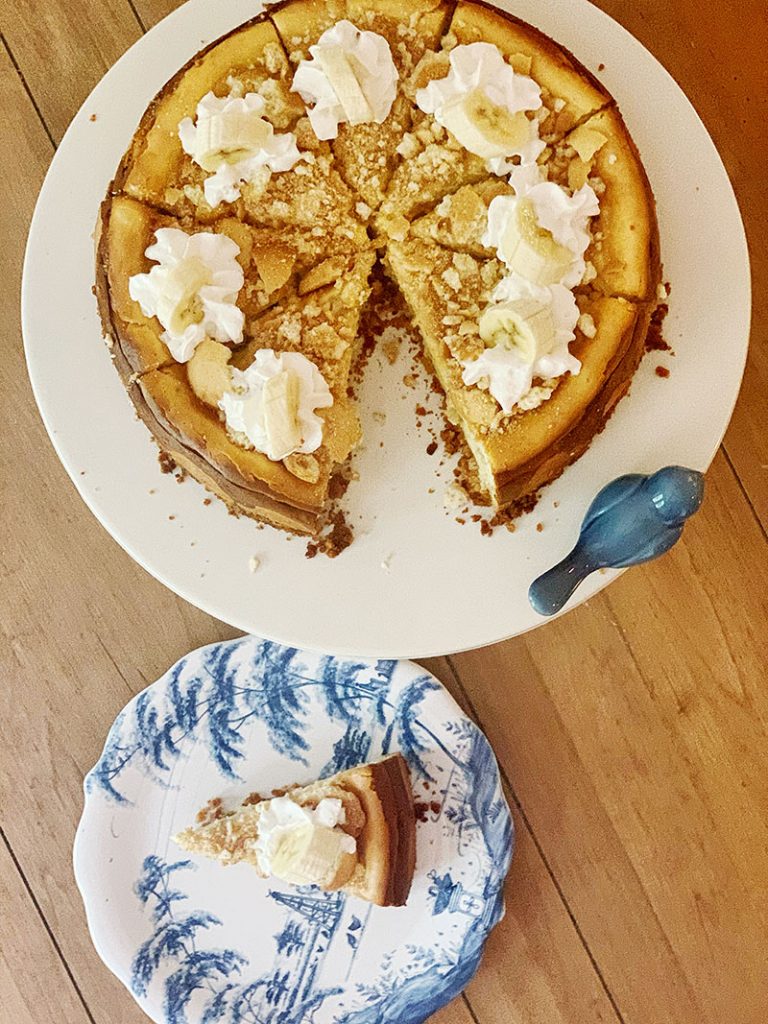
There are few things that get me excited more than cheesecake. It’s one of my favorite guilty pleasures and to be honest, one of the easiest desserts I have ever made. Sure, it takes a bit of time to bake, cool, and set but since I love to prepare most of my party food a day or two prior to the actual party, cheesecakes are the ideal make ahead dessert. And once you’ve figured out the basic techniques, you can go crazy with the flavors with just a few tweaks here and there.
Makes for a beautiful cake.
Best of all, this particular cheesecake is a bit “out of the box” since it incorporates bananas. Plus, it’s so easy to decorate. With a bit of whipped cream (home made or store bought), lemon soaked bananas, and vanilla wafers, you will be able to create a gorgeous dessert without having to be a professional cake decorator.
If you are visual, you will enjoy watching my YouTube tutorial where I show you all the preparation techniques. The link is below. Enjoy!
1 1/2 Cups Finely Crushed Vanilla Wafers 1/2 Cups of crushed cashews 1/4 Cup of melted butter 19 Vanilla Wafers (or enough to fit entirely around your springform pan) 3-4 Ripe bananas (diced) Juice of one lemon 2 Tbsp of brown sugar 3 (8-oz) packages of cream cheese, softened 1 Cup of granulated sugar 3 Large eggs 2 tsp of vanilla extract 1/2 cup of crushed/broken vanilla wafers
Garnishes: Sweetened whipped cream, vanilla wafers, sliced bananas tossed in lemon juice
Preheat oven 350 degrees. In a food processor, process vanilla wafers, cashews, and melted butter. Once it is well blended, press mixture onto the bottom of a greased and floured springform pan. Stand 17-19 vanilla wafers around the springform pan, pressing gently into crust to secure. Put the springform pan on a baking sheet (to prevent butter from leaking on to the bottom of your oven) and bake 8-10 minutes. Cool completely for approximately 30 minutes.
Combine bananas and lemon juice in a small sauce-pan. Add brown sugar and cook over medium heat stirring constantly until the sugar has melted into the mixture, approximately 1-2 minutes.
Beat cream cheese at low to medium speed. Make sure your cream cheese is softened since it will help prevent cracks in the cream cheese during the baking process. Once the cream cheese is ready, gradually add eggs, beating until blended. Make sure to add eggs one at a time and wait until each egg has fully blended into the mixture. Add vanilla. Add the cooked banana mixture. Pour batter into the prepared crust.
Bake at 350 (on a baking sheet) for 55-65 minutes or until center is almost set. Remove cheesecake from oven; gently run a knife around the edge of cheesecake to loosen. Let cool for 20-30 minutes then sprinkle the top of cheesecake with crushed wafers. Remove cheesecake from springform pan. Cool completely for an hour. Place in refrigerator, cover, and chill for 8 hours.
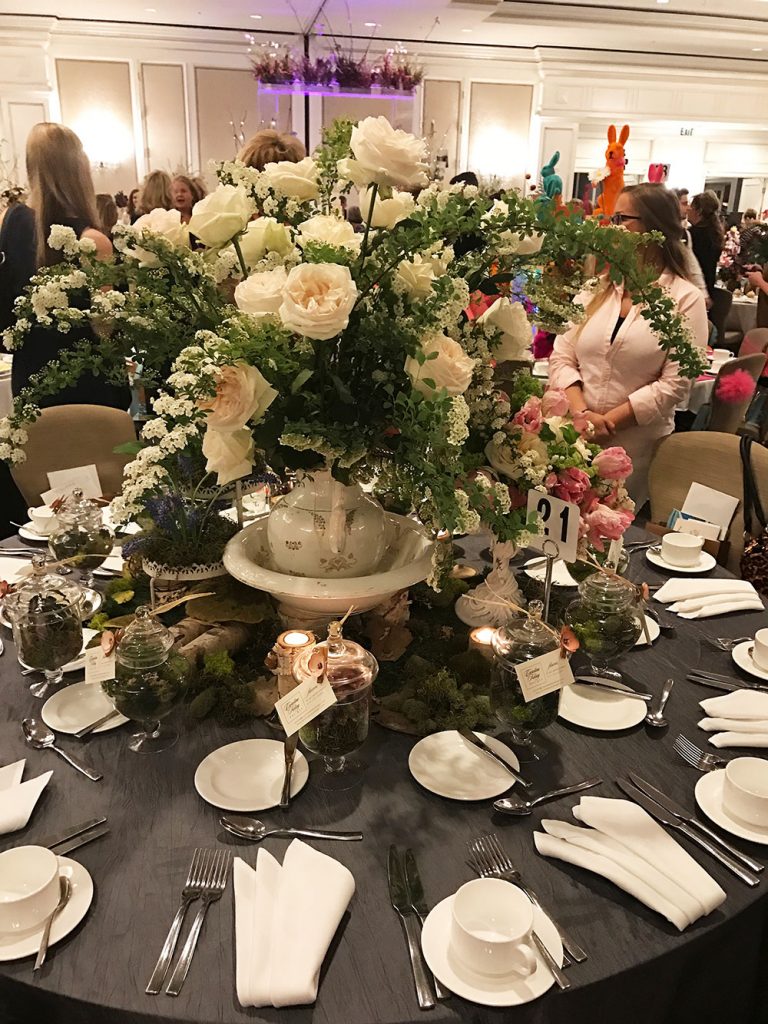
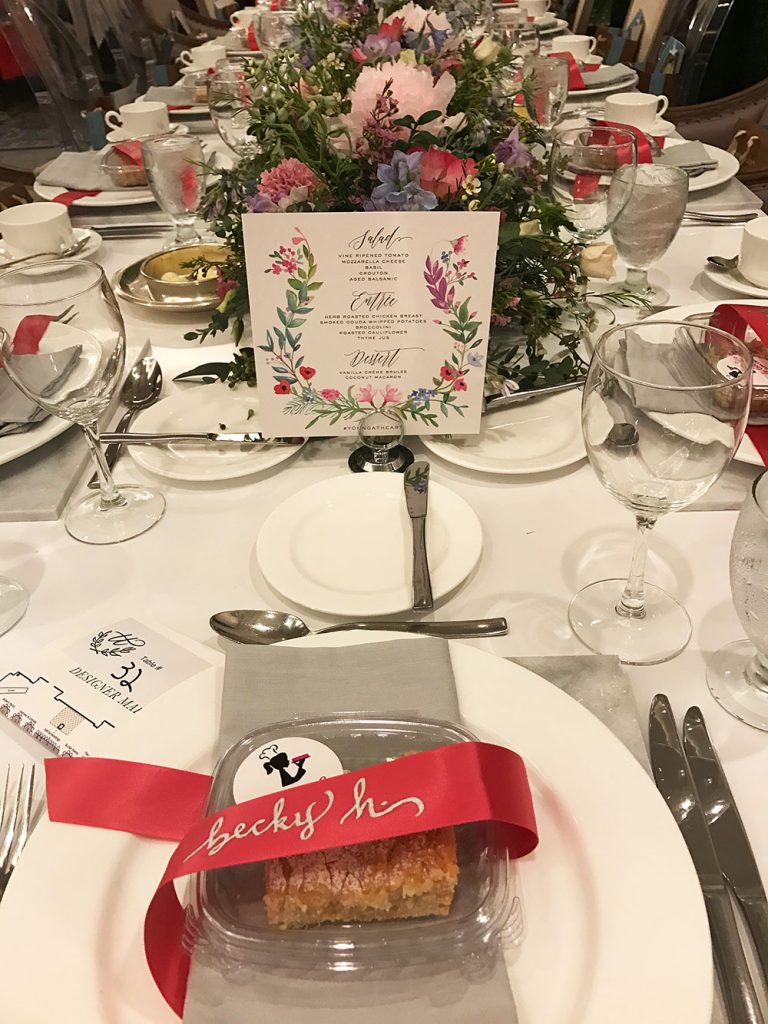
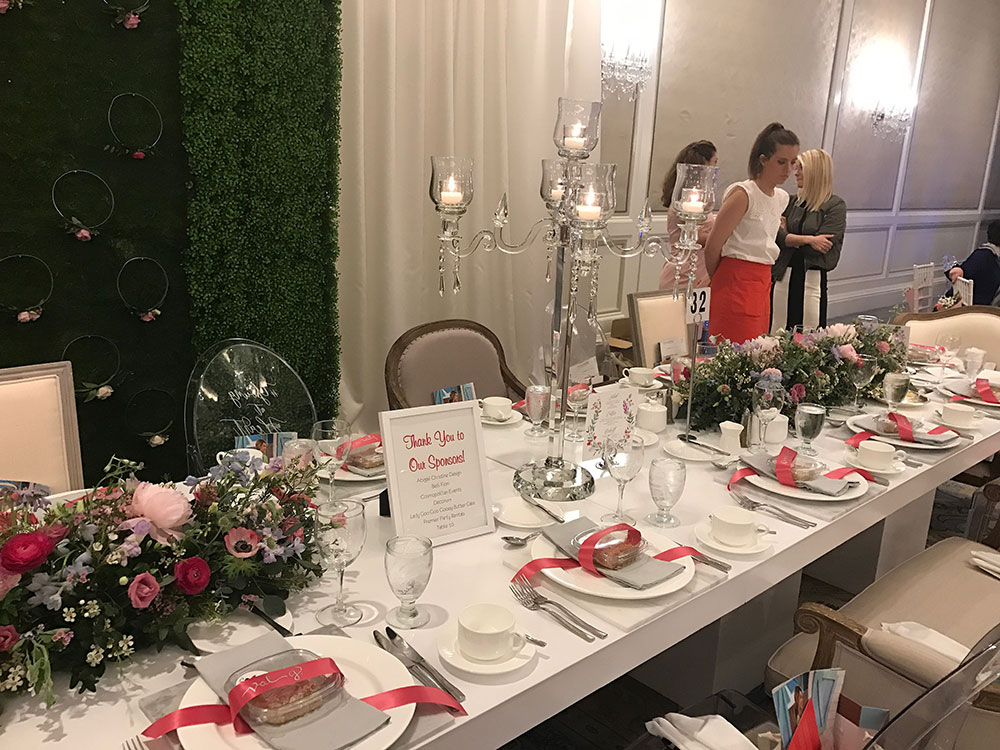
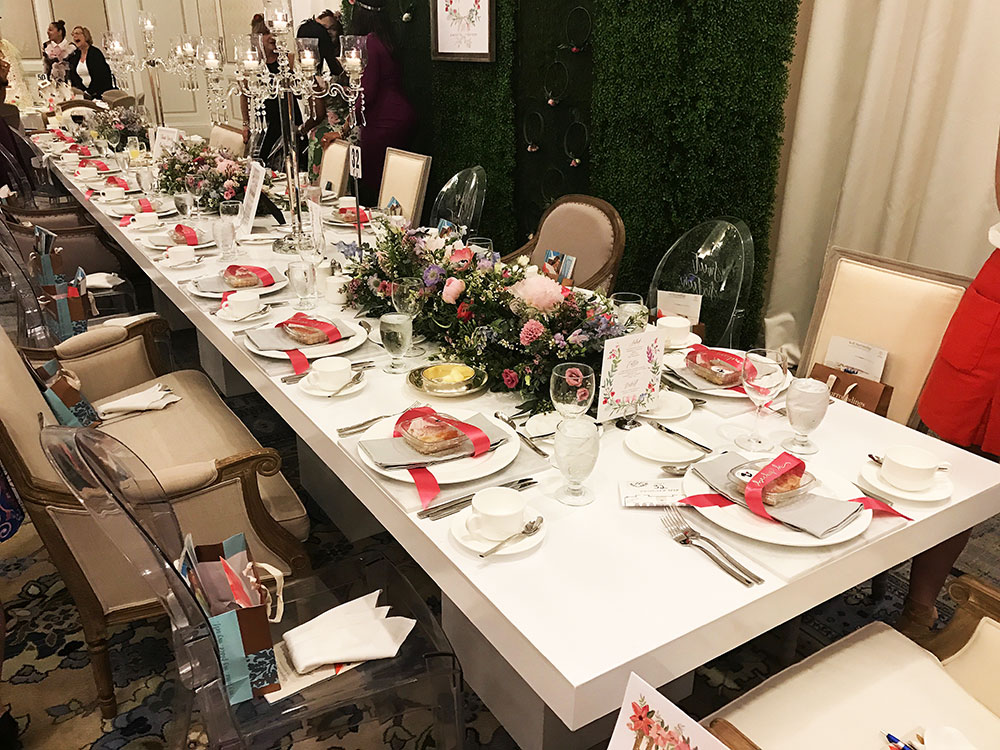
As many of you know, I am obsessed with anything party, so when this annual event rolls around in the spring, I’m the first to get my tickets. Best of all, proceeds benefit the Friends of St. Louis Children’s Hospital Endowment Fund for Camp Rhythm, a summer camp specially designed for children with heart problems. Why do I love it so much? Because so many fabulous St. Louis designers create spectacular tables that literally blow my mind! When I published St. Louis Entertains magazine, I also participated in this event and Sandra Fulton, our floral designer, created a fruit/citrus themed table. Here is a link to another blog post featuring this event. Click Here To See It
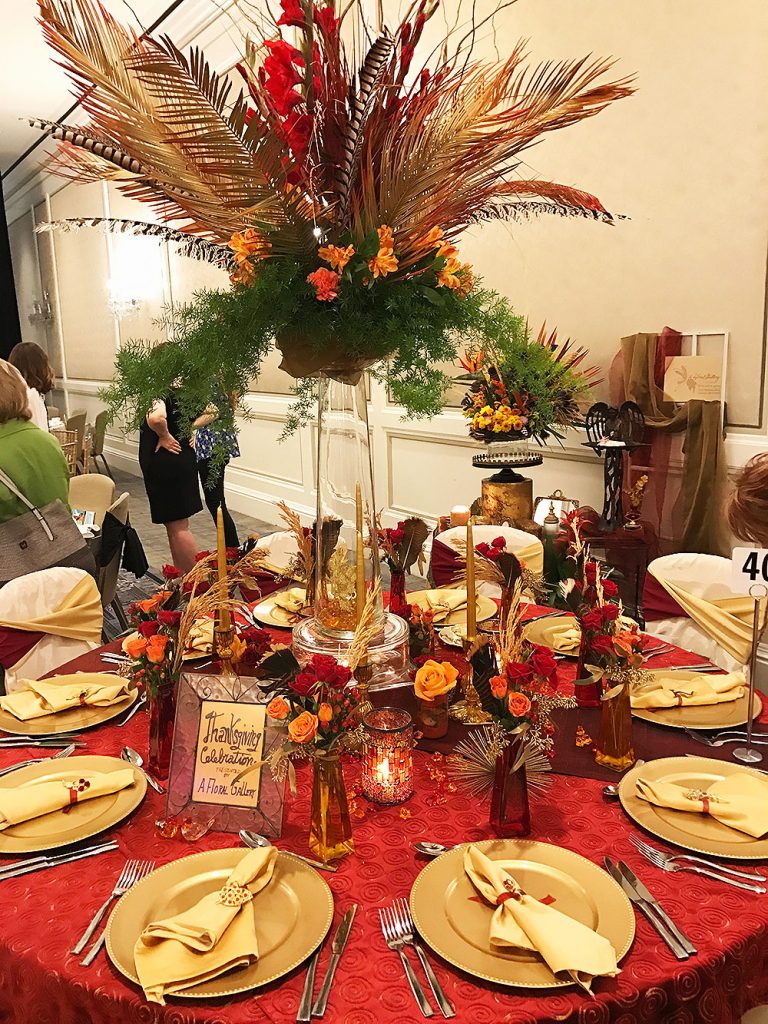
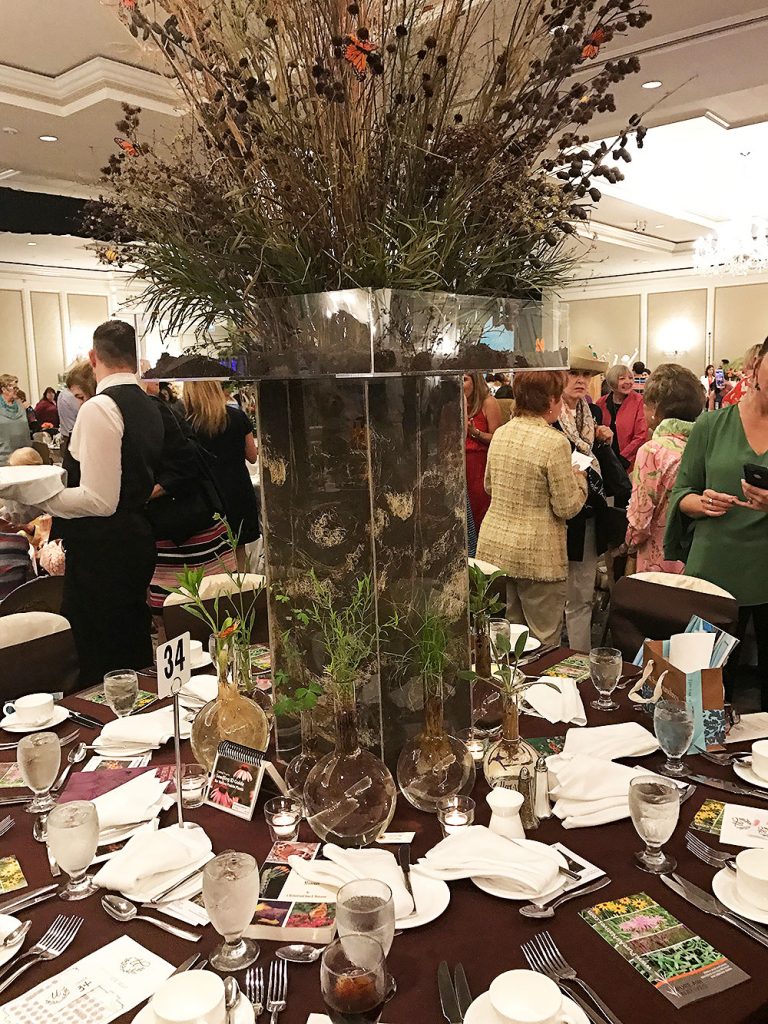
The theme for 2017 was special events. Special events such as baby showers, birthdays, holidays, weddings, etc. Each table chose the event they wanted to design and went all in! There were many beautiful tables, but I have to say, these are my very favorites. So without further delay, here they are!
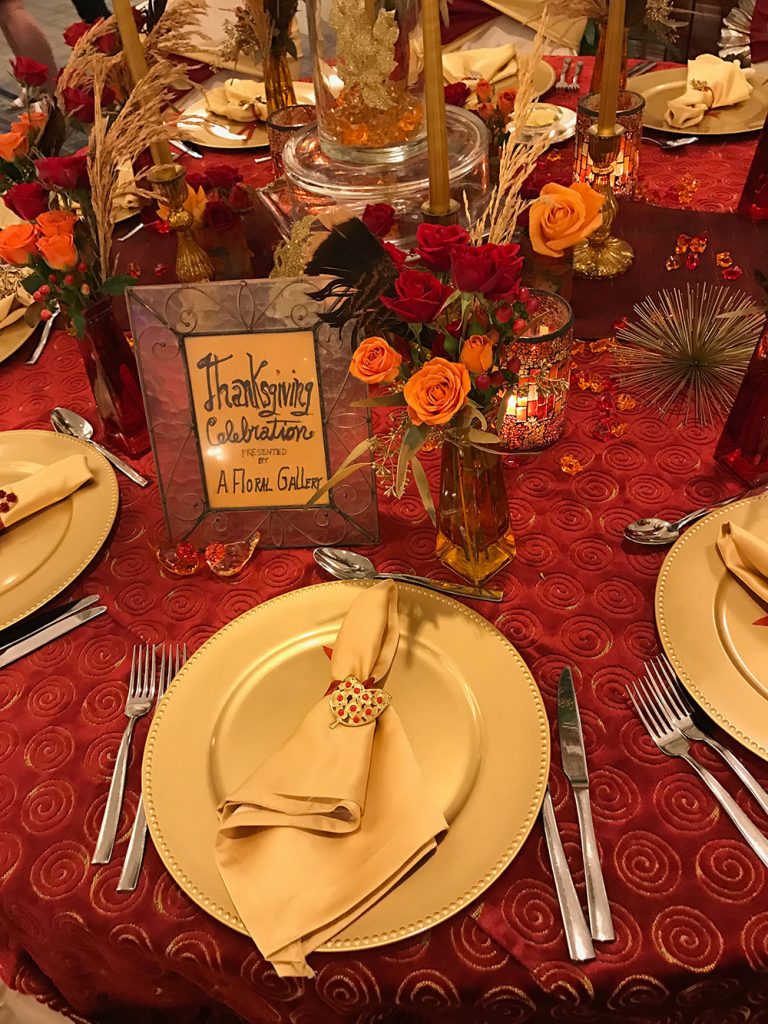
Loving this gorgeous Thanksgiving Day table from A Floral Gallery. It has just the right balance of red, orange, and gold tones.
Ooooh… that tablecloth!
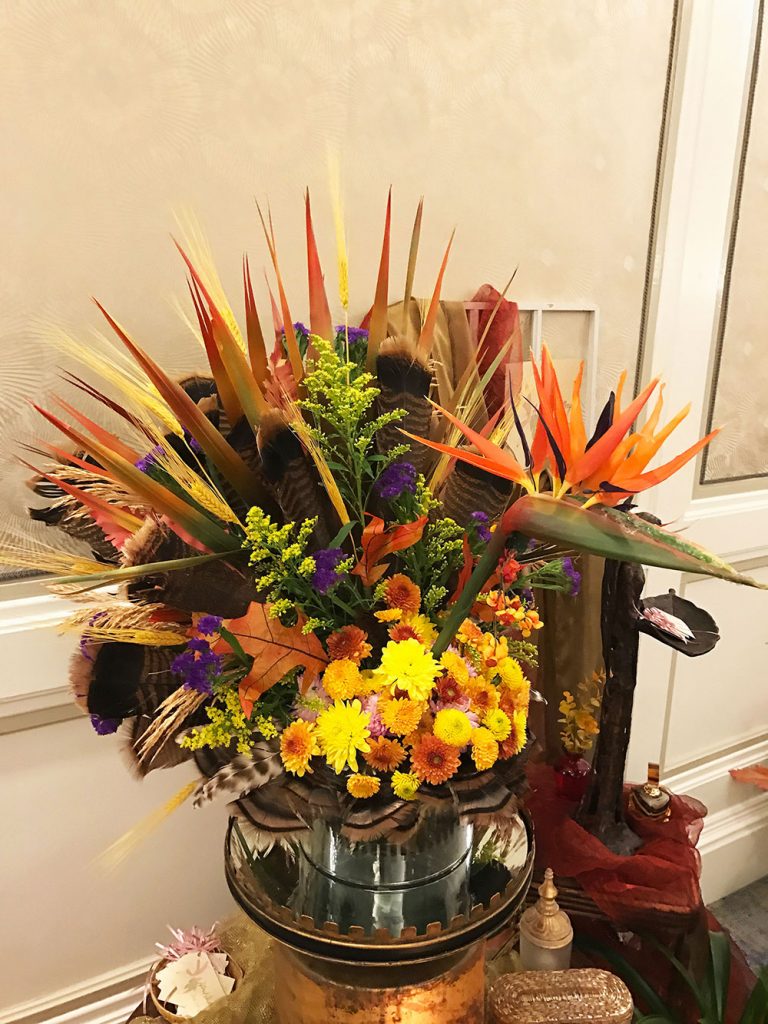
Yes folks, that’s a floral turkey… I mean… how creative is this woman??? Incredible job, A Floral Gallery!!
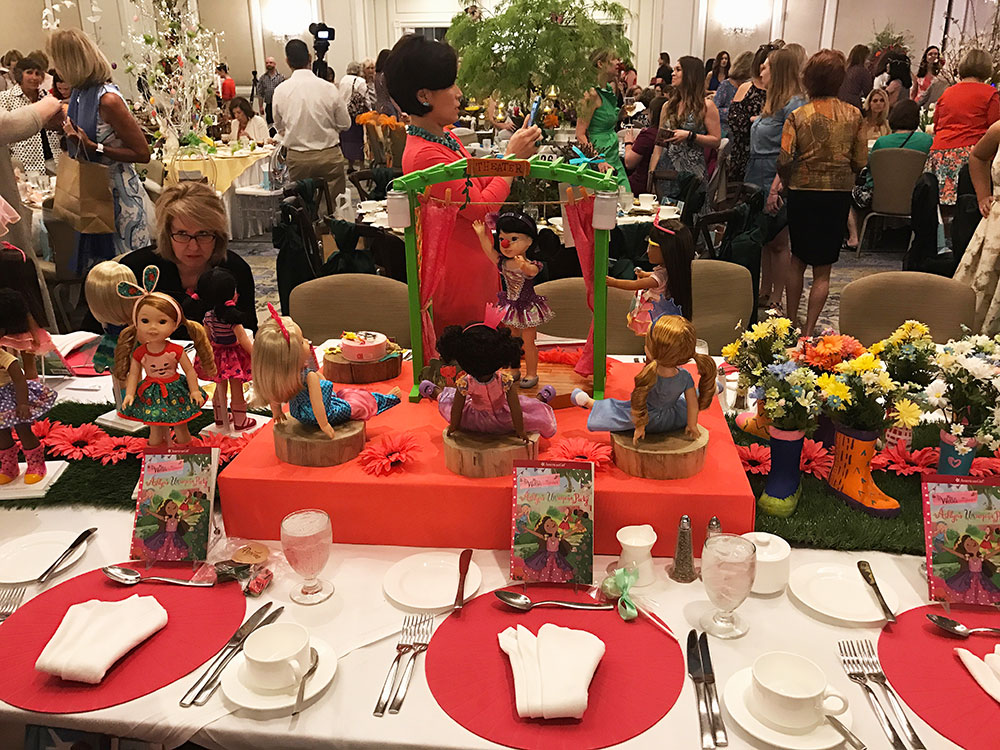
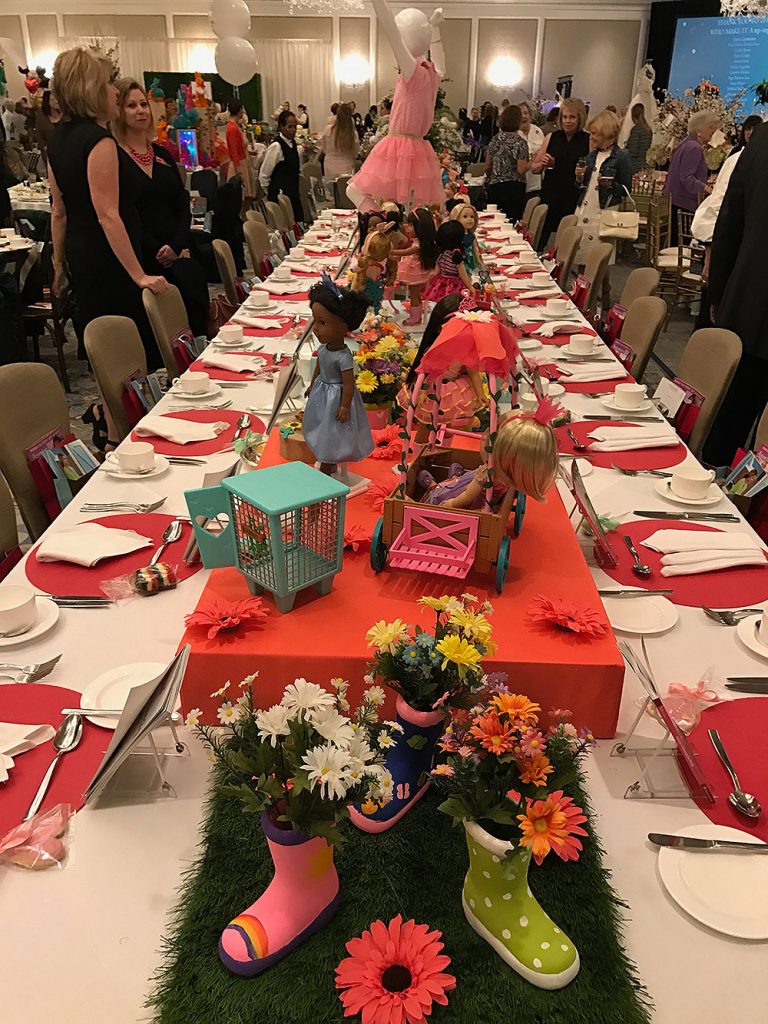
American Doll table by the folks at American Doll St. Louis. Very cute!
American Doll Table. Loving those adorable boot centerpieces.
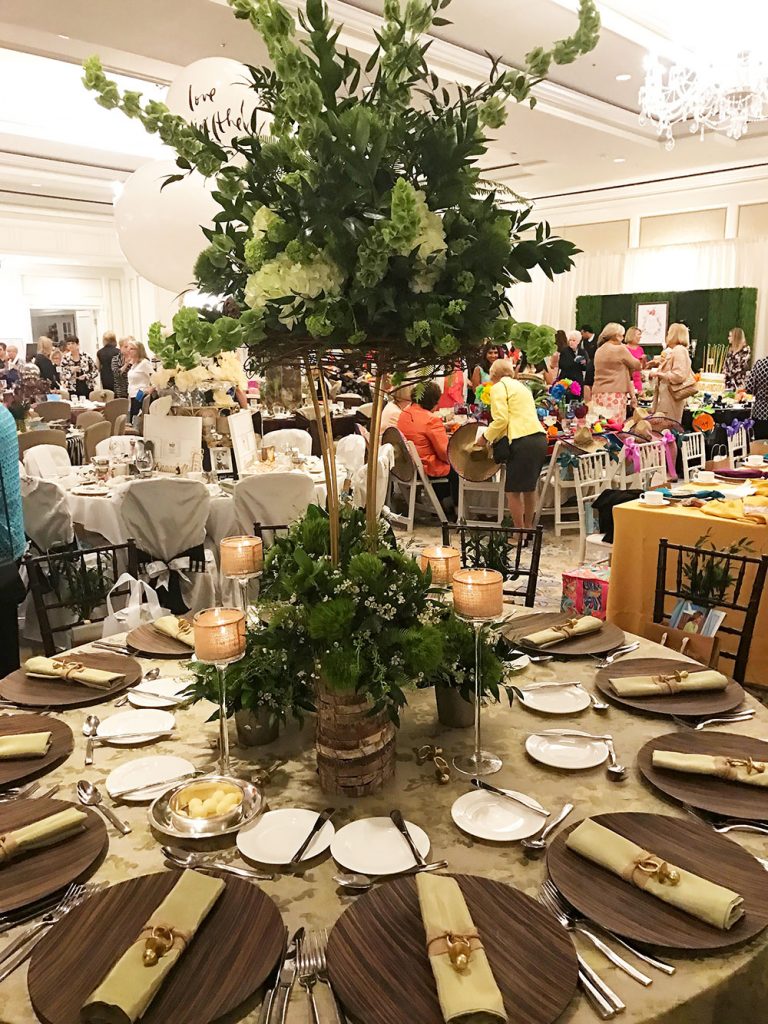
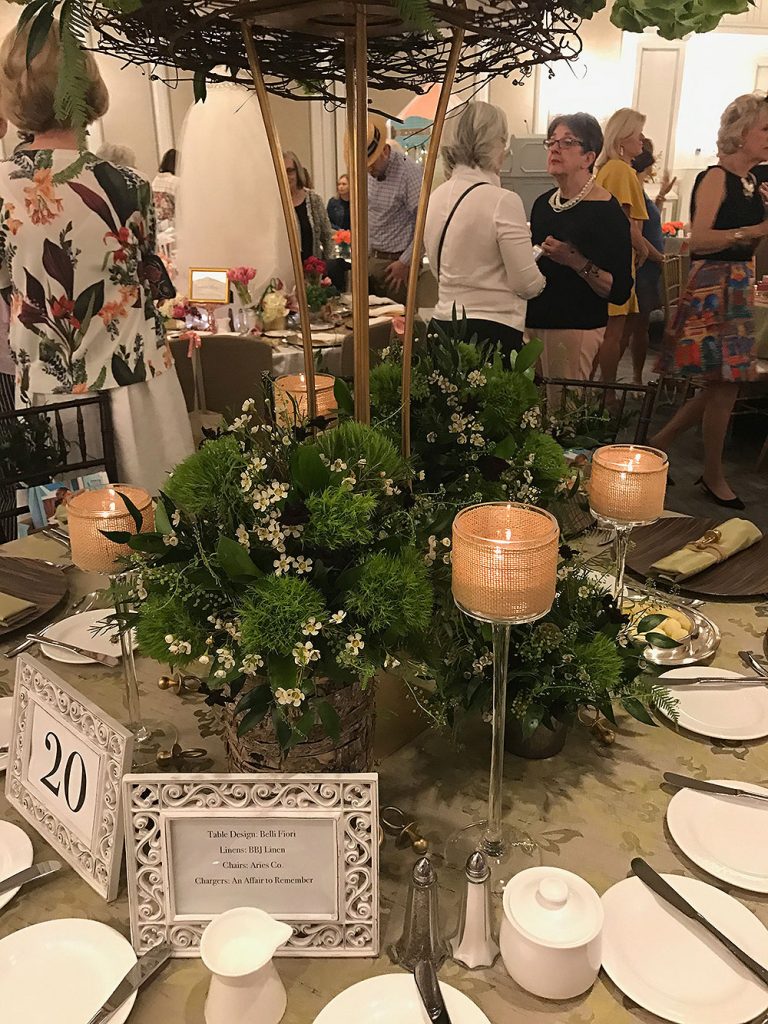
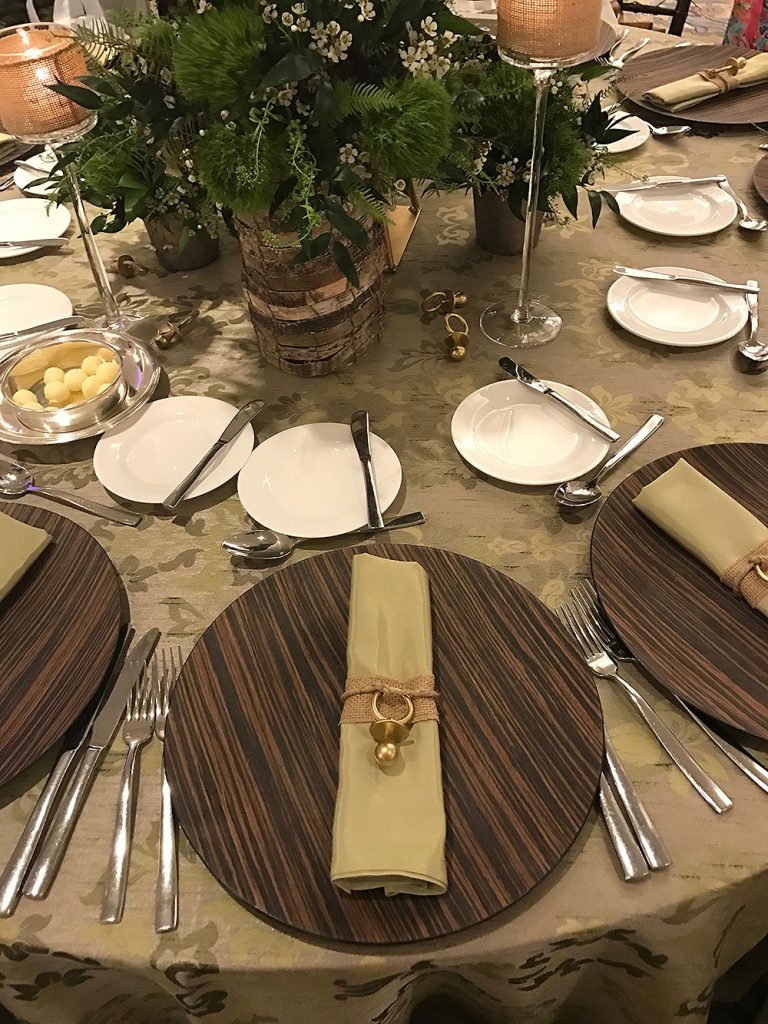
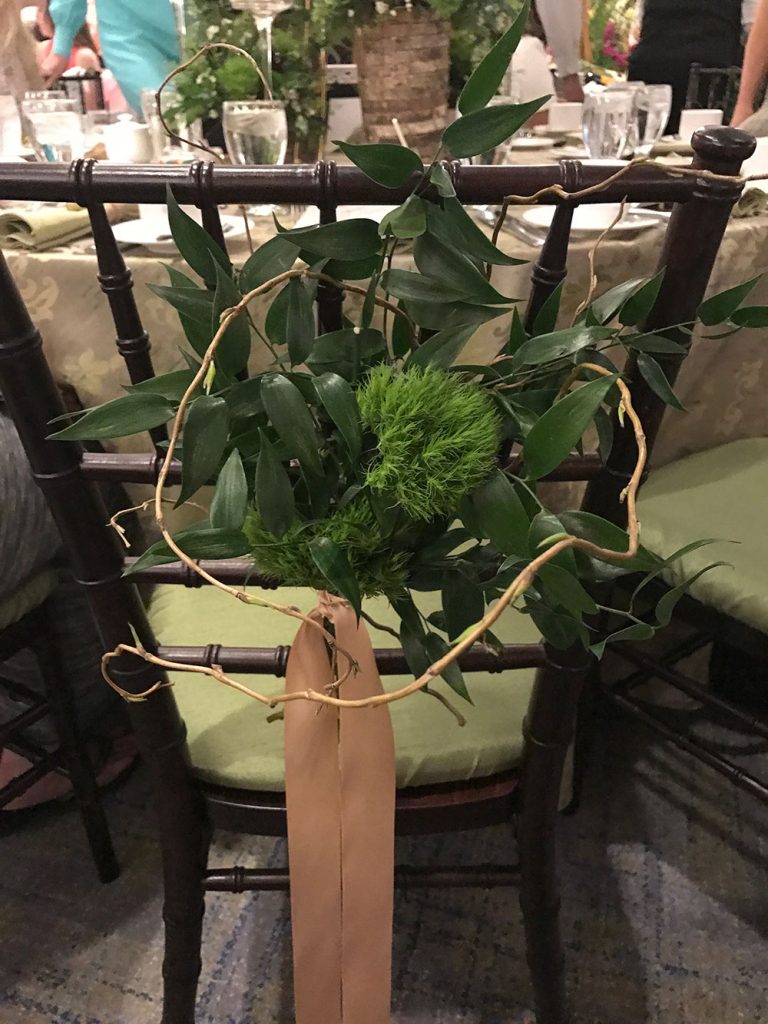
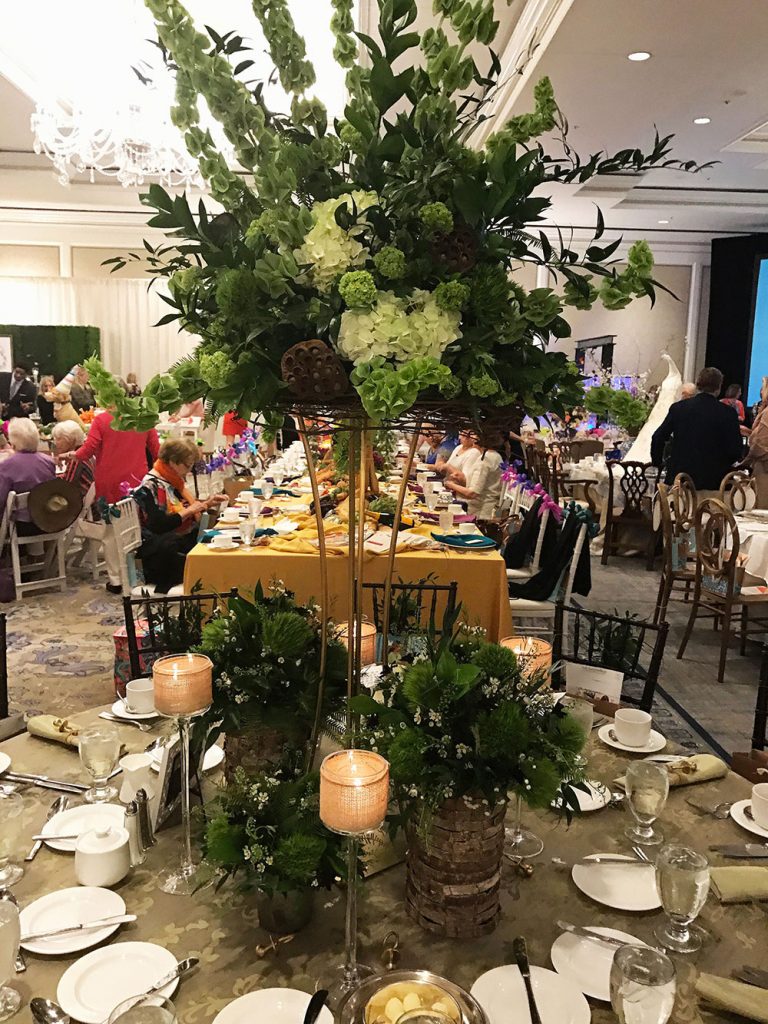
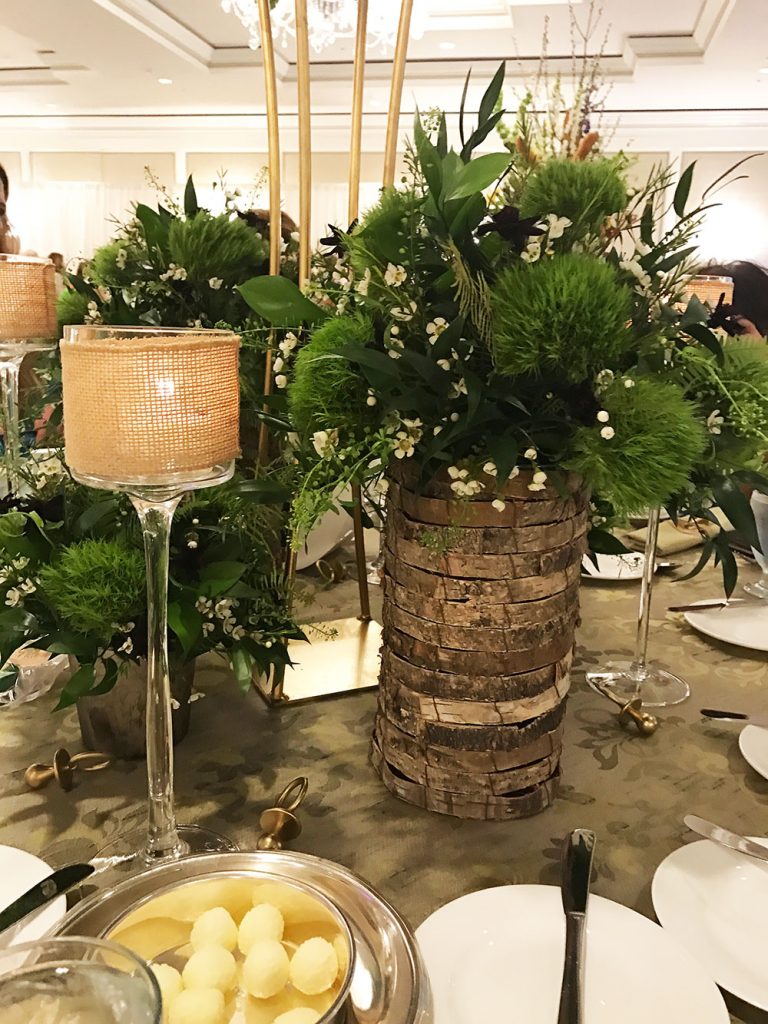
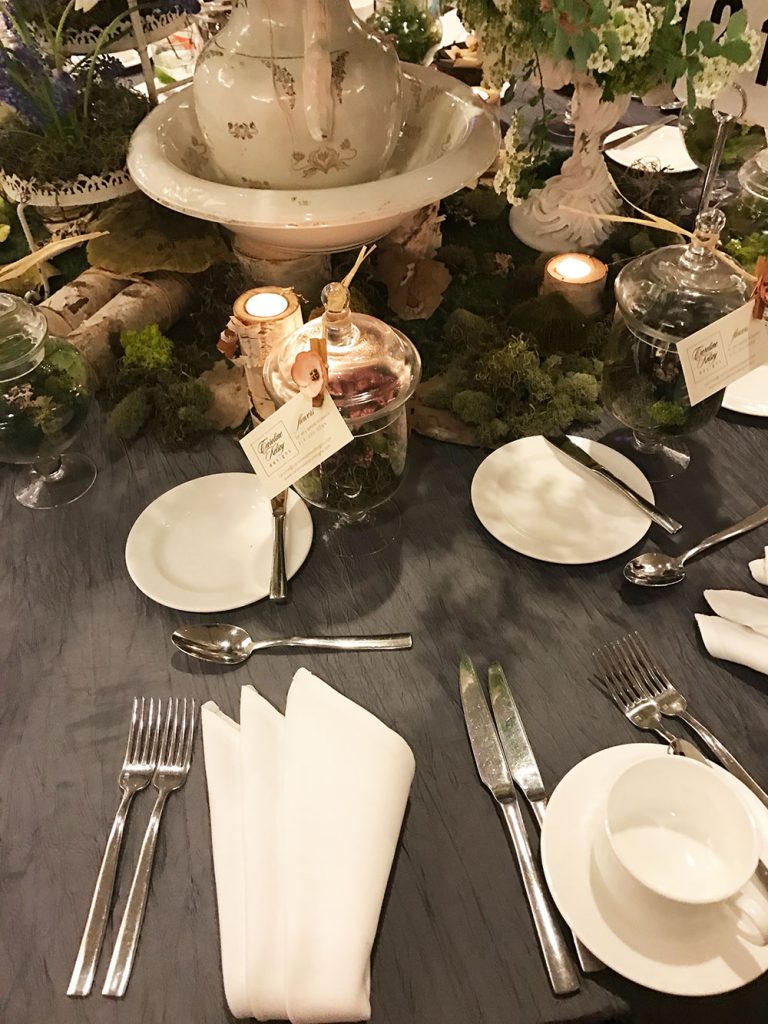
This was a very creative woodsy baby shower theme created by Belli Fiori. I thought this was a clever way to get out of the pink or blue “box” and step into a very unique green and brown color palette.
Love the bushy green base. Gives the table a sense of fullness. The votive holders, which are raised off the table, also bring your eyes up to the main centerpiece.
The wood chargers are very organic while the moss green table linens give all the table accessories a great backdrop.
The chair had interesting floral decorations which were very organic and free flowing.
And here is the full table. It’s a WOW!!!
I also love the bark floral containers. Again, very organic. This concept would be great for a couple who love nature and the outdoors.
This beautiful table, created by Caroline Kelsey Flowers, is also one of my favorites. I love the choice of linens which make the china pop beautifully off the table. The distress floral container is gorgeous and all the natural elements are beautifully orchestrated. I found this table to be very soothing and relaxing.
Love the texture of the tablecloth and the touches of moss around the base of the centerpiece. Really well executed!
This table, by Cherree Berry Paper, which is a bridal shower, is classic and beautiful. The floral elements, created by Bloomin’ Buckets, look like something out of a magazine. I love the table linens as well.
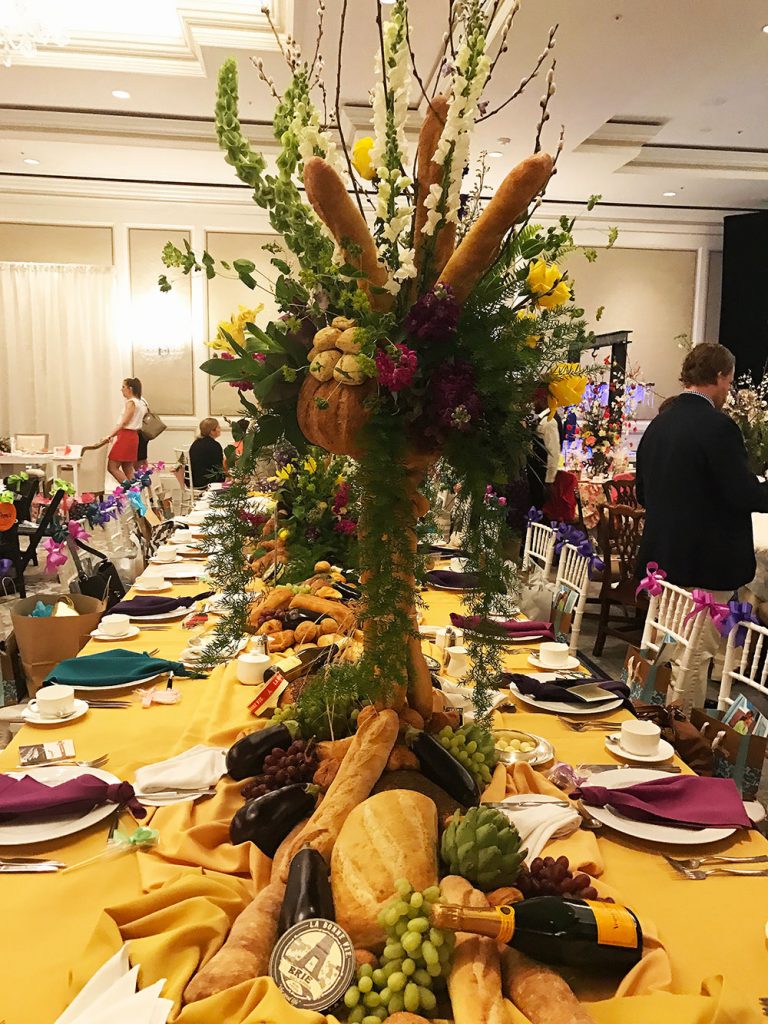
Although I was not the biggest fan of this arrangement, since it looks like a hand with three fingers, I have to say that I thought it was very creative. The centerpiece is designed with vegetables, bread, cheese, fruit, and alcohol… all of the things I LOVE!! So, I would have been in heaven if I was sitting at this table.
One of the most talked about tables was designed by Cosmopolitan Events. Although they had a full team of vendors that contributed to their massive table, they did a great job fusing all the elements together and creating one of the biggest tables on display.
Love the backdrop of grass and flowers.
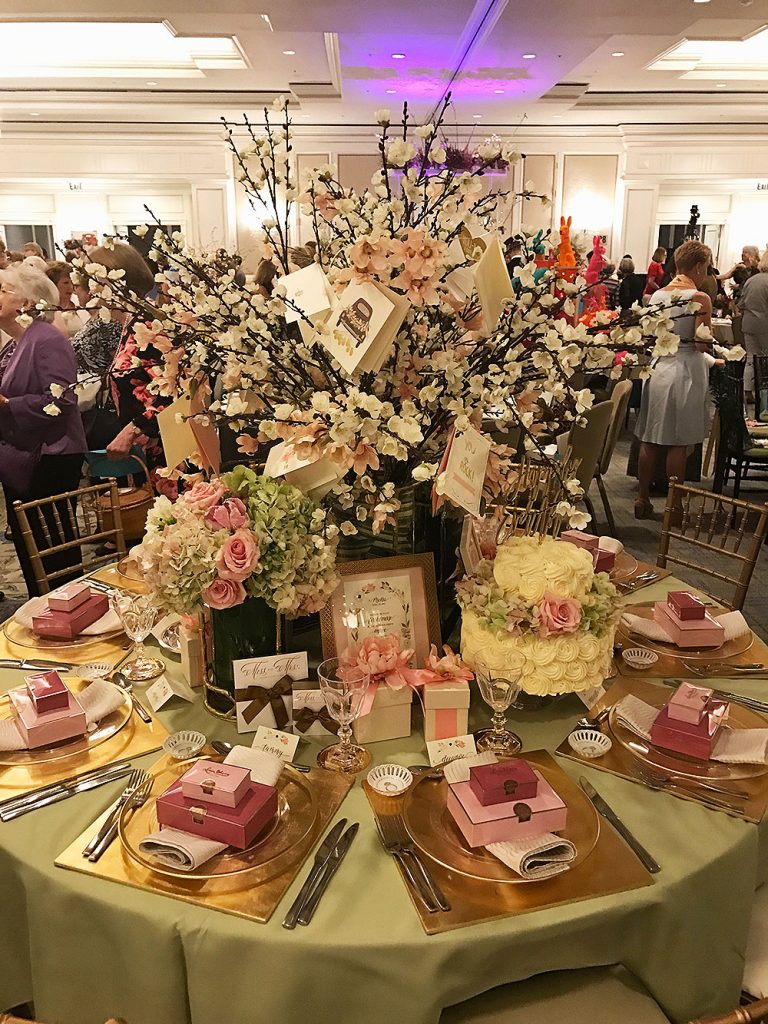
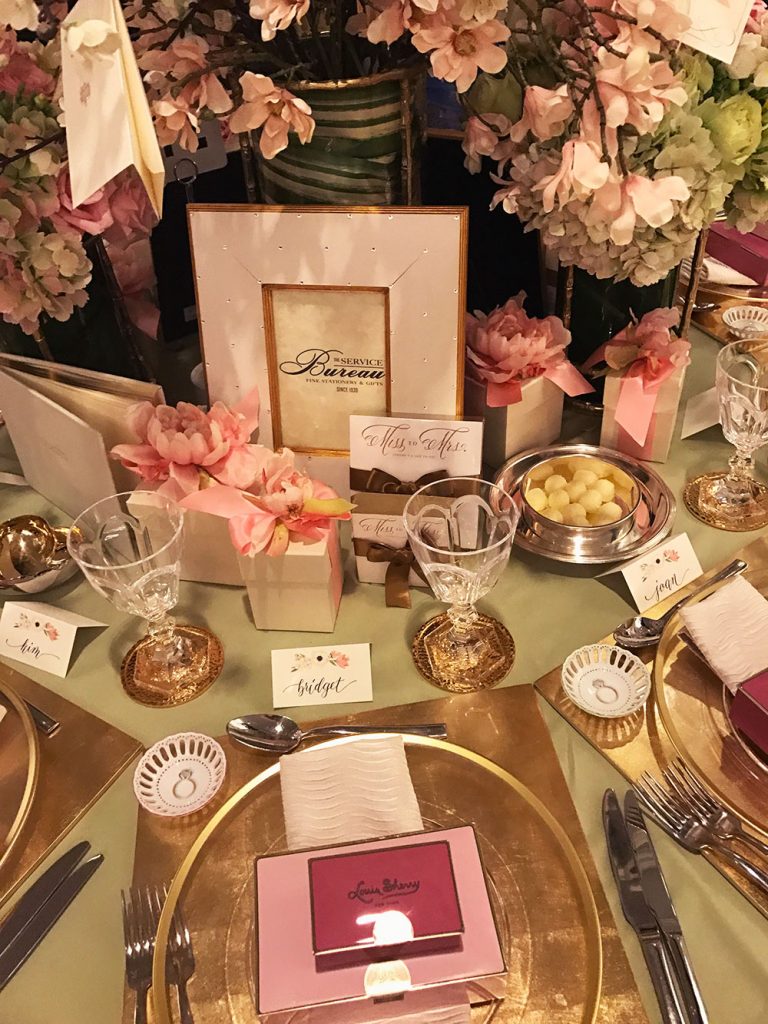
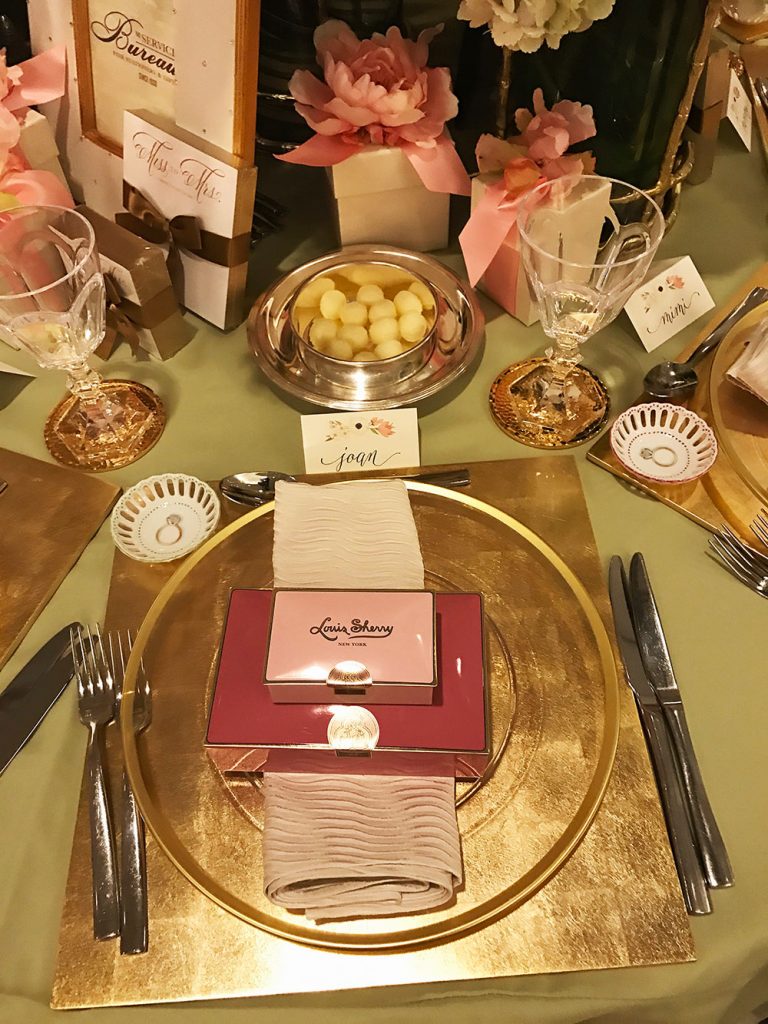
This gorgeous table was designed by the St. Louis Service Bureau. Each year they create a jaw dropping table and this year was no different. This bridal shower themed table is perfection!! Loving the dogwood centerpiece, which has cards filled with sweet wishes, hanging off it. The cake… the invitations… place settings… it’s all fabulous!
Loving the beautiful calligraphy on the place cards.
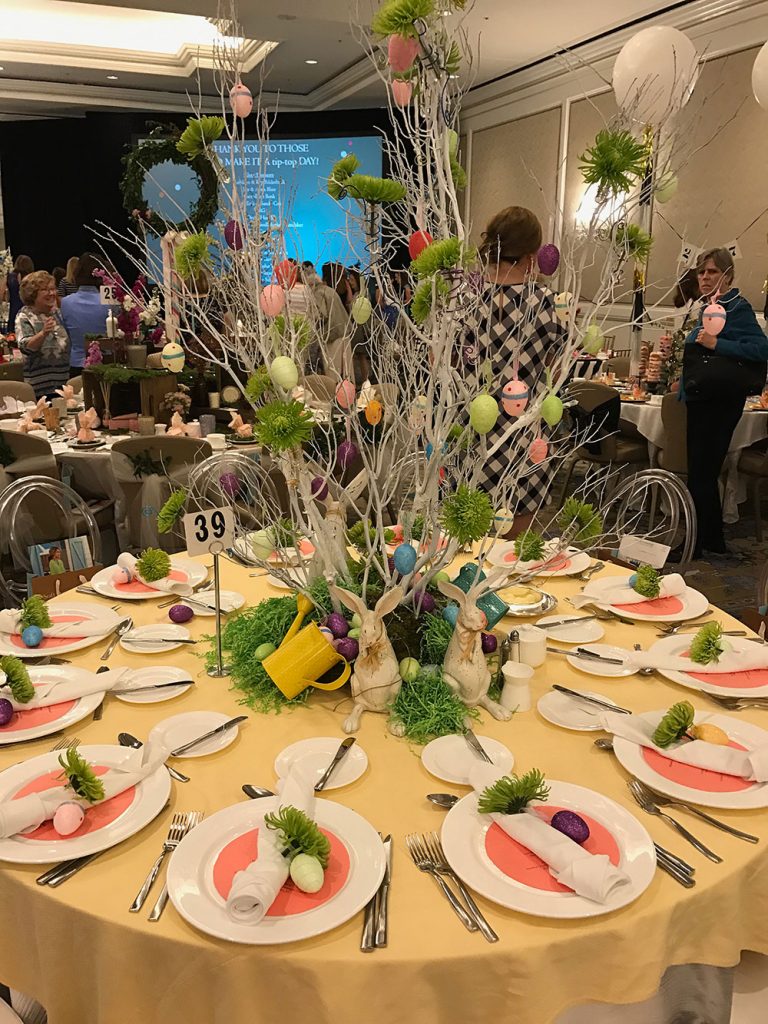
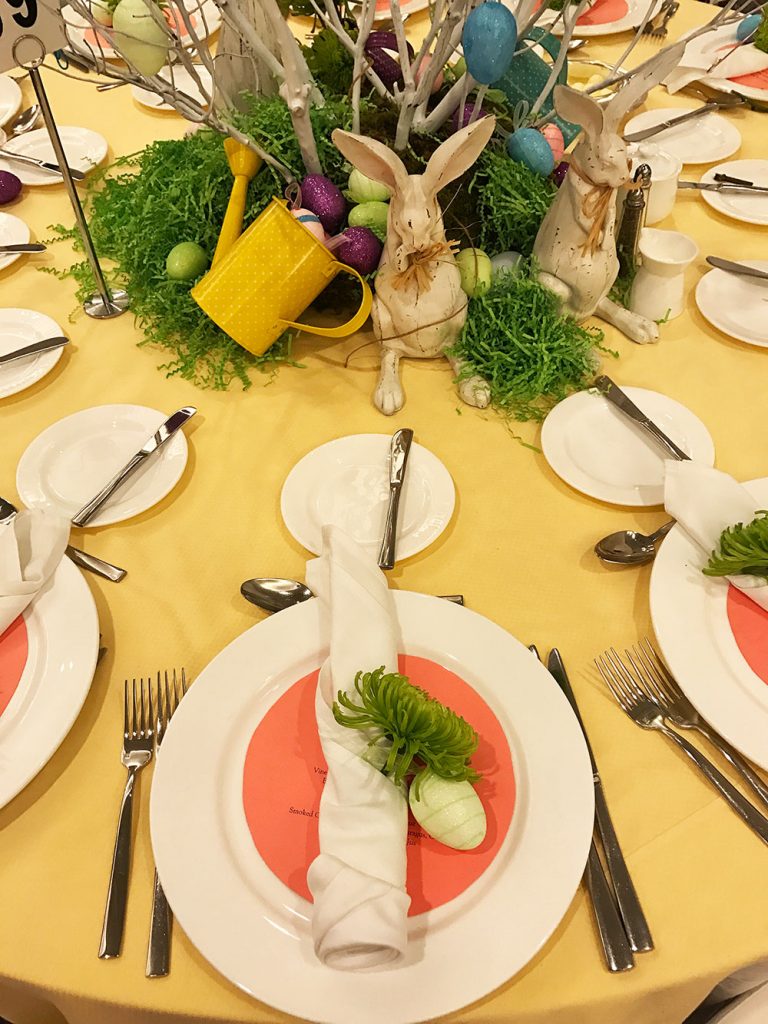
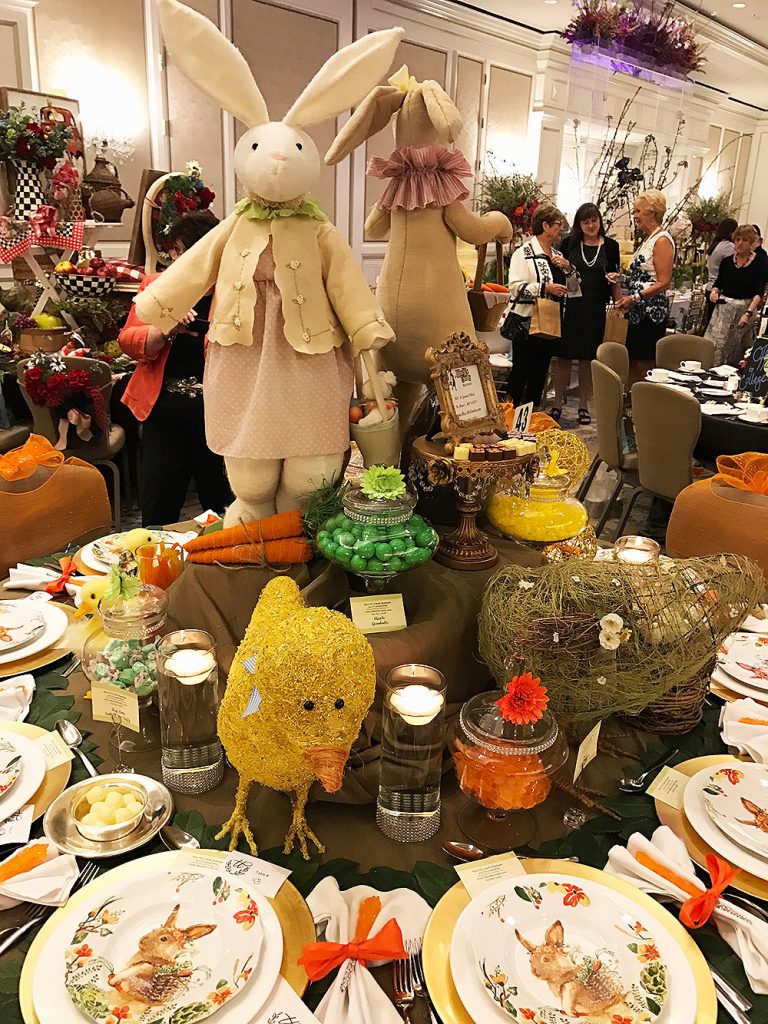
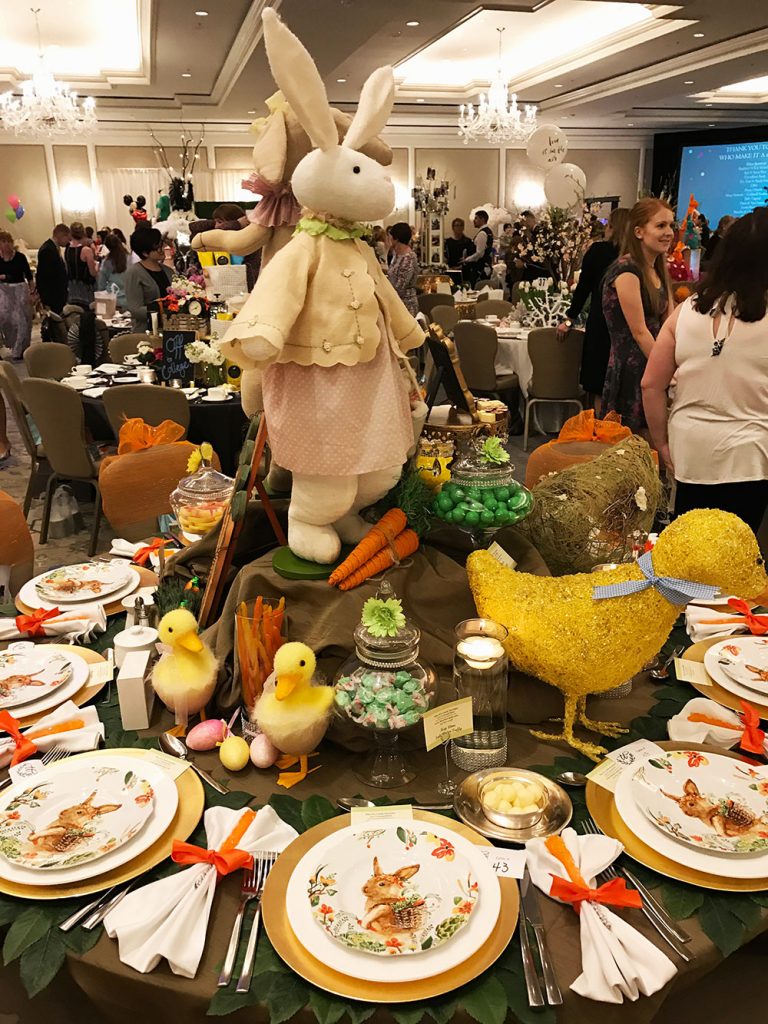
Isn’t this table ADORABLE?! Perfect for easter! Unfortunately, I don’t know who created it because I couldn’t find the card. But I just love how festive it feels. I also love that it’s not difficult to re-create. The simplicity of the details are my favorite. I love it when I find a table I adore and I can actually re-create it! Unfortunately, that’s hard to find at Table Top events since people want to impress the guests with crazy designs that either cost a fortune or are impossible to re-create unless you are an award winning florist. This table was beautifully designed and also non pretentious. I just love it!
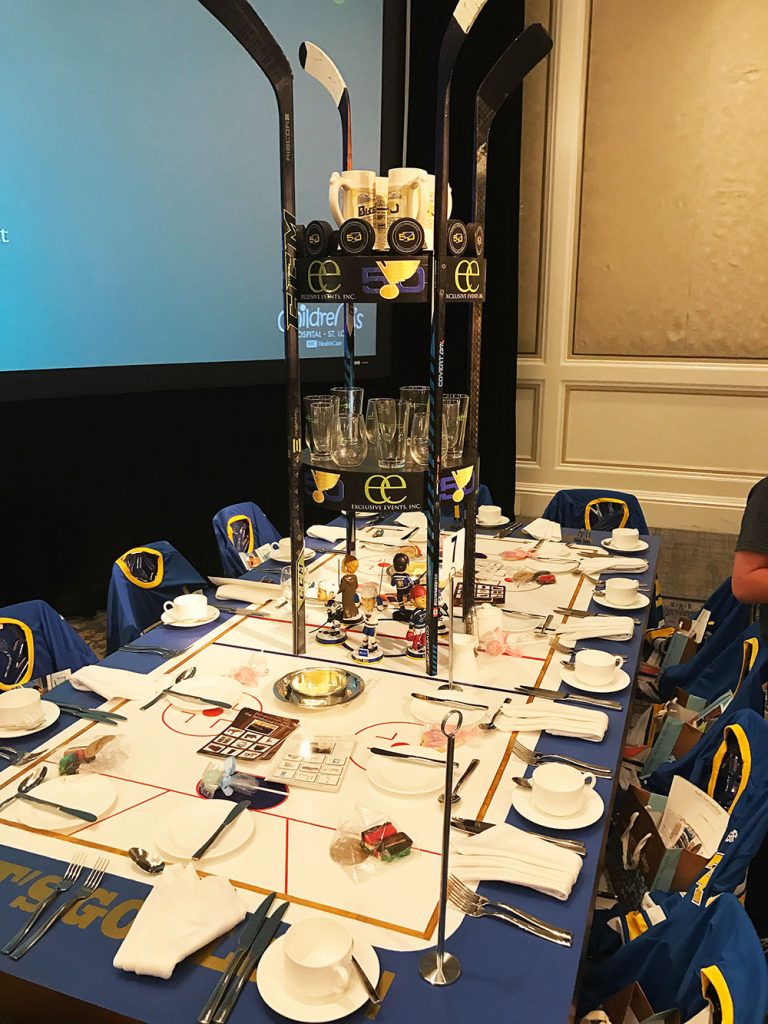
This St. Louis Blues hockey table is a DREAM for a boy’s birthday. It was created by Exclusive Events and was by far, the most popular table at the event, which is ironic since all the guests were women. Each chair had a blues hockey jersey on it, the centerpiece is actually created with four hockey pucks, and the table itself is the ice rink… GENIUS!!
How can you not fall in love with this beautiful table from Walter Knoll Flowers. It just screams SPRING!
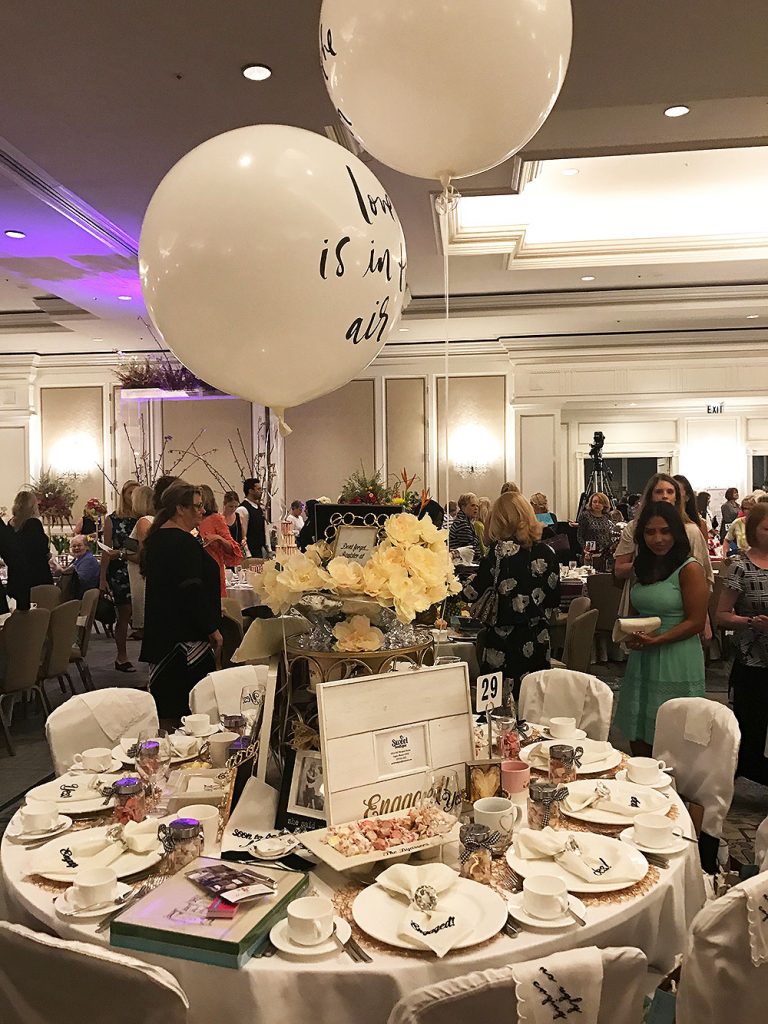
Fun table Happy Engagement table from The Sweet Boutique. I love the large balloons with sweet messages printed on them like “Love is in the air!”
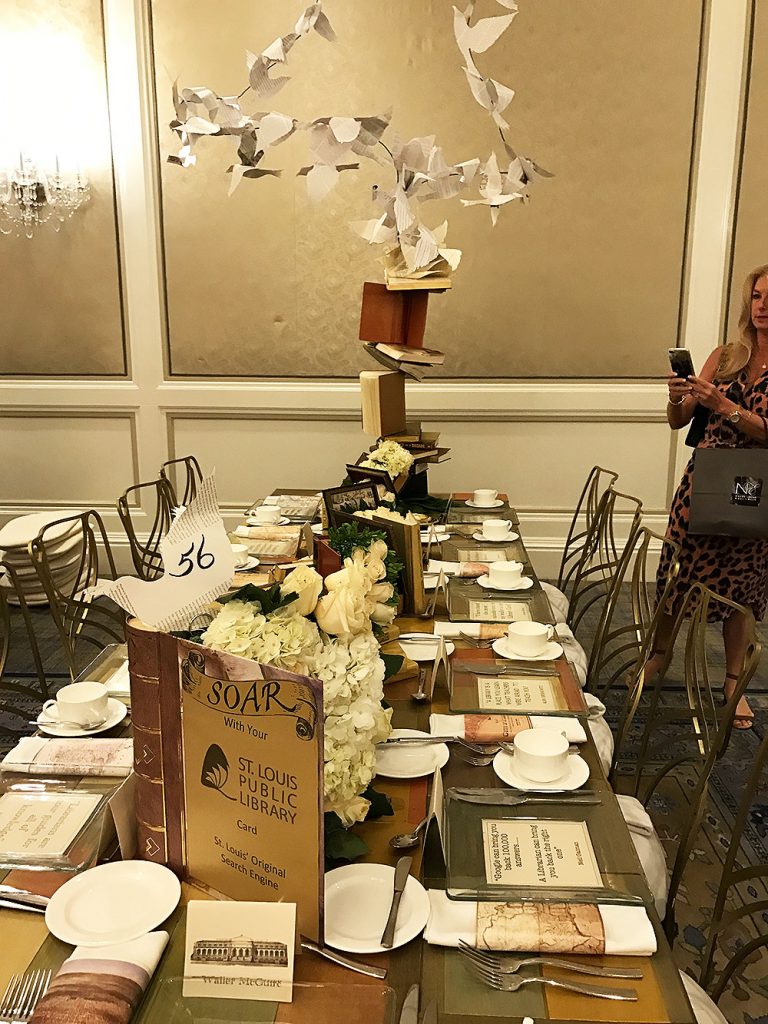
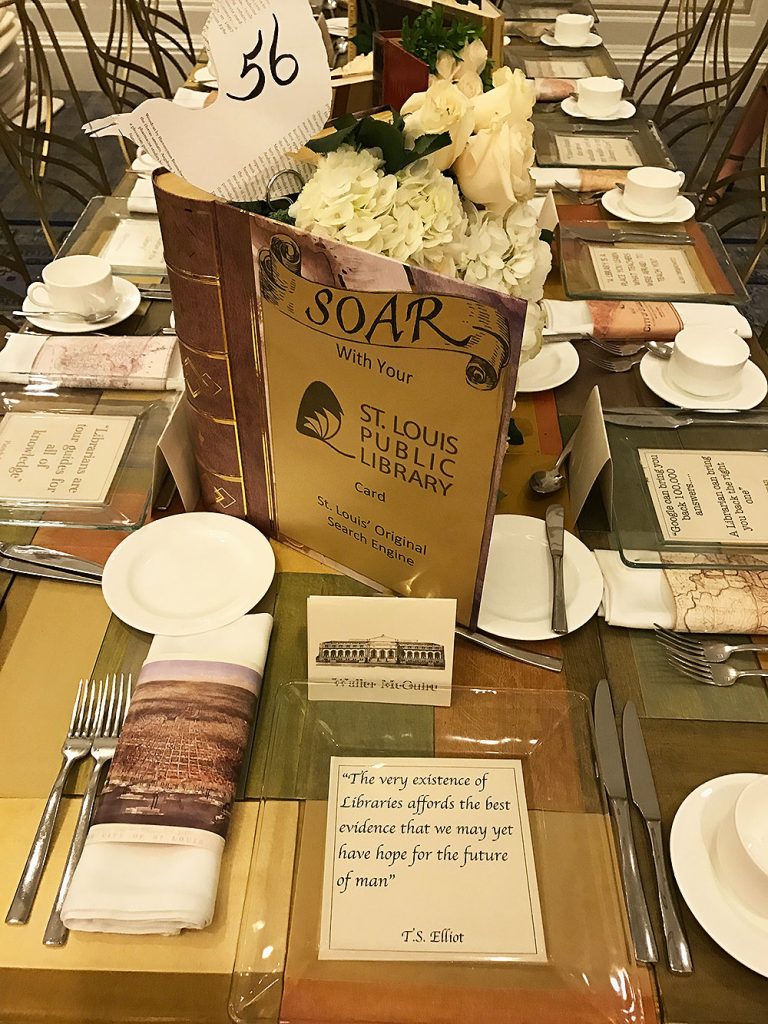
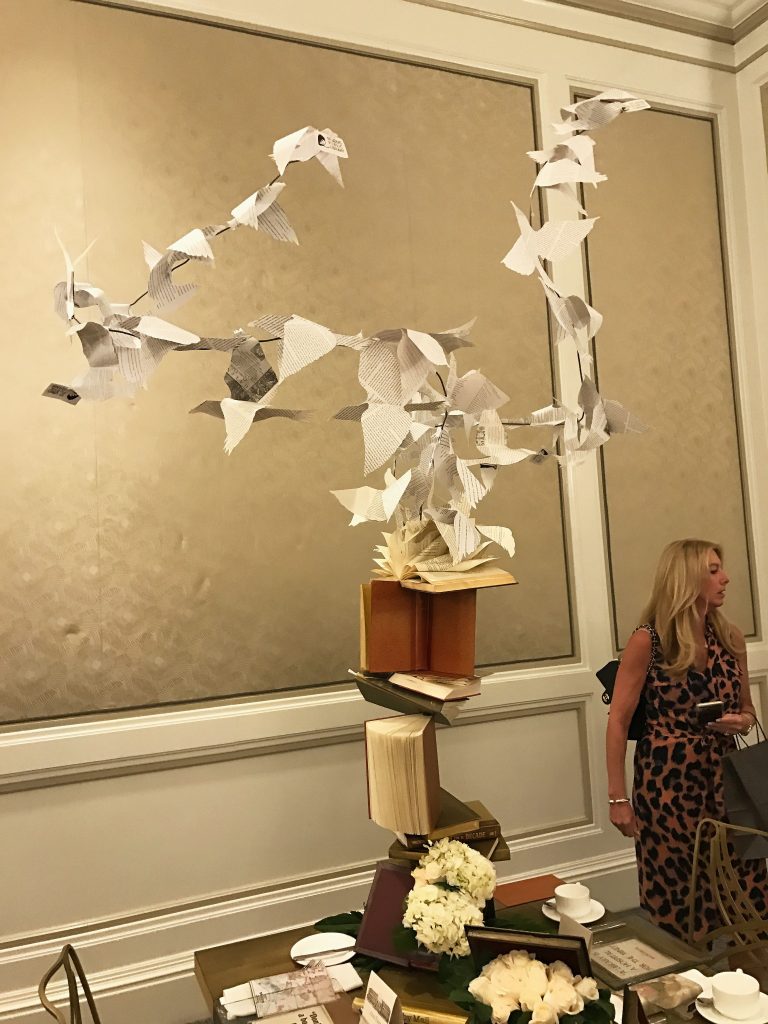
This table was a SPECTACULAR!! And the most ironic thing is that it came from a vendor that does not do special events… not a florist, not a designer, not a special events venue.. but The St. Louis Public Library! It was absolutely spectacular. People could not get enough of it.
The place cards were popular quotes, the table cloth were made out of old book covers, the centerpiece was books with pages flying out of them and occasional flowers. It was BEYOND creative. If this event was a completion. THEY WOULD BE THE WINNER!
Yes friends, that’s a book tower with pages flying out of them!!!
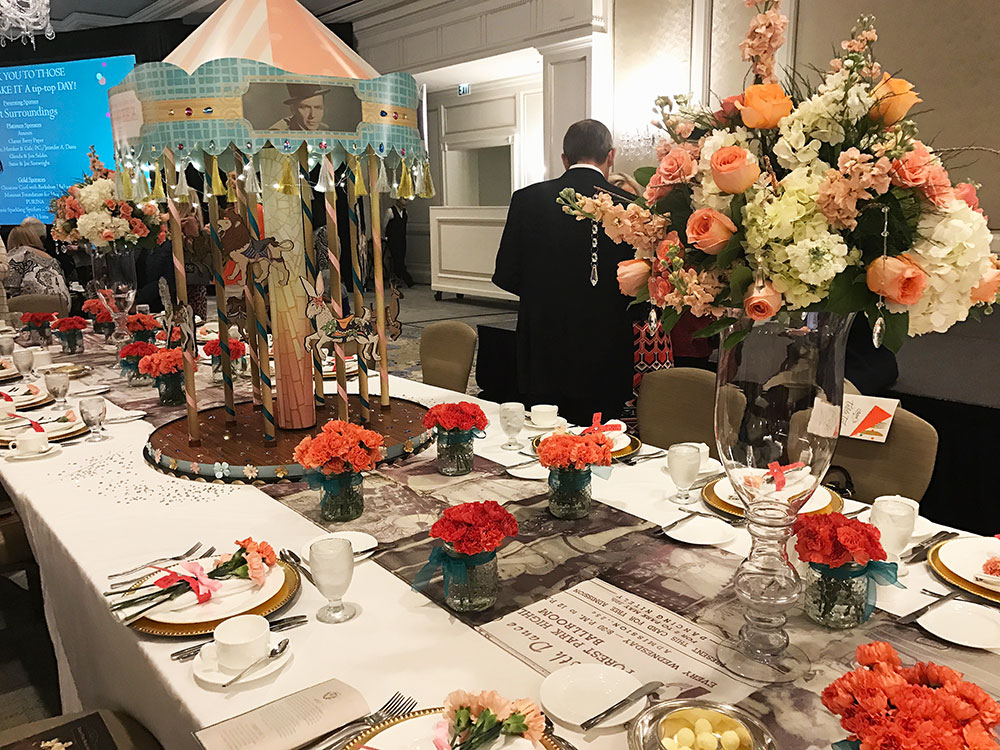
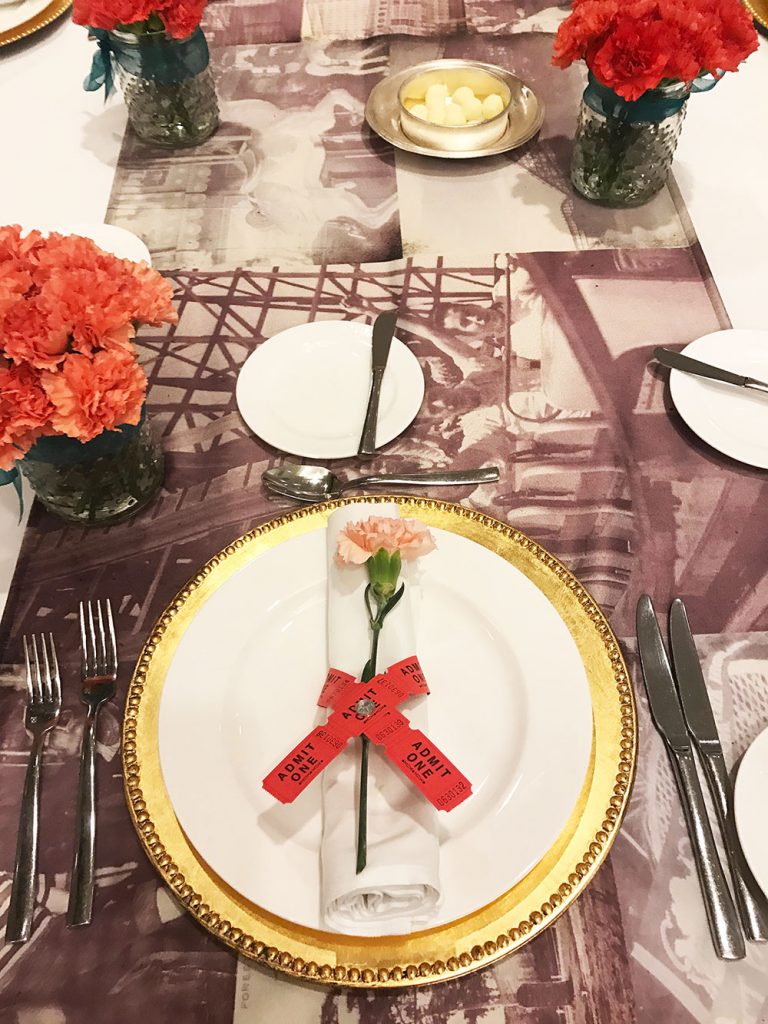
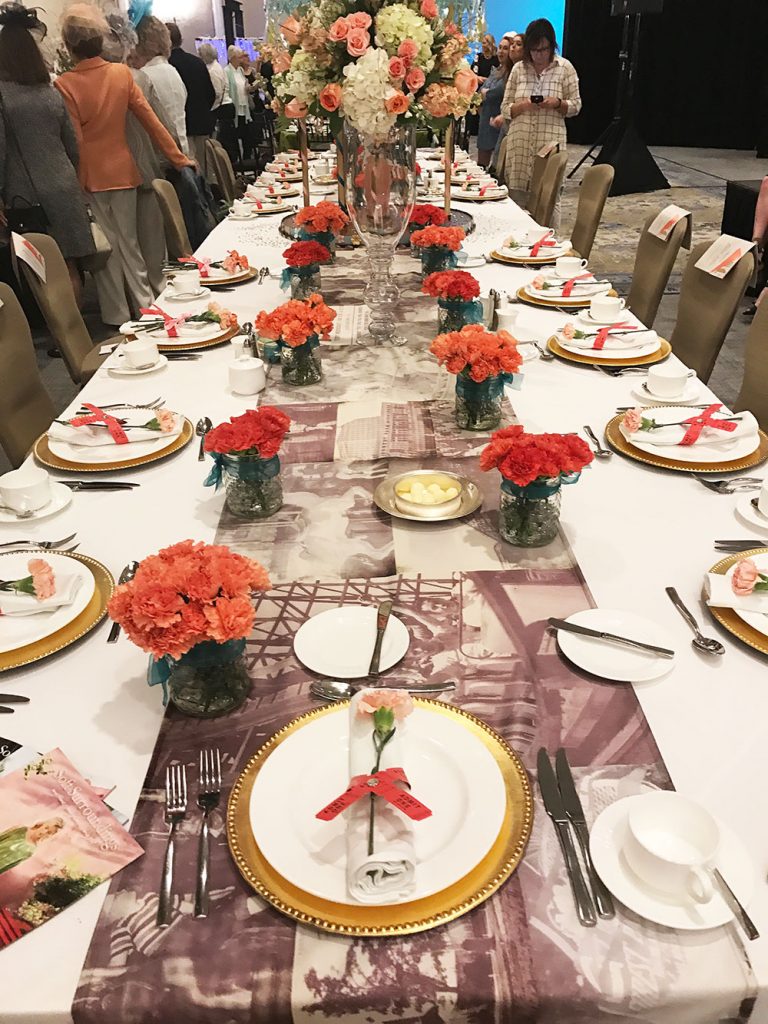
Soft Surroundings sponsored this event and they had a large table with a carnival theme.
Cute Merry-Go-Round tickets wrapped each napkin.
I also loved the runner which was a collage of vintage photos of carnivals and theme parks. Really well done for such a large table.
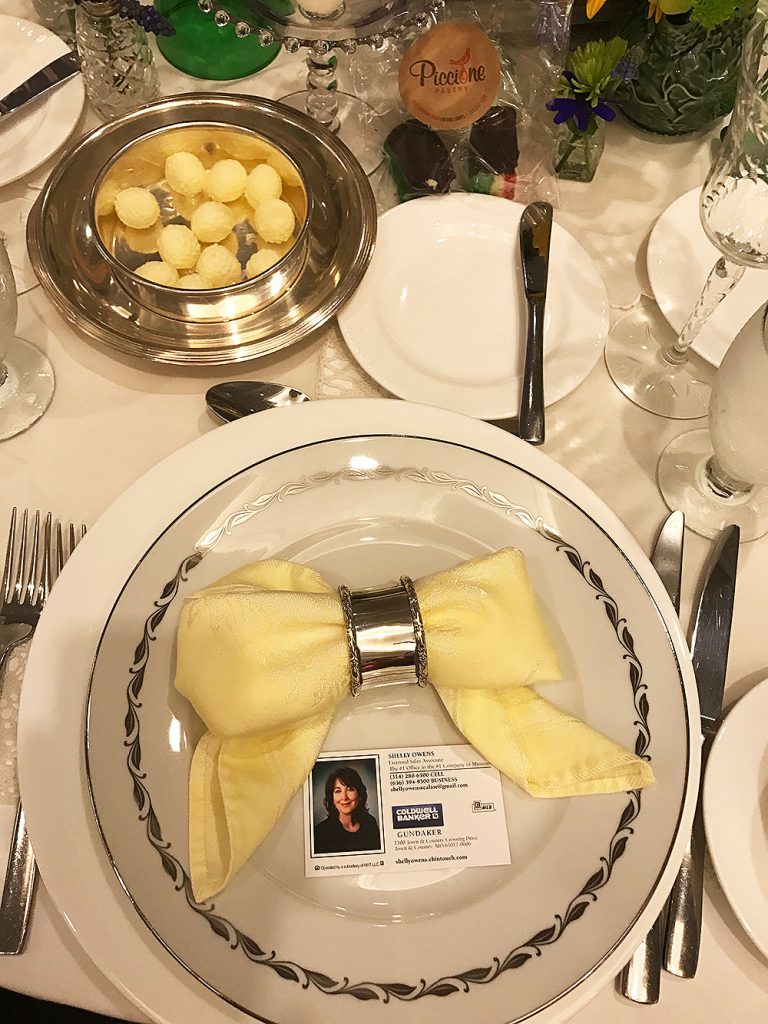
This “housewarming” themed table was adorable. It was created by a local realtor, Shelly Owens, and she did a wonderful job inspiring guests on how to create a fun table without spending a fortune. The centerpiece is a grouping of adorable birdhouses. She added flowers and cute messages for a fun touch. Another table I thought I could easily replicate.
This was a very interesting table from Pure Air Natives. Very natural.
This table was SOOOO CUTE!!! It was from Miss M’s Candies. She did a wonderful job of bringing fun and whimsy to the event. It was so reflective of her branding.
Loving all the bunnies and ducks… oh and those plates!
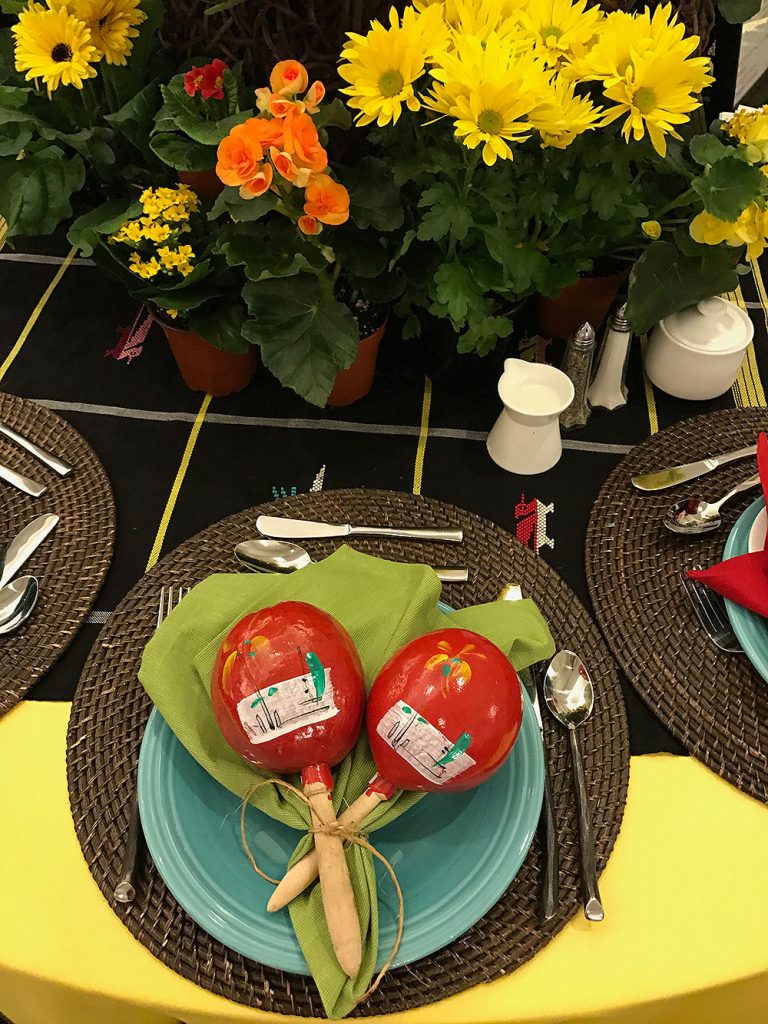
Fiesta party from June Roesslein Interiors. So colorful and fun, made me crave chips and margarita immediately! Love all the colors on the table and the centerpiece.
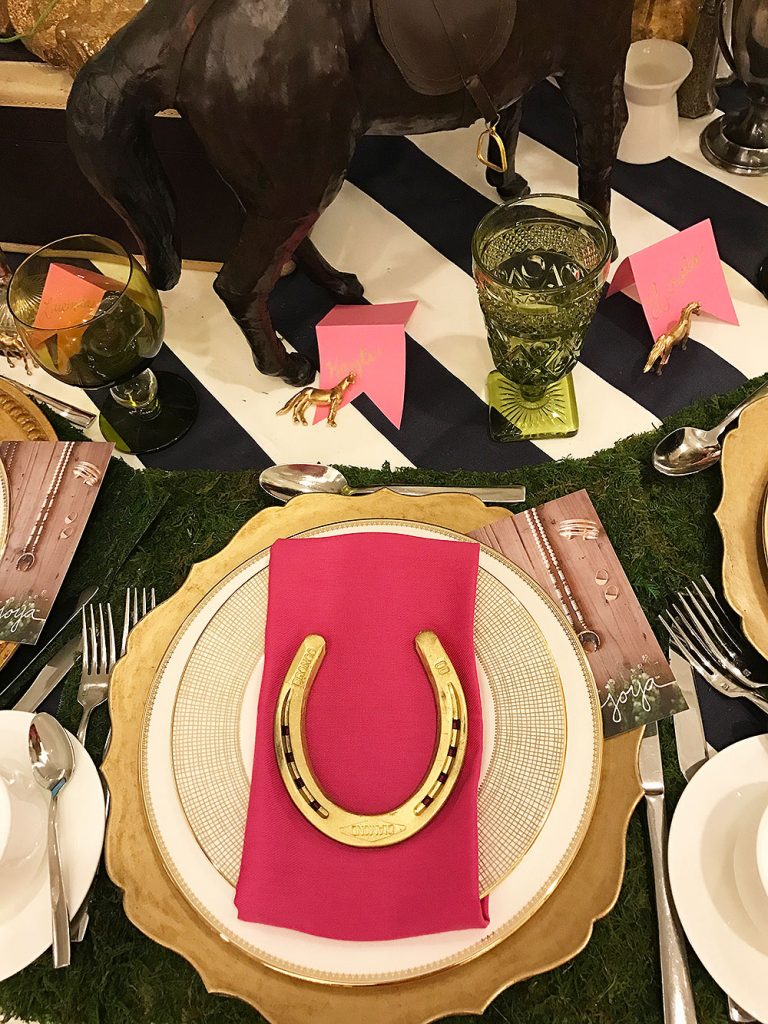
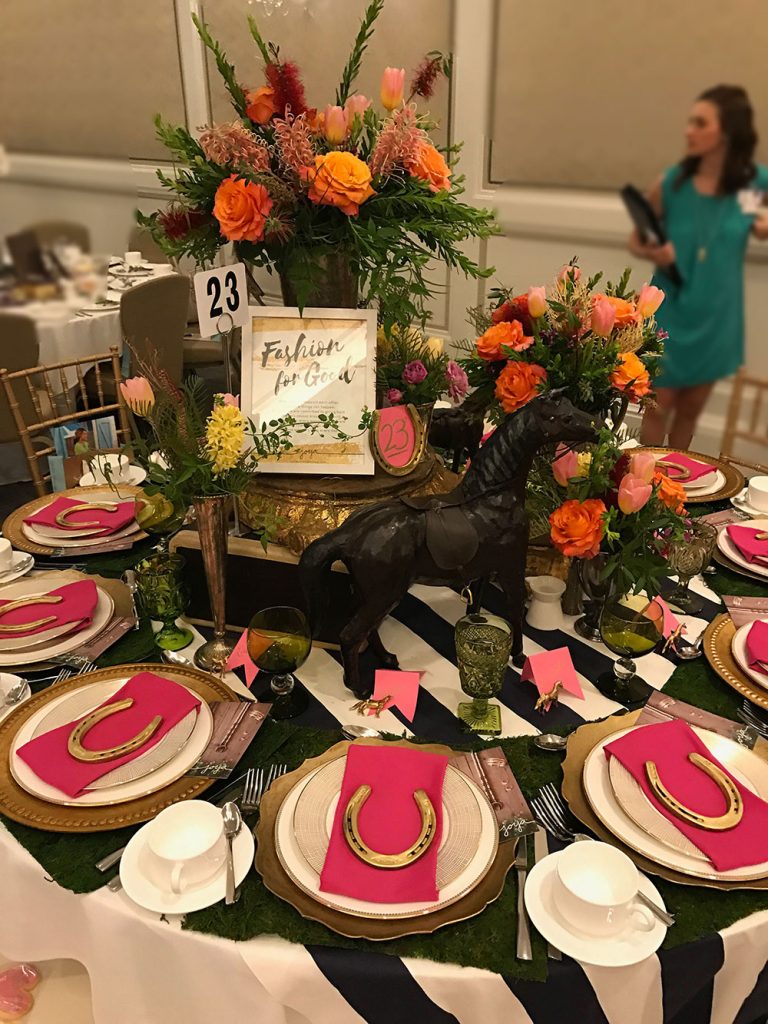
Gorgeous Kentucky Derby party by Joya. I mean… it’s absolutely perfect!
BLUSH Events created this gorgeous pineapple themed table with a stunning color palette. This is the perfect table for for a bridal or engagement party… or even a wedding. Two thumbs up!
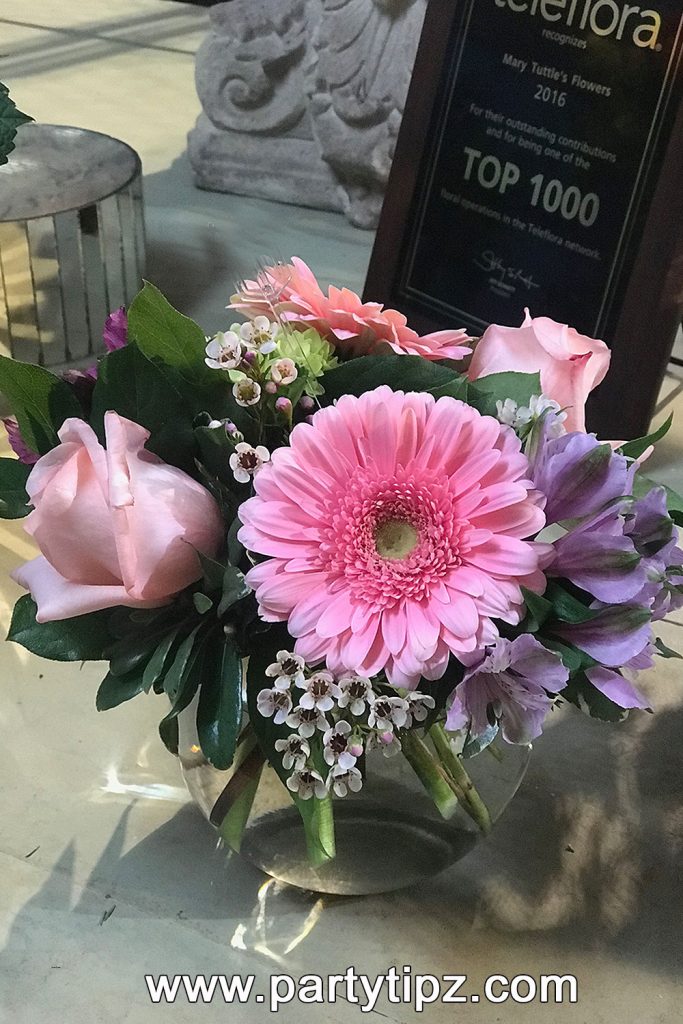
One of the best parts of transitioning into January from the hustle and bustle of the holidays is getting a preview of the upcoming spring inspirations. Mary Tuttles, a floral shop in Chesterfield, MO, is a great place to do just that! The designers at the store create beautiful spring vignettes and floral arrangements that exude creativity, no matter the season.
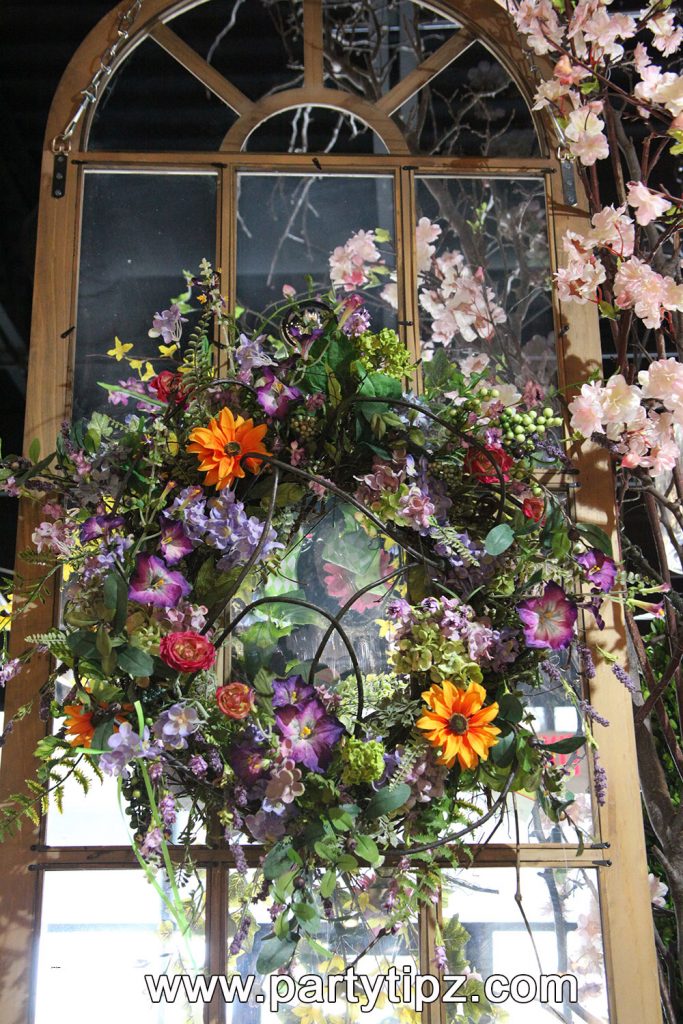
Today, I want to showcase some of the beautiful floral arrangements and vignettes created by the talented designers at Mary Tuttle’s.
Gorgeous bouquet, filled with so many beautiful flowers. Especially love the arch over the arrangement.
Loving this stunning Juliska pacesetting arrangement with the preserved boxwood ball. A classic!
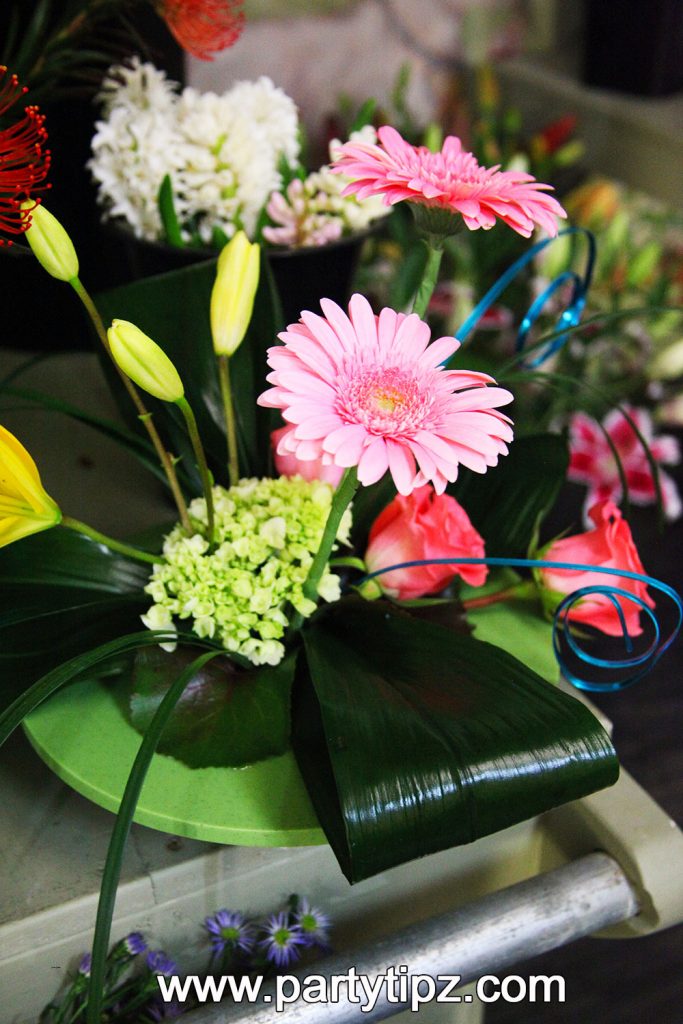
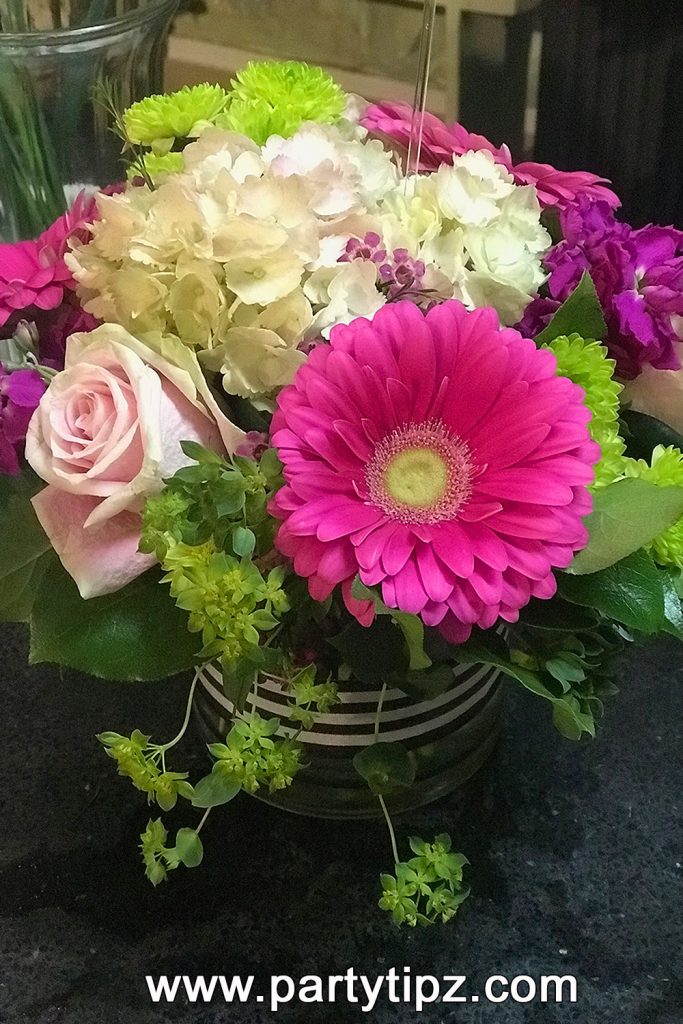
Bring on the Gerbera Daisies.. the perfect arrangement for spring or any time of the year!
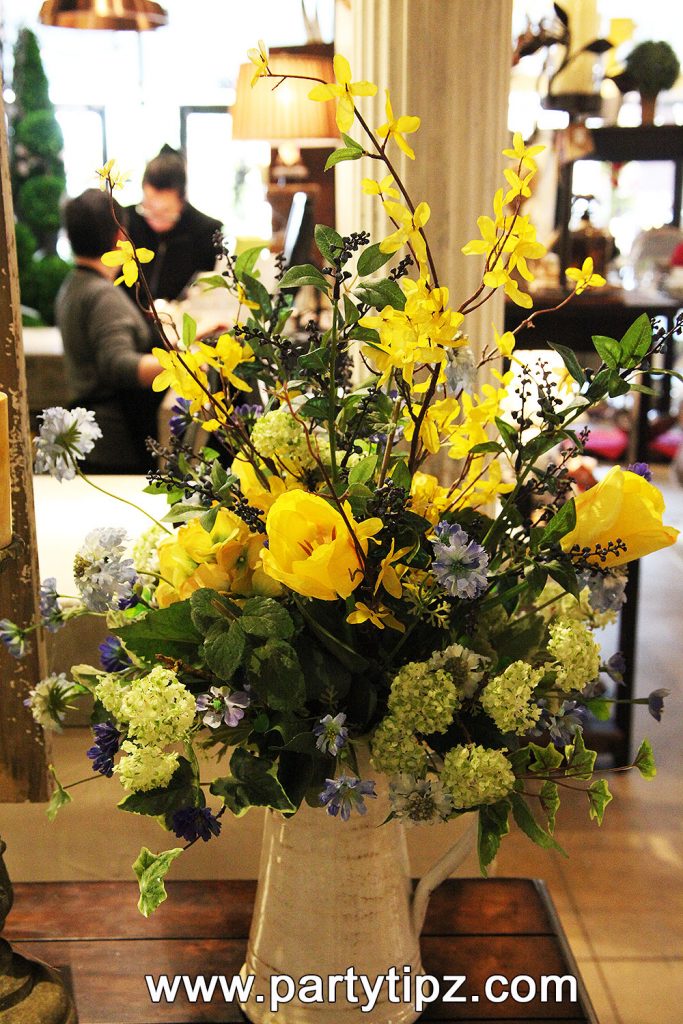
This spring arrangement is like a ray of sunshine! Also, a bit deceiving since its totally silk. Low maintenance!
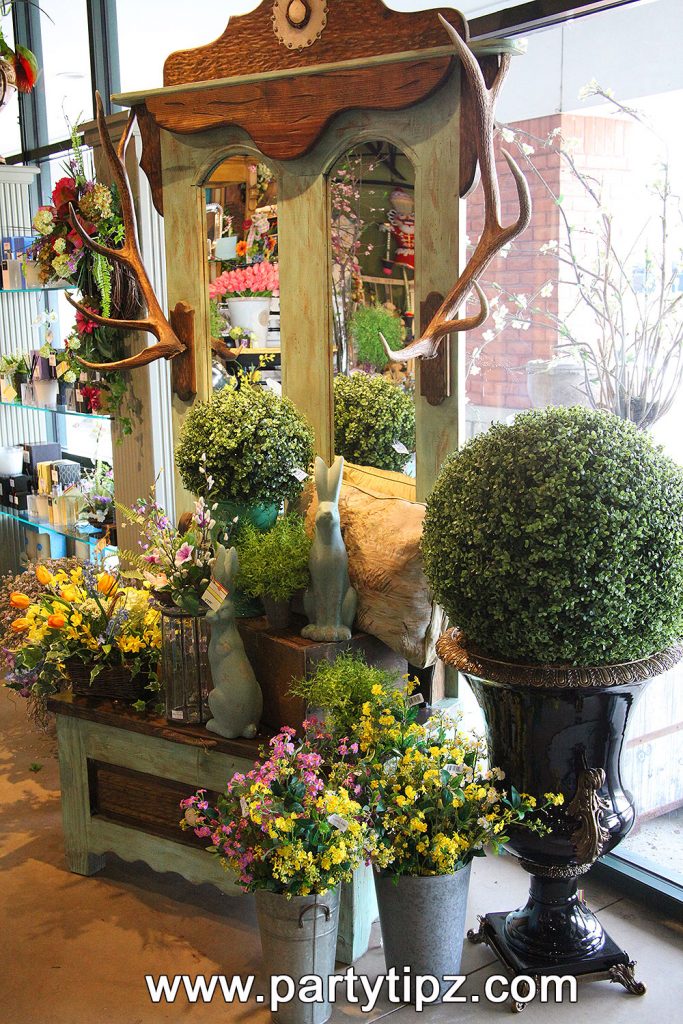
This Easter vignette screams SPRING!!! Loving the antler coat rack!
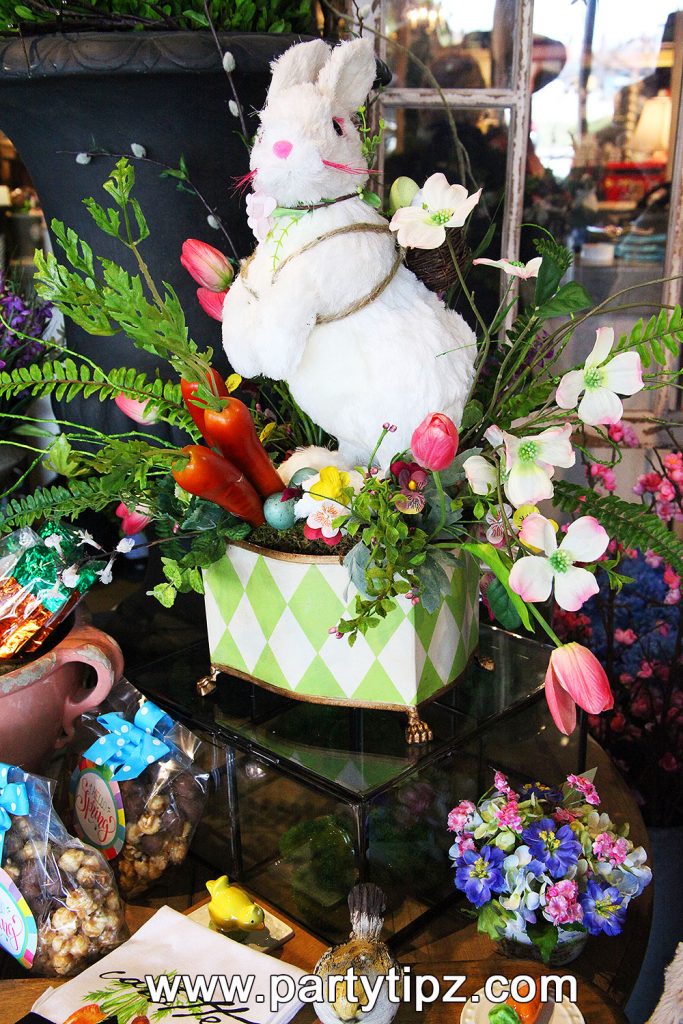
Who wouldn’t feel welcome entering a home with this adorable arrangement! I’m absolutely IN LOVE with this bunny in the harlequin container filled with tulips, dogwood, and carrots. The perfect addition to any foyer!
This spring wreath is PURELY STUNNING!!!
Hello pink gerbera daisy arrangement … you are gorgeous!
Black, white, and pink… need I say more! Always in love with this color palette and of course, a beautiful gerbera daisy!
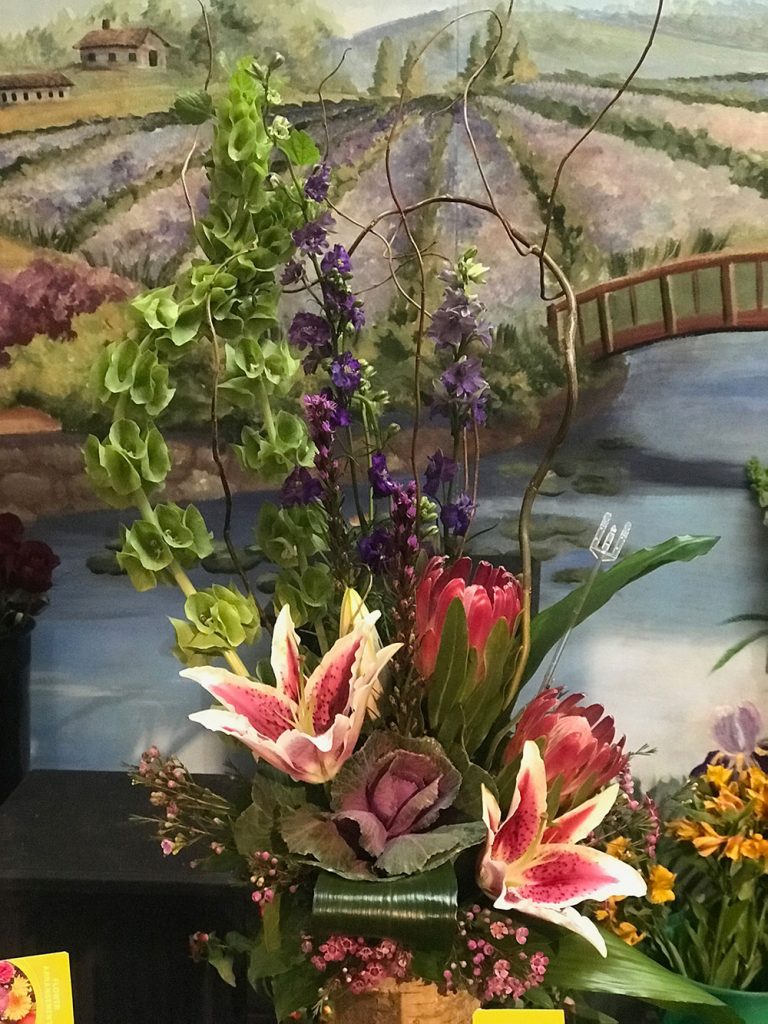
Who doesn’t love a little DRAMA!!! Loving this beautiful Lilly arrangement!
If you are from St. Louis, you may be familiar with one of the most beautiful stores in the area, Mary Tuttle’s. Located in Chesterfield, Missouri, it has become one of the “must see” retail establishments in the area. Why, you may ask? Because the people who work there, sales associates, designers, and floral artists, have created a home decor oasis that is unlike anything you have ever seen.
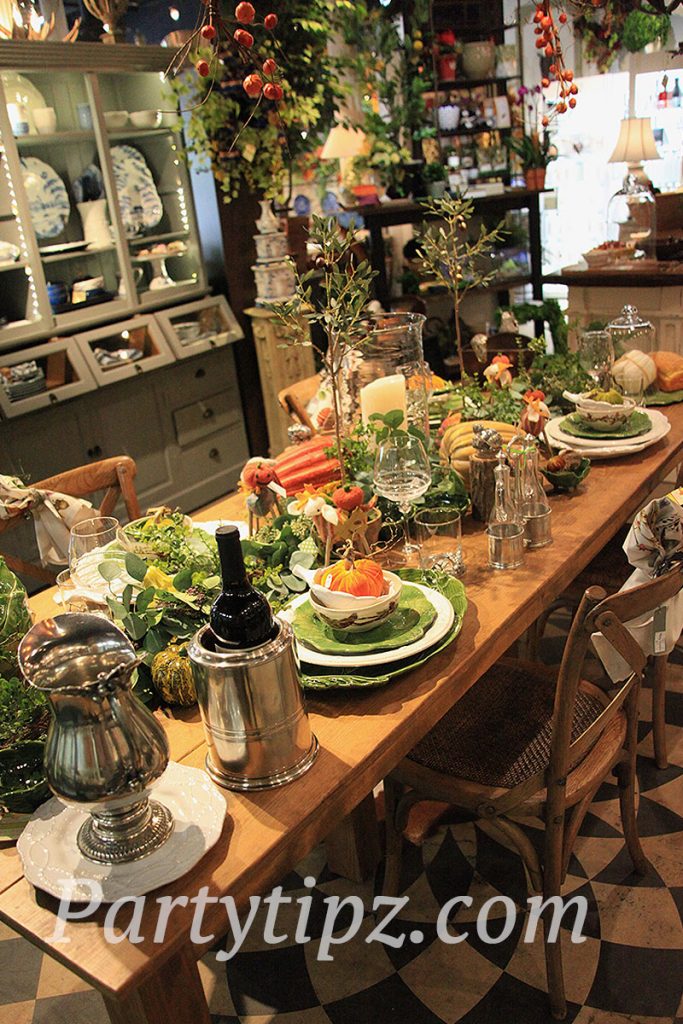
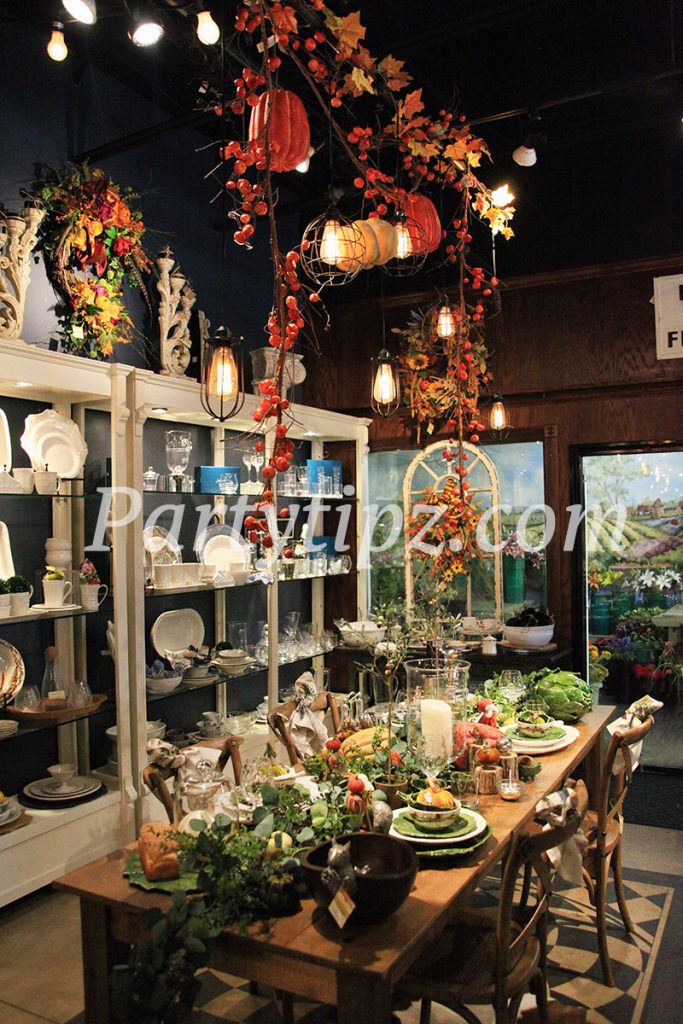
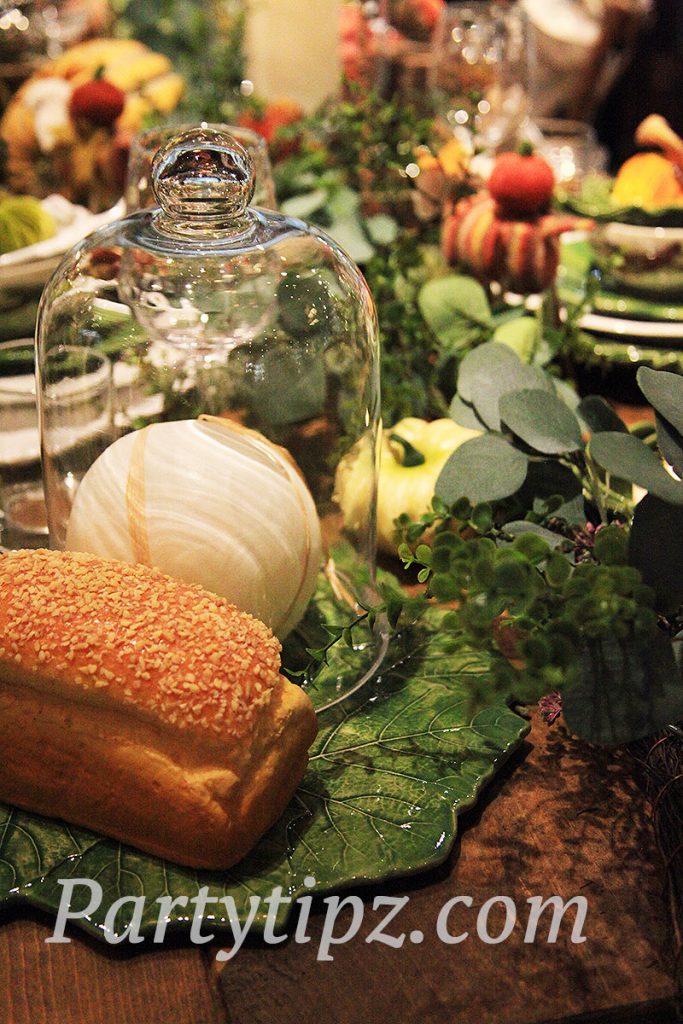
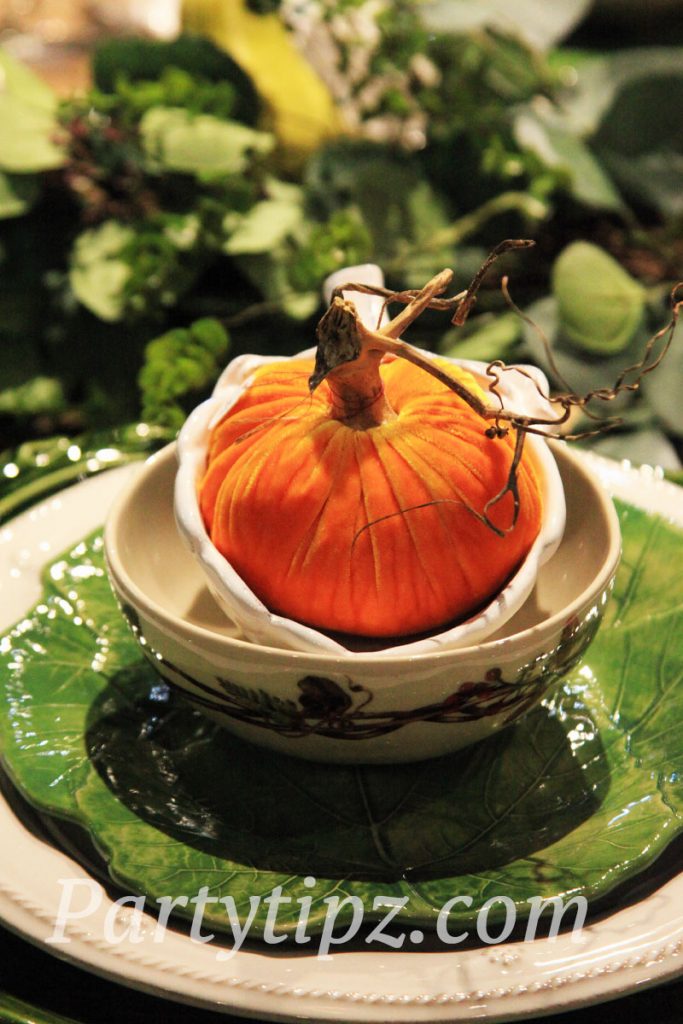
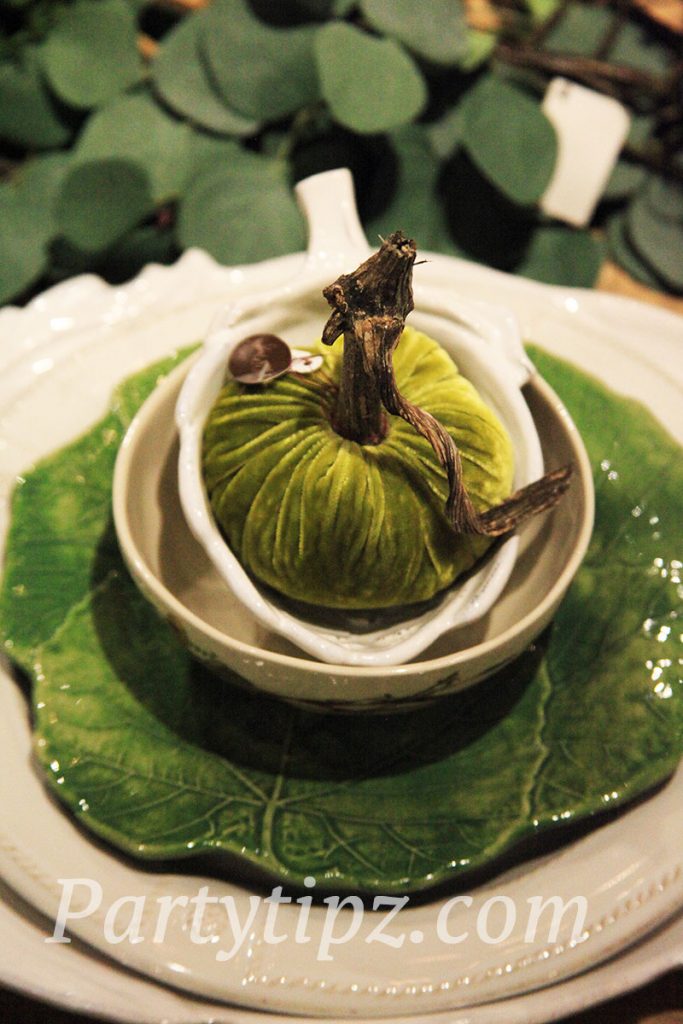
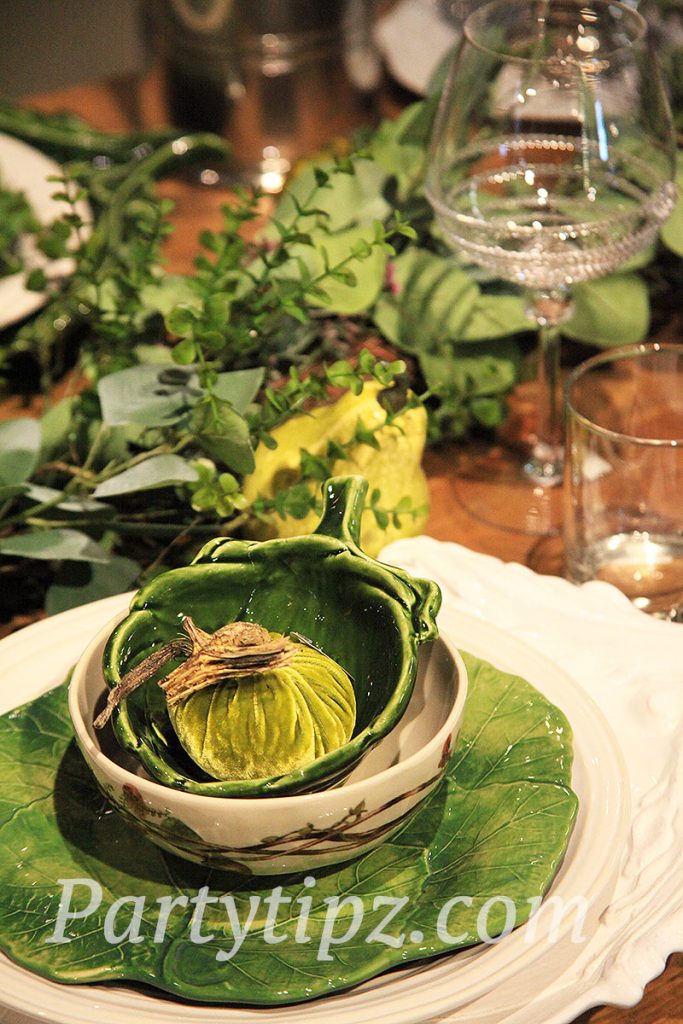
This fall, they did not disappoint with a table dedicated to a garden harvest theme.
Beautiful Fall table featuring many of the brands they carry at the store
Michael also created a stunning pumpkin chandelier to place above the table. Such drama!
The designer who created this table was Michael. He’s sort of a living legend at Mary Tuttle’s. He’s worked at the store for many years and has truly created a legendary flair.
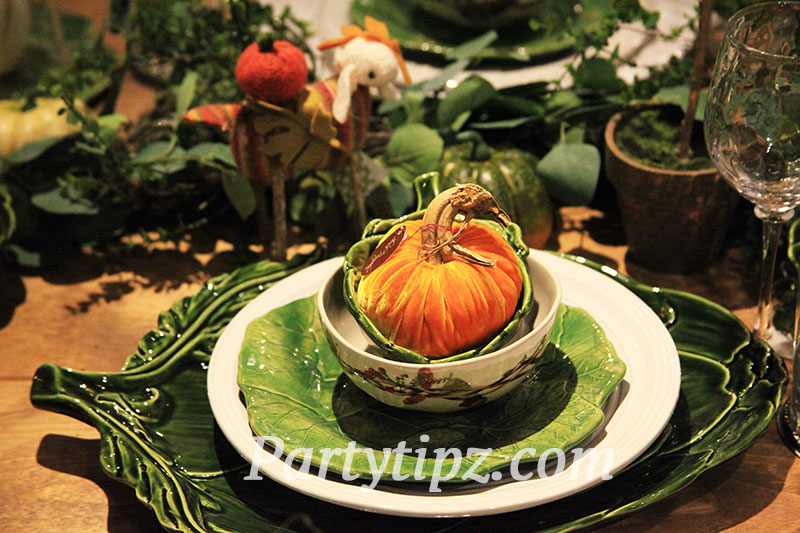
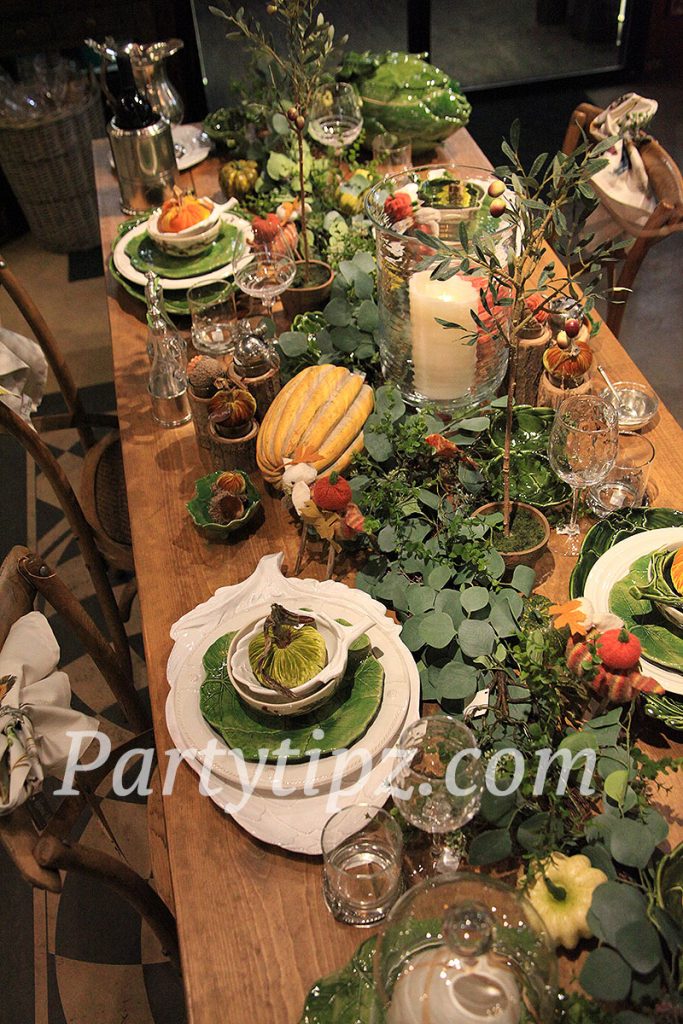
The top view of this gorgeous harvest garden themed table
Micheal’s creation has WOWed everyone, including myself. As someone who has enjoyed and studied table scapes for many years, I can truly appreciate the creativity that went into this design. Here are my top five favorite design tactics which Michael has incorporated into this table.
LAYERING
As you can probably tell, this table is a retail display, so it may not be designed to fit a realistic table setting. However, I love Michael’s concept of layering. He has used serving platters as placemats. Which, in and of itself, is a unique approach to setting the table. I also love how he layered the centerpiece. With olive trees for height, and the green leaves for fullness at the base. Within the leaves, he added another layer of pumpkins, gourds, and acorns to mimic a garden where you would harvest your favorite items.
Beautiful collection of gourds, acorns, and pumpkins
STICK WITH A LIMITED PALETTE
Michael used green as his dominant color and brown as his secondary color. Perfect to elicit a feeling of earth and nature. Also, these colors tend to be soothing and relaxing. He infused additional fall colors but only slightly, in the most interesting way, to draw your eye around the table.
BRING IN A FUN SURPRISE
Incorporating a “surprise” element is always welcomed! I love this concept with interior decor, food preparation, and all aspects of entertaining. Guests love it when they “discover” something on the table. Michael used a whimsy surprise by incorporating these adorable wool lambs at every place setting. Each lamb carries a pumpkin and is covered in fall leaves. They were hand-crafted by a local artist who creates these lambs throughout the year.
ADD THEMATIC ELEMENTS
Of course, you cannot create a “fall” table without incorporating decor that is reflective of fall. Michael did that by bringing in Plush Pumkin (R) pumpkins to the place settings.
These pumpkins are soft and beautiful and would be perfect as gifts for your dinner guests to take home. Or, they can remove them from the plate and set them on to the center of the table, adding to the centerpiece.
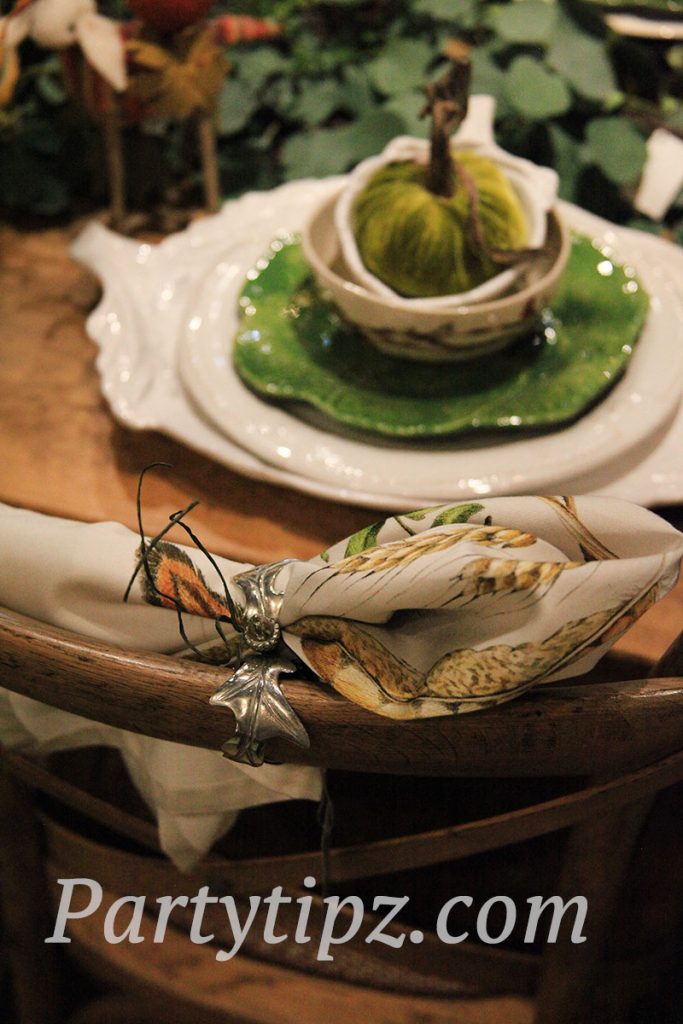
DO SOMETHING OUT OF THE ORDINARY
Although we’ve already covered the “element of surprise” I do love it when the host or hostess take something that we are very accustomed to and think out of the box. With this table, Michael took the napkins, which we are accustomed to seeing somewhere on the table, and placed it hanging off the chair. So CLEVER!!
If you would like to see more beautiful entertaining ideas. Stop by Mary Tuttle’s, in Chesterfield Missouri. No matter the season, they are sure to have beautiful inspiration from Michael and the entire design staff.
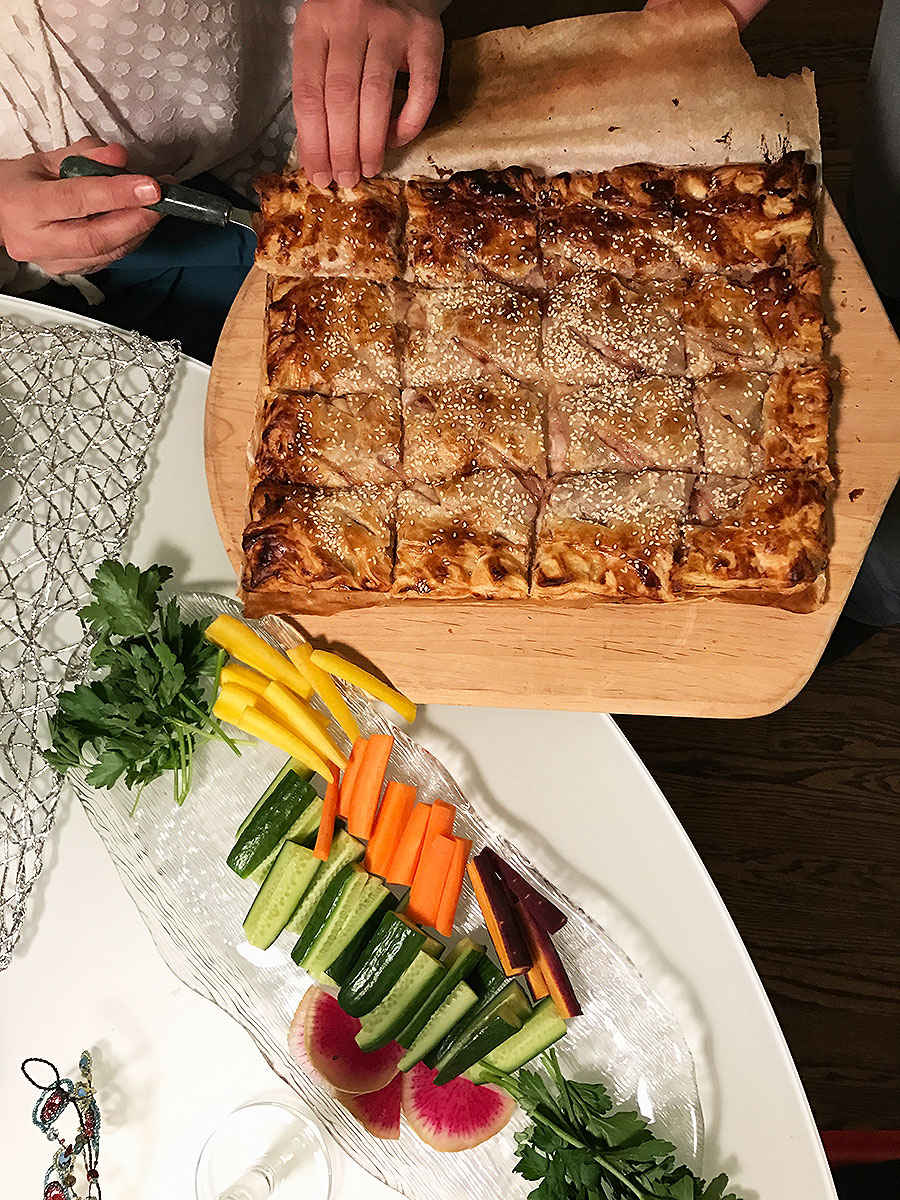
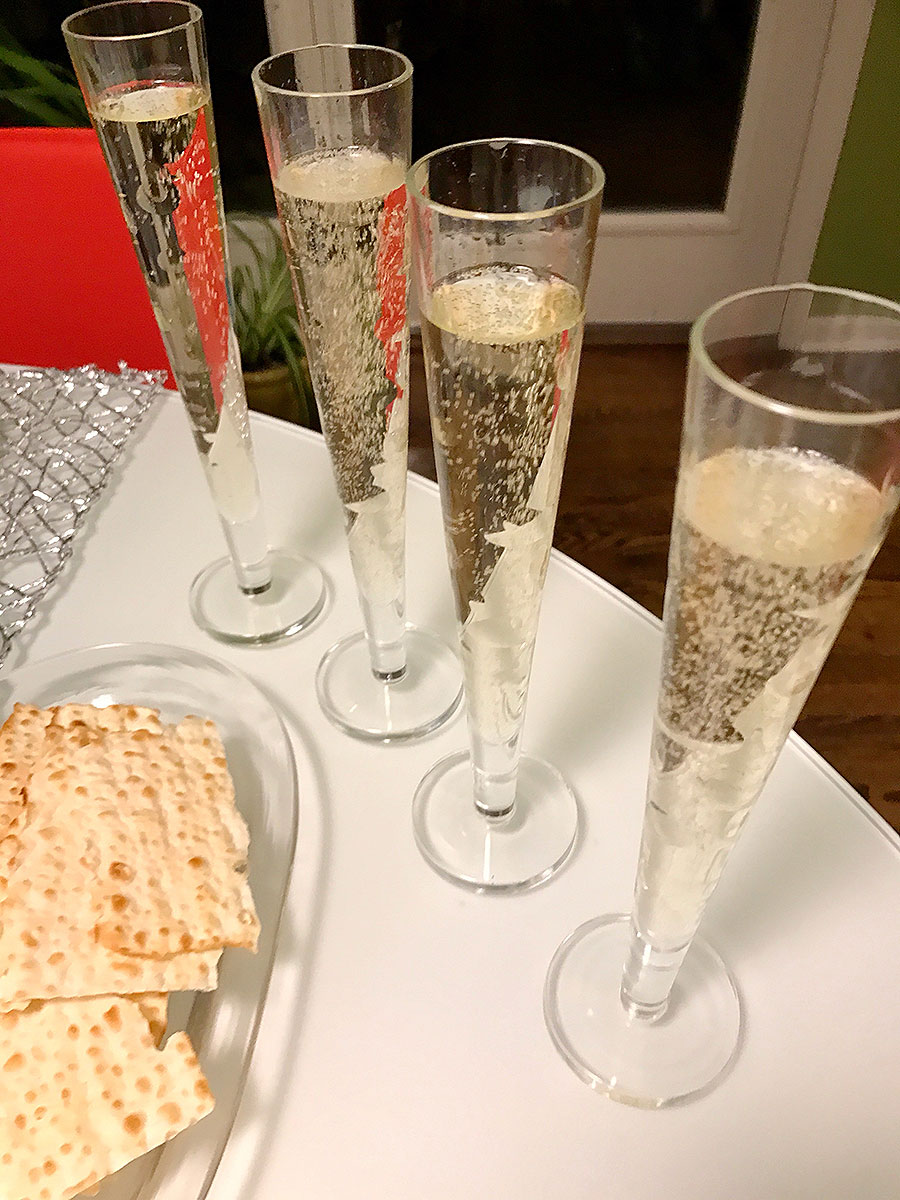
My friend, Jane, has incredible taste and she happens to be a fabulous hostess. When she invited a small group of friends for a Chanukah celebration, no one knew what to expect, since none of us celebrated Chanukah. Jane made sure to tell us prior to the evening, that we weren’t expected to do anything special, just to come and enjoy the beautiful dinner she prepared for us.
First, I noticed the elegance of the table. Jane didn’t dress the table with a lot of items, just a few beautiful elements that played off each other. Her centerpiece was a wire and bead art piece which traveled across the table. Her placemats mimicked the look with a silver wire design. Jane also mixed her metals to bring in the gold of the chocolate coins and the silver of the table decor. Of course, she brought in some blue with the small votives at each place setting.
The menu was full of home-made foods which looked beautiful but simple to prepare.
To end the evening, we toasted champagne and mentioned how grateful we were to have each other in our lives. I love experiencing my friends’ hospitality. As always, Jane did an outstanding job creating a warm and loving atmosphere which we all cannot wait to experience again.
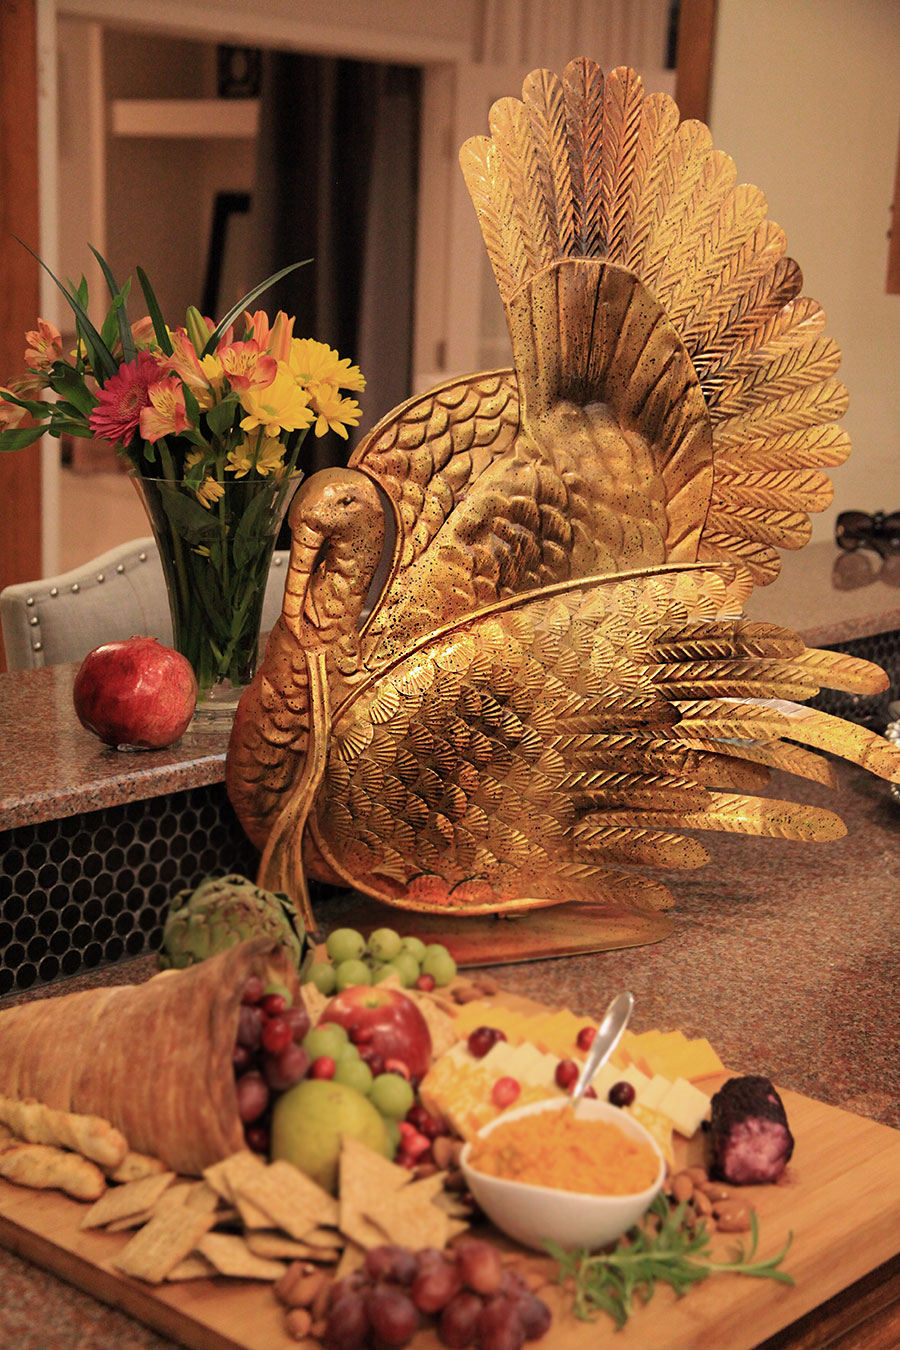
My friend Rachel has a saying…”It’s not Thanksgiving at Arina’s until the Golden Turkey Appears!”
She’s right, when the golden turkey makes its way to the kitchen, Thanksgiving can officially commence! Of course, I start displaying the golden turkey waaaayyy before Thanksgiving. We change its placement in accordance to the party theme. For cocktail parties, you’ll find it at the bar or appetizer table. For family dinners, we’ll display it on the buffet section of the kitchen. Sometimes, I’ll even place it in odd little nooks just to be funny, it’s a lot like an elf on a shelf except you can touch it, rub it, reposition it, bend it, and pretty much have fun with it! It’s quite the conversation piece.
We acquired this big bird at a garage sale and I probably paid $3 for it. Ironically, it has given us so much entertainment and fun that it has become one of our cherished family pieces. I know my boys will be fighting over who gets the golden turkey (HA! Probably not!).
I guess my point is, consider having one or two fun pieces that you traditionally display during the holidays. In addition to the expensive crystal, fine china, or grandmother’s silver, maybe you too can find yourself a golden turkey!
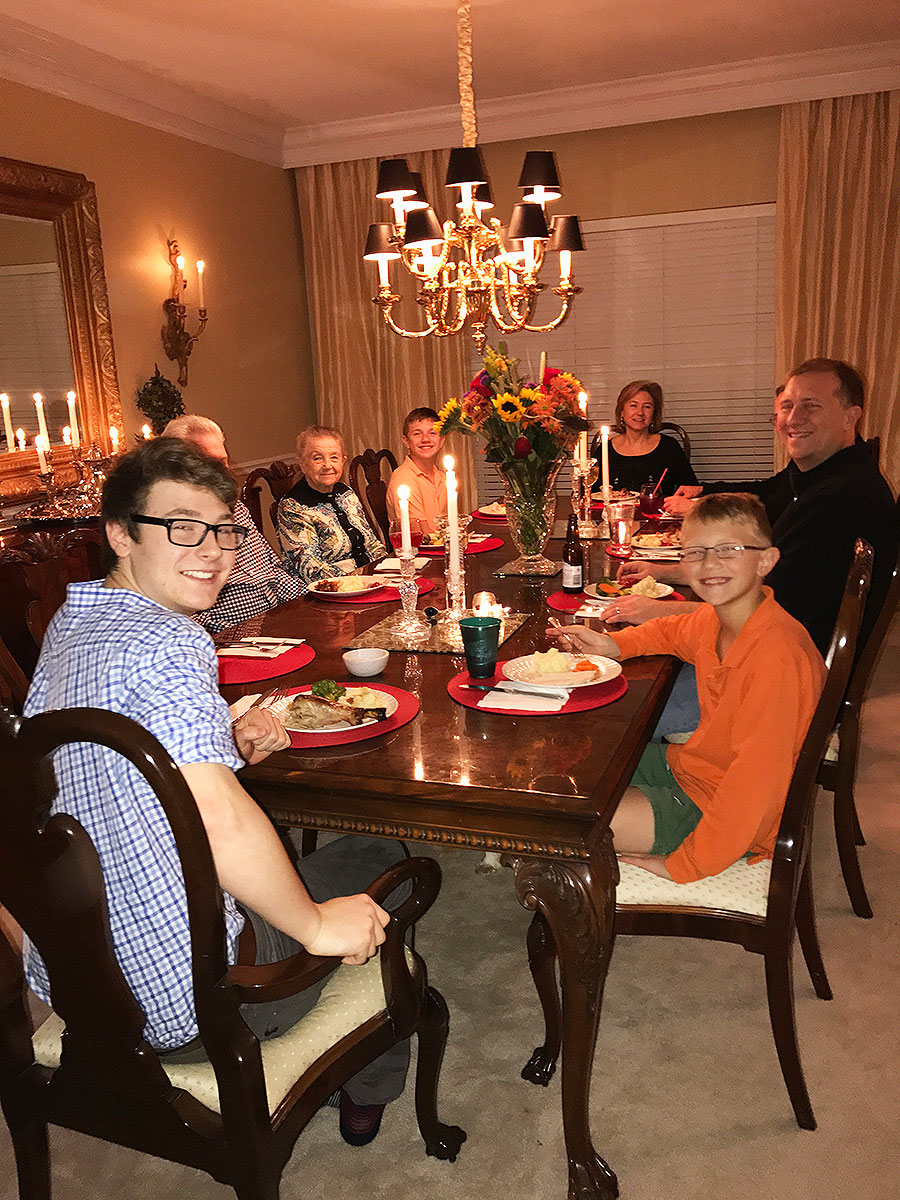
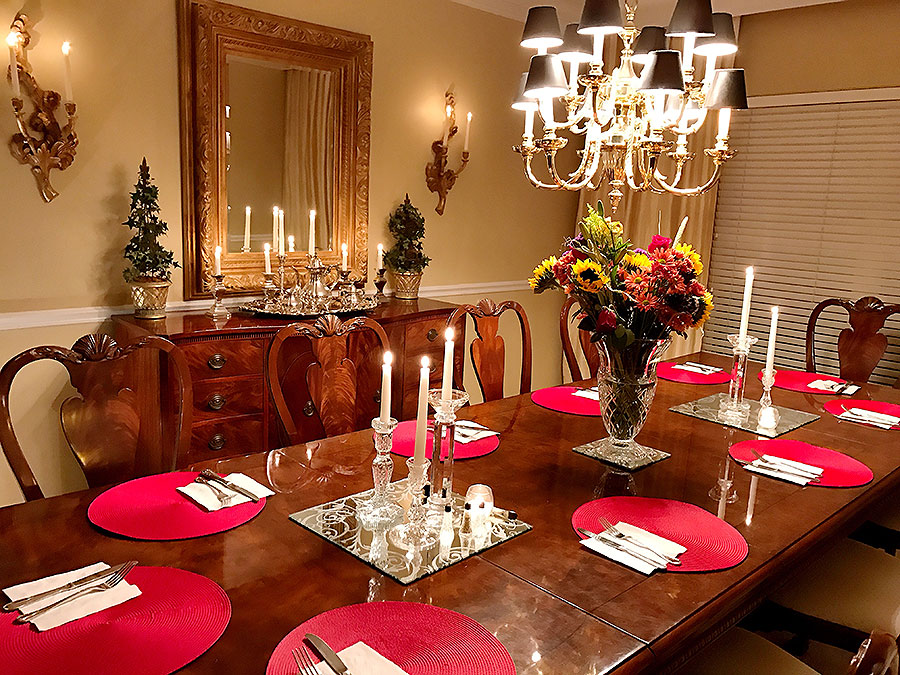
Each year, my sister Anna, volunteers to host Thanksgiving and our family gathers at her home to celebrate the holiday. Anna is a wonderful hostess, I’ve said this many times. She and I are always stealing each other’s ideas and recipes. Unlike me, Anna does things very simply with a relaxed feel but always seems to WOW her guests. She never seems to stress over the details. Even the few times she’s asked me for help, Anna always seems relaxed and at ease while I’m running around stressing over pretty much everything. Nevertheless, we always seem to pull off a great party and when working together, we make a good team.
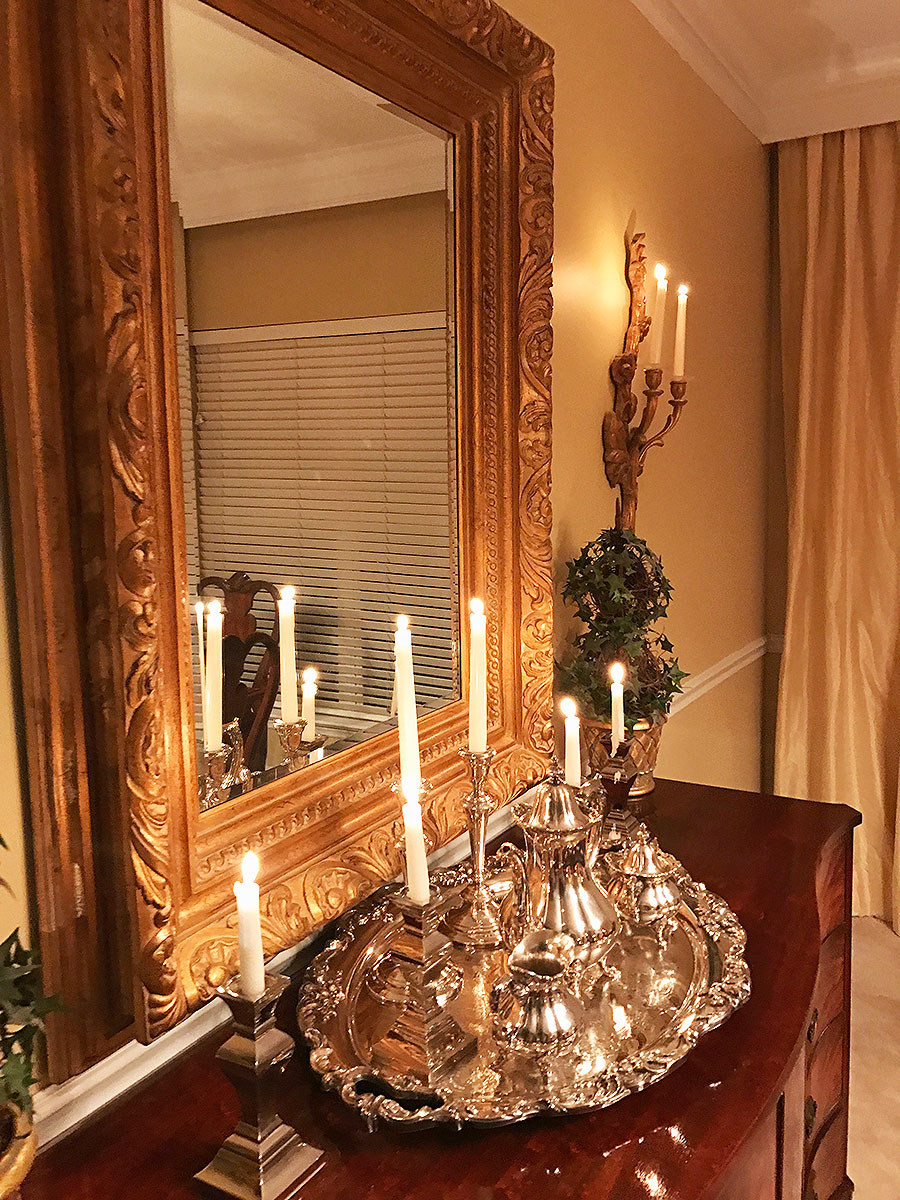
During this particular celebration, her table was simple with red placemats and a bouquet of fresh flowers. However, she added candlelight as her main decor element, creating a soft, warm, and quiet atmosphere. She used different style and height crystal candleholders which were set on mirror tiles to reflect the light. She also placed some candles in her silver candleholders on the back buffet. Last but not least, she added some votives to bring various levels of height. It looked so beautiful.
Candlelight Everywhere
This look was very minimal but definitely brought the WOW factor.
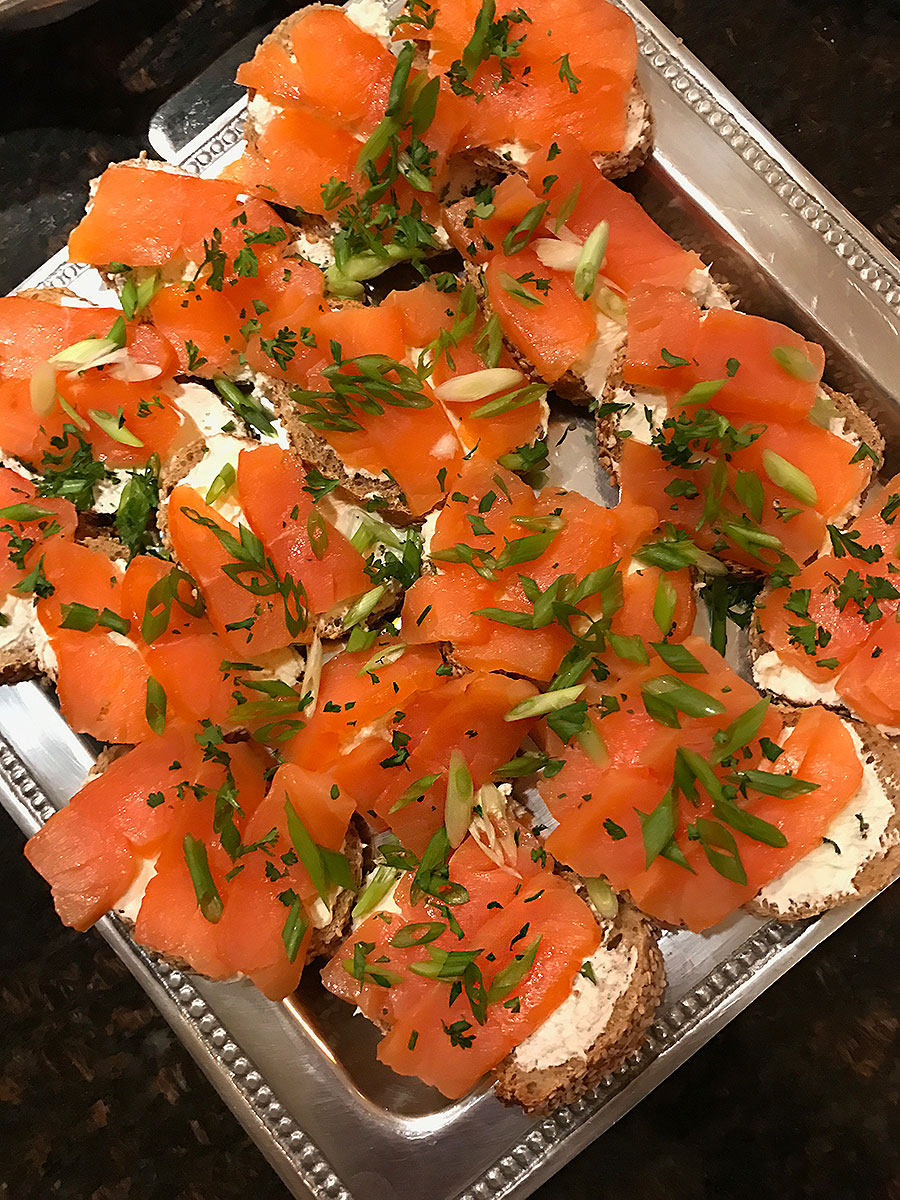
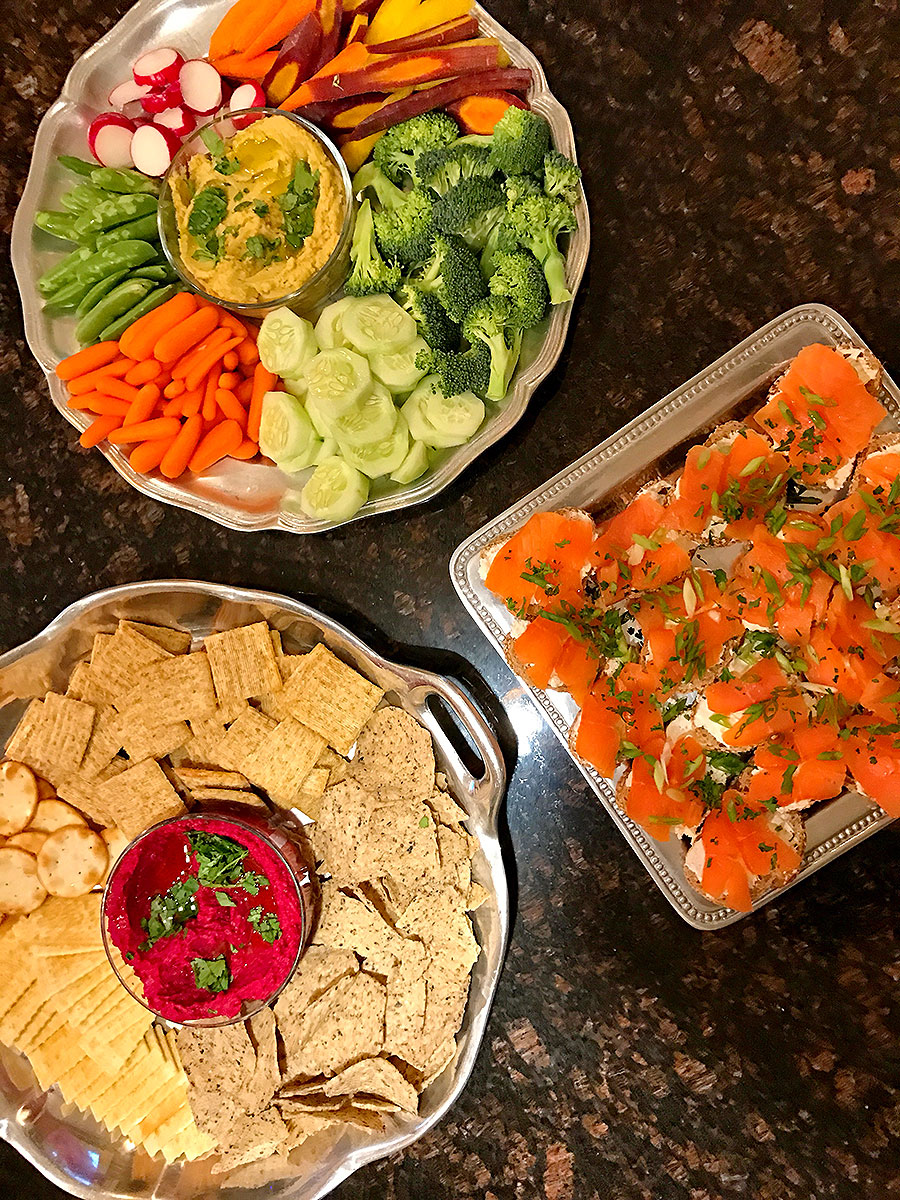
Smoked Salmon Appetizers
It’s no secret, our family is ALL ABOUT THE APPETIZERS… Anna always prepares a wonderful appetizer spread that is easy and festive. Above are the smoked salmon appetizers which she serves at practically every function. They are served on small pieces of bread, smothered in plain cream cheese and topped off with a generous slice of smoked salmon. She finishes by sprinkling green onion on top and watches them disappear off the plate in a matter of minutes.
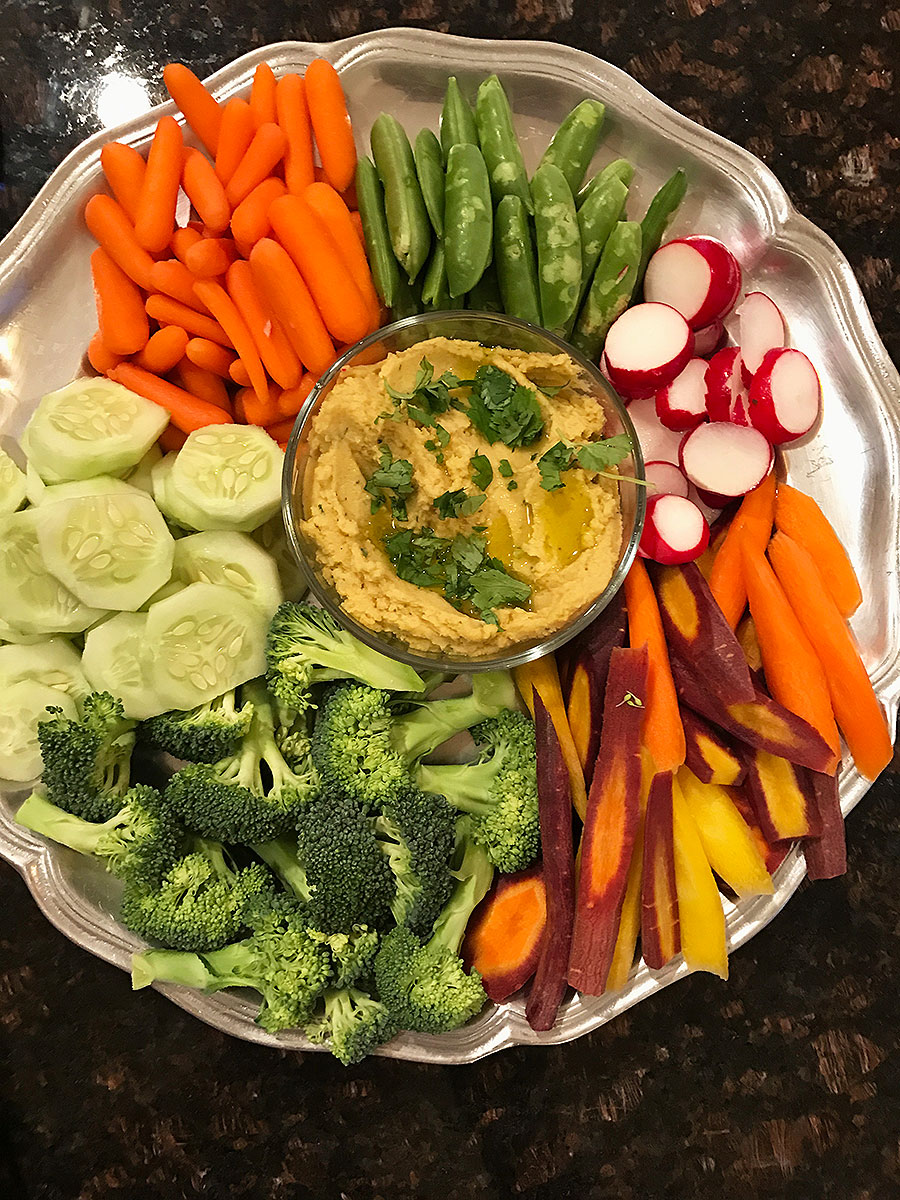
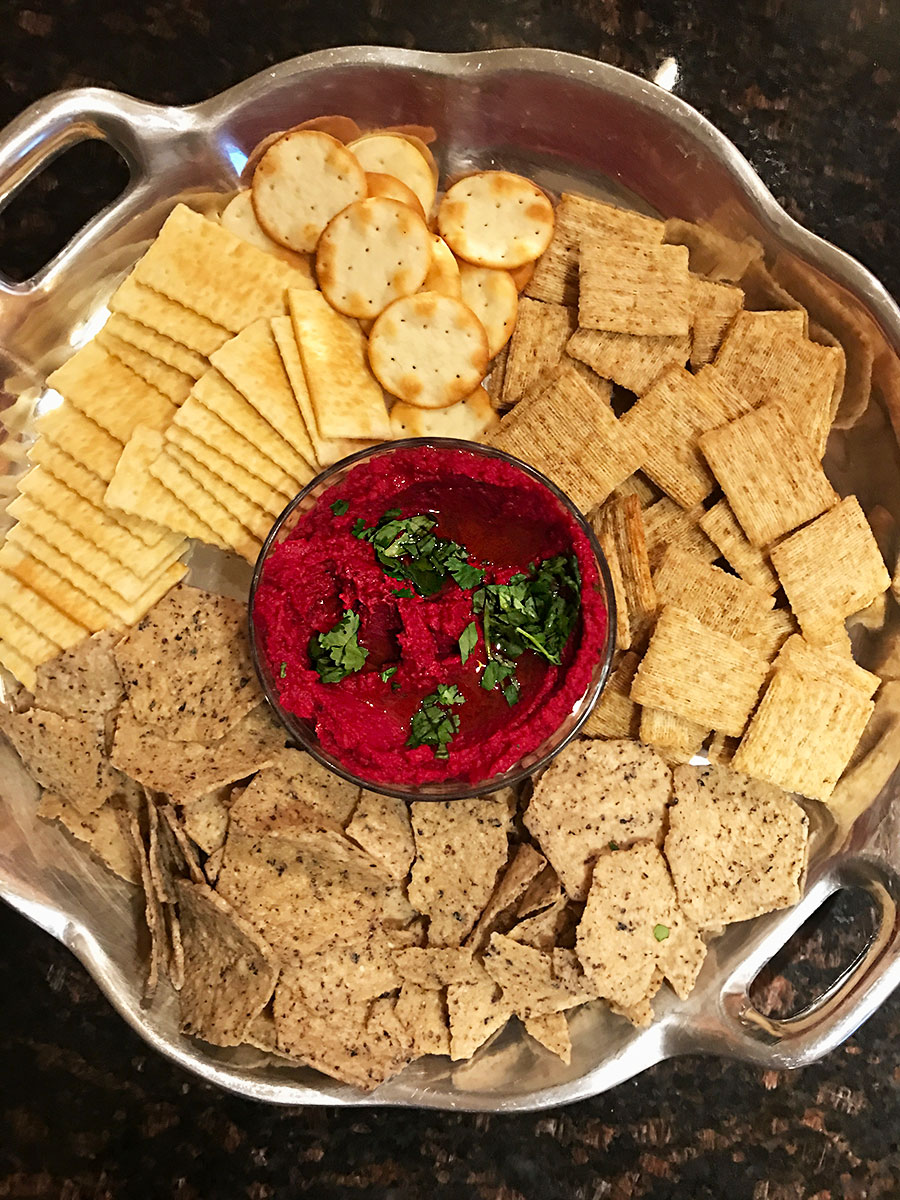
Veggie Plate and Hummus Dip
I’m always in charge of the veggie plates and dip.
Veggie Plate and Basil Hummus
This veggie plate featured my favorite basil hummus which I make for practically EVERY occasion.
I also love bringing my beet hummus which adds a vibrant color to an otherwise boring cracker bowl.
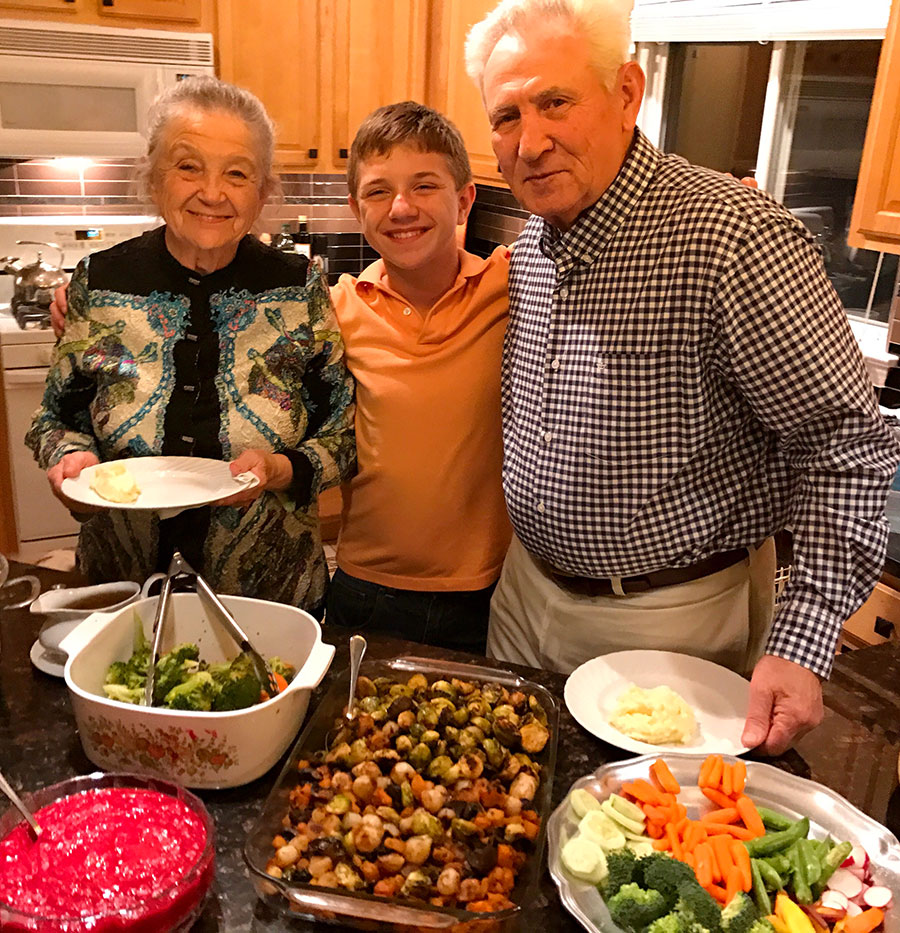
The dinner is typically traditional with turkey, cranberry source, her famous mixed roasted vegetables, and of course, mashed potatoes. Here’s my son and my parents enjoying her delicious buffet.
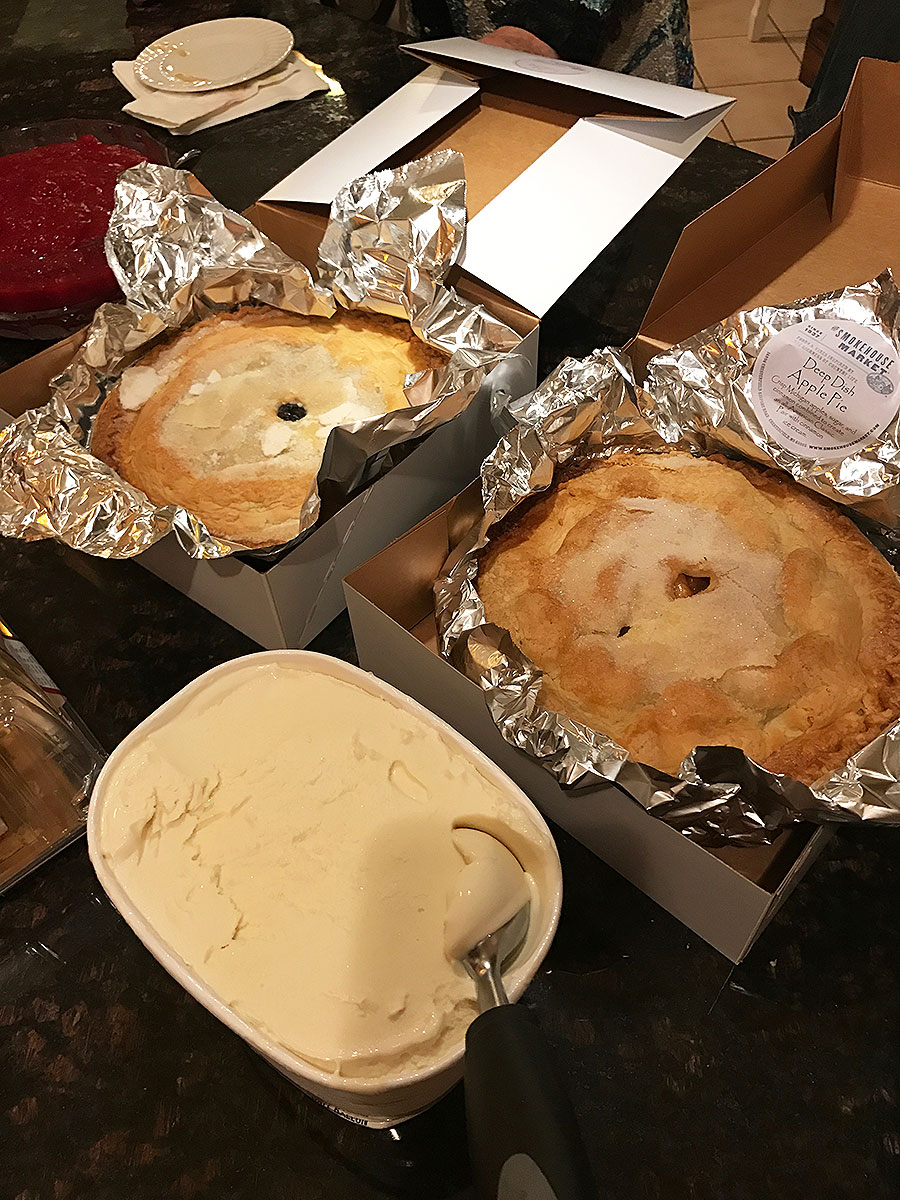
Last but not least, the dessert always comes from The Smoke House Market, which is a wonderful store in Chesterfield, Missouri. It is affiliated with Annie Gunns, which is a famous steak house in St. Louis, and sells many of their freshly prepared food creations. Their pies are in HIGH DEMAND during the holidays and since my niece worked there, we always had fresh pies for Thanksgiving… with a bit of vanilla ice cream on top.
All in all, my sister does a fantastic job with Thanksgiving. And I’m alway impressed with how beautifully and seamlessly she executes this annual celebration.