October 16th, 2018
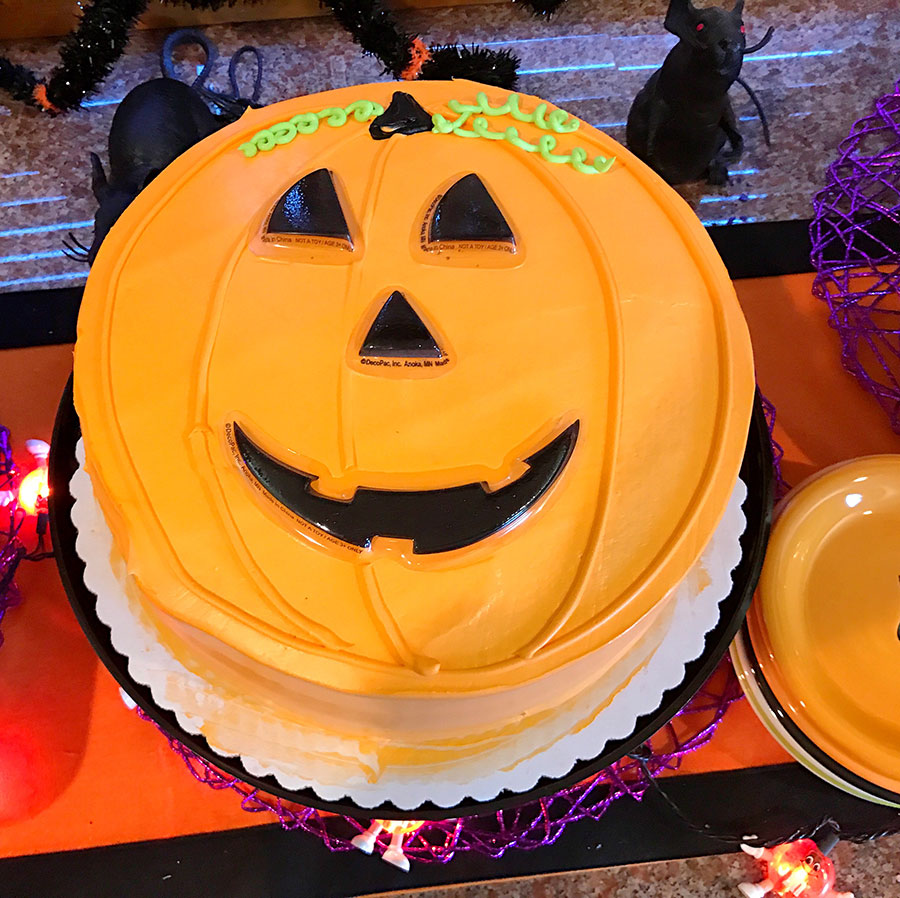 Pumpkin cake I ordered at Sam’s As you may or may not know, I love to throw my two sons Halloween parties. I invite tons of kids and their parents and it becomes a fun potluck. I ask the parents to bring one Halloween dish they would love to showcase and they NEVER disappoint. Here are some of the fun and easy Halloween dishes the parents brought to the party.
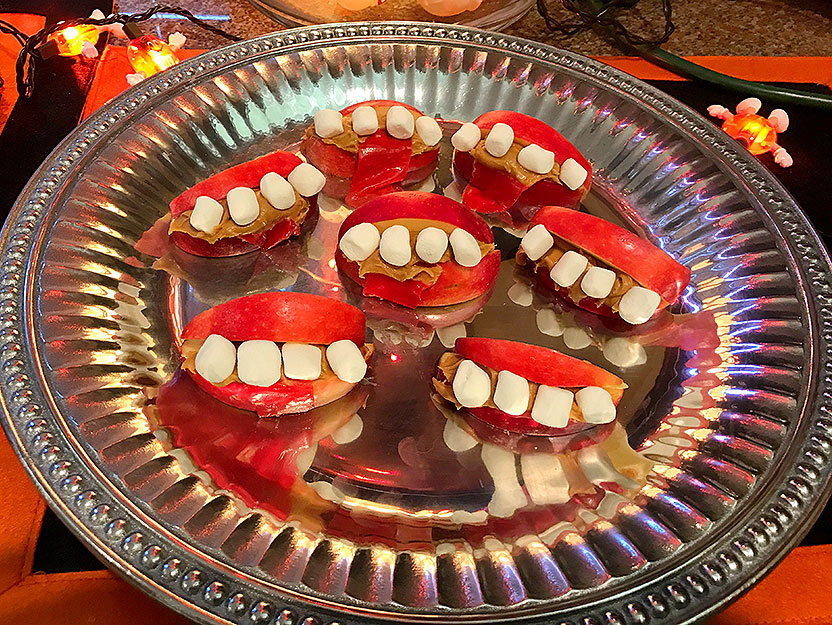 Healthy monster jaws. I love these delicious apple, peanut butter, and marshmallow treats made to look like monster jaws. The mom also added a fruit roll-up as the tongue. This was a fun treat for the kids.
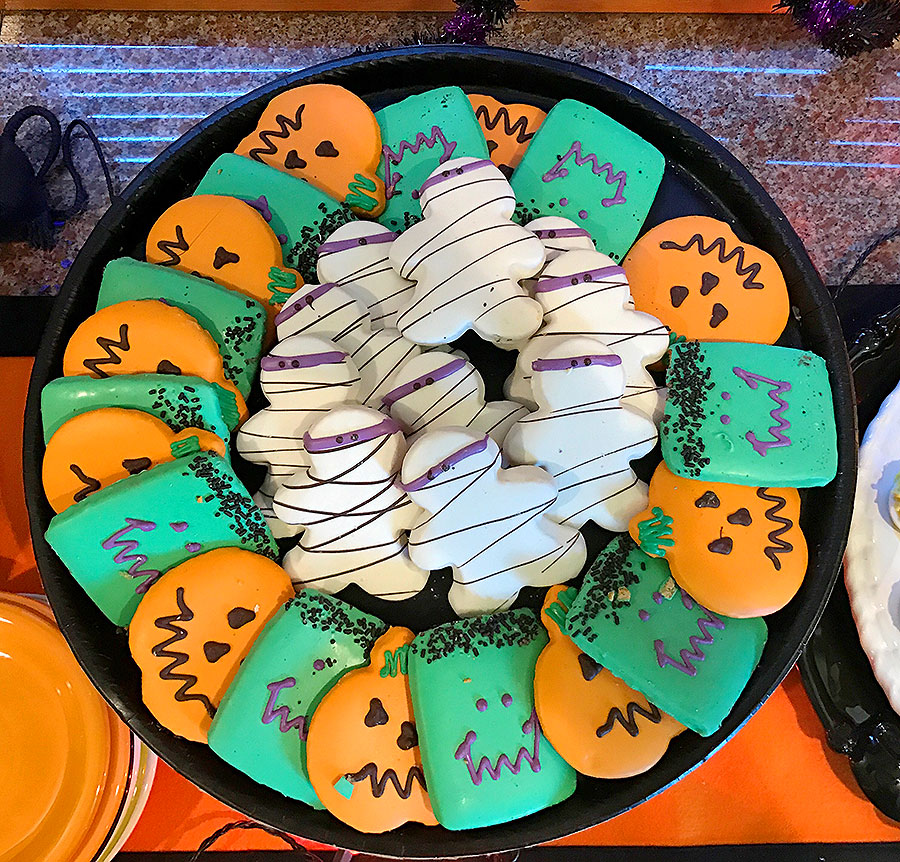 Monster, ghost, and pumpkin cookies from Sam’s If you know me, you know that I outsource as much as I can, especially baked goods. When it comes to my annual Halloween parties, my favorite place to outsource from is Sam’s. I order my Halloween cakes from there as well as any thematic cookies. I would imagine Costco has the same fun desserts, but either way, buying in bulk is always a great thing for parties, so I highly recommend it! Best of all, these cookies were a fraction of what I would pay for custom designed cookies.
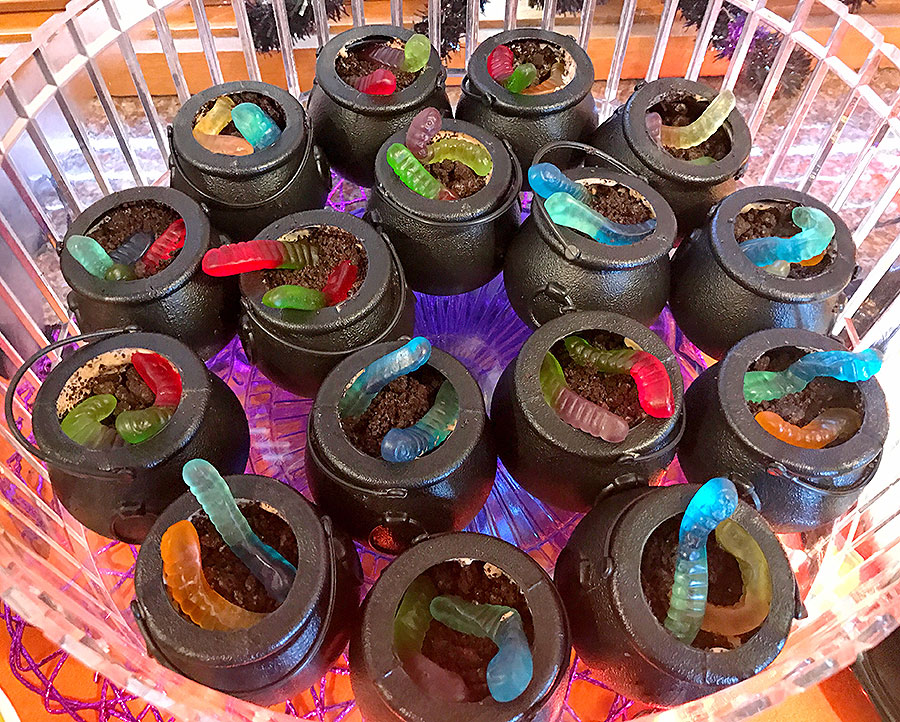 Dirt n’ Worms You cannot help but fall in love with this adorable dessert created by my friend Zalina. Dirt n’ Worms! I love how she used fun black kettle containers. Needless to say, I don’t think we had any left over!! They are filled with chocolate mousse (or you can use pudding), crumbled Oreo cookes, and gummy bears.
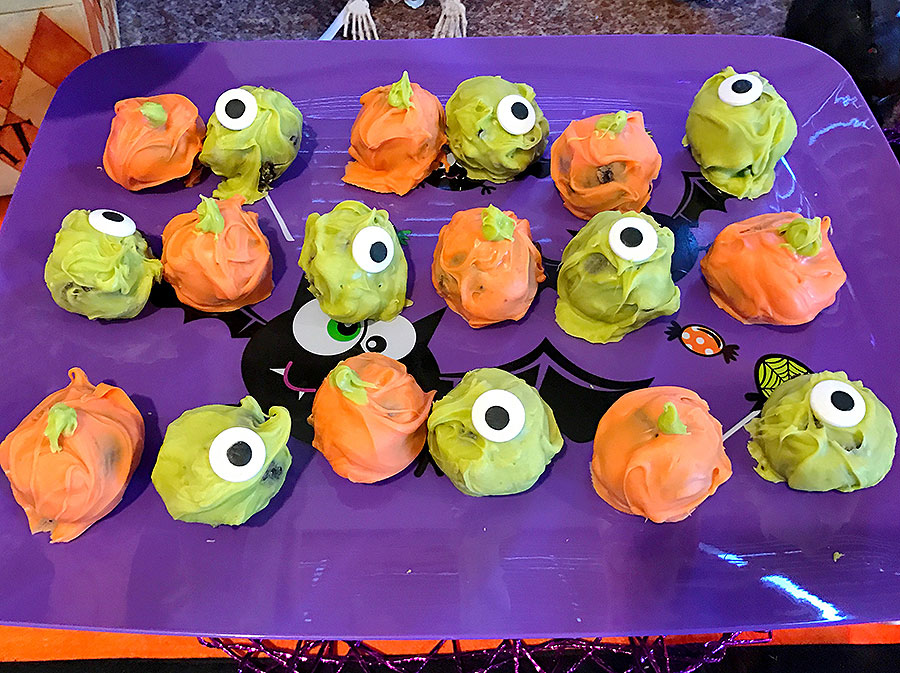 Monster Eye Cake Pops My friend Tara did NOT disappoint with these fun and funny Monster Eye Cake Pops! We all know how hard it is to make cake pops look perfect… well, with this theme, the more imperfect the eye is, the better! She made a regular cake pop mixture, rolled it, and dipped it in candy melts. Last but not least, she popped a candy eye on top and VOILA!!!
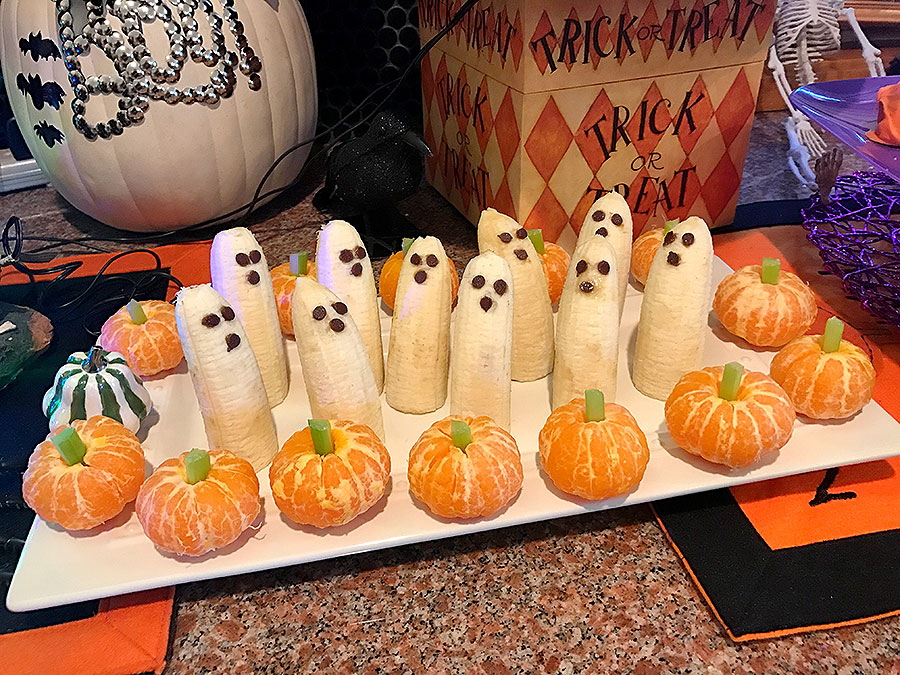 Fruit ghosts and pumpkins Seriously… can these be any cuter? My friend Jenna created these adorable tangerine pumpkins and banana ghosts. Adorable and healthy!!
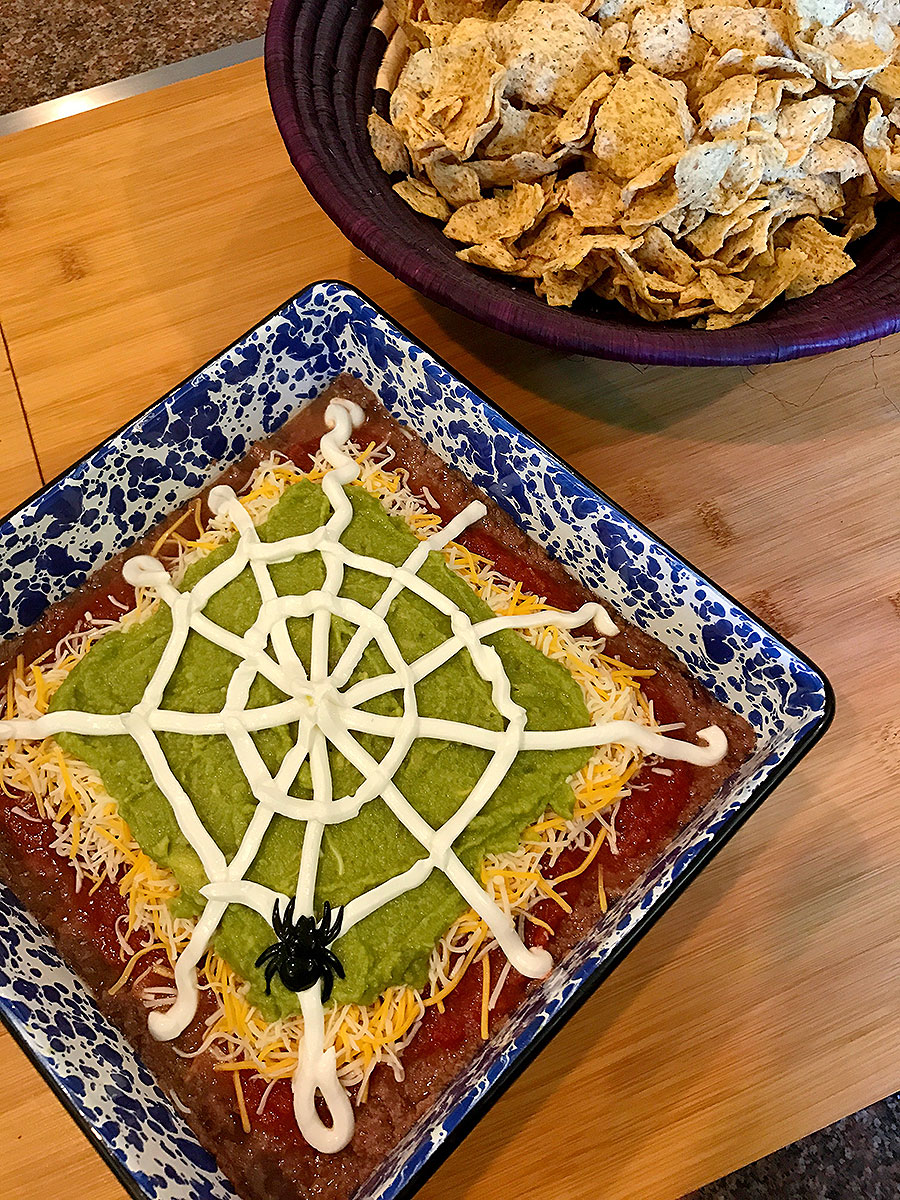 Spider Web Dip I’ve made spider web dips before, but mine NEVER came out so cute! This was a delicious seven layer dip created by my friend who is an incredible entertainer. This Halloween dip was a HIT and was the perfect savory accompaniment to all the sweet items on the buffet. DELICIOUS!!
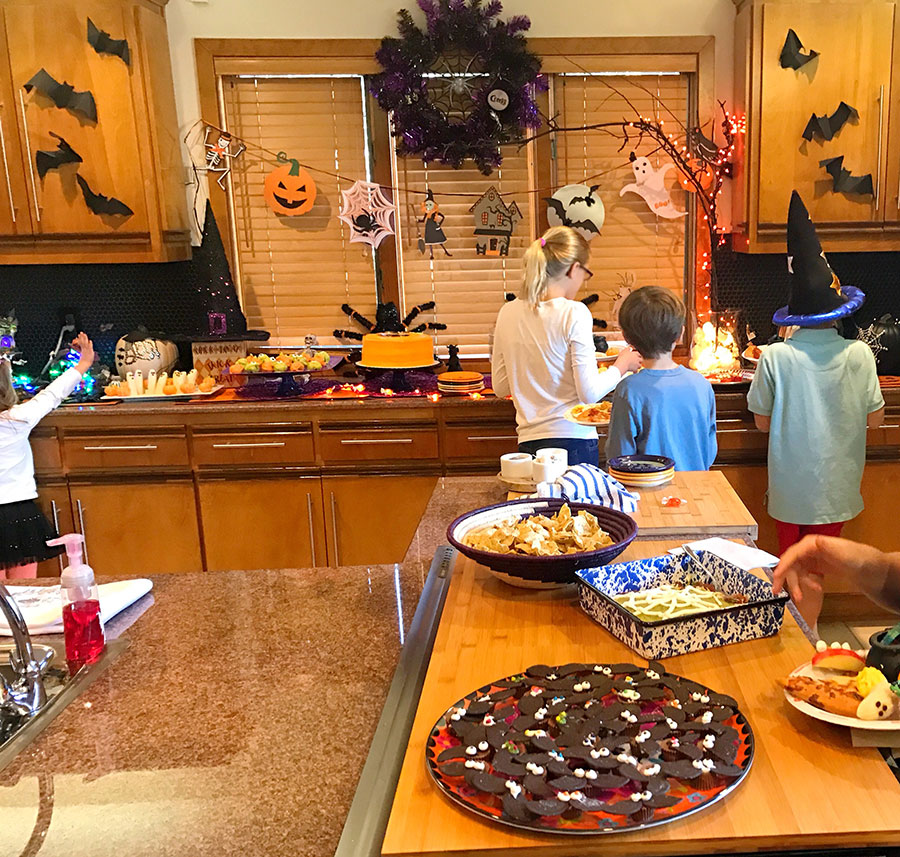 Some of the kids enjoying the Halloween buffet. The calm before the storm. This was early on in the party when just a few kids arrived. I typically have fifteen or more people hanging out in my kitchen which include adults and children. When the party starts, everything is so well organized and displayed. By the end of the party…. it’s not a pretty site!
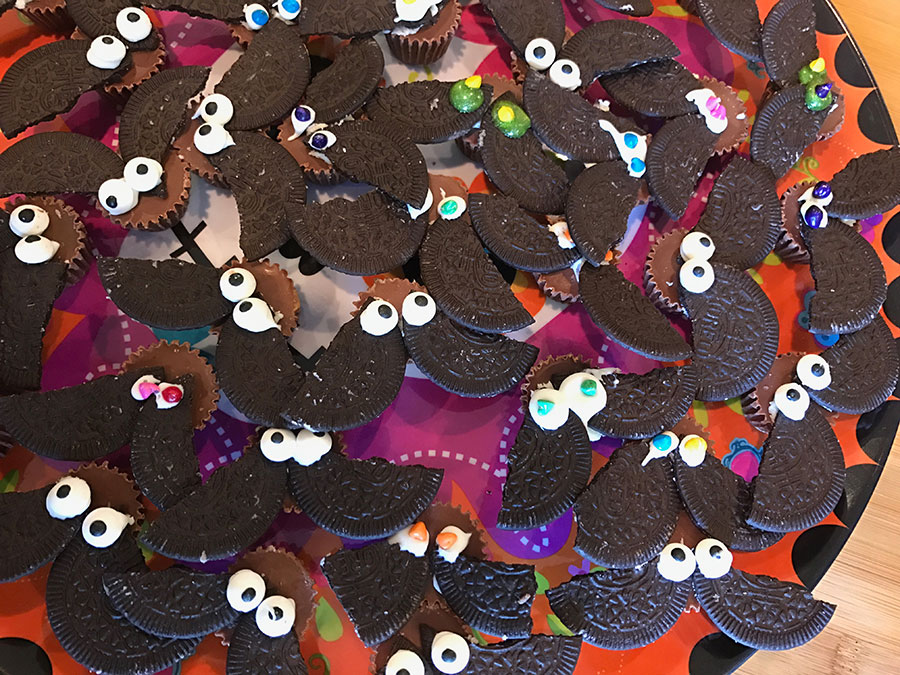 Halloween Bat Wings My friend created these fun Halloween Bat Wings from Reece’s Peanut Butter Cups, Oreo Cookies, and candy eyes. They are ADORABLE!
· Posted in 31 Days of Halloween, Buffet, Decadent Desserts, Desserts, Food Holidays, Halloween, Parties ·
October 10th, 2018
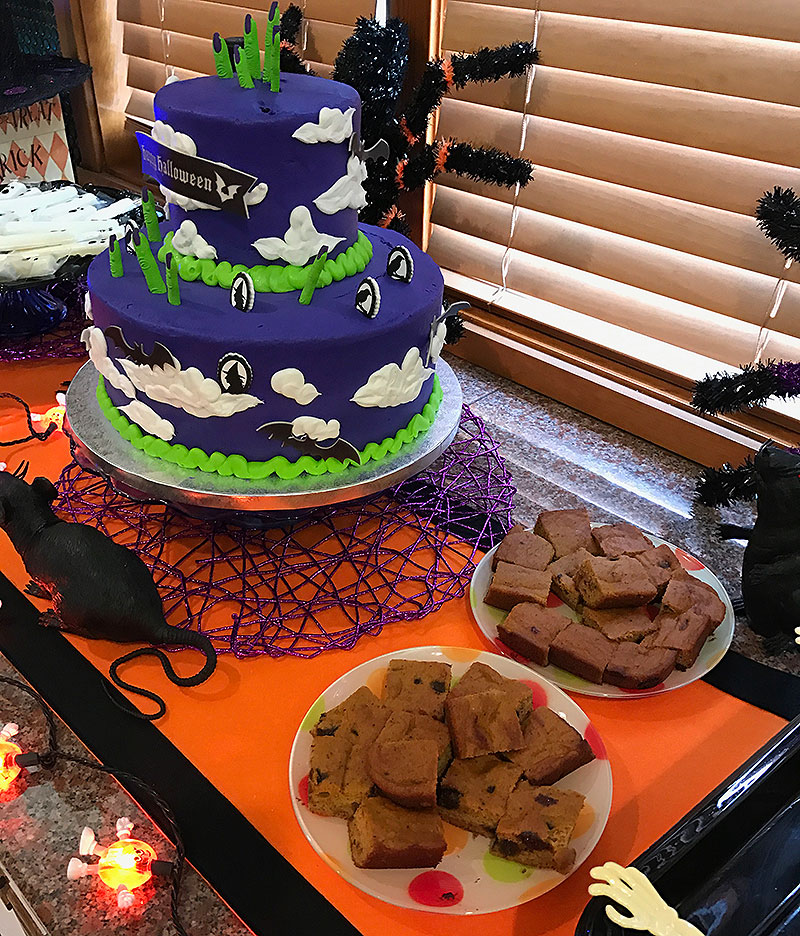
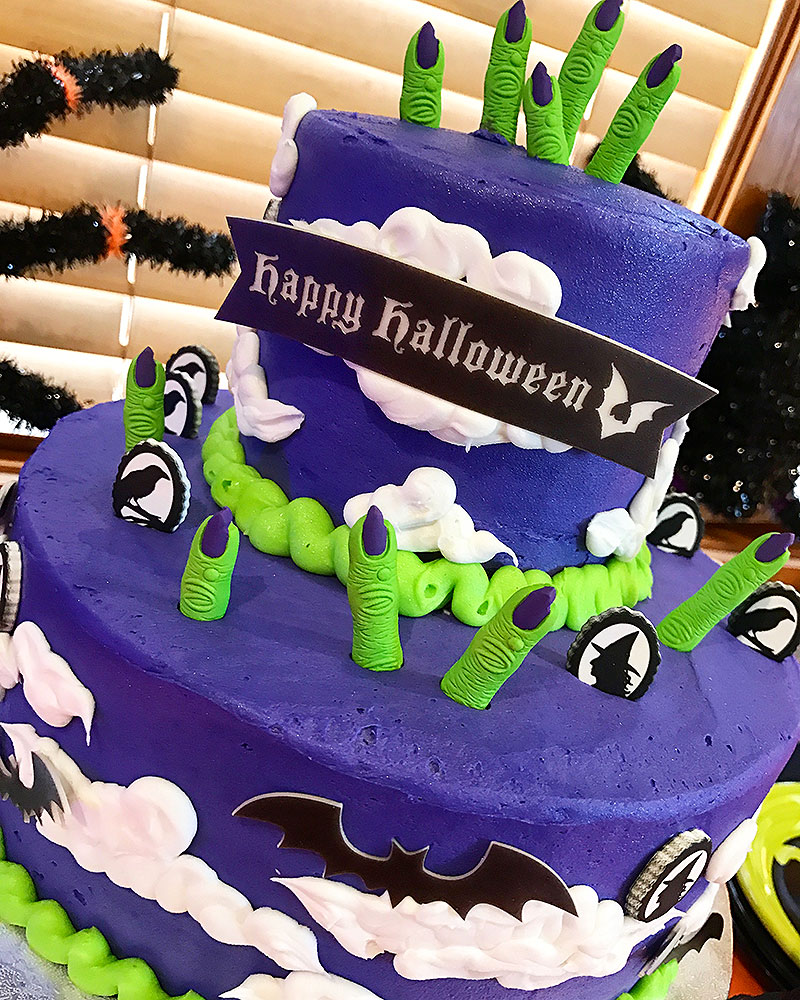 Loving this beautiful Halloween Cake with Green and purple witches fingers. I have thrown fun Halloween parties for many years. I usually throw a party every week in October… yes, every Friday, I will have some sort of a Halloween party. I like to call them “taste testing parties” since the guests are bombarded with fun Halloween goodies and they get to choose their favorites. Sometimes I create all the items for the buffet, but most of the time, other parents bring their creations and we all just watch the kids devour their favorites. It has become one of my most fun and exciting events which I look forward to. As you will see, I try not to do anything super scary, although I have been known to create some gory dishes on occasion (like my severed fingers hot dogs, which is a Pinterest favorite!).
Here are some fun photos from one of my parties, which I like to call Purple Witch’s Finger Cake (shown above). You may say… “Why Arina, I had no idea you were a cake baker!” Well, rest assured… I AM NOT!!! If you know me, you know that I am well aware of my limits. Throwing a party for 60 children means I do as much outsourcing as possible. This cake was ordered from Sam’s and I simply chose it from one of their cake catalogs, available in the bakery section.. It came with the purple, green, and white frosting, clouds and bats. The cake bakers did a great job making a two tiered cake. There were times when I would order the three tiered ones, but they always came out crooked, so I stick with the two tiered cakes.
To customize it to be a Witch’s Cake, I went to Michael’s and purchased the fingers and witch silhouettes separately. I have NO idea how the colors came out so perfectly, but even if they didn’t match, … my motto is and will always be… kids don’t care! I was very happy with the cake and so was everyone else. Oh, and it was soooo affordable, only $40!

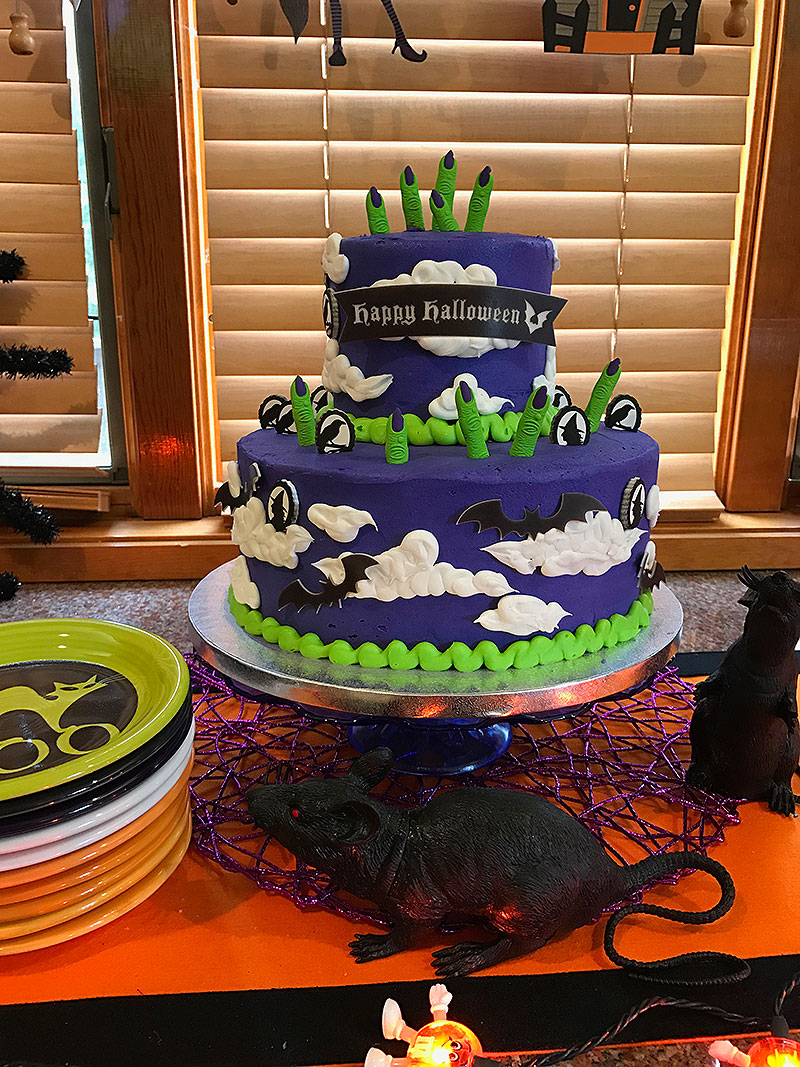
 Cake with fun Halloween plates, my friend Heidi gifts me with every year. 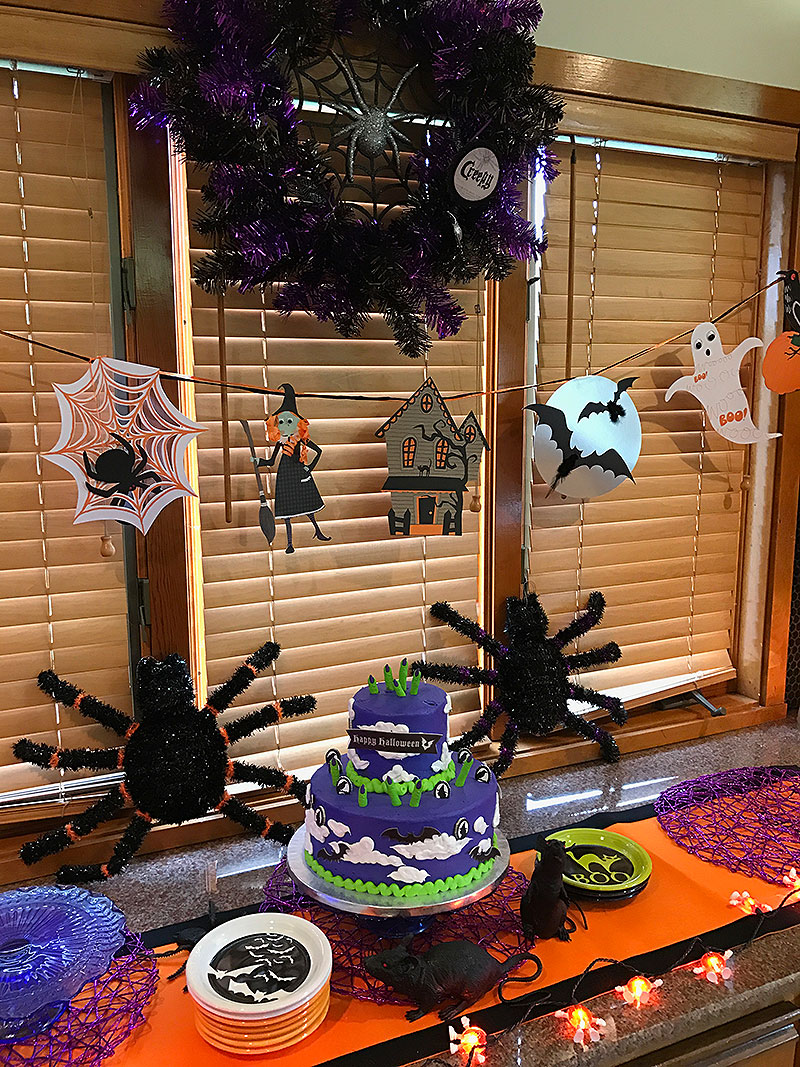 My sons’ decorations.  Buffet set-up for Halloween Party I typically do a buffet set-up and provide the cake and a few other dishes. Then, the parents of the guests bring their favorites. Parents are always invited to the parties and are encouraged to stay and enjoy the festivities.
Here are some of the fun and creative Halloween inspired desserts created by my guests’ parents.
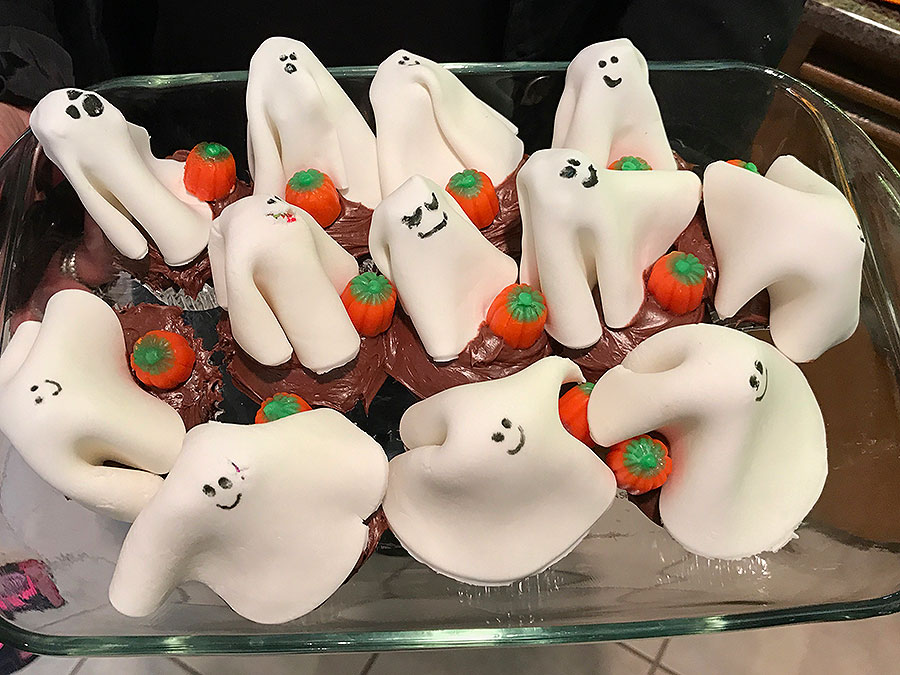 Adorable cupcake ghosts created by my friend Deborah. 
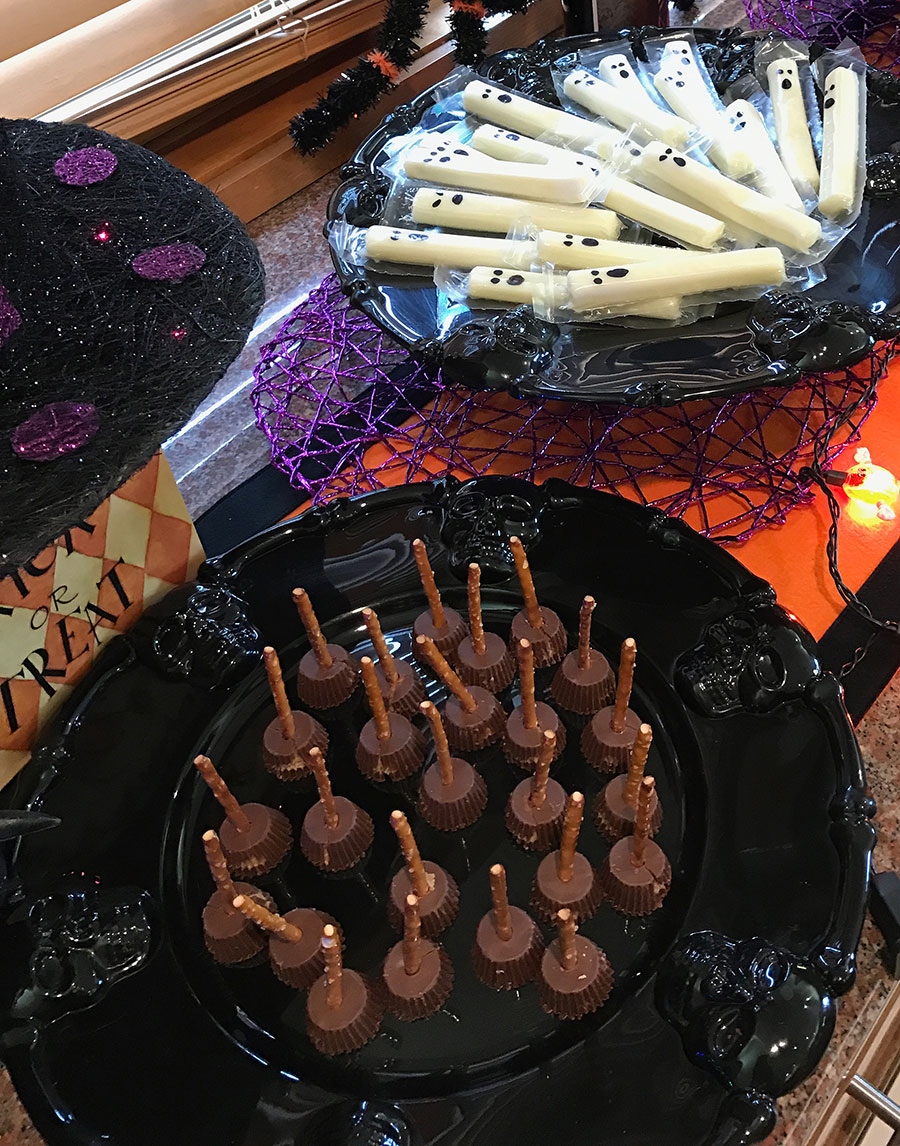
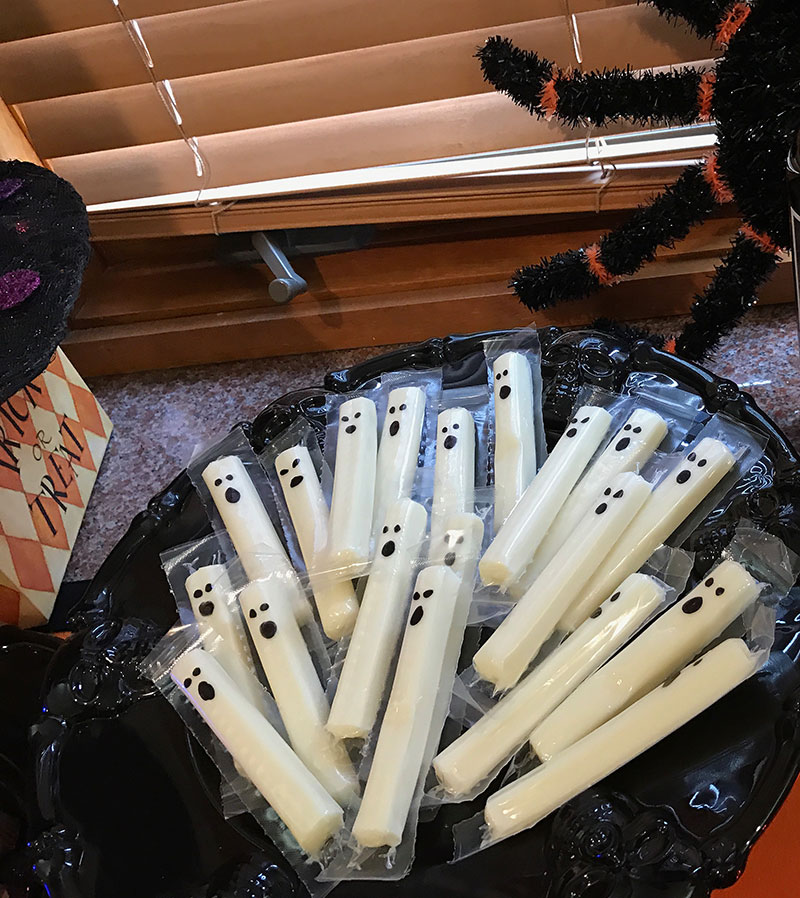 Cheese Stick Ghosts… so clever and easy! 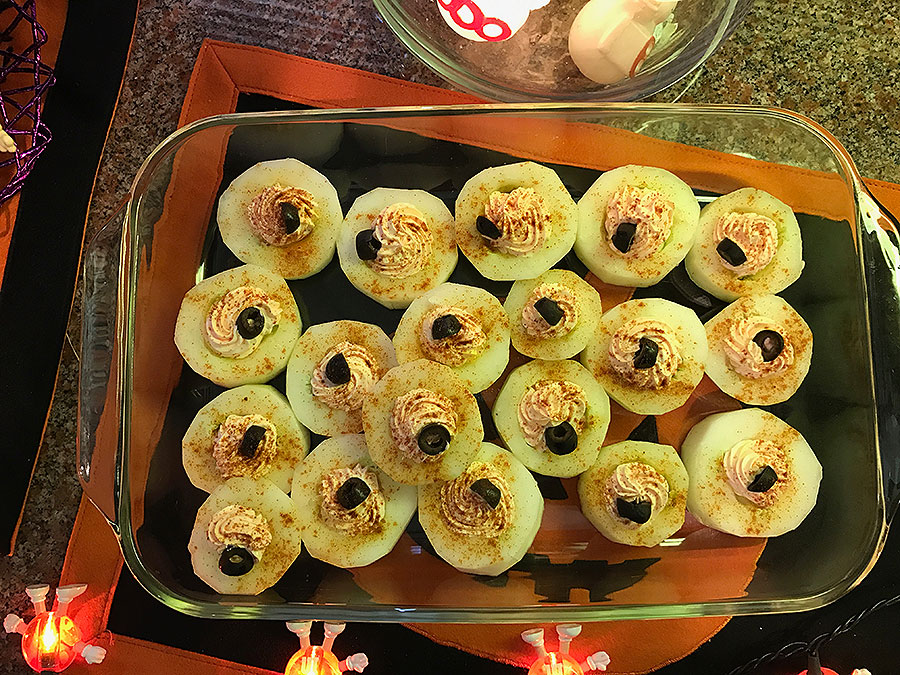 My friend Nina prepared these wonderful and healthy cucumber eyes made with cucumber slices, cream cheese, and black olives. She sprinkled a bit of cumin for the “red” 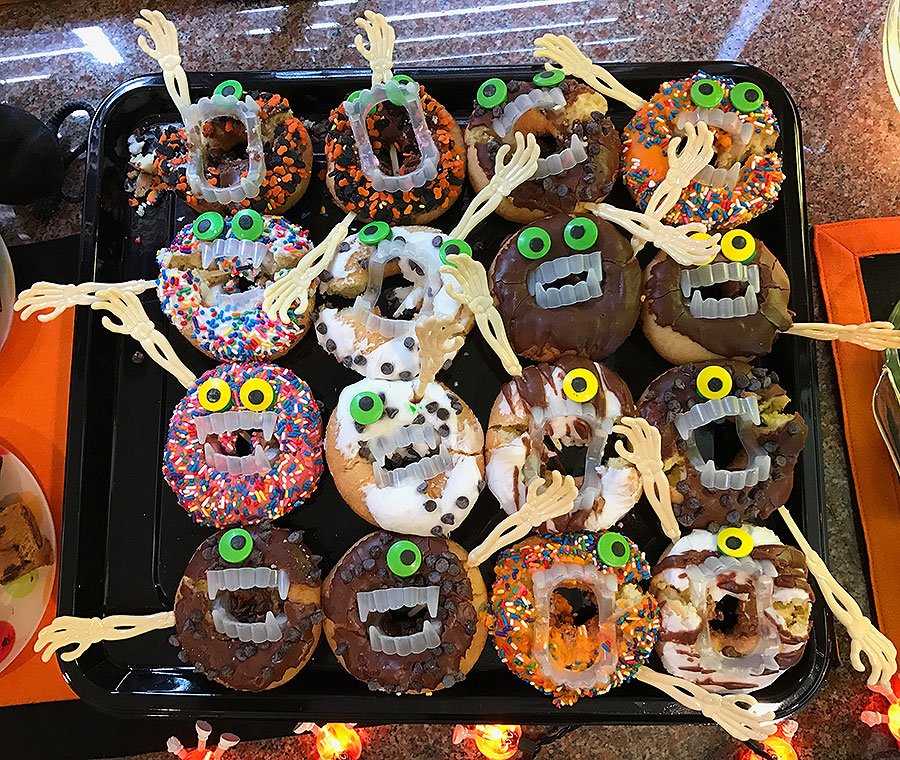 These wonderful Donut Monsters were created by my friend Maureen, who is incredibly creative and no stranger to wonderful Halloween parties. Apparently, they took her no time to create. She purchased ready-made donuts, then stuck fake teeth and skeleton arms inside them and some candy eyes. That’s it! The kids loved playing with the fake teeth afterwards and took them all home as favors. 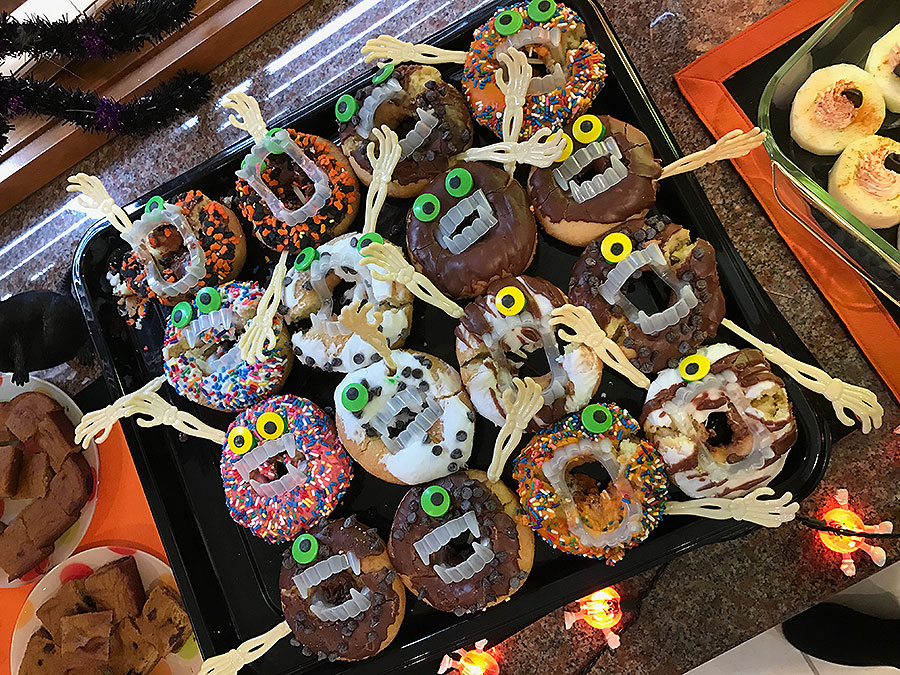
 Yummy and healthy pumpkin bread, prepared by my friend Dana. 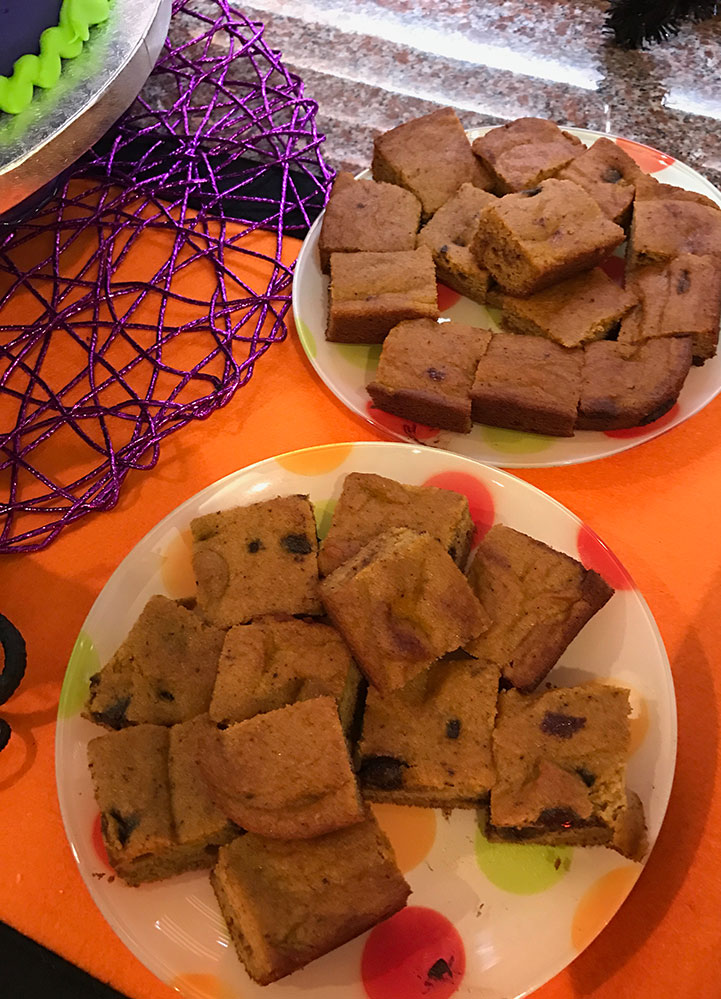
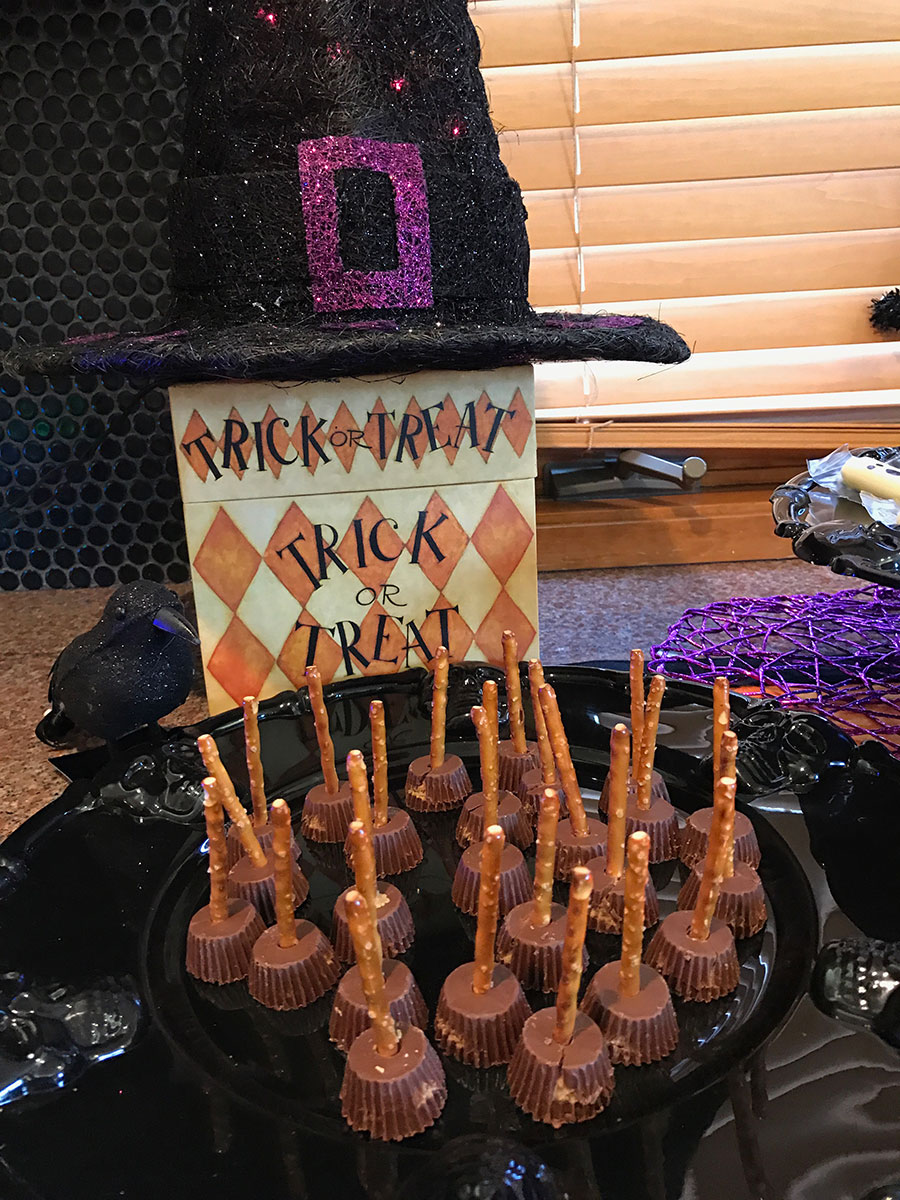 This is such a wonderful and easy Halloween dessert, created by my friend Nicole. They are witch’s brooms. Two ingredients … Reece’s Peanut Butter Cups and Pretzel sticks… you’re done! 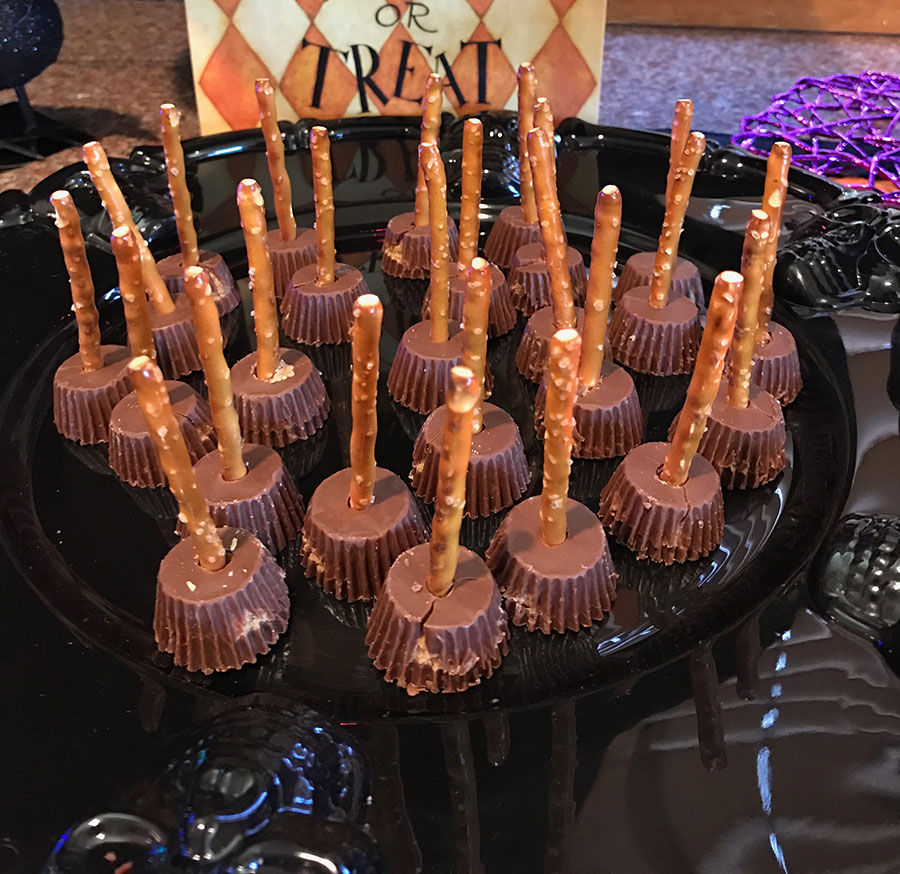
 This skeleton appears in different parts of the house at every party. At this party, he’s hanging out in the sunroom! 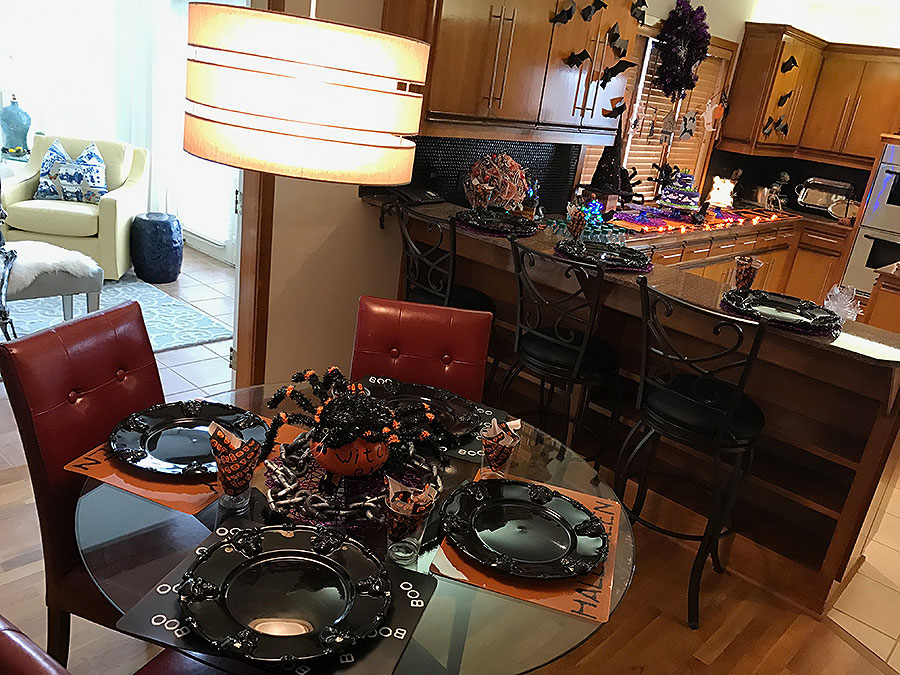 I re-use many of my decorations at each Halloween Party. As I said, kid’s don’t care and there is really no reason for me to keep buying decorations when I have plenty stored away from my previous parties. Sometimes, I even get decorations gifted to me by other moms who’s kids may no longer be living at home. I truly believe that re-puposing and re-using, as well as borrowing is the best way to decorate for a party. 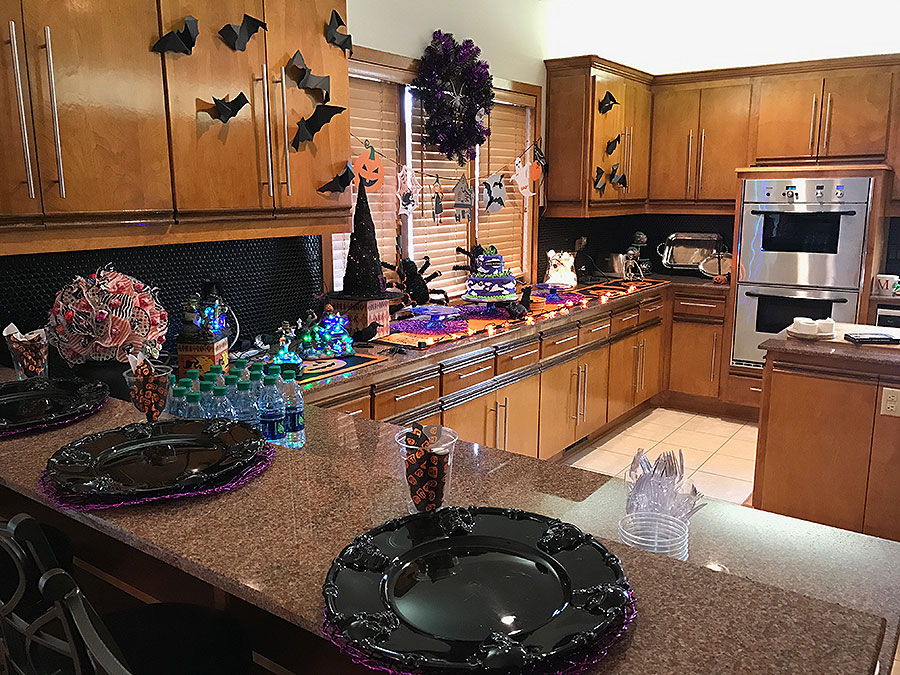
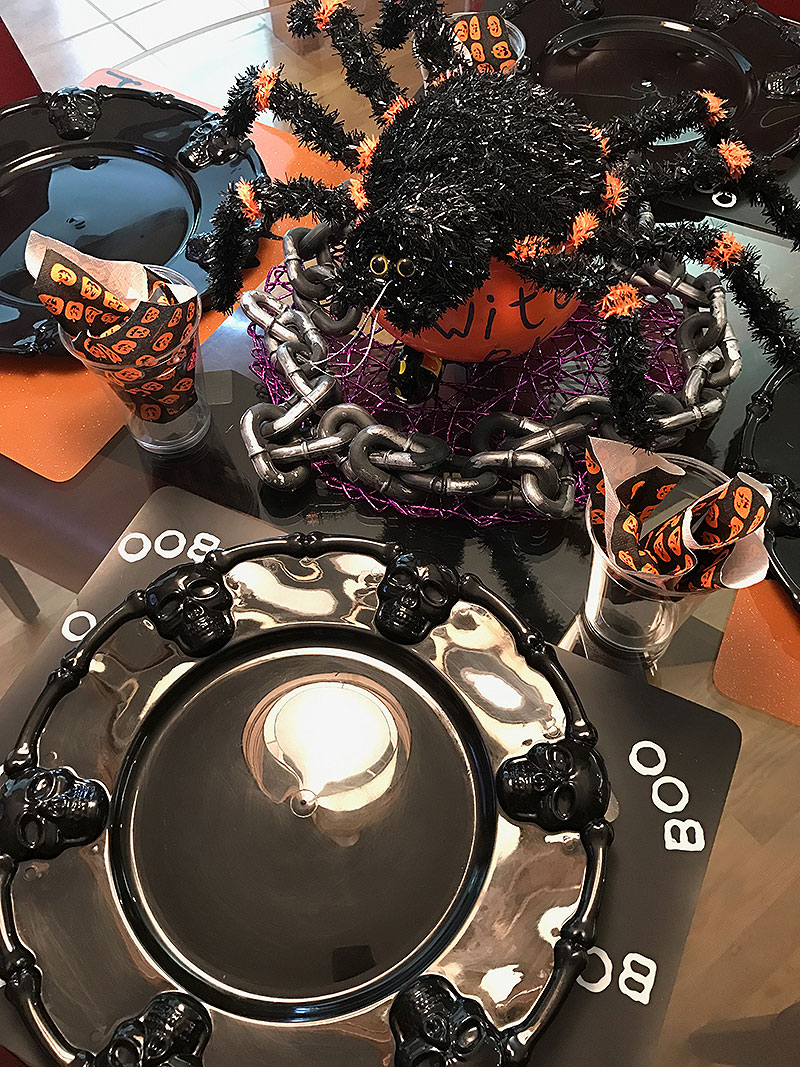 Fun table place settings 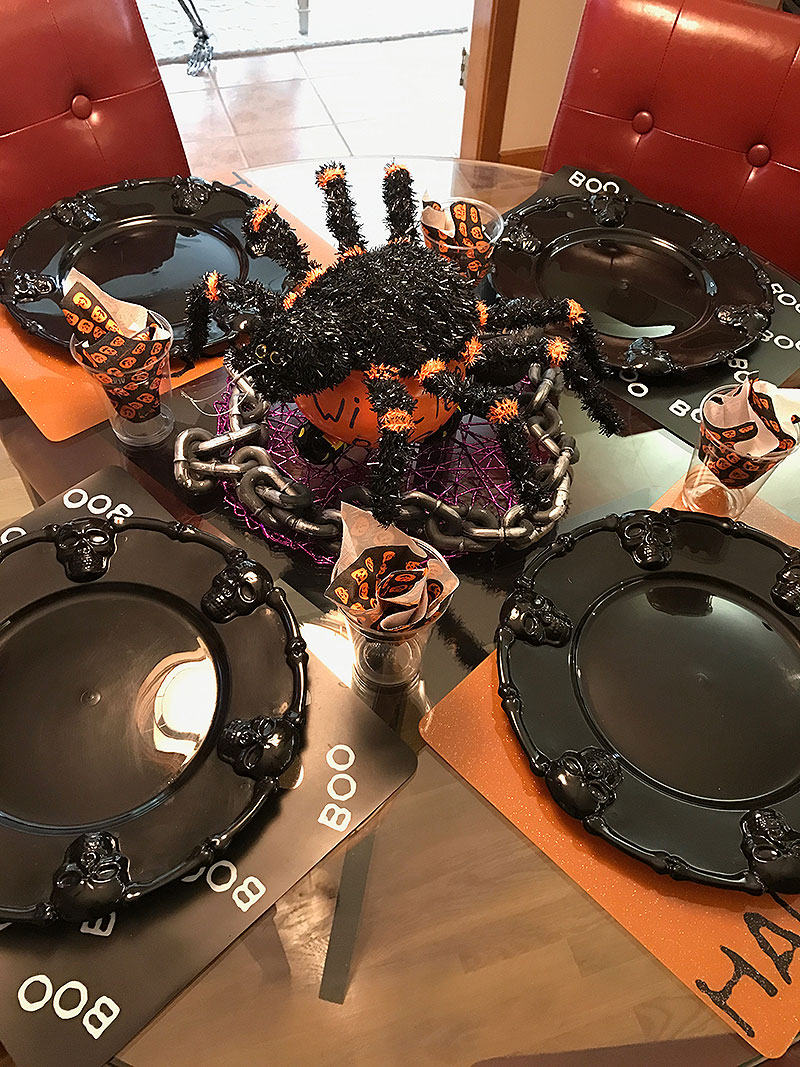
· Posted in Buffet, Decadent Desserts, Desserts, Food Holidays, Guilt Free Party Snacks, Halloween, Parties, Party Hacks ·
August 29th, 2018
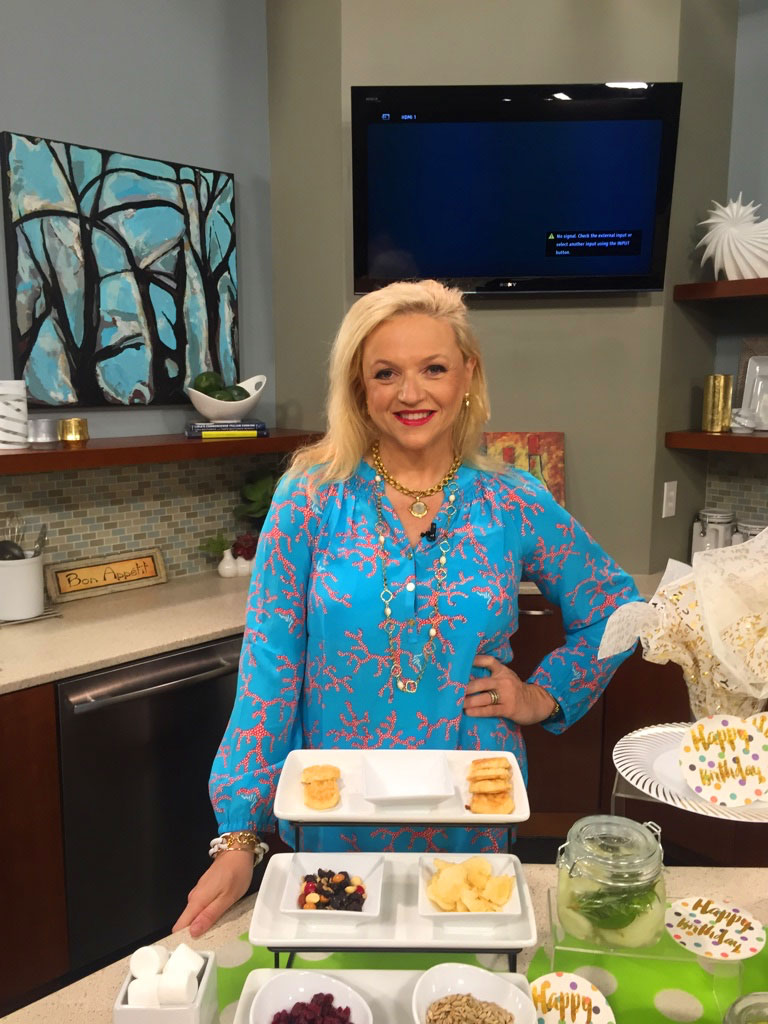
I forgot to post this oldie but goodie on my blog. A few years ago I did a fun segment on Better Kansas City on how to create a delicious and easy S’Mores Bar. This idea is super simple and requires very little prep. Prior to my party, I created my platter with the Godiva Chocolate Squares. Then, for the “extras”, I just prepared some sandwich bags filled with the ingredients I wanted to include inside my S’Mores and when it was time to serve, I just quickly put them into white plates and Voila…. DONE!! We used stereos for our fire source inside the house.
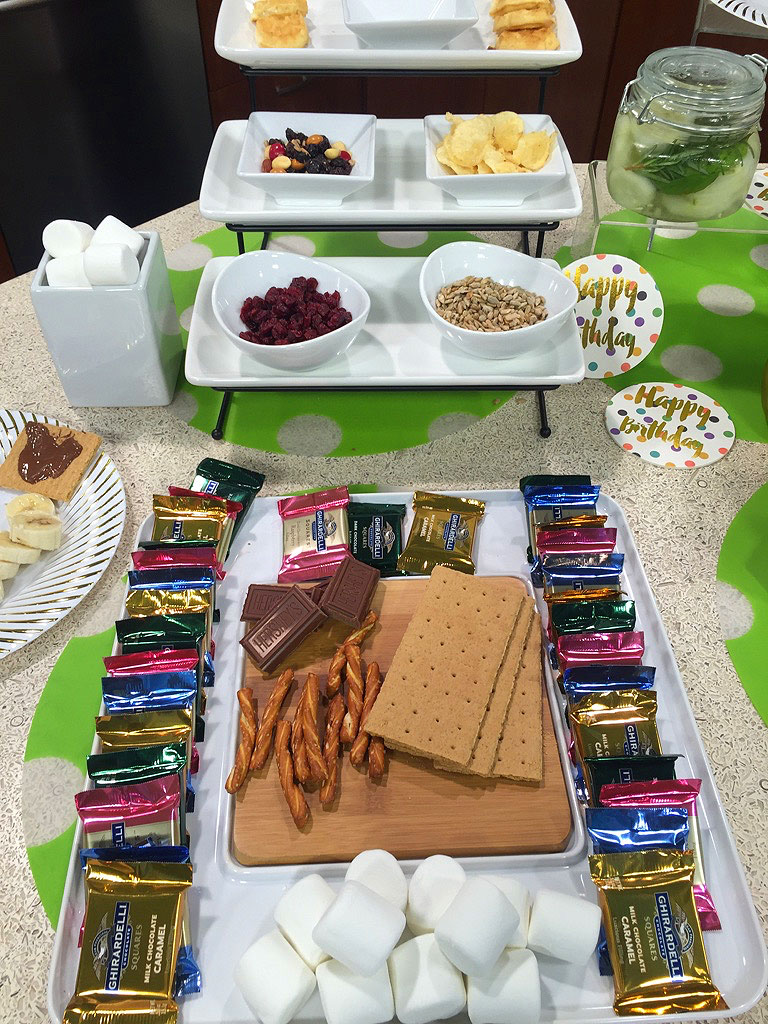 Here’s a beautiful Godiva S’Mores Platter. Includes Godiva chocolates, graham crackers, pretzel sticks, marshmallows and more!
· Posted in Decadent Desserts, Desserts, Game Night, Parties, TV Appearances, TV Spots ·
October 24th, 2014
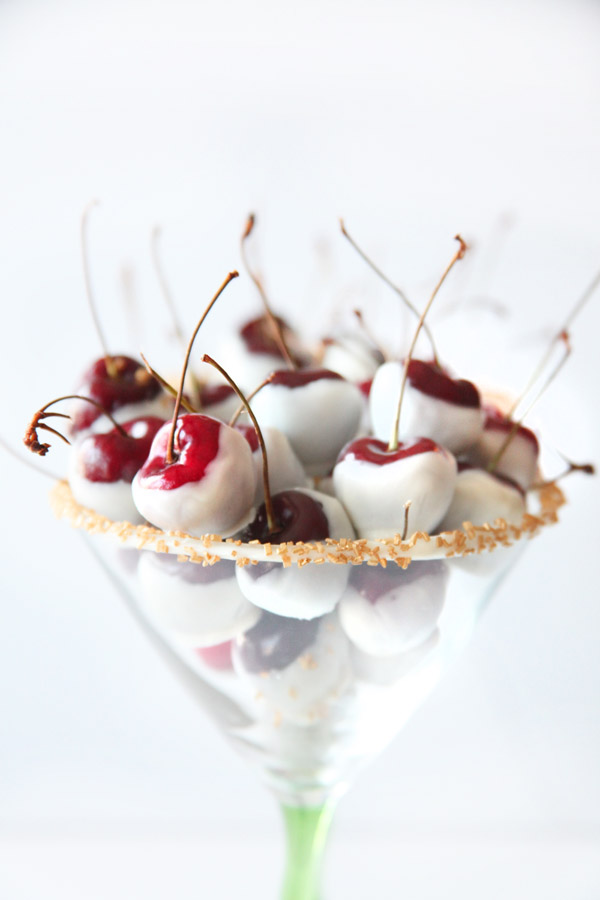
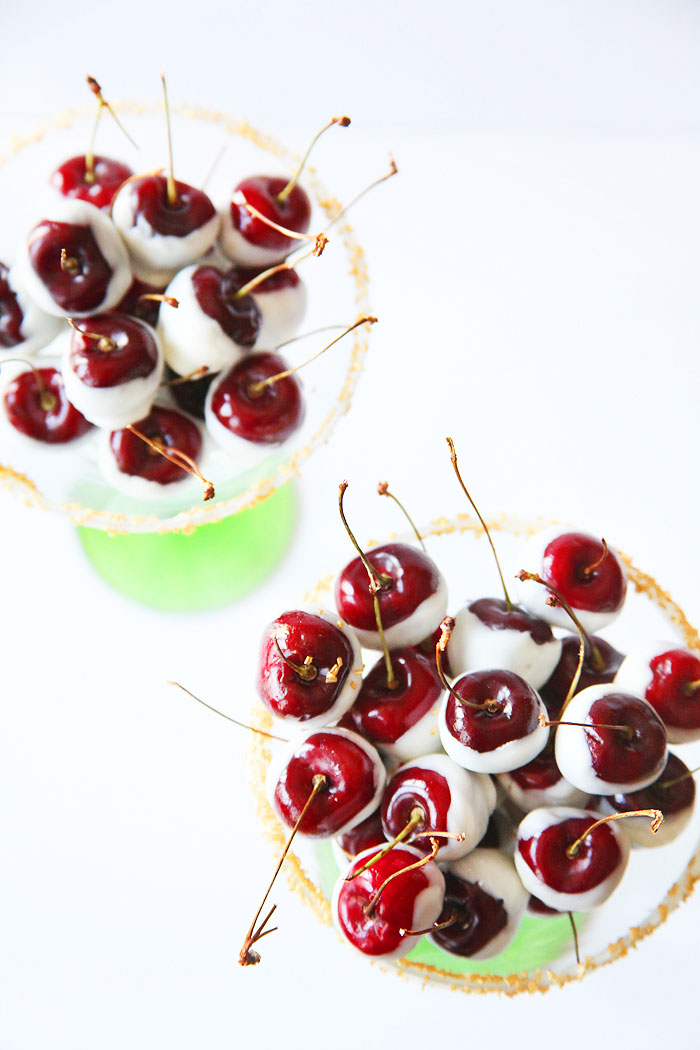
Can you guess what’s in season? Cherries, cherries, cherries!!! Why am I so excited? Because typically cherries are really expensive, I can easily pay $10 or more for a few pounds… but not when they are in season! I love cherries and honestly, I don’t need to do anything to them. I can just sit down and enjoy them individually, but when I’m planning a party, there is nothing like serving these cherries in a light candy coating! You can do chocolate, vanilla, or whatever coating you choose. Serve them in a martini glass with the rim dipped in candy coating as well, and you WILL be rewarded with oohs and aahs from your guests…this I guarantee!!
And the best part, it’s the easiest dessert to make. No baking, mixing, or tons of ingredients. So without further delay, here is the recipe:
INGREDIENTS:
1 pound of cherries
1/2 bag of white candy coating ( available at Michael’s or JoAnn’s). You can use chocolate too, I just like the contrasting colors of white and red. Great for the holidays too!
PREPARATION:
Melt candy. Wash cherries well and dry them completely. Put out parchment paper to rest your cherries on after you cover them with candy. Choose the cherries with stems, eat the ones that are missing the stems!!! While holding the stems, dip the cherries in the candy coating and place them on top of the parchment paper. Let them dry and serve. For an extra “wow”, dip a martini glass rim in the candy coating and add some gold or silver sprinkles. Let dry. Serve the cherries in the martini glass. These are also great to make a day ahead of time, store them in the refrigerator inside the glass.
· Posted in Decadent Desserts, Parties, Recipes ·
October 2nd, 2014
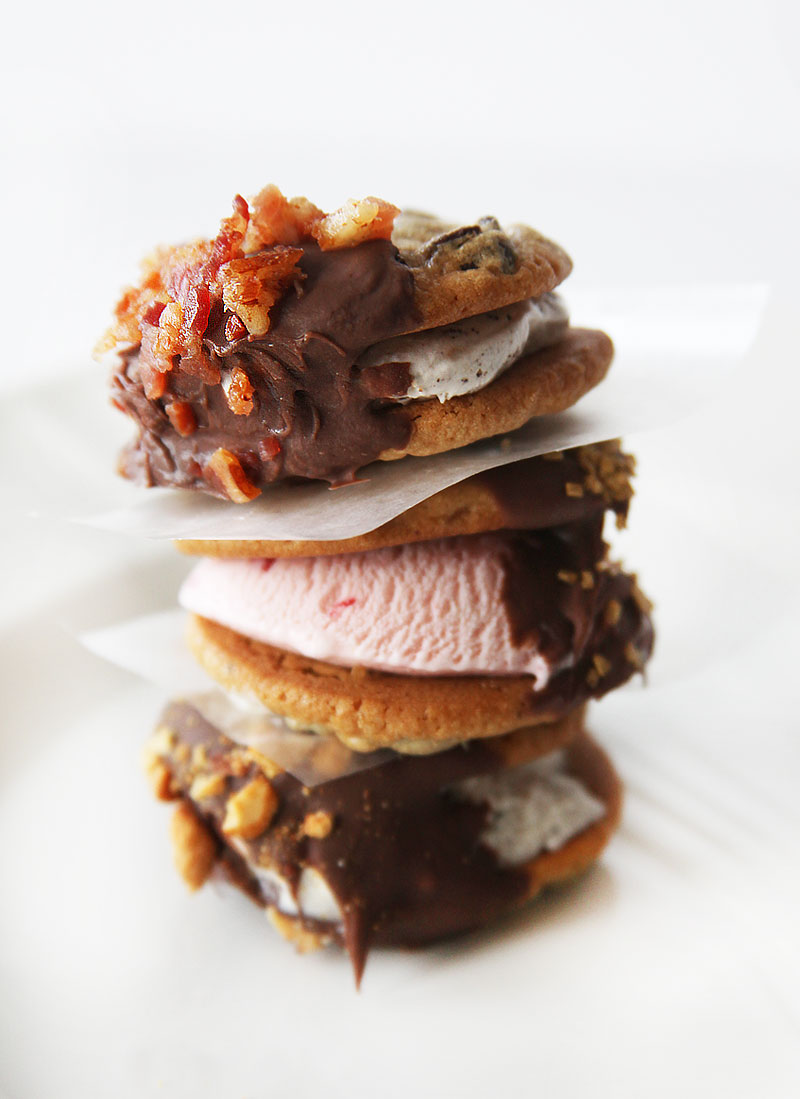
One of the reasons I started partytipz.com is to showcase foods that are “out of the box”, fun, and unforgettable for your guests. I love to give my guests new experiences with fun party food and combinations of foods they wouldn’t typically think of putting together. Today, is National Ice Cream Day and I’m having some friends over for dinner. I’ve prepared a fun menu, but my favorites will be these chocolate covered ice cream sandwiches which I dipped in nuts, sprinkles, and yes.. bacon! These were easy to make and my friends will love them!! I hope you have a wonderful National Ice Cream Day!!
· Posted in Decadent Desserts, Food Holidays, Recipes ·
May 24th, 2014
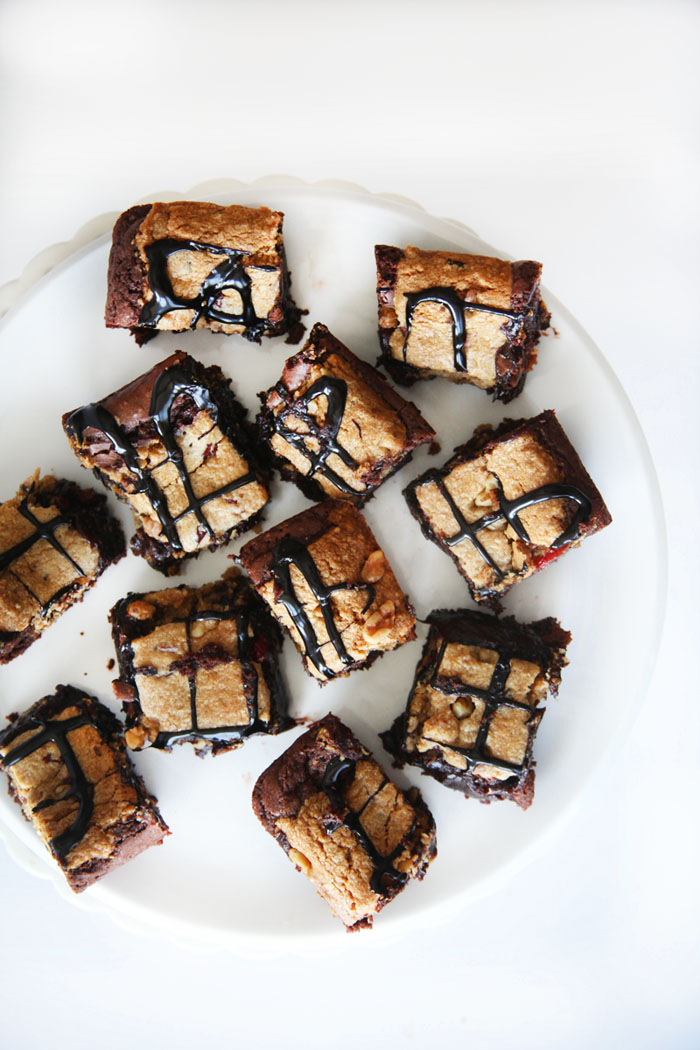
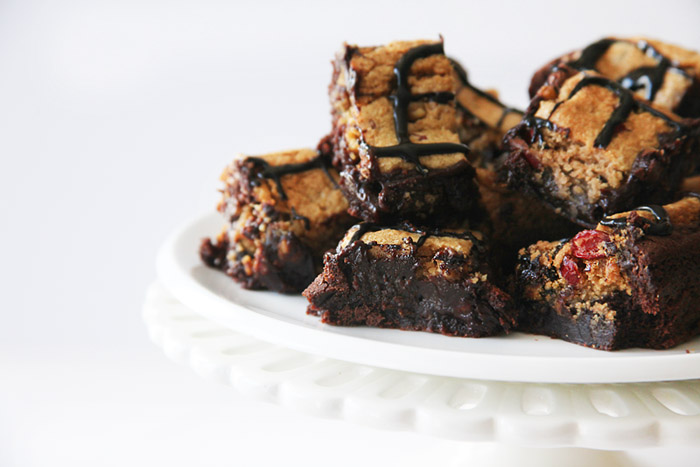
Sometimes I feel really guilty posting recipes for sweet things, especially when I know I’m about to unleash something on to you that you will never forget! Well, this is exactly how I feel about my latest obsession, the BROOKIE! And what is a Brookie you may ask? Well, if you ever had a day when you couldn’t decide to eat a cookie or a brownie, you can kiss those days goodbye! Now, there is a dessert that encompasses both passions… beautifully I may add! Before I give you the recipe, I want to warn you that I am a lazy dessert girl. So, if I can cut some corners… I WILL! With this said, I use the term “from scratch” rarely… and I’m not about to use it today! I have figured out the best way to combine store-bought items for a quick and simple concoction. I love using Ghirardelli brownie mix. Trust me, I’ve used many different brands and this one is PERFECT!!! For cookies, I use the refrigerated ones, Pillsbury is always a winner, however, the store-brand ones seem to work well too. If you would like to make both the cookies and brownies from scratch and then combine them, feel free. And you will find many recipes on the web that are great resources. Just Google “brookies”. But since I typically make this dessert for parties (trust me, it’s safer for my waistline this way), I have a ton of menu items that I need to work on, so the less steps I have to go through, the better!
Another warning… the toughest part about this recipe is the time you have to stare and drool over the Brookies while they are cooling. So your best bet is to make them ahead of time. Make them the morning of your dinner party or even the evening prior. Put them out of your sight and forget about them! Cut them when they have completely cooled. If you want to pop them in the microwave for 10-15 second to get them a little warm, that will work. And of course, you can serve them with other accoutrements, such as a scoop of ice cream or whipped cream! But honestly… they are fabulous on their own!
But enough with the talk. Here is the recipe for the easiest and most addictive dessert I’ve made thus far. Don’t say I didn’t warn you!
INGREDIENTS
1 box Ghirardelli Triple Fudge Brownie Mix, 19 oz (It will come with a fudge pouch… so good!!!)
1 package of any cranberry oatmeal (or just oatmeal) refrigerated cookie (Pillsbury is great!)
1 egg
1/3 cup vegetable oil
1/4 cup water
PREPARATION
Mix the Ghirardelli brownie mix according to package directions. DO NOT ADD THE FUDGE POUCH, I’ve got a better use for it later! Grease a 9×9 pan and preheat your oven to 325 degrees. Empty the brownie mix into the greased pan. Open the refrigerated cookies and break them apart. Set them on top of the brownie mix giving them a little space between each one the end result is sort of like a grid of cookies on top of the brownie mix. Do not be concerned if the cookies start sinking into the brownie… that’s all part of the plan!
Pop the brookie into the oven and set your timer for 45 minutes. If you like your brookies super moist, you can remove them from the oven after 45 minutes. If you like them slightly more dense, put aluminum foil on top of the brookie and let it bake for another 10 minutes.
Once it’s done baking. Remove the brookie and open up that FUDGE POUCH that came with the brownie mix. Create a pretty pattern on top of the brookie with the fudge. Let it fully cool, which could be up to an hour. You can even pop it into the refrigerator for the last 30 minutes. Serve and enjoy!
· Posted in Decadent Desserts, Recipes ·
May 22nd, 2014
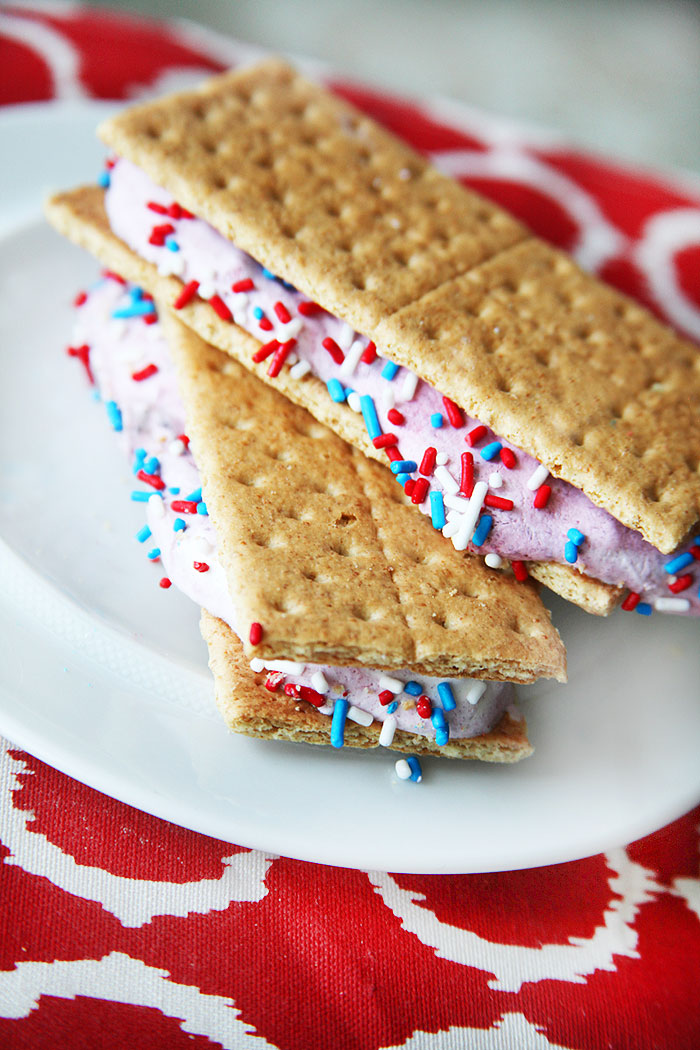
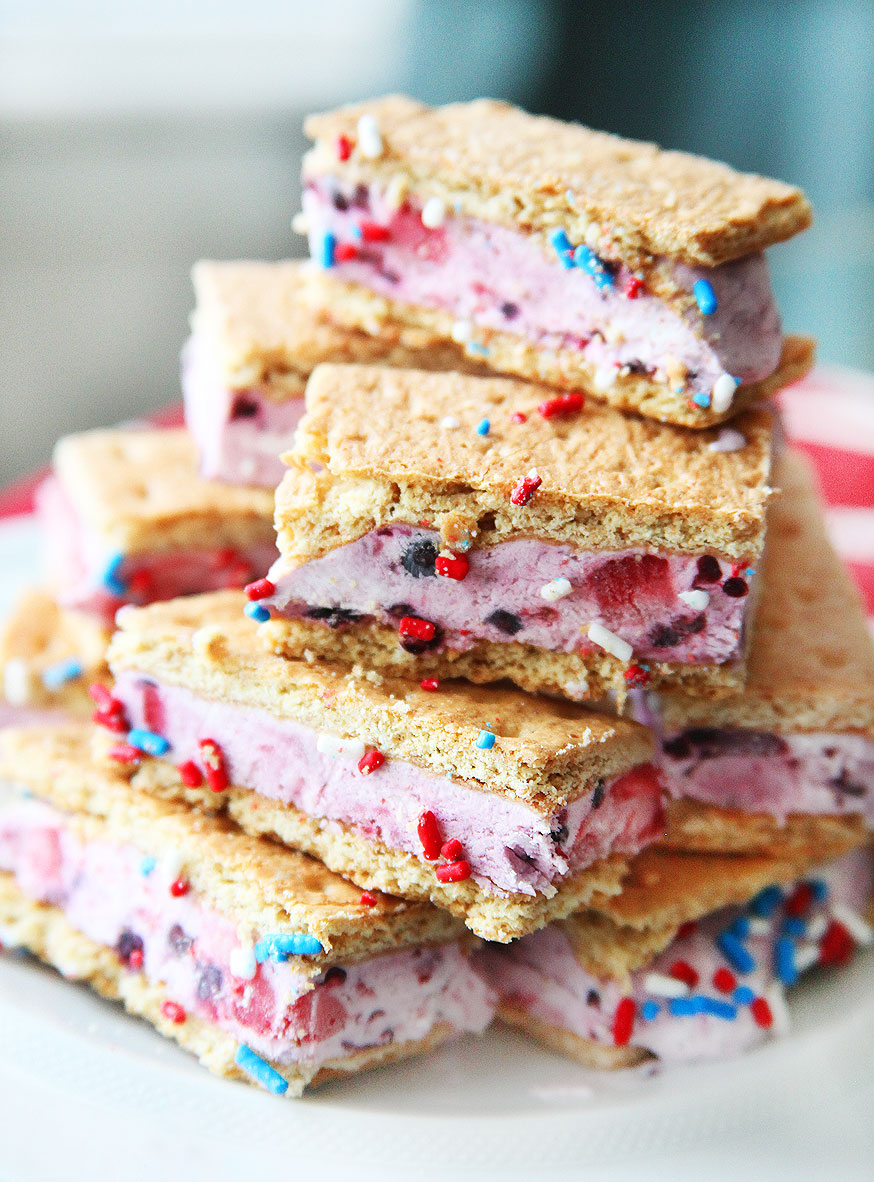
When I find a great recipe, I don’t hesitate for a moment to try it. Here’s a recipe I found on the box of Honey Maid graham crackers. I LOVE ice cream sandwiches, but let’s be honest, they are not the healthiest of choices. These however, are a winner! You’ll be using fresh berries, banana, yogurt, graham crackers, and fat free whipped topping. If you want to cut even more calories, omit the banana, these sandwiches will still come out wonderfully!! Pictured are the sandwiches “whole” or cut into smaller pieces, according to the perforations on the crackers.
Ingredients
- 10-1/2 HONEY MAID Honey Grahams (you can use the whole cracker or broken into quarters (42 rectangles)
- 1/2 cup sliced fresh strawberries
- 1/2 cup chopped bananas
- 1/2 cup cup blueberries and/or blackberries
- 1 cup vanilla nonfat Greek-style yogurt
- 1 cup (or more) thawed frozen reduced-fat whipped topping
Preparation
LINE 9-inch square pan with foil or parchment paper, with ends of foil extending over sides. Arrange half the graham pieces, in 3 rows of 7 pieces each, on bottom of pan. Or, you can use the whole cracker and arrange them into three rows of 3.
PULSE fruits in blender just until blended. (Some chunks should remain.) Alternatively, you can just mash up the fruit in a bowl, this will give the sandwiches large chunks of fruit (this is the method my family prefers). Spoon fruit mixture into medium bowl; stir in yogurt and whipped topping. Spread over graham pieces in prepared pan. Top with remaining graham pieces, aligning to match placement of graham pieces on bottom layer.
FREEZE 4 hours. Use foil handles to remove dessert from pan; cut between grahams to form 21 bars (or eat the whole thing). If you would like to add sprinkles, let stand 2-5 minutes so moisture can cover the yogurt, this way the sprinkles will stick to the yogurt.
Presentation
When cut-up, this makes 21 servings at 50 calories per serving. With 4gm of sugar and 9gm of carbs.
· Posted in 4th of July, Decadent Desserts, Fourth of July, Guilt Free Party Snacks, Parties, Recipes ·
May 9th, 2014
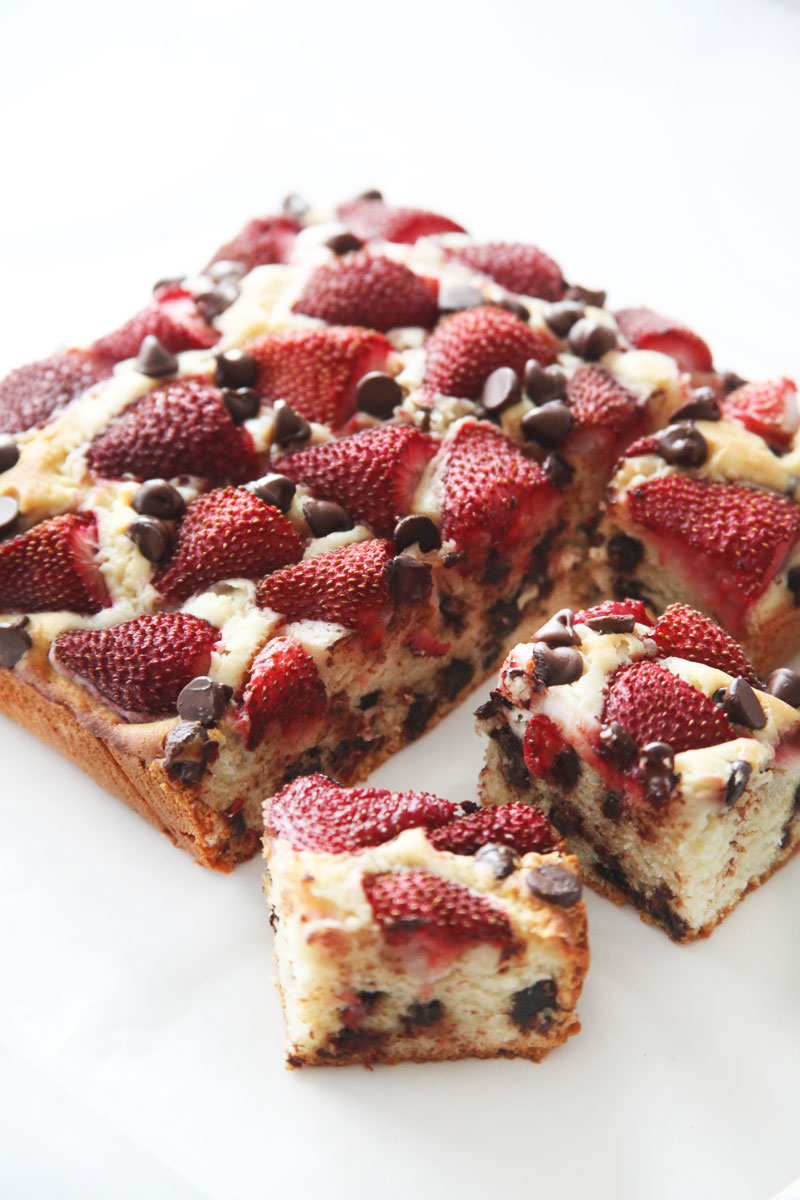
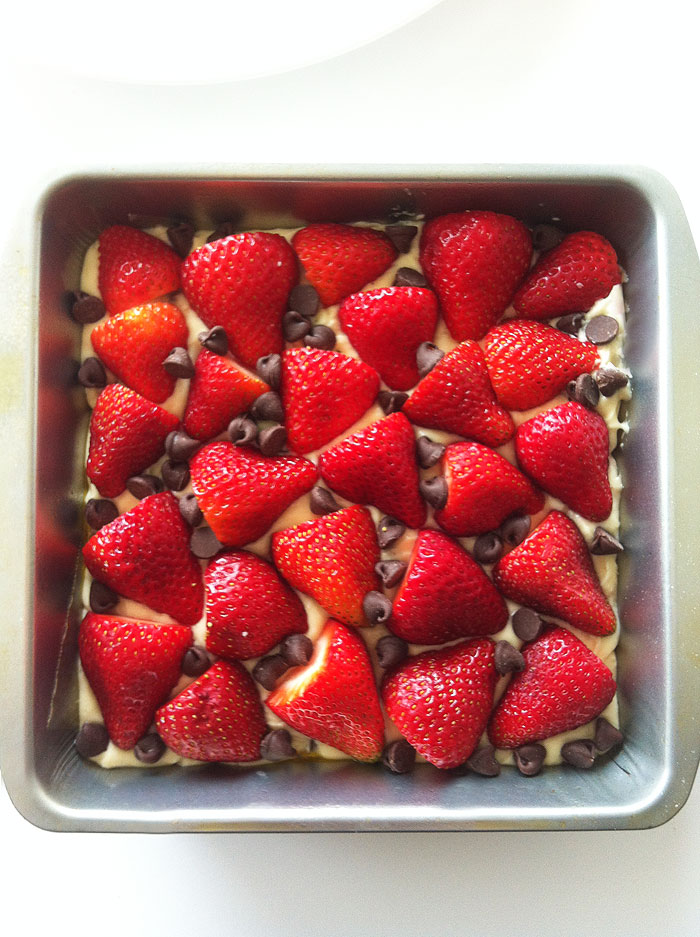
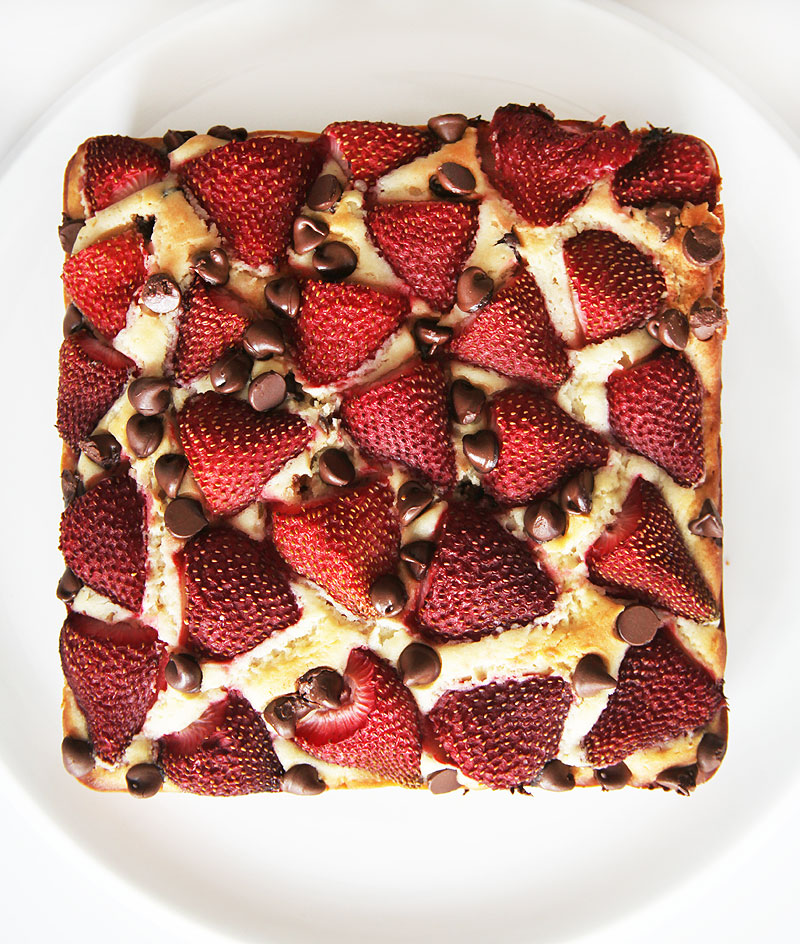
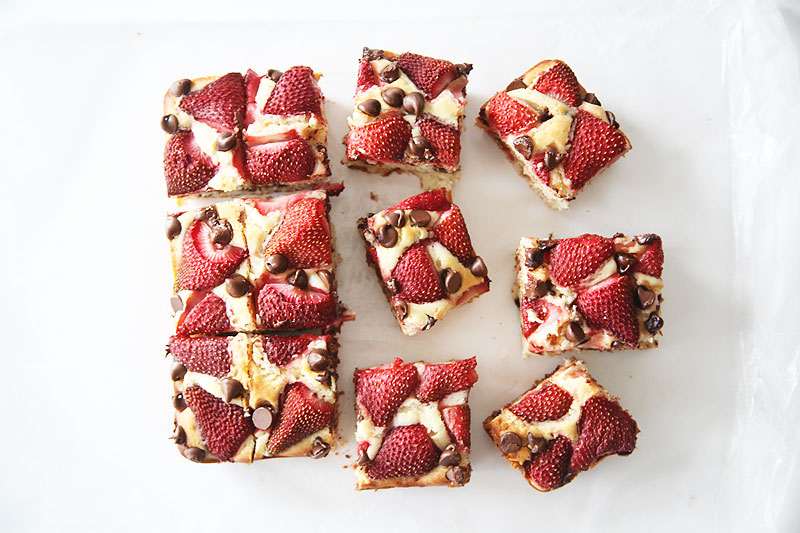
I want you to prepare yourself for a dessert that’s not only beautiful but absolutely delicious! This strawberry chocolate chip cake is fabulous alone or with a scoop of ice cream. I made it for my husband because I realized I had a lot of strawberries left over and wanted to bake something delicious. I found this recipe on Pinterest which led me to Julia’s Album. She has a great web site with many great recipes. I think she originally got it from Martha Stewart and tweaked it a bit. Of course, I have tried many things on Pinterest that turned out to be disasters, but not this time! My cake turned out fabulous! Julia used a springform pan, I just used a 9×9 square pan. Mine turned out beautiful but I’m sure it would turn out even better in the springform.
This is what the cake looked like going into the oven.
This is what it looked like when it came out of the oven. Obviously the strawberries are a little less vibrant, but still delicious!
Ingredients
- 1 and 1/2 cups all-purpose flour
- 1 and 1/2 teaspoons baking powder
- 1/8 teaspoon salt
- 3 tablespoons unsalted butter, softened
- 3 tablespoons Greek yogurt
- 1 cup sugar
- 1 large egg
- 1/2 cup milk
- 1 teaspoon pure vanilla extract
- 1/3 cup chocolate chips plus more for sprinkling the top of cake
- 1 pound strawberries, hulled and halved
Instructions
- Heat oven to 350°F. Line the bottom of a 9×3-inch springform pan with parchment paper and spray cooking spray. Or you can use a 9×9 brownie pan and spray with cooking spray.
- Sift flour, baking powder, and salt together into a medium bowl.
- In a separate large bowl, combine butter, Greek yogurt, and 1 cup sugar and, using electric mixer, beat on medium-high speed until light and fluffy – no more than 2 minutes.
- Reduce speed to medium, mix in the egg, beat until light and fluffy. Then mix in milk, vanilla.
- Keeping the mixer speed low, mix in the flour mixture, gradually, just until combined. Do not over mix.
- Fold in chocolate chips into the batter. Transfer batter to springform pan. Arrange strawberries on top of the cake, cut sides down and close together. Place chocolate chips in spaces in between.
- Bake cake for about 1 hour until the top is golden brown and the tester comes out clean. In the last 5-10 minutes of baking, you can take the cake out of the oven and sprinkle some more chocolate chips on top, pressing them lightly into the top of the cake (the top of the cake will already be baked and a bit crusty) – it will make for a nice presentation. Return to the oven for 5-10 more minutes, to allow chocolate to melt a bit and look even nicer!
- When the cake is done baking, let it cool (still in the baking pan) on a wire rack. After cake has cooled for about 40 minutes, release the cake from the springform pan. At this point, if the cake is cool enough, you can slide your hand under the cake, between the parchment paper and the bottom portion of the springform pan and move the cake with the parchment paper attached to its bottom onto a cake plate easily.
Notes
Adapted from: Martha Stewart
Storage tips: Because strawberries tend to make any desserts overly moist, this cake is best kept refrigerated. When refrigerated, it keeps very well for at least 1 week, and tastes just as fresh! It tastes pretty good cold, and you can also microwave it for 10 or so seconds to melt the chocolate chips.
Freezing tips: This cake freezes very well. Cool the cake completely. Tightly wrap the cake in plastic wrap, make sure it’s airtight. Freeze for up to 1 month.
· Posted in Decadent Desserts, Pinned it - Tried it, Recipes ·
May 3rd, 2014
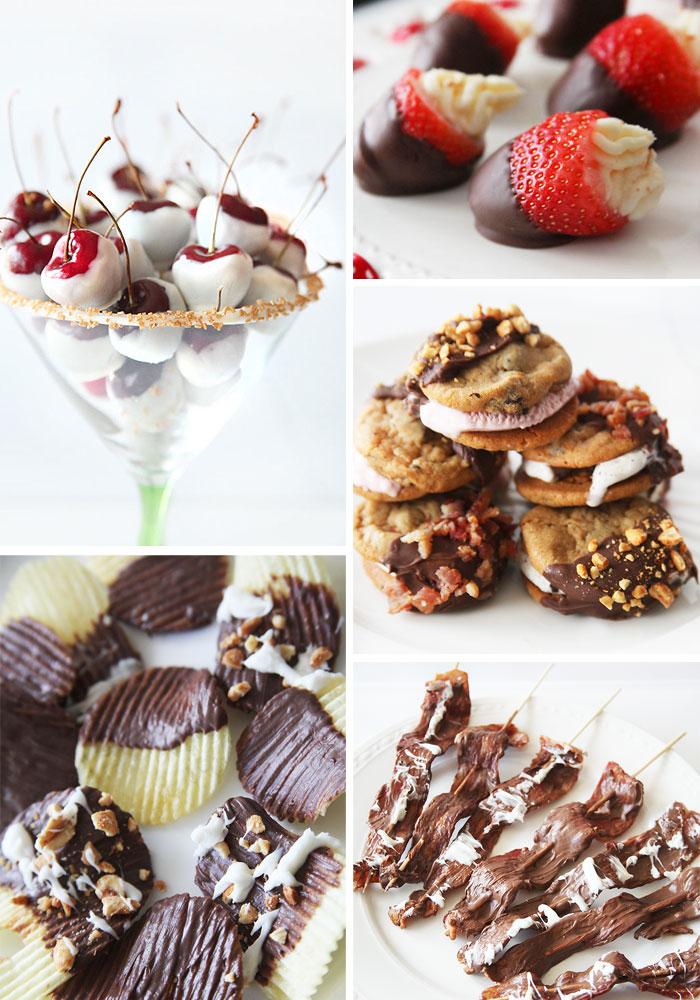
I’m going to admit something to you… I have a fail safe party secret which ALWAYS works… I mean ALWAYS! Chocolate covered anything! Some people resort to chips and dip, I resort to chocolate and it has never failed me yet. So the next time you get the urge to entertain, try covering these foods in chocolate. Trust me, you’ll thank me later!
Chocolate covered cherries
Super easy and absolutely delicious. Cover these beauties in white or dark chocolate and you won’t be able to eat just one. Serve them in a martini glass for a beautiful presentation.
Chocolate Covered Ice Cream Sandwiches
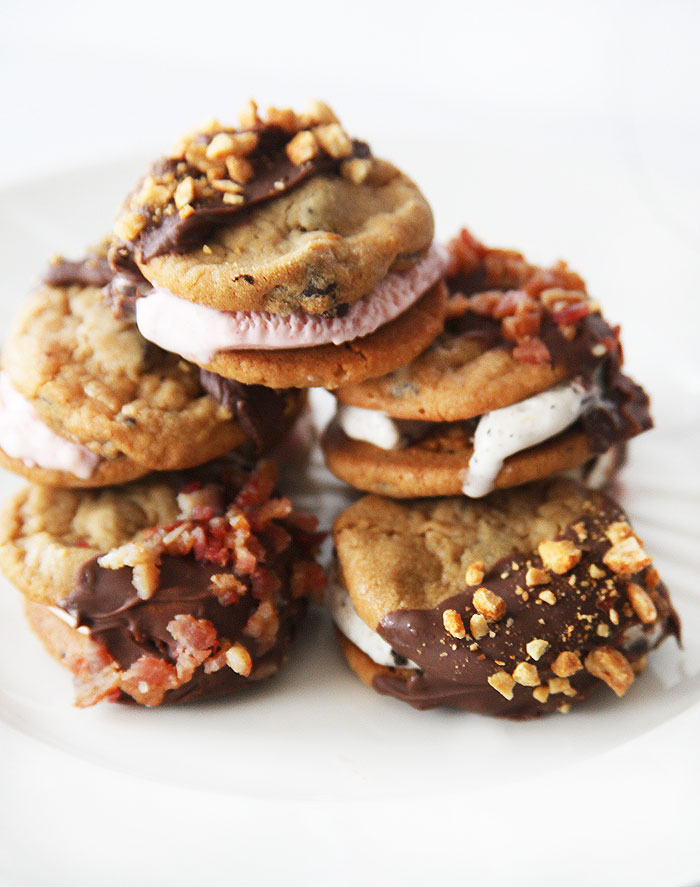
Hold on to your hats! As if ice cream sandwiches weren’t enough, now you can dip them in delicious milk or dark chocolate for an added special touch and what’s a party if you don’t make your guests feel special. Just make your sandwiches and freeze for four hours. Melt chocolate and quickly dip the sandwiches in the chocolate and put back in the freezer. I placed all my sandwiches on parchment paper in the freezer. The sandwiches picture above were for a dinner party we had a few weeks back. I also dipped them in bacon and peanuts…. yes, I’m crazy!
Chocolate Covered Potato Chips
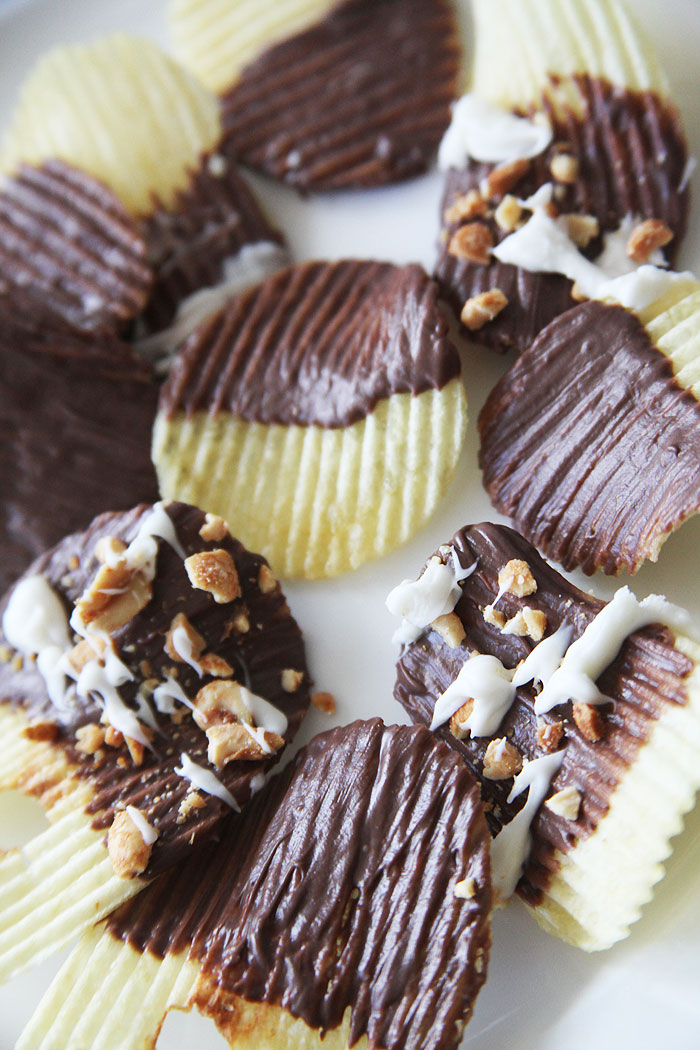
I know, I know… pure sin! However, chocolate covered potato chips seem to have a great combination of the “salty and sweet” that people enjoy. Plus, it’s unique and who doesn’t want to do something “out of the box” at a party?! Trust me, your guests may look at you funny initially, but they’ll be praising your efforts after they try it! Just brush a little chocolate on a thick potato chip. I suggest using the kettle brand or the rippled versions. I wouldn’t dip the chips, a light brushing seems to have a nice effect without overpowering the chip as dipping may do.
Chocolate Covered Bacon
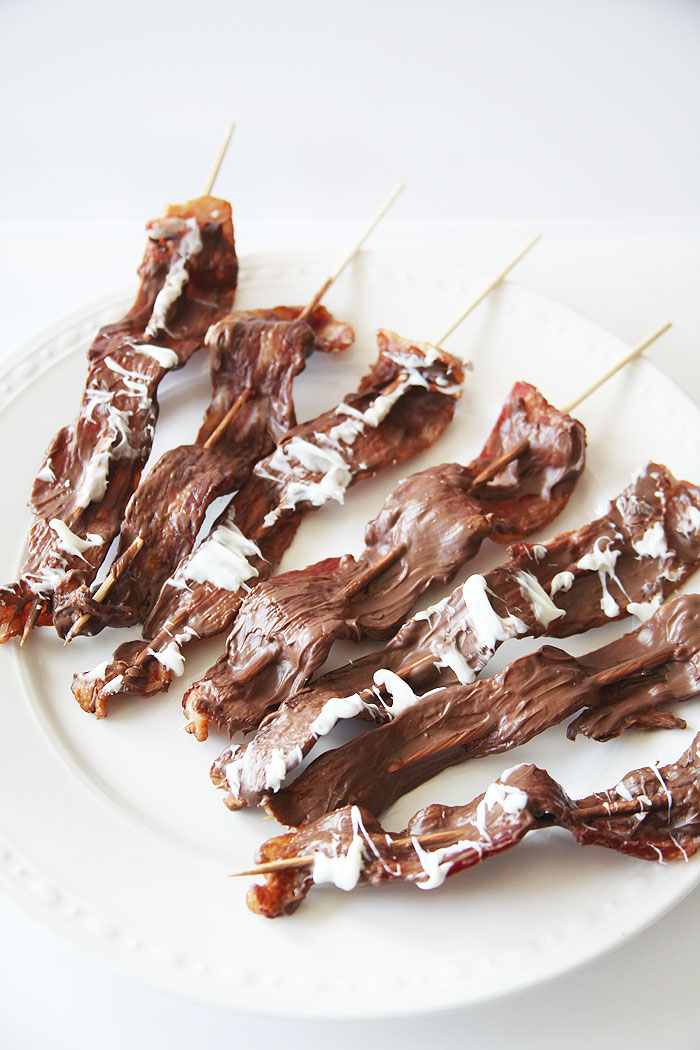
Hold on to your hats! What’s the hottest food trend? Chocolate covered bacon, of course! I prefer to brush my bacon with chocolate instead of dipping it. I find that brushing it gives it just the right balance. Although some people fully dip the bacon and love it! You’ll have to try it yourself and discover your preference! Just make your bacon as you normally would. I prefer to bake mine and for an added sweetness, I sprinkle a generous amount of brown sugar on the bacon before placing it in the oven.
Chocolate Covered Strawberries

This classic will never fail you. You can ask my friends, no one has ever NOT had chocolate covered strawberries at least once while hanging out at my house. Simply put, they are the magic dessert that always seems to look beautiful and taste sensational. I prefer to dip my strawberries in dark chocolate, it’s the best combination of wonderfully sweet strawberries with a slightly bitter taste of the dark chocolate. Pure perfection!! And if you really want to go crazy, stuff the strawberries with cheesecake filling. Your guests will never forget it!! Here’s the recipes.
· Posted in Decadent Desserts, Parties, Recipes, Uncategorized ·
May 1st, 2014
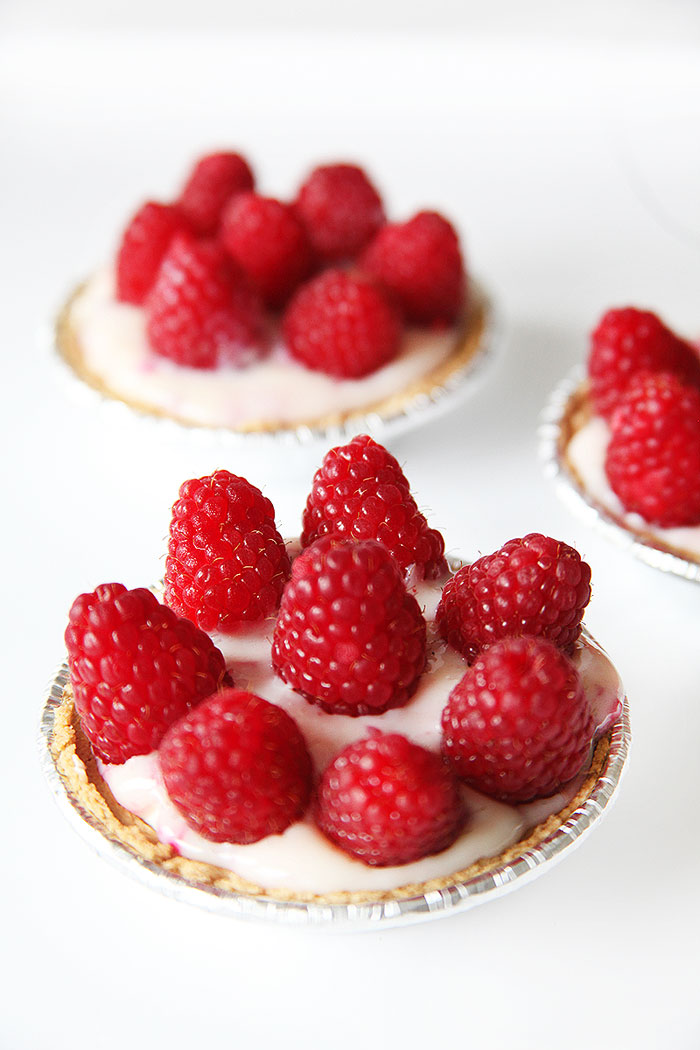
Looking for something to celebrate? How about because it’s friday… it’s summer… and it’s the first day of August?! Still not excited? What about the fact that today is National Raspberry Cream Pie Day… yep, thought that would get your attention! Today we celebrate beautiful raspberries in a delicious pie crust resting inside (or out) of a delicious cream pie filling. Okay, I have to be honest, I’ve never made a raspberry cream pie before, so I had to look for an easy recipe. And here’s the good news… I found one! I had to tweak it a bit, but it worked out! I created mini-pies, that way I wouldn’t have to cut into it and everyone would receive a beautiful little mini-pie instead of a piece of pie that tends to get a bit sloppy! I think they worked out and I highly recommend the recipe! Enjoy…
INGREDIENTS:
2 (14 ounce) cans sweetened condensed milk
4-5 tablespoons lemon juice
12 oz fresh raspberries
6-8 ounces cream cheese, softened
12 mini graham cracker pie crusts
PREPARATION
- Whisk sweetened condensed milk and lemon juice together in a bowl; gently fold in raspberries.
- Gently spread cream cheese onto the bottom and sides of graham cracker crusts using a spatula or the back of a teaspoon. The secret here is to make sure you purchase good crusts and that your cream cheese is WELL softened. Otherwise, your pie crust will crack. Divide raspberry mixture between the mini pie crusts… about 2 Tablespoons per crust. Top with some fresh raspberries.
- Refrigerate until set, at least 3 hours.
· Posted in Decadent Desserts, Food Holidays, Recipes, Trends ·
|
|
|