May 28th, 2014
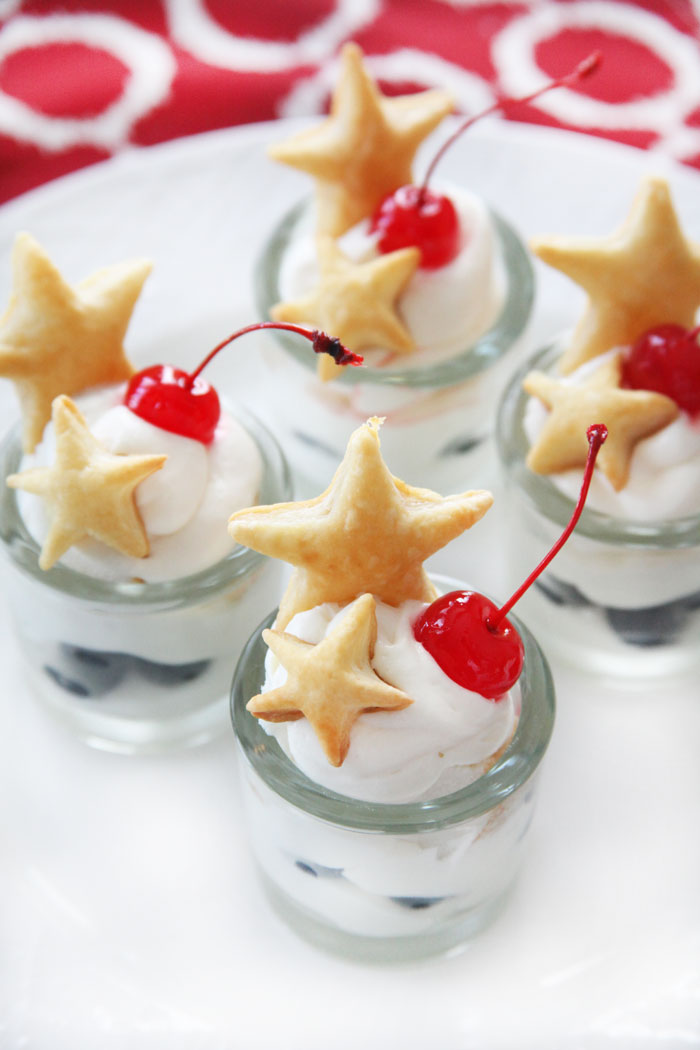
Bite sized, delicious, and of course… gorgeous!! Wait until you see these beautiful little trifles sitting on your dessert table. I highly recommend you chill them since the cream cheese filling tastes a lot better when its cold. A great “make-ahead” treat!
Ingredients
- 1 sheet puff pastry dough
- 8 oz cream cheese
- 1/2 can condensed milk (or 1/2 cup powdered sugar)
- 1 tsp vanilla extract
- 1 cup mixed berries (blueberries and strawberries)
- 1/4 slice angel food cake, cubed
Preparation
Preheat oven to 400 degrees.
Thaw the puff pastry sheet at least 45 minutes and roll out a bit to make slightly thinner, wider, and longer.
Take your cookie cutters and cut out small star shapes using as much of the dough as you can. If you are left with dough, you can roll out the dough and cut out the stars again, but I have to warn you, manipulating the puff pasty does something weird to it, so those stars will come out looking “different” then the original ones.
Bake the stars for 15-20 minutes, depending on your oven, until they are slightly brown. Make sure they do not burn. You can also brush them with egg wash to make them a bit darker on top.
Let the stars cool and set aside
In the meantime, create the cream cheese filling by beating the cream cheese at medium speed with an electric mixer until creamy; gradually add sugar and vanilla, beating well.
Spoon or pipe the cream cheese filling into a shot glass. I would highly recommend you “pipe” the cream cheese into the glass, it just makes it look better. If you don’t have a piping bag, just use a sandwich bag with a whole in it. That is how I made mine. Start piping in layers. First, pipe in a bit of cream cheese, top off with berries, then pipe in a bit more, add a few cubes of angel food cake, and top off with more cream cheese filling. Then add a few small puff pastry stars and a red maraschino or fresh cherry. You can also use berries if you instead of cherries, if you like.
· Posted in 4th of July, Fourth of July, Memorial Day, Recipes ·
May 28th, 2014

For Easter brunch, my family went to Lidia’s in Kansas City. It was a wonderful brunch and I tried a number of delicious dishes. One of the items I ordered was the Asparagus E prosciutto appetizer.
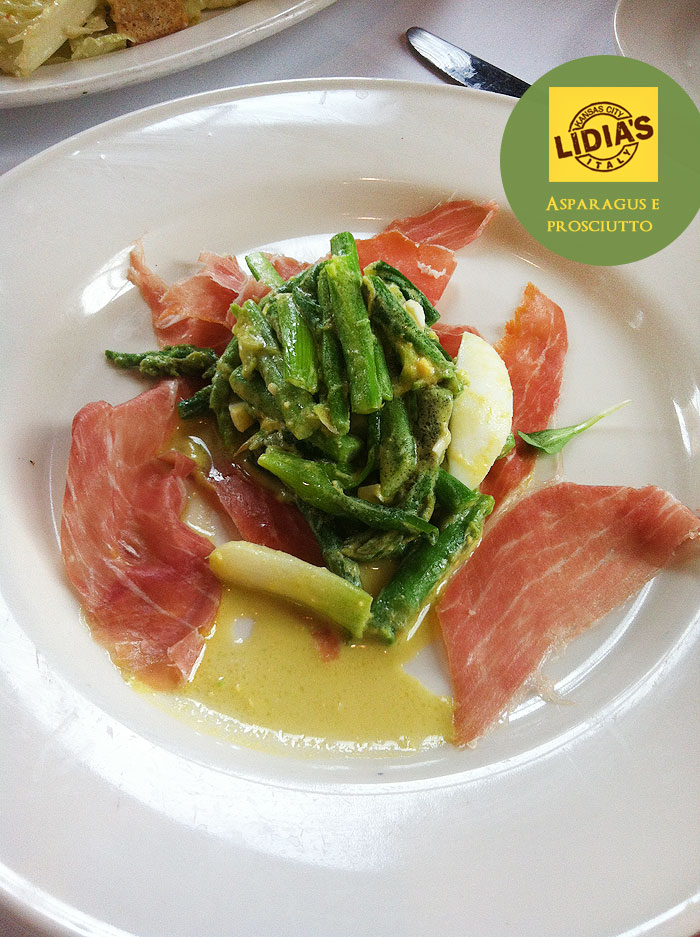
Isn’t it beautiful? It really caught my eye when they placed it in front of me. When I tried it, I liked it, but wondered if I could make a similar dish, which is bigger and healthier. The ingredients listed on the menu at Lidia’s for the Asparagus E prosciutto is Asparagus, Scallion and Egg Salad with Prosciutto di Parma. I’m on a carb free eating plan and wasn’t sure what was in the dressing or the egg salad. So, I thought I would try to re-create the salad at home, with ingredients that were more accommodating to my eating plan. Here is the salad I created.

Here is my recipe… all these ingredients are fabulous and good for you! I hope you enjoy this salad as much as I do.
RECIPE:
8-9 fresh asparagus which are blanched for 1-2 minutes
2-3 hard boiled eggs
2-3 fresh radishes
1/2 avocado
4 slices of prosciutto ham (thinly sliced)
1 tbsp fresh cilantro
1-2 tbsp of balsamic vinegar and olive oil mixture
salt and pepper to taste
Cut up your eggs and place them in the middle of your plate to create the bed for the salad. Top with radish slices. Drizzle with a little bit of the dressing and salt and pepper. Place the blanched asparagus on top of the egg and radishes. Place the prosciutto pieces around the outside of the plate. Top off with diced avocado and cilantro. Last but not least, drizzle the remaining dressing all over the salad and serve!
· Posted in Low Carb, Recipes, Restaurant Copy, Salads ·
May 26th, 2014
If you are one of those people who can’t seem to get out of the “cheese and crackers” plate, you will LOVE this article!
A few weeks ago, I invited one of my favorite couples to my place for an “ultimate” cheese experience. Knowing that cheese was their weakness, I thought… why bother with dinner, we’ll just make the appetizer our main meal… needless to say, my guests loved it!
Something I hear from many of my friends is that they can’t seem to get creative with the cheese plate. It seems like it’s always an after thought with the main meal taking most of the priority. Well, here is a cheat sheet of some of my favorite things to add to a cheese spread. Use all these ideas, or just a few. I guarantee these items will always be a success!
Marinated Olives
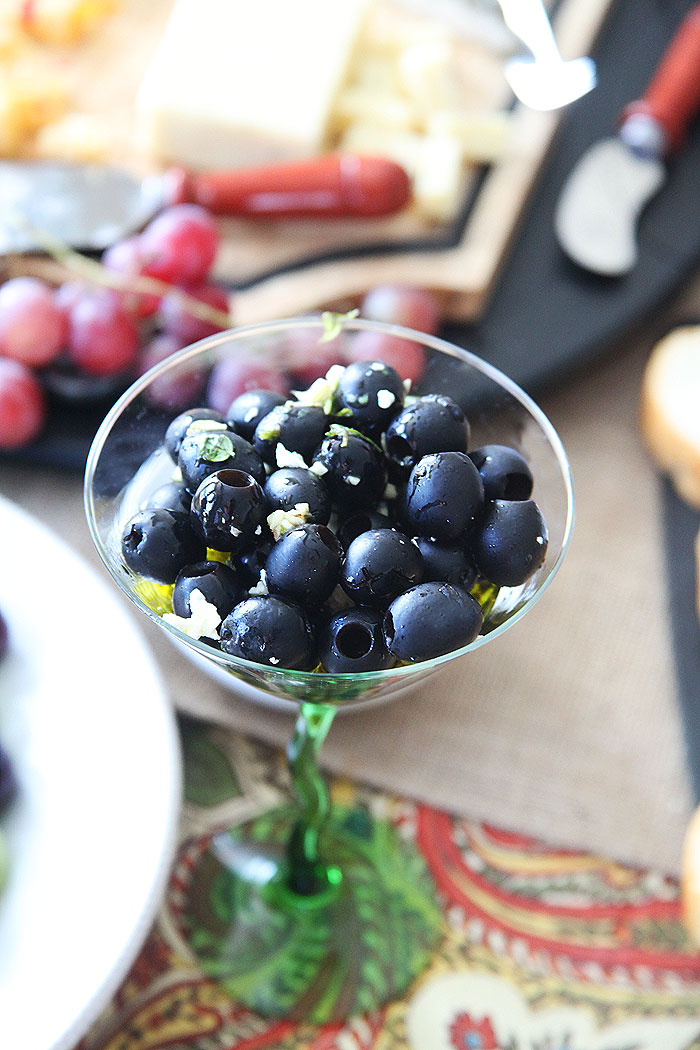
Olives are a staple on a cheese plate, however marinated olives are even better! Most supermarkets have a plethora marinated olives at their deli section and I love that you can buy them by the pound and choose the amount you would like to serve. However, they tend to be a bit pricey and if you are sticking to a budget, making your own is always a better option. I simply mix a little garlic (not too much) and my favorite spices (but not too spicy) in olive oil and pour over my favorite olives. Let them stand for an hour and you should have a great addition to your cheese plate.
A Variety of Cured Meats
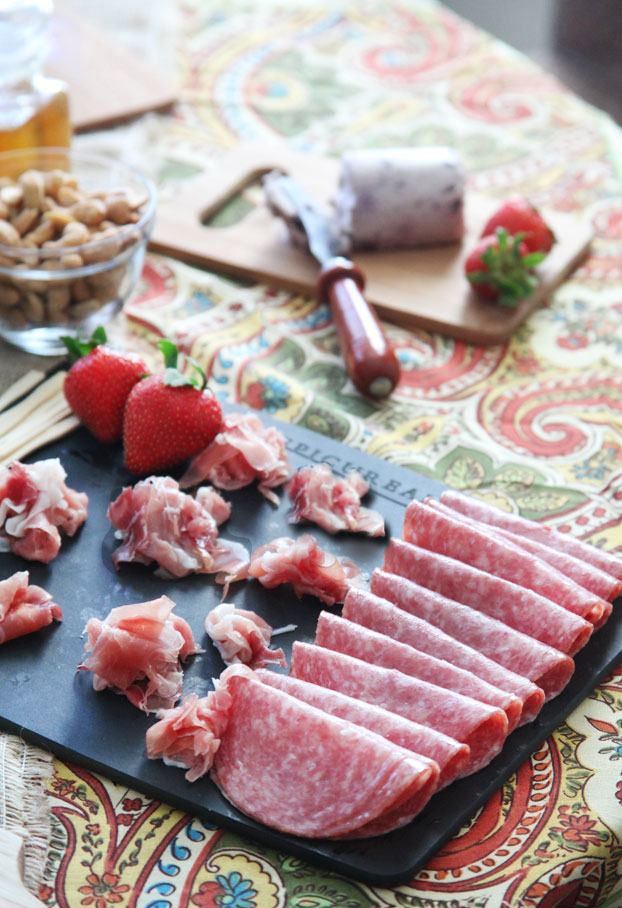
Whether you choose salami, prosciutto, or ham, cured meats are always a delicious addition to any cheese platter. If you don’t like cured meats, you could also serve deli meats, such as roast beef, turkey, or chicken slices. Your guests will love making their own combinations of cheese, crackers, and meats.
A Variety of Breads
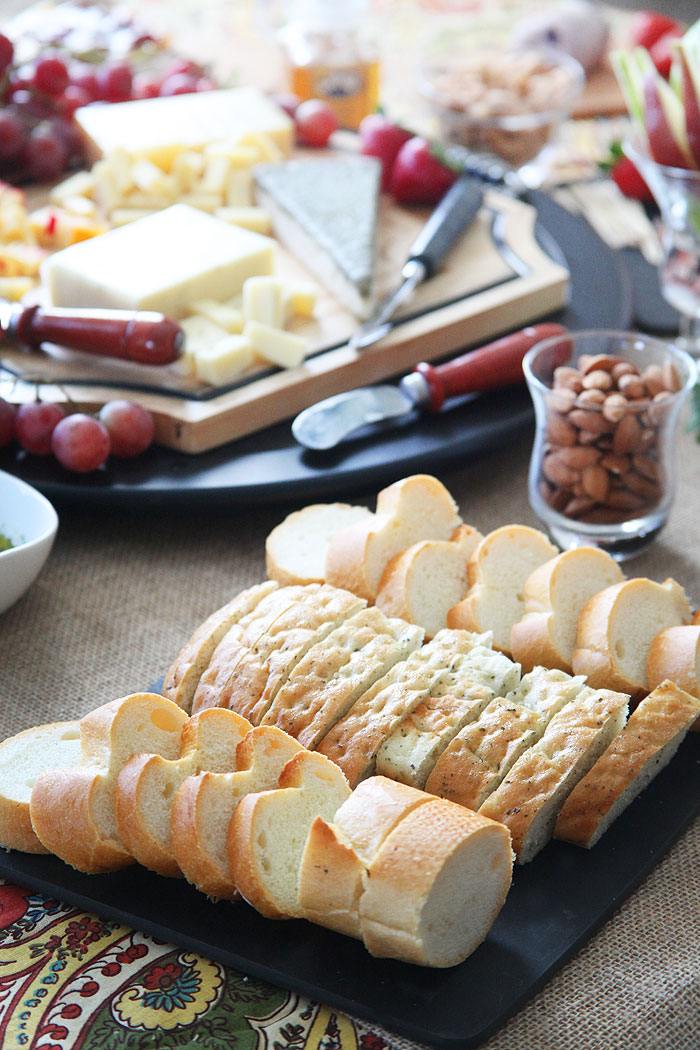
Most people opt for crackers with their cheese. And if you are serving a cheese plate as an appetizer, before a big meal, this will probably be a great option. However, if you would like the cheese spread to be your main meal (maybe for a wine tasting party), consider adding various kinds of breads to the table. Bread can fill up those hungry guests and adding additional bread accoutrements such as olive oil dip and soft cheeses will guarantee that no one walks away from your party hungry. Also, consider using breads that are “out of the box” and your guests would not normally consider purchasing, such as olive ciabatta any flavor challahs, egg breads, etc. Of course, have one “neutral” bread that everyone would like such as a french baguette.
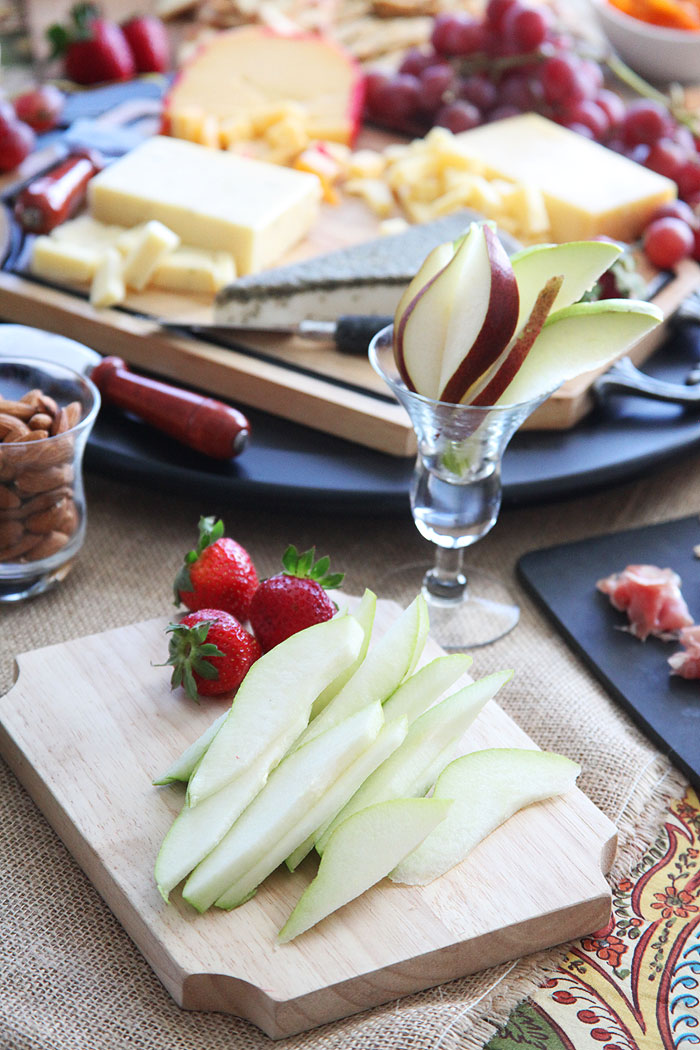
Fruit
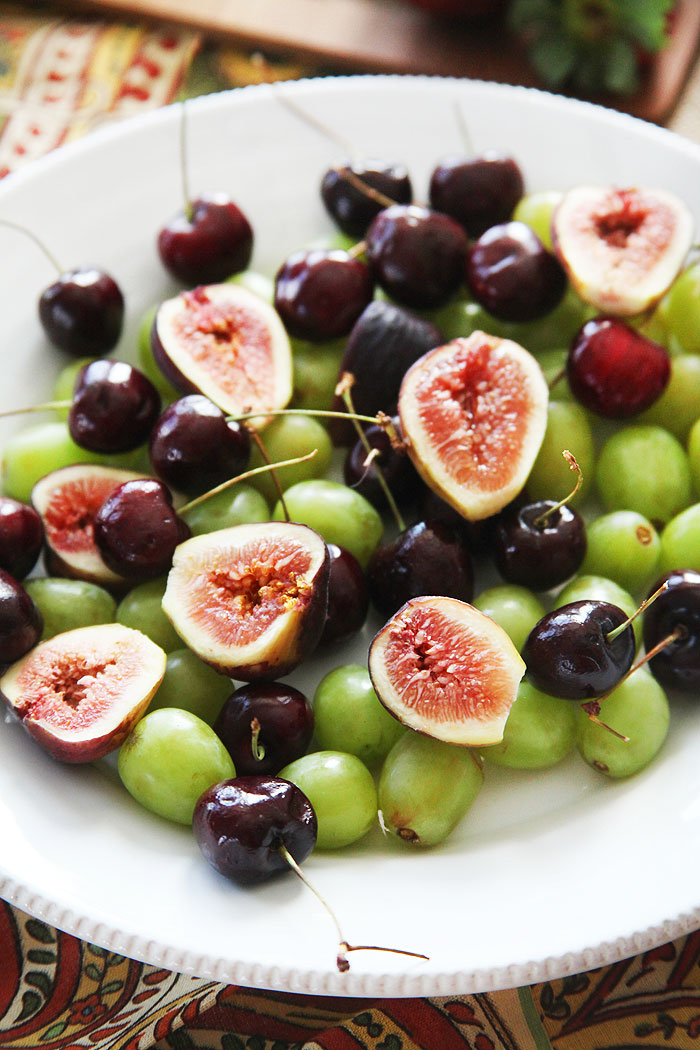
Fruit is a MUST!! Fruits are beautiful, delicious, and best of all, help the digestive process. Fruits have always complemented cheese and the best part of creating a cheese platter is adding fruit which may be out of the box a bit. Grapes are always great, but fruits such as figs, cherries, and strawberries look beautiful and taste great with cheese. Of course, doing a bit of research and checking to see which cheeses go with which fruit is always recommended. For example, stay away from any high acid or citrus fruit. But it’s not rocket science so don’t overthink it! And don’t forget, dried fruit is wonderful too!!
Honey
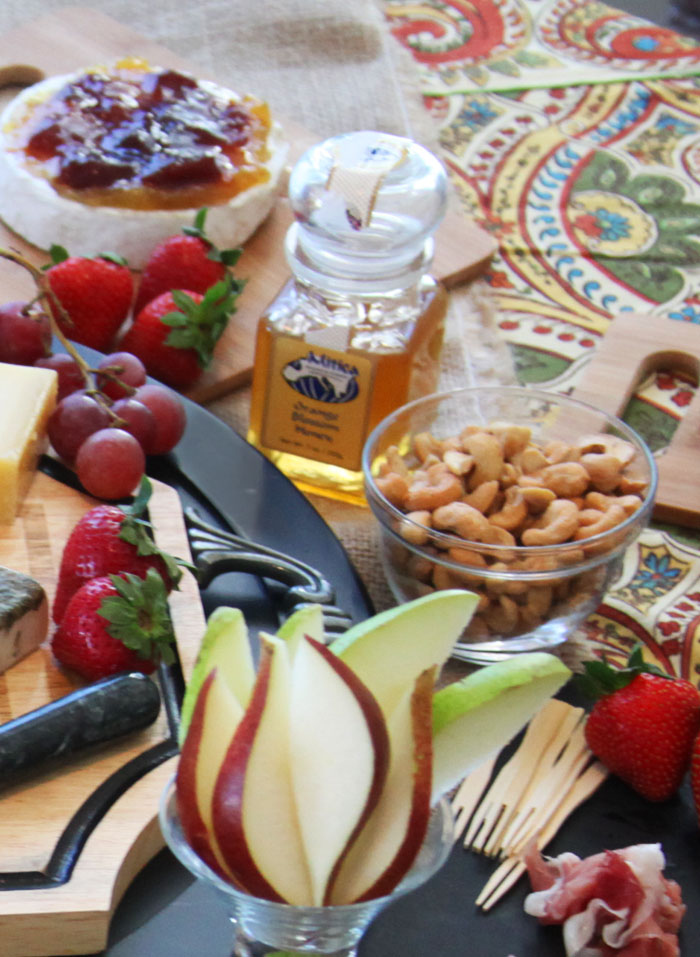
Honey is a wonderful addition to any cheese platter. It is the perfect juxtaposition of sweet and sour. Generally, I recommend you use varietal honey which is made from bees who pollinate on just one flower rather than bees that pollinate a bunch of different kinds of flowers. Also, just drizzle a little honey on the cheese, don’t soak it. A little goes a long way!
Honeys goes really well with aged cheeses that have a good amount of nuttiness. Parmigiano-Reggiano, a tangy Cheddar, or any of the alpine cheeses (Comté, Gruyère, Appenzeller). Other sweet and creamy cheeses like ricotta, goat cheese, or feta are wonderful with a citrus based honey. Don’t forget the blue cheeses which are spectacular with honey. For some, the spicier the better, but you may want to experiment to see what you and your guests like the best.
Other Wonderful Additions:
Pepperoni Chips – Simply place pepperoni slices in your oven at 375 degrees for 5-10 minutes or until they get crispy and serve!
Chocolate – Did you know that dark chocolate and Parmesan cheese have been scientifically proven to work well together. That’s right, scientists have actually proven that these two items are perfect for pairing. Here’s the link to the full article on HuffingtonPost Taste, it’s fascinating. And the good news is that your guests will be WOWed by your brilliance 🙂 Another cheese you may want to try with chocolate is mozzarella cheese. But don’t over do it, just a small amount will make a huge impression!
Fondue – So many of us think that we have to have wedge cheese on our cheese plate, but a hot delicious and creamy fondue will bring oohs and ahhs! Plus, they are very easy to make
Nuts – Don’t forget the nuts!! Almost any nut will look wonderful on your cheese plate. You can do a little research to see which nuts pair well with cheeses, but honestly, it’s hard to go wrong. My ultimate favorites are almonds and cashews. They work well with most cheeses.
Preserves – Fig preserves are incredible on top of a delicious brie! Other preserves such as plum, apricot, and even wild blueberry are unbelievable!! Stop in at your local supermarket or gourmet grocer and talk to the cheese monger about the best pairings for their cheeses. I find that the people behind the counter can answer all my questions and even teach me a thing or two! Also, if there is a special gourmet cheese section at your grocer, take a look around to see if other items are displayed. Many times, the cheese section has all you need to find the perfect preserves.
Things to avoid would be vegetables, spicy foods, heavy garlic flavored crackers and breads, citrus or high acid foods, and Tannic Red Wines.
· Posted in Appetizers, Cheese, Parties, Recipes ·
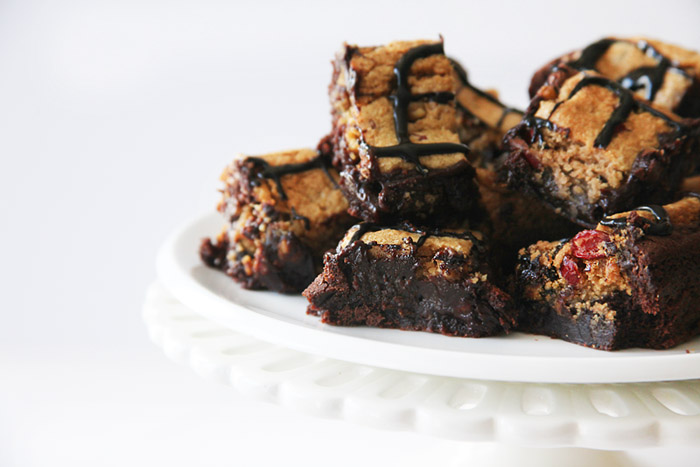
May 24th, 2014
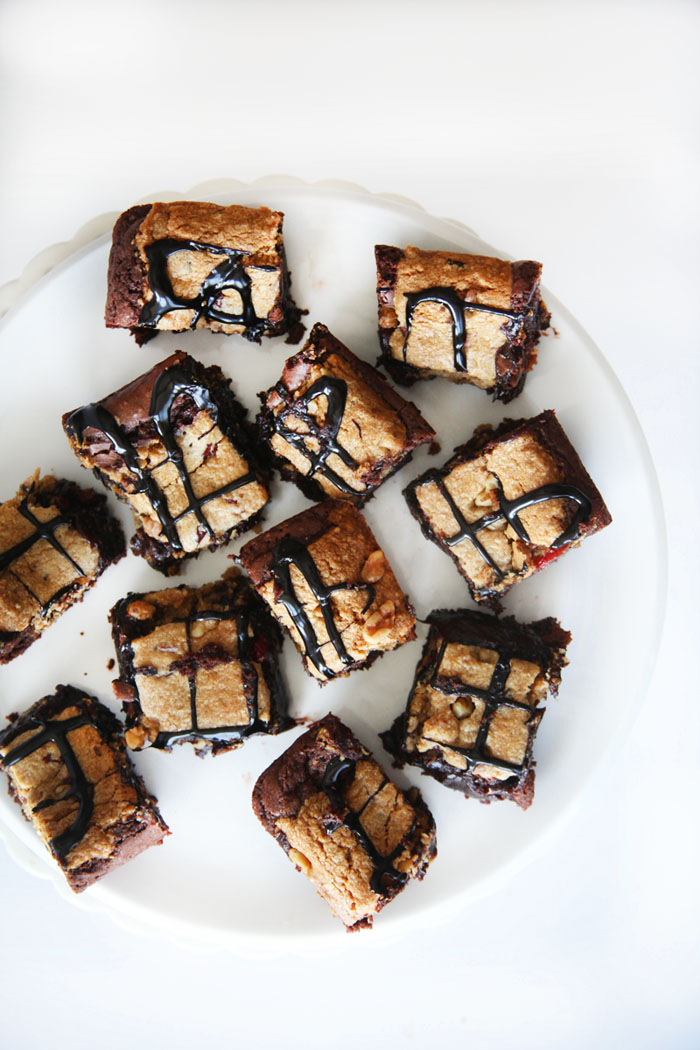
Sometimes I feel really guilty posting recipes for sweet things, especially when I know I’m about to unleash something on to you that you will never forget! Well, this is exactly how I feel about my latest obsession, the BROOKIE! And what is a Brookie you may ask? Well, if you ever had a day when you couldn’t decide to eat a cookie or a brownie, you can kiss those days goodbye! Now, there is a dessert that encompasses both passions… beautifully I may add! Before I give you the recipe, I want to warn you that I am a lazy dessert girl. So, if I can cut some corners… I WILL! With this said, I use the term “from scratch” rarely… and I’m not about to use it today! I have figured out the best way to combine store-bought items for a quick and simple concoction. I love using Ghirardelli brownie mix. Trust me, I’ve used many different brands and this one is PERFECT!!! For cookies, I use the refrigerated ones, Pillsbury is always a winner, however, the store-brand ones seem to work well too. If you would like to make both the cookies and brownies from scratch and then combine them, feel free. And you will find many recipes on the web that are great resources. Just Google “brookies”. But since I typically make this dessert for parties (trust me, it’s safer for my waistline this way), I have a ton of menu items that I need to work on, so the less steps I have to go through, the better!
Another warning… the toughest part about this recipe is the time you have to stare and drool over the Brookies while they are cooling. So your best bet is to make them ahead of time. Make them the morning of your dinner party or even the evening prior. Put them out of your sight and forget about them! Cut them when they have completely cooled. If you want to pop them in the microwave for 10-15 second to get them a little warm, that will work. And of course, you can serve them with other accoutrements, such as a scoop of ice cream or whipped cream! But honestly… they are fabulous on their own!
But enough with the talk. Here is the recipe for the easiest and most addictive dessert I’ve made thus far. Don’t say I didn’t warn you!
INGREDIENTS
1 box Ghirardelli Triple Fudge Brownie Mix, 19 oz (It will come with a fudge pouch… so good!!!)
1 package of any cranberry oatmeal (or just oatmeal) refrigerated cookie (Pillsbury is great!)
1 egg
1/3 cup vegetable oil
1/4 cup water
PREPARATION
Mix the Ghirardelli brownie mix according to package directions. DO NOT ADD THE FUDGE POUCH, I’ve got a better use for it later! Grease a 9×9 pan and preheat your oven to 325 degrees. Empty the brownie mix into the greased pan. Open the refrigerated cookies and break them apart. Set them on top of the brownie mix giving them a little space between each one the end result is sort of like a grid of cookies on top of the brownie mix. Do not be concerned if the cookies start sinking into the brownie… that’s all part of the plan!
Pop the brookie into the oven and set your timer for 45 minutes. If you like your brookies super moist, you can remove them from the oven after 45 minutes. If you like them slightly more dense, put aluminum foil on top of the brookie and let it bake for another 10 minutes.
Once it’s done baking. Remove the brookie and open up that FUDGE POUCH that came with the brownie mix. Create a pretty pattern on top of the brookie with the fudge. Let it fully cool, which could be up to an hour. You can even pop it into the refrigerator for the last 30 minutes. Serve and enjoy!
· Posted in Decadent Desserts, Recipes ·
May 22nd, 2014
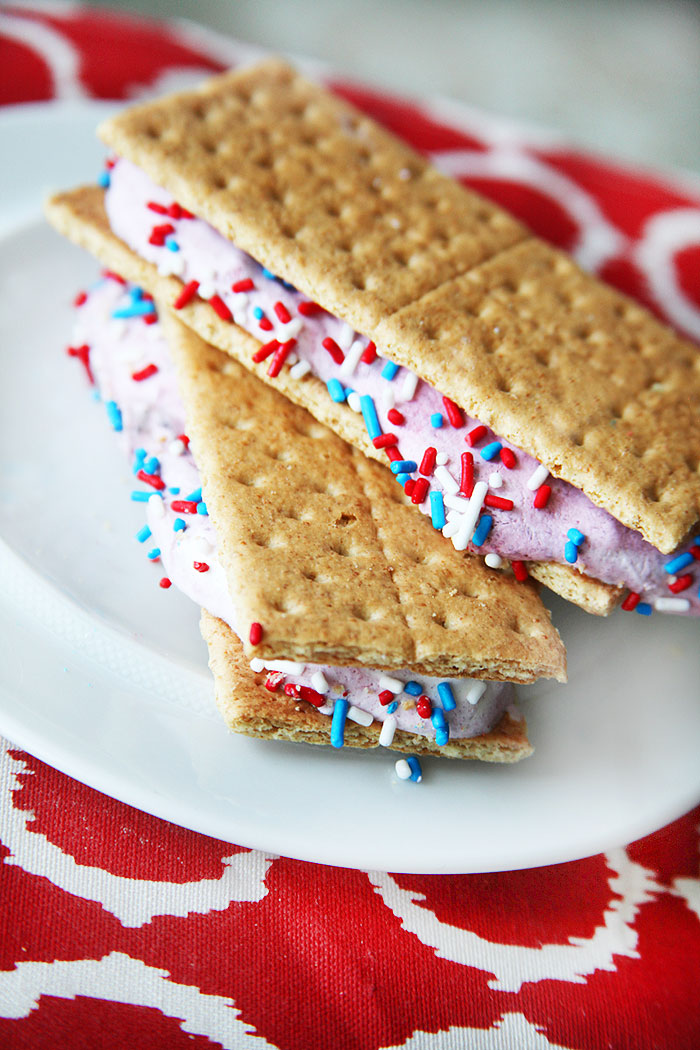
When I find a great recipe, I don’t hesitate for a moment to try it. Here’s a recipe I found on the box of Honey Maid graham crackers. I LOVE ice cream sandwiches, but let’s be honest, they are not the healthiest of choices. These however, are a winner! You’ll be using fresh berries, banana, yogurt, graham crackers, and fat free whipped topping. If you want to cut even more calories, omit the banana, these sandwiches will still come out wonderfully!! Pictured are the sandwiches “whole” or cut into smaller pieces, according to the perforations on the crackers.
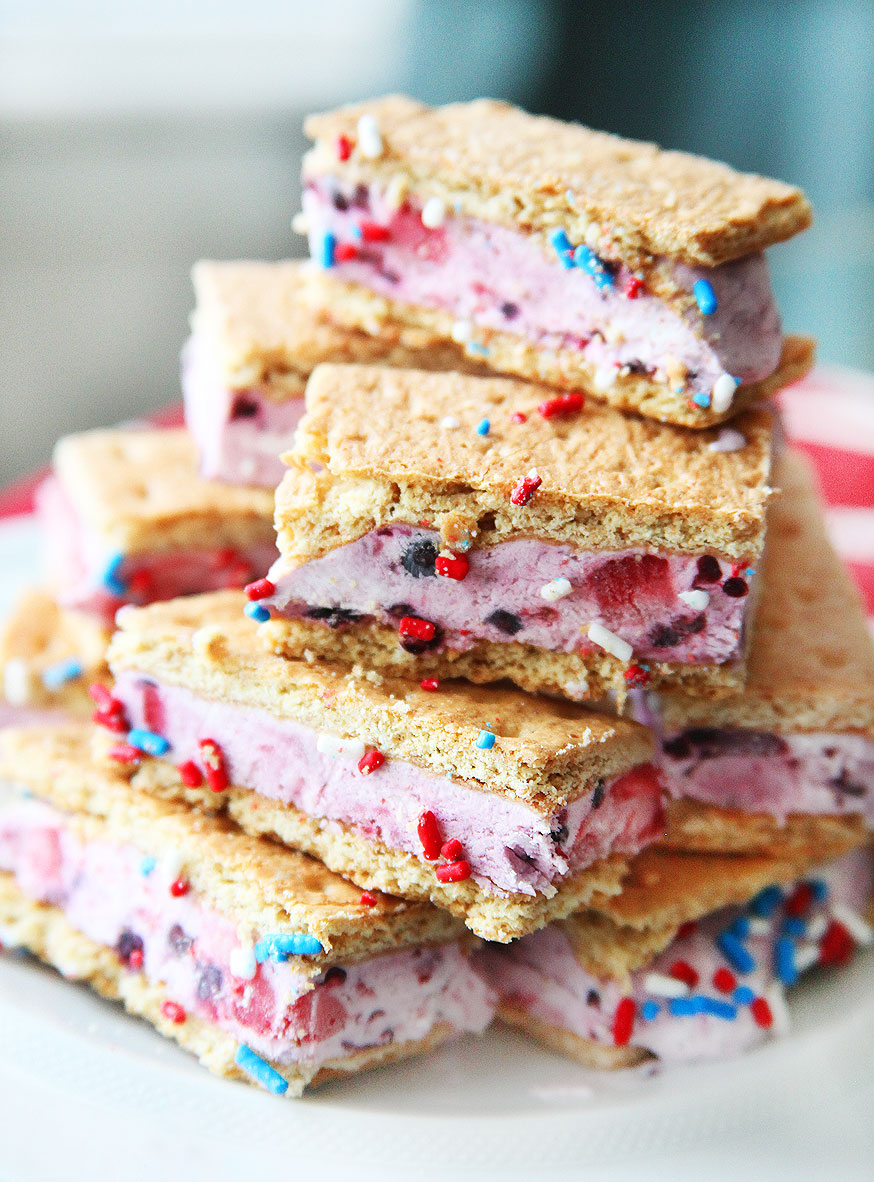
Ingredients
- 10-1/2 HONEY MAID Honey Grahams (you can use the whole cracker or broken into quarters (42 rectangles)
- 1/2 cup sliced fresh strawberries
- 1/2 cup chopped bananas
- 1/2 cup cup blueberries and/or blackberries
- 1 cup vanilla nonfat Greek-style yogurt
- 1 cup (or more) thawed frozen reduced-fat whipped topping
Preparation
LINE 9-inch square pan with foil or parchment paper, with ends of foil extending over sides. Arrange half the graham pieces, in 3 rows of 7 pieces each, on bottom of pan. Or, you can use the whole cracker and arrange them into three rows of 3.
PULSE fruits in blender just until blended. (Some chunks should remain.) Alternatively, you can just mash up the fruit in a bowl, this will give the sandwiches large chunks of fruit (this is the method my family prefers). Spoon fruit mixture into medium bowl; stir in yogurt and whipped topping. Spread over graham pieces in prepared pan. Top with remaining graham pieces, aligning to match placement of graham pieces on bottom layer.
FREEZE 4 hours. Use foil handles to remove dessert from pan; cut between grahams to form 21 bars (or eat the whole thing). If you would like to add sprinkles, let stand 2-5 minutes so moisture can cover the yogurt, this way the sprinkles will stick to the yogurt.
Presentation
When cut-up, this makes 21 servings at 50 calories per serving. With 4gm of sugar and 9gm of carbs.
· Posted in 4th of July, Decadent Desserts, Fourth of July, Guilt Free Party Snacks, Parties, Recipes ·
May 18th, 2014
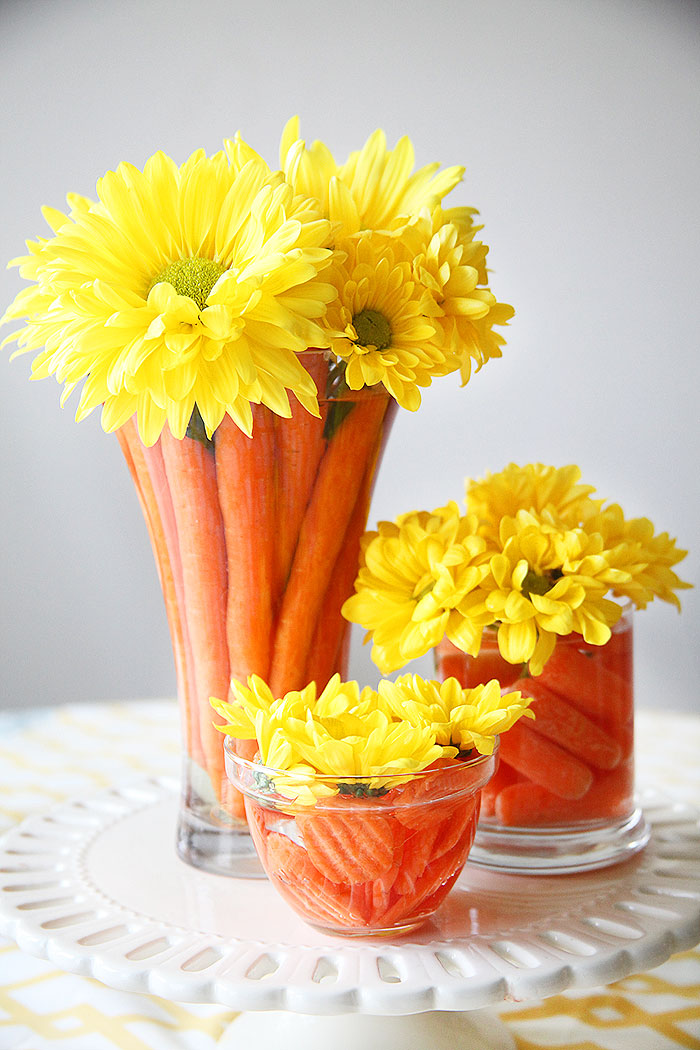
Whether you are celebrating Easter, or just the beauty of the arrival of spring, this centerpiece could not be any easier and makes an incredible impact on your table or buffet. All you need is clear glass vases, various carrots, and some mums or daisies. For a step-by-step instructional video, just VISIT MY VIDEOS PAGE and look for the EASTER CARROT CENTERPIECE segment on Better Kansas City!
· Posted in Easter, Table Decore, TV Appearances, TV Spots, Uncategorized ·
May 17th, 2014
Last night was a wonderful night, which I desperately needed. We had our neighbors over for a dinner which was long overdue. They’ve invited us several times to their beautiful home and we enjoyed many laughs. I promised to have them over, but with my friend’s husband being a pilot, and our lives being crazy, we could not get our schedules synced! But yesterday was that magic Saturday when all the stars aligned… as well as our schedules! We had a wonderful evening filled with great food and conversation.
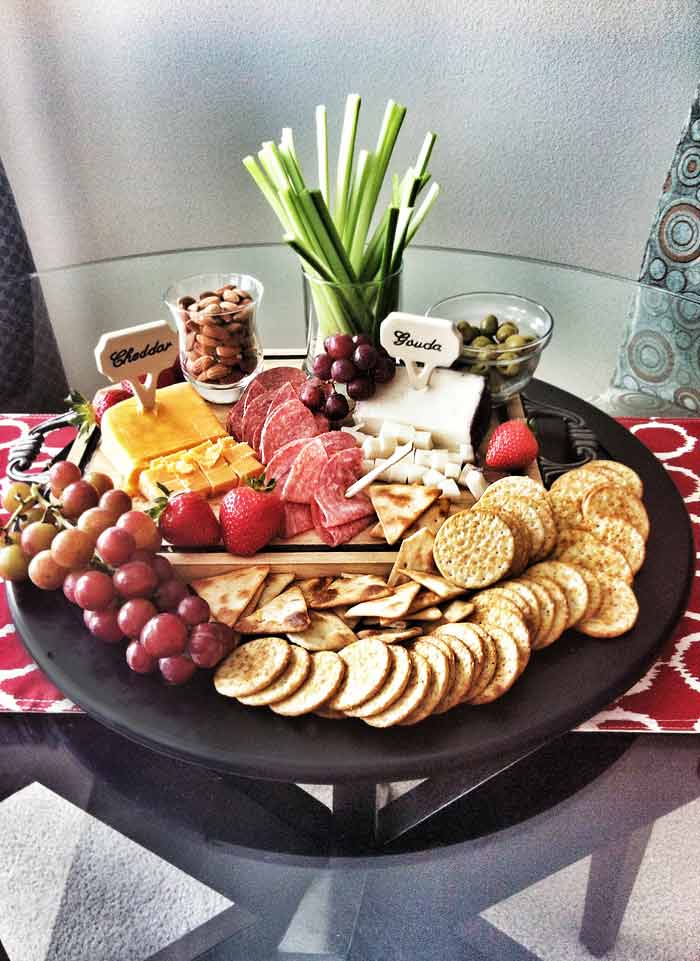
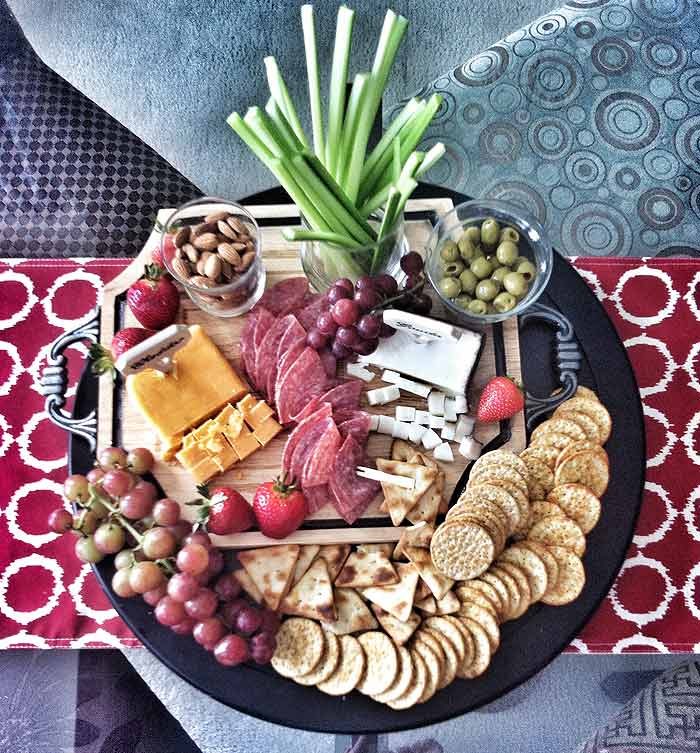
For an appetizer, I decided to create a cheese platter which would overflow with yumminess! I had a total of three platters, but the one pictured was the main platter which included gouda and cheddar cheeses, salami, almonds, celery, olives, crackers, and fruit. The other platters (not pictured) had a Brie with a combination of fig and cherry preserves and a cured meat platter with prosciutto and grapes. But I really loved how my main platter came out. Nothing fussy just easy and rustic. It was a big hit with our guests and I bet it would be a big hit with yours! And as you can see, it was very easy to put together.!
· Posted in Appetizers, Guilt Free Party Snacks, Parties, Recipes ·
May 17th, 2014

Looking for a blue flower and just can’t find it? Here’s the solution. Stem dye your flowers to get the color you want! The color that I wanted was blue since I was trying to come up with a pretty 4th of July centerpiece. I used roses, one of the easiest flowers to stem dye. And here is how I did it.
Purchase white roses. Fill a vase, which will accommodate the number of roses you purchased without crowding them, with a nice amount of water. Place 10, 20, or more drops of food coloring in the water. The goal is to make your water very dark with the blue food coloring… as dark as you can get it. Cut the stems of your roses to the length you would like to use in your centerpiece. Place the white roses inside the blue water and wait about 24 hours. If you start seeing blue coloring on the rim of your rose petals, pat yourself on the back because things are progressing just as you want them to! Within 24 hours, you should have a beautiful blue rose.
Here is the progression of how my roses went from white to blueish. As you can see, within hours, my roses starting getting the blue dye on the outer rims of their petals and then, they started to get bluer and bluer.

Just a warning, the rose will never become fully blue, just a fun speckled look that will still show some of the original white. The roses kind of look like they have blue freckles.

You can also get creative and use some roses that have become mostly blue with roses that only have a little bit of blue on the rims of their petals. This is what I did for my centerpieces. Most importantly use food coloring (gel or liquid) ONLY… no clothes dye or other dyes. They will just kill the flowers.
Of course, last but not least, enjoy all the wonderful comments you will get from your work and your beautiful arrangement.


· Posted in 4th of July, Crafts, Flowers, Fourth of July ·
May 17th, 2014

If you love sub sandwiches but hate having to consume the extra calories from the massive buns, you will LOVE this sub sandwich on a stick! Much lower calorie than the real thing, less carbs and perfect for parties! Super easy! CLICK HERE TO READ THE RECIPE
· Posted in Guilt Free Party Snacks, Low Carb, Recipes, Super Bowl ·
May 13th, 2014
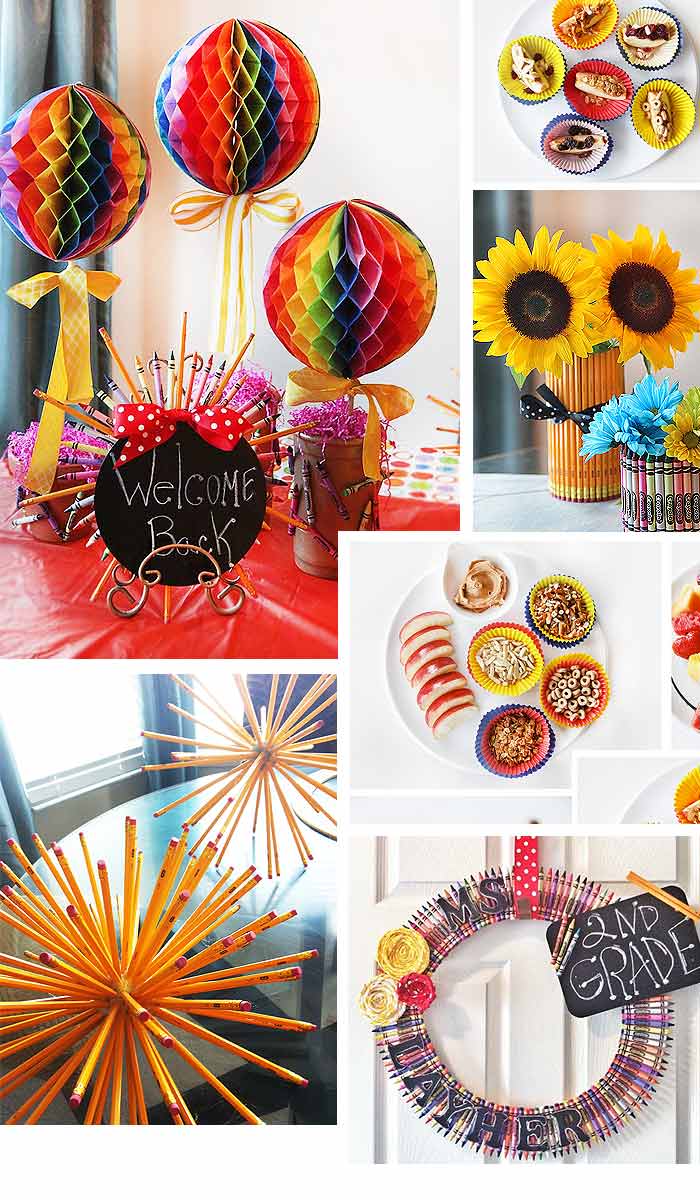
Looking for some fun back to school party ideas! I’ve been busy this year with some fun projects. I hope they inspire you to create something wonderful!
· Posted in Back To School, Crafts, Dollar Store, Fall Season, Parties, Uncategorized ·
|
|
|