May 27th, 2015
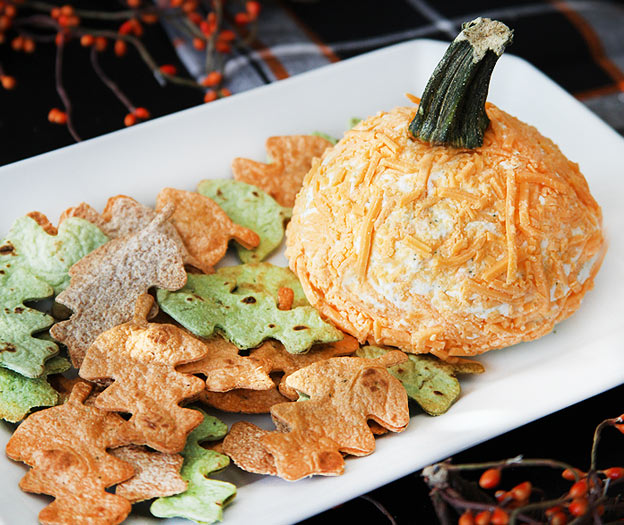
Get ready for a delicious treat your guests will “ooh and aah” over! This is the perfect recipe for Halloween and Thanksgiving. Bring the flavors of fall inside with this delicious and super easy pumpkin cheese ball.
Ingredients
- 2 (8 oz) Packages of Cream Cheese
- 1 packet Onion Soup Mix or Ranch Dressing
- 2 tsp Paprika
- 1 Green pepper stem (you can also use a celery stick with leaves or a broccoli stem
- 2 1/2 cups shredded cheddar cheese
- Apples, pita chips, baked tortilla chips, or crackers
Preparation
In a medium bowl, mash cream cheese. Mix the dressing or soup mix and cheddar cheese into the cream cheese. Spoon the mixture into a sheet of plastic wrap and shape into a ball. Refrigerate until firm. Carefully remove the seran wrap and create ridges in the ball to mimic a pumpkin.
Presentation
Place the stem on top and put on a serving platter. Surround the pumpkin cheese ball with chips, crackers, veggies, or fruit. For an extra touch, you can also roll the ball in crushed nuts.
· Posted in 31 Days of Halloween, Guilt Free Party Snacks, Halloween, Recipes ·
May 24th, 2015
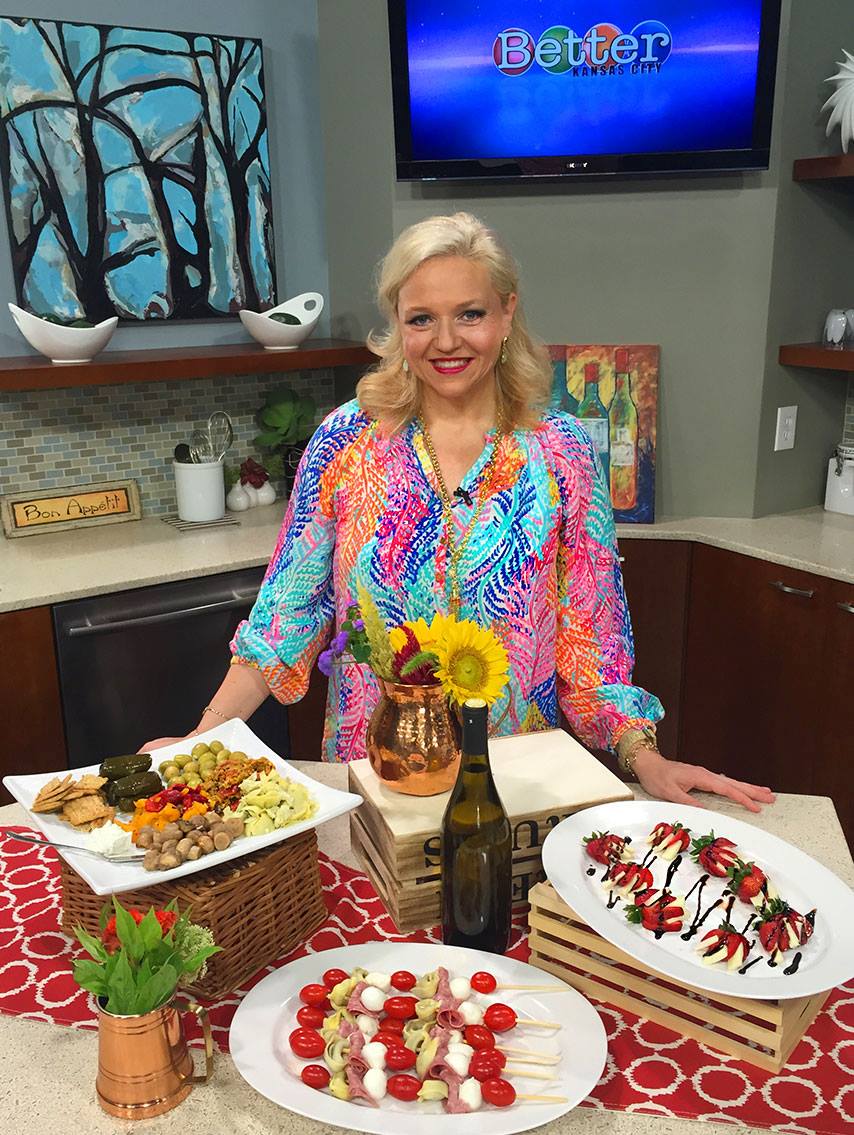
What is one of the easiest parties to throw? A wine and cheese tasting party, of course! Just ask your friends to bring a bottle of wine and a wedge of their favorite cheese, and before you know it, you’ll have a buffet worthy of royalty!! You can even make a “theme” out of it. Ask your guests to only bring a particular kind of wine (red or white) or narrow it down to a wine from a specific region. You can also choose a single type of cheese you want your guests to bring. For example, ask everyone to bring only their favorite sheep cheeses or only goat cheeses. It’s fun to see what people enjoy and you don’t have to take on the financial burden of paying for all the cheese and wine, which can get pricey!
As the hostess, I love making fun recipes which guests can sample. As I said in my TV segments, I don’t typically like to have all my dishes be experiments, but I at least try one dish which is a little bit out of the box. Here are three recipes which I find to be easy and very attractive and they are all perfect for a wine and cheese tasting party!! One of the recipes, the easy Antipasto Plate, was contributed by a very talented florist and friend, Rhae Adams, owner of FOUND IN NATURE.
Would you like to watch these dishes be prepared? You can go to the videos page and find the recipes you like and watch how simple they are to create. http://www.partytipz.com/media/
Rhae’s Simple Antipasto Plate
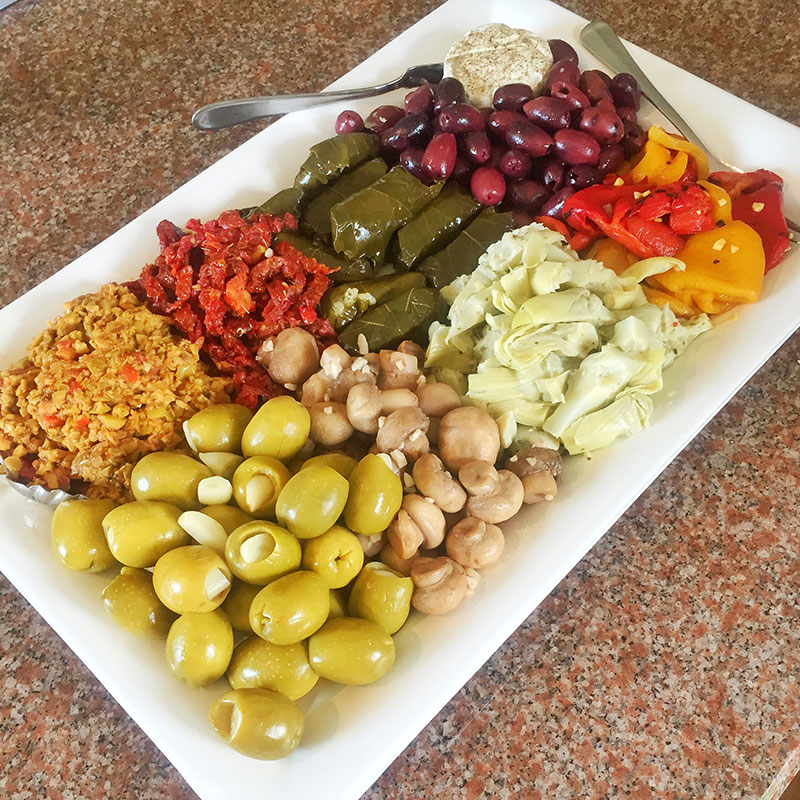
Go to the marinated and canned section of your store and find what you love. I love purchasing these items at Trader Joes since they are all right next to each other. Some of my favorite things are:
1 can of Artichoke Hearts
1 jar of marinated olives (stuffed with almonds, onions, garlic, or whatever
you like)
1 jar of marinated red and yellow peppers
1 jar of pre-made tamponade
1 jar of sun dried tomatoes in olive oil
additional jars of items you like
goat or sheep cheese
crackers
Make sure to drain all jars of the water or olive oil. Cut up the items (such as artichoke hearts and peppers into small pieces, carefully arrange all items on plate, making sure that the colors go well together. Use chopsticks to move and arrange items neatly on the platter and use paper towels to absorb any extra liquids which may mix on the platter. Lastly, add your favorite cheese have a selection of various crackers, and add some fresh bread. Enjoy!
Cheese Stuffed Strawberries
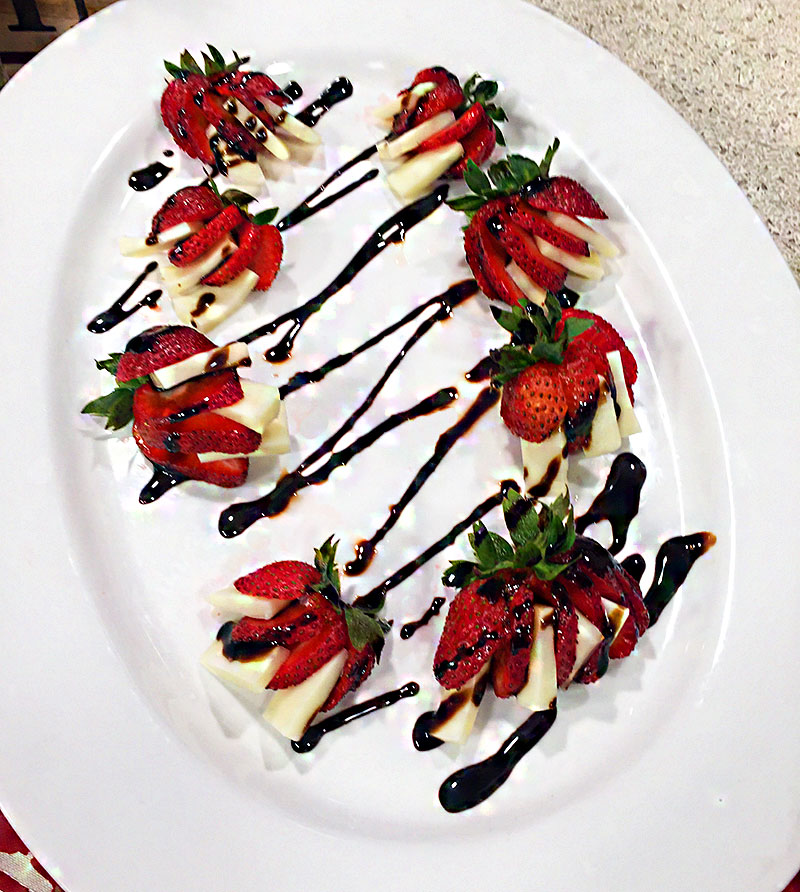
1/2 bottle of white wine
5-6 strawberries
25 small slices of Fontina cheese
Balsamic vinegar or balsamic reduction sauce
Soak strawberries in wine for 24 hours
Slice and fan strawberries
Slice fontina cheese into thin and small slices which can fit inside the
strawbwerry
Place each slice in the strawberry crevices
Drizzle balsamic vinegar or reduction sauce on the strawberries
Top off with almonds or mint and enjoy
Cheese Kabobs
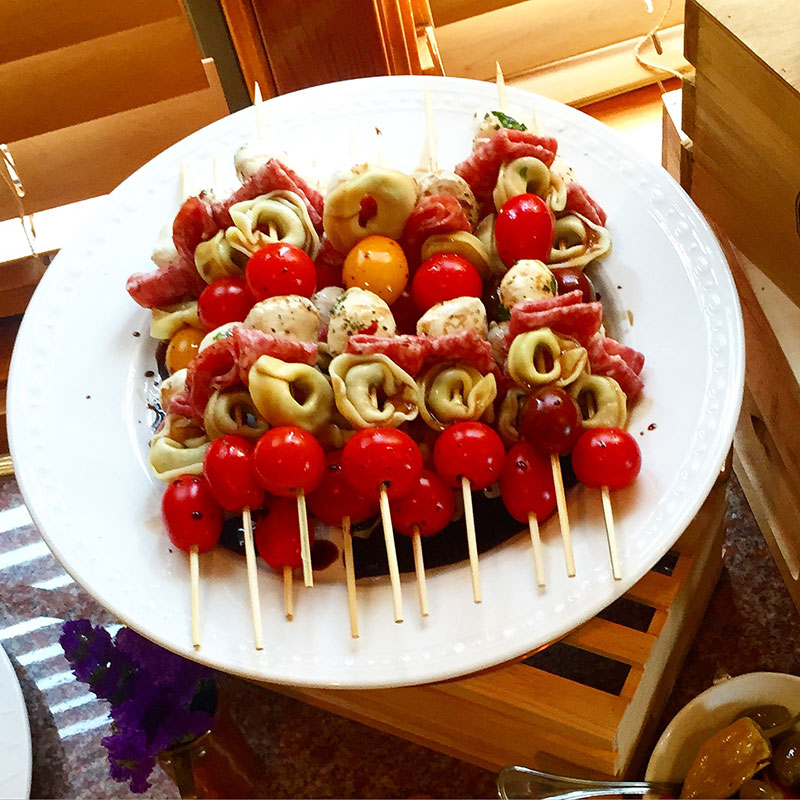
Skewer Sticks
Mozzarella cheese
Salami
Meat or cheese tortellini
Heirloom Tomatoes
Grease the skewers with oil
Skewer a tomato, followed by mozzarella cheese, salami, tortellini and
repeat until you cap off with the last tomato. Arrange finished skewers on
platter and drizzle with balsamic vinegar, salt, pepper, and serve
· Posted in Appetizers, Cheese, Guilt Free Party Snacks, Parties, Recipes, Trends, TV Appearances, TV Spots ·
May 23rd, 2015
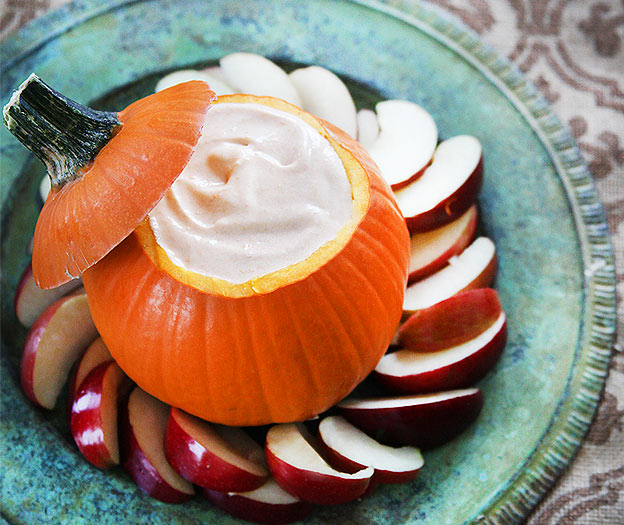
Ingredients
- 1/2 cup canned of pumpkin (you can add more if you would like a stronger pumpkin flavor)
- 1/2 large container of Light and Fit vanilla yogurt
- 1/2 tsp cinnamon
- 2/3 container Sugar Free Cool Whip
- 1/2 cup sugar
Preparation
Combine all the ingredients and put in a bowl (or a hollowed out small pumpkin), I use sugar free and “light” varieties because I like to see how much sugar I’m putting in the dip. If this doesn’t matter to you, you can get the sugared varieties and skip adding your own sugar. Chill for at least 1 hour and serve with apples or sweet crackers.
· Posted in 31 Days of Halloween, Guilt Free Party Snacks, Halloween, Low Carb, Parties, Recipes ·
May 17th, 2015

How lucky am I? I got to spend this morning with the beautiful ladies from KCTV 5’s Better Kansas City! Today, I shared my two recipes for something sweet and salty… my “caramel” popcorn made with real maple syrup and lavender sea salt and my apple and goat cheese Phyllo/Filo cups quiches. Get ready, because they are absolutely delicious!!
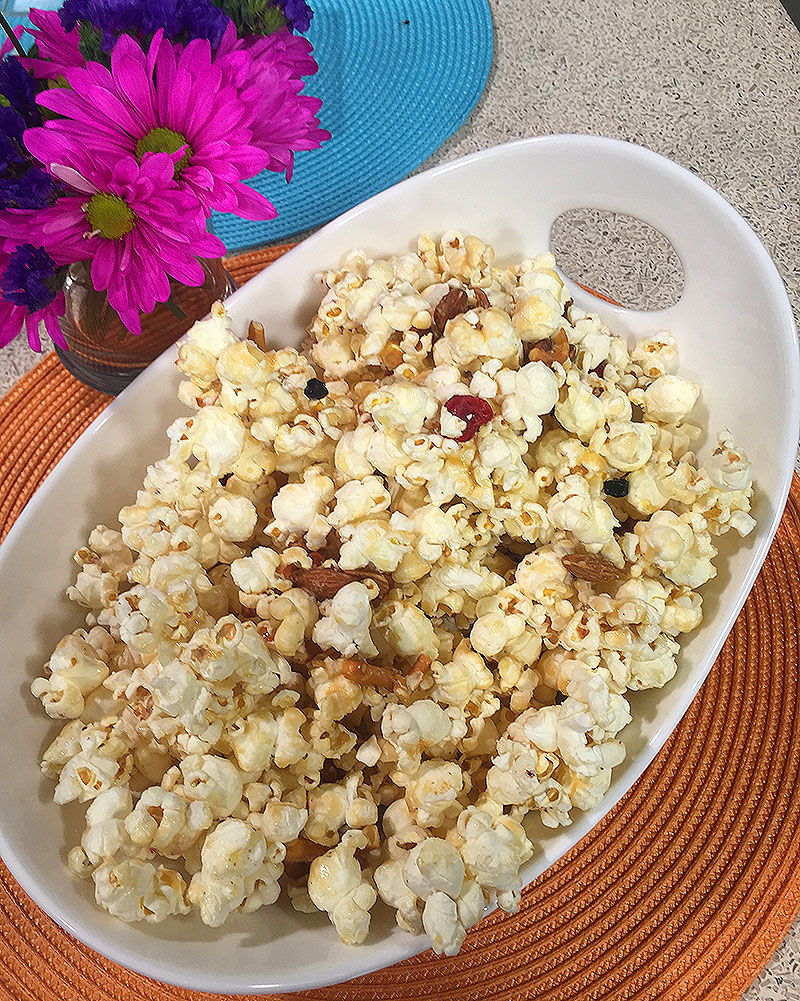
Enjoy the delicious taste of caramel while benefiting from all the wonderful and beneficial nutrients that come in maple syrup. They include minerals such as potassium, magnesium, and iron. Plus, this syrup is non refined and contains no fat. Below is a recipe for the most simple version which includes the maple syrup and lavender salt. But I got a little creative (photo I posted above) by adding almonds and pretzels to my popcorn. You can add anything you want! And if you want to get super creative, add a “savory” element with a bit of diced turkey bacon!!
SWEET & SALTY “CARAMEL” POP-CORN
1/4 – 1/2 cup – Grade A Maple Syrup (Doesn’t matter if it’s medium or dark, whatever you like best). The range of syrup depends on if you want a heavily coated popcorn or slightly coated.
1/2 cup of pop corn
2-3 tablespoons of butter
Lavender sea salt ( plain sea salt will work as well)
Pop your popcorn. You can do air popped, bagged, or microwave, although I prefer air popped.
Put the popcorn in a bowl and set aside. In a small sauce pan, bring your maple syrup to a boil. Add the butter and let the combination boil for 2-3 minutes. You can mix the butter and syrup slightly, you don’t have to constantly stir the mixture in the pan, move your spoon through it once or twice and leave it alone. Have your popcorn, baking sheet, and salt on standby and ready to go. While your syrup is hot, you have a small window to work with the popcorn. Once the caramel is ready, pour it over the popcorn and mix (I use a wooden spoon) while the caramel is still hot. Keep mixing until the popcorn is well coated with the caramel, then quickly spread it out on a cookie sheet and begin salting with the Lavender salt.
Once you are happy, give it 5-10 minutes to dry. Once the caramel popcorn is dry, you can place it back in the bowl and serve.
WARNING: No matter how good the popcorn looks, don’t serve it when it’s wet. Your guests will have sticky caramel on their fingers which is difficult and no fun to get off. Additionally, you can add other things to the popcorn. Salted nuts, pretzels, bacon (for a bit of savory), dried cranberries (for a bit of sour), or anything else you like. Just remember to add these items while the caramel is hot and you are mixing it with the popcorn.
These are super easy and can be made for wine tasting parties, breakfast parties, brunch, lunch, dinner… you name it!! They are beautiful to serve and delicious!!
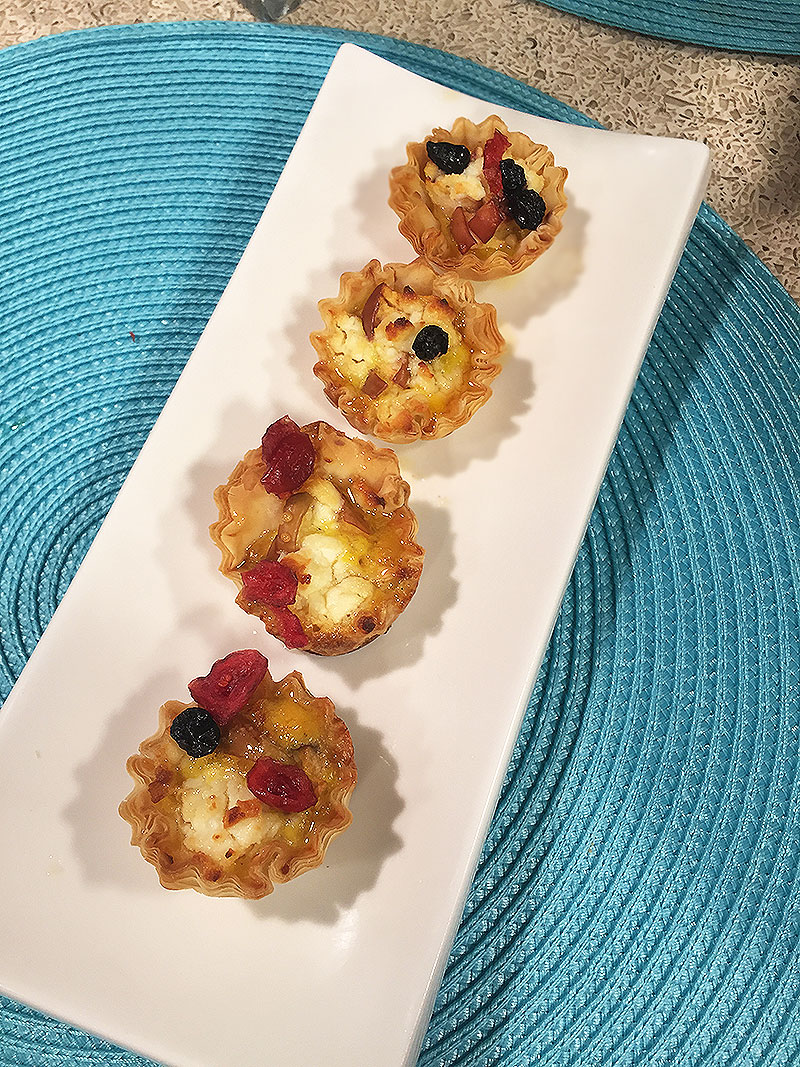
APPLE AND GOAT CHEESE FILO/PHYLLO QUICHES
12-24 Filo/ Phyllo Cups (available in the refrigerated section)
1 Red & Delicious Apple
2 Eggs
1 tbsp Half & Half
1/2 package of Goat Cheese
Nutmeg
Dried blueberries and cranberries
Honey
Preheat your oven to 350 degrees. Place the Filo/Phyllo Cups in a lightly greased mini muffin pan. Dice the apple and place a few small pieces in each Phyllo cup. Mix eggs, half & half, a dash of salt, and a dash of nutmeg together in a measuring cup. Carefully pour a little bit of the egg mixture in each cup. Finally, put a generous amount of goat cheese on top of each Filo cup. Place the mini muffin pan with the Filo/Phyllo cups in the oven and bake at 350 for 15 minutes. Let cool for 2-3 minutes and arrange on a plate. Drizzle with honey and serve.
· Posted in Fall Season, Guilt Free Party Snacks, Recipes, Super Bowl ·
May 13th, 2015
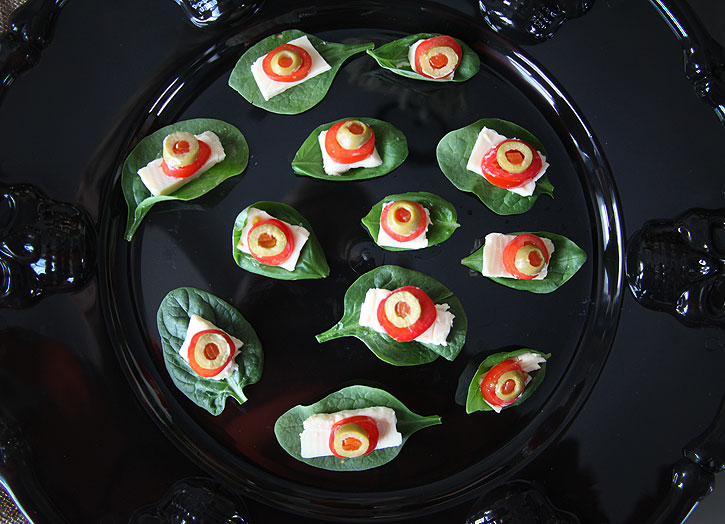
I found a great idea for “Monster Eyes” on the web. My favorite part about this appetizer plate? This recipe is pretty much “guilt-free”! The original recipe included a basil leaf, mozzarella cheese, a slice of a grape tomato, and a slice of olive. To add a little zing, you can drizzle a bit of balsamic vinegar on top.
Of course, I had to experiment a bit more and maybe shave off just a few extra calories. I added my own twist by using spinach leaves (I have both spinach and basil leaves in the below photo) and substituting mozzarella cheese with a flavored SKINNY COW cheese slice. You can eat this whole plate and not even think about the calorie content!! DONE!!
· Posted in 31 Days of Halloween, Guilt Free Party Snacks, Halloween, Low Carb, Parties, Recipes ·
May 5th, 2015
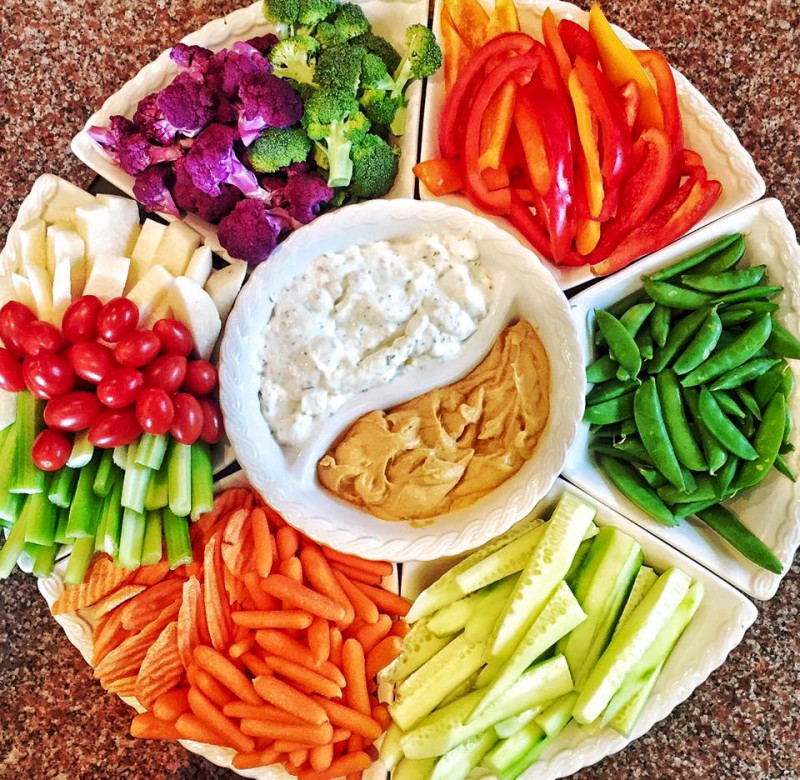
Sometimes the simplest thing can be the most beautiful on your table. That is what I love most about fruits and vegetables, they are so gorgeous and no matter how you arrange them, they WILL look beautiful. This simple vegetable platter was created by my sister for one of our parties a few weeks ago. I bought a large vegetable tray at Sam’s and I’ve used it non-stop for YEARS!! I don’t even bother putting it away, because it gets used on a regular basis. It looks great with all kinds of things, but it looks the BEST with fruits and vegetables. My sister also made sure to separate the colors, which plays a big part in presentation. But all in all, it was one of the simplest food items at our party and the most popular!
· Posted in 30 Days of Veggie Platters, Appetizers, Guilt Free Party Snacks, Low Carb, Parties, Vegetable Plate, Veggie Platter ·
May 4th, 2015
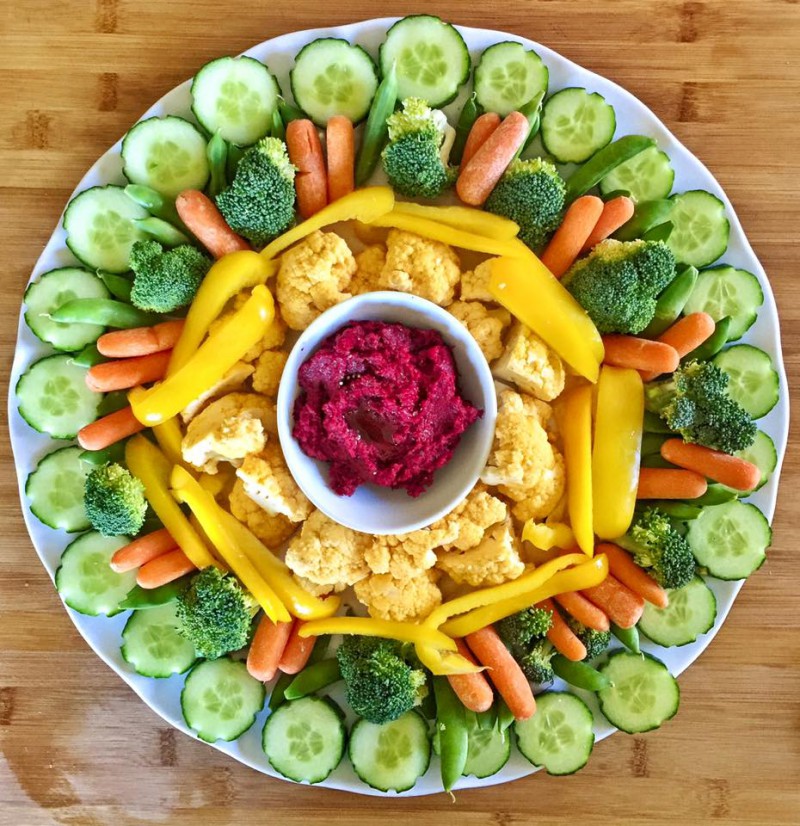
I don’t know if you heard the news, but the Kansas City Royals won the World Series!! It’s a pretty big deal in KC. In fact, they closed all the schools yesterday so that everyone can enjoy the Rally and Parade. Over half a million people attended and it was a celebration like no other! And while most of Kansas City was enjoying the parade, I decided to skip the crowds and instead, had a watch party at my house. My friend brought over delicious Dean and Deluca salads, while I created this vegetable platter. Unfortunately, no blue vegetables (Royals color)… but this Kaleidoscope of colors did the trick! The Beet and White Bean hummus was delicious. I found the recipe on Marthastewart.com and played around a little with the ingredients, which I will post at a later date. But for now, Martha’s Beet and White Bean Hummus recipe is very good!!
· Posted in 30 Days of Veggie Platters, Appetizers, Guilt Free Party Snacks, Low Carb, Parties, Vegetable Plate, Veggie Platter ·
May 3rd, 2015
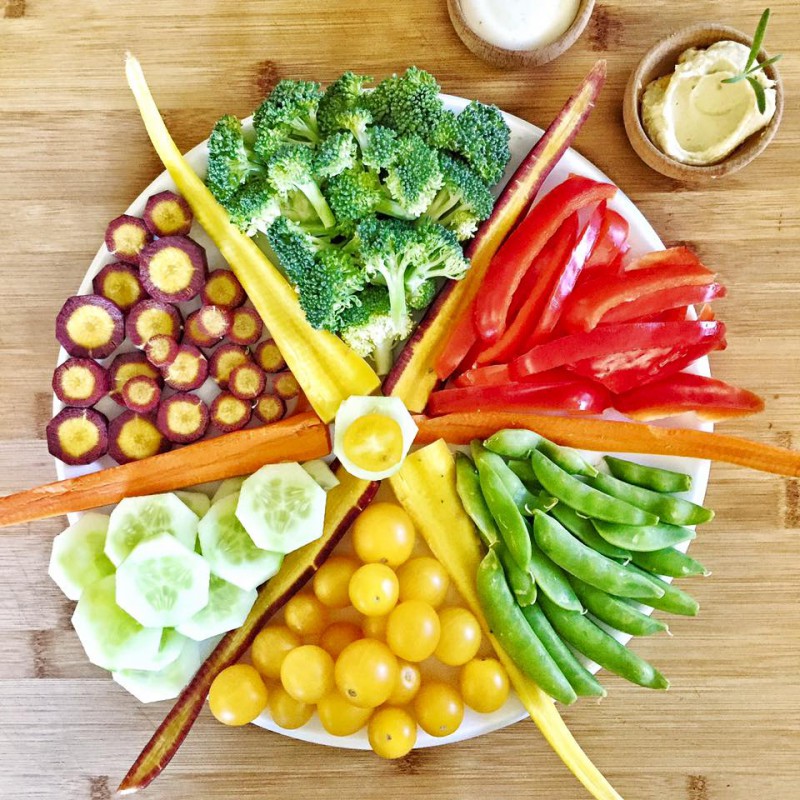
Who wouldn’t love a Veggie Wheel Plate at your next gathering?! You don’t need those fancy schmancy veggie bowls with the separate compartments for your vegetables, just make your own. I used different colored carrots to separate the vegetables. It was easy and beautiful.
· Posted in 30 Days of Veggie Platters, Appetizers, Guilt Free Party Snacks, Low Carb, Vegetable Plate, Veggie Platter ·
May 1st, 2015
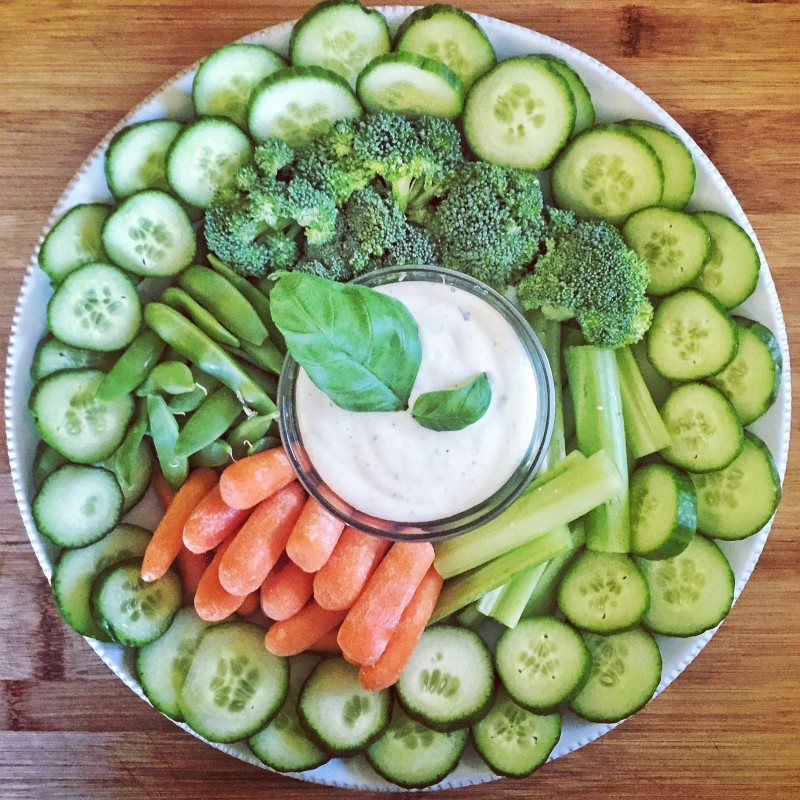 Delicious, healthy, and simple veggie plate What do you do with the leftover veggies from yesterday’s Monster Veggie Platter? You make a new veggie plate and serve it up as a delicious snack while watching the World Series game! Super easy and delicious!!
· Posted in 30 Days of Veggie Platters, Appetizers, Guilt Free Party Snacks, Low Carb, Vegetable Plate, Veggie Platter ·
October 18th, 2014
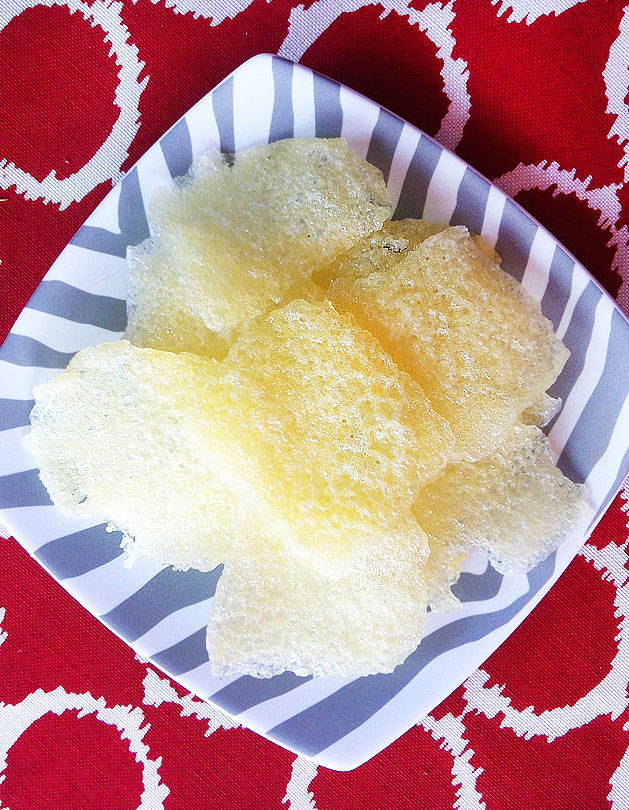
If you love swiss cheese, this is your recipe! It’s so easy and it is such an interesting way to enjoy your cheese. Plus, it’s wonderful for parties and scores big with the low carb party guests. It’s a win-win, so try it today. The recipe is so easy, you can literally enjoy it in about 5 minutes! Oh, and before I forget to make everyone’s day… this works pretty much with any sliced cheese, including CHEDDAR… my other favorite cheese :-).
INGREDIENTS
5 slices of swiss cheese (Yep, that’s it!)
PREPARATION
Rip your cheese slice in half, and place it on a plate. Cook in microwave for 3 minutes. Once done, peel the cheese off the plate and place on a paper towel. Wait for it to cool and dry and enjoy your cheese chips. The longer they dry, the crispier they’ll get. You can also serve them with your favorite dip, although I prefer to eat the chips all by themselves!
· Posted in Appetizers, Back To School, Guilt Free Party Snacks, Low Carb, Recipes, Super Bowl ·
|
|
|