November 25th, 2014
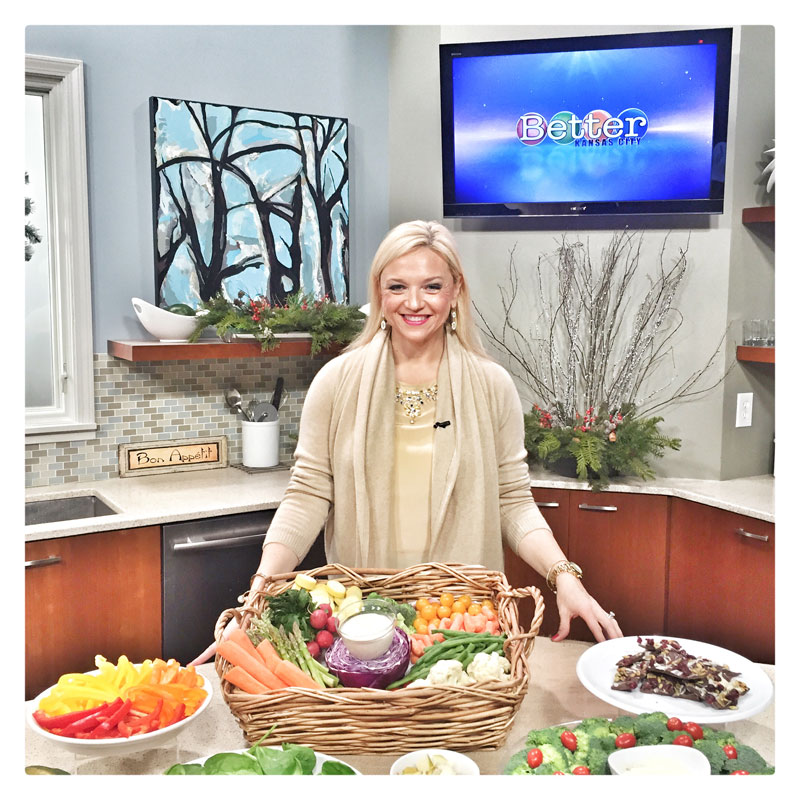
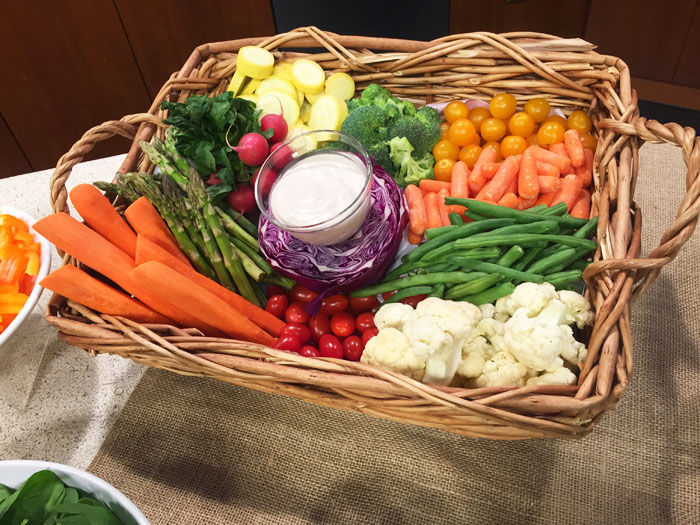
If you are hosting your holiday dinner this year, you are in luck, because I am about to encourage you to create something healthy, easy, and beautiful. A crudité platter! For those of you who have never heard the term, a crudité plate is simply a pretty way of saying a vegetable platter. However, it just sounds so much more schnazzy saying “crudités”.
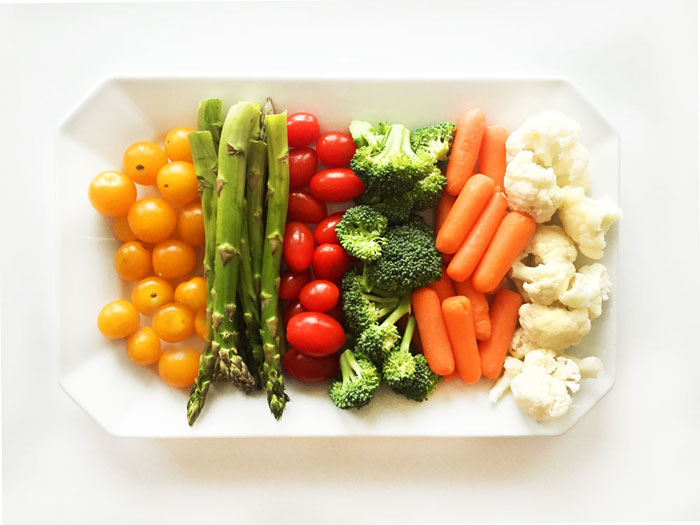
What is a crudité, you may be asking? Wikipedia defines Crudités as traditional French appetizers consisting of sliced or whole raw vegetables which are sometimes dipped in a vinaigrette or other dipping sauces. Crudités often include celery sticks, carrot sticks, cucumber sticks, bell pepper strips, broccoli, cauliflower, fennel, and asparagus spears; sometimes olives, depending on local custom.
With crudités, its all about the “look”, which makes them a popular draw to the buffet table. But for me, serving raw and cooked vegetables creates a “healthy zone” at my buffet spread, and healthy, is always good at a party!
As you can imagine, few rules apply to vegetable platters, but here are some that you may find useful.
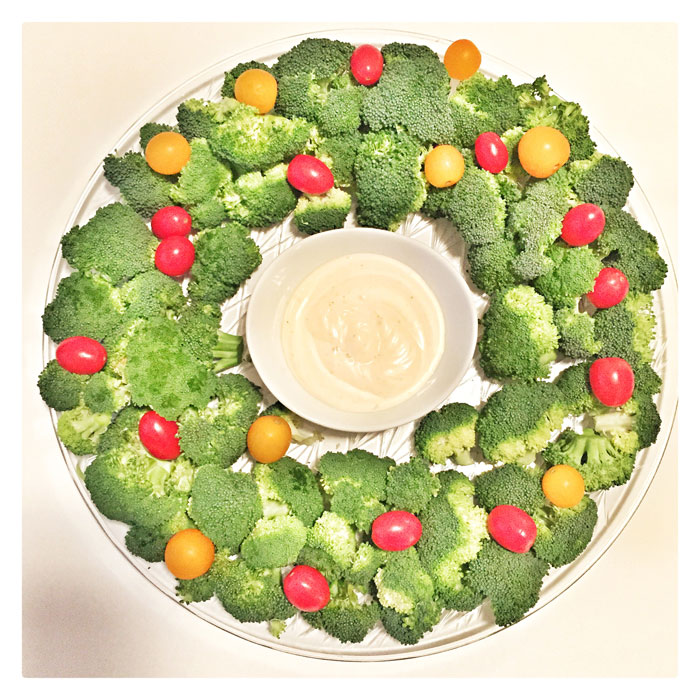
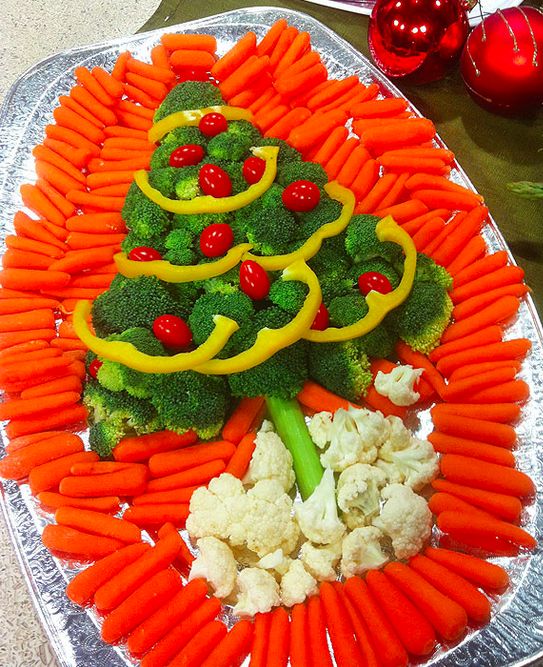
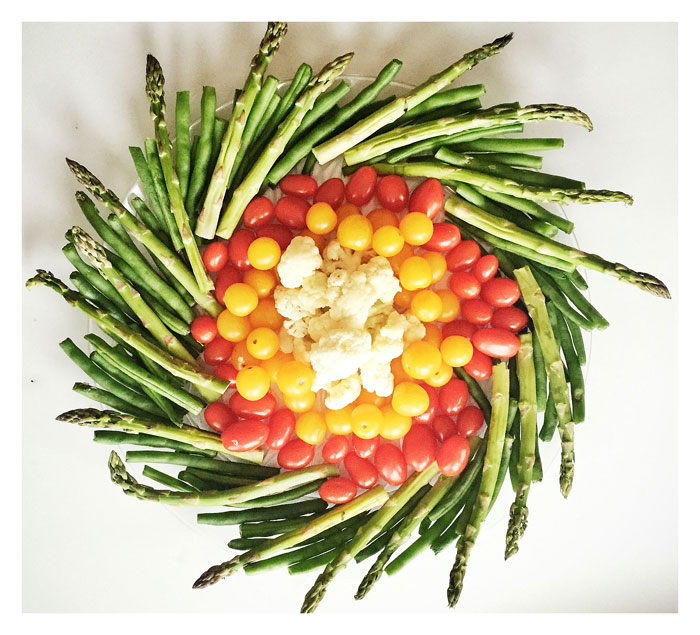
1. Don’t get caught up in the complexity of the arrangement, sometimes simple is better. All of my crudités platter below are super simple, but still look beautiful.
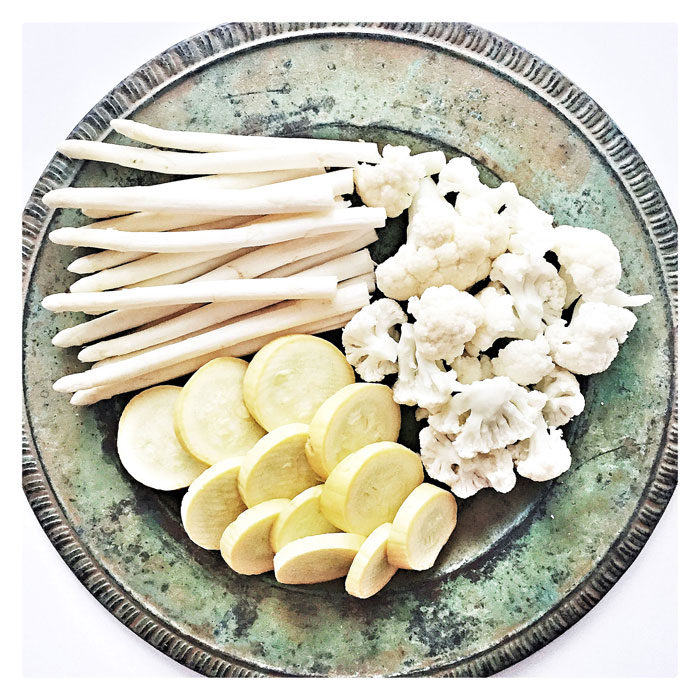
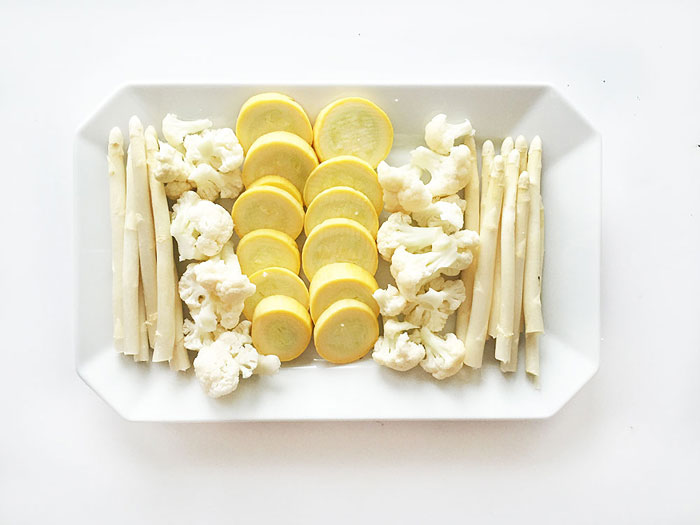
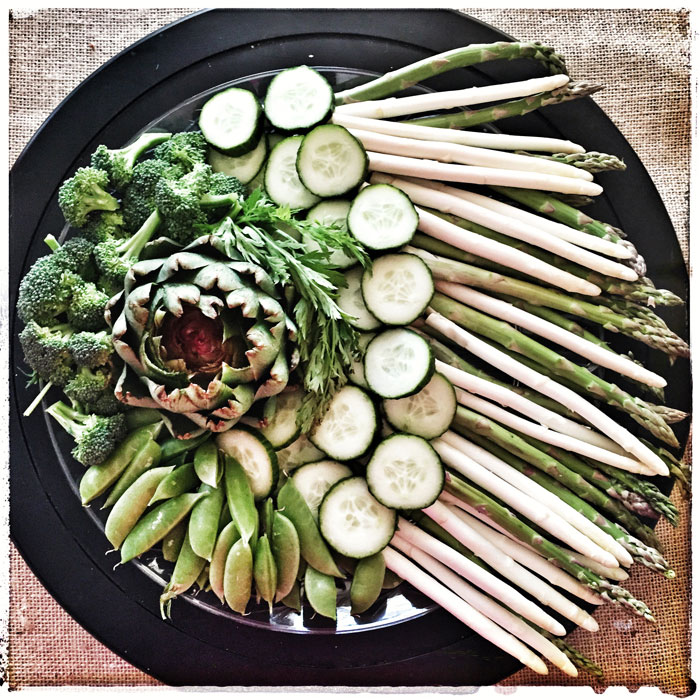
Color goes a long way. But did you know that you can create beautiful monochromatic vegetable platters? Here are two examples of easy vegetable platters where we went with a white look. It is beautiful and unexpected! Vegetables like cauliflower, endives, white squash, asparagus, cucumbers and even peeled radishes, can easily be incorporated into a white crudités platter. Don’t worry, the vegetables do not have to be stark white… but even a hint of white adds impact.
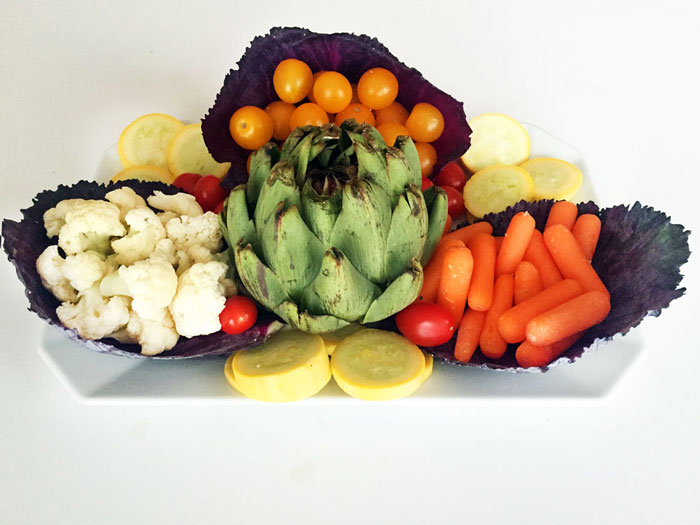
Don’t be afraid to go with a theme, especially during the holidays. Why not make your vegetable platter look like a Christmas tree or a wreath. If there is anything that brings a smile to your guests’ faces, it will be your fun element you bring to your veggie plate.
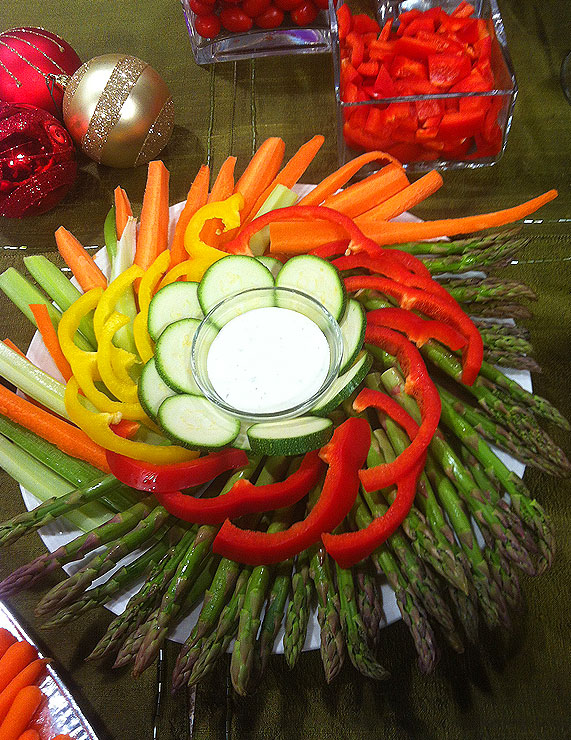
Think outside the box when it comes to presentation. Many of us think of veggie platters and crudités as the round plastic trays filled with celery and carrots at the grocery stores. But don’t be afraid to be daring and out of the box. The more creative you get, the more you’ll love putting the platters together.
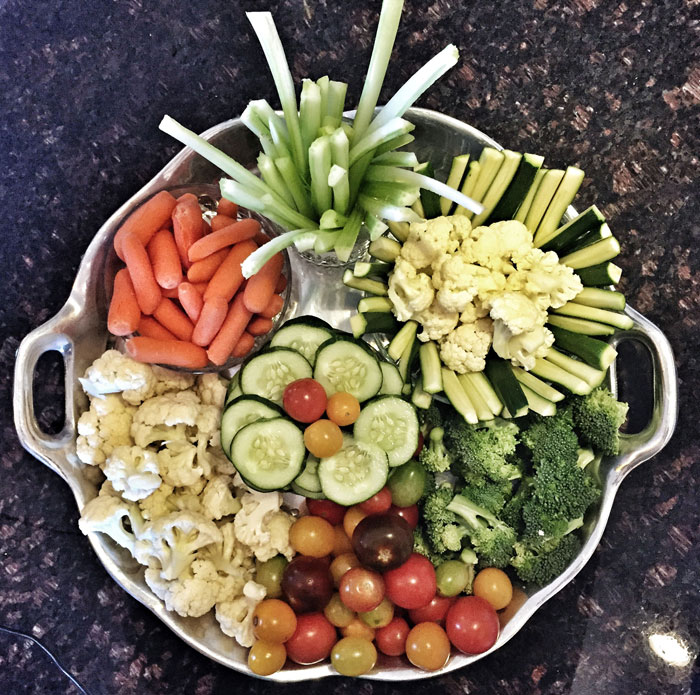
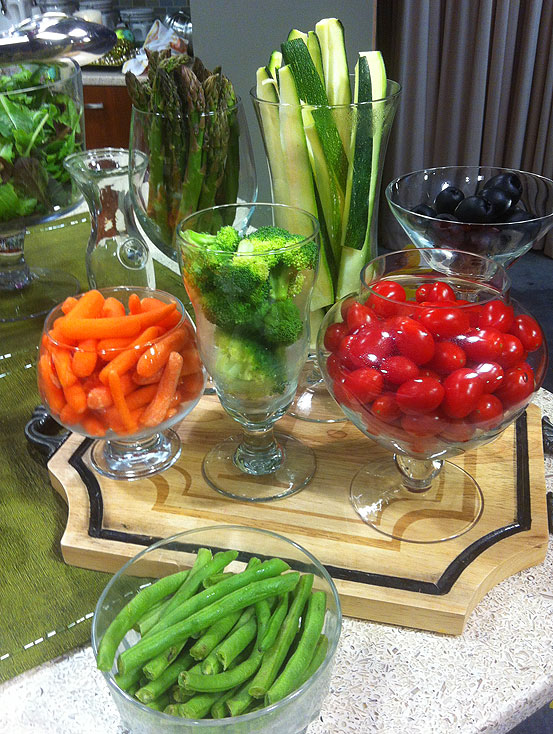
Last but not least, don’t feel like the round plate is your only option to display your vegetables. There are lots of different serving pieces you can use. Various sized glasses, baskets, Chinese food “to go” boxes, and many more.
Last but not least, enjoy the process of putting a credités platter together. There is NO WRONG way to do it… except not to do it at all!
· Posted in Appetizers, Christmas, Parties, Thanksgiving, TV Appearances ·
October 18th, 2014
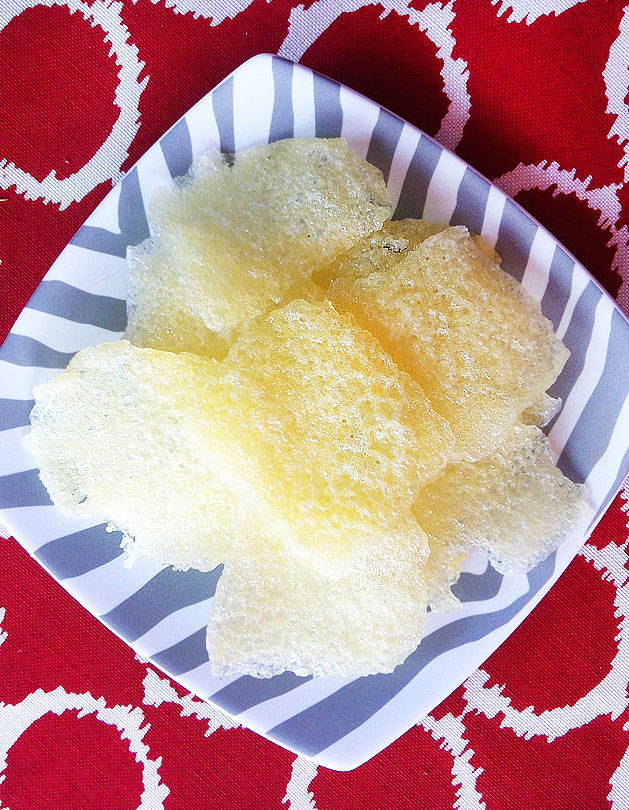
If you love swiss cheese, this is your recipe! It’s so easy and it is such an interesting way to enjoy your cheese. Plus, it’s wonderful for parties and scores big with the low carb party guests. It’s a win-win, so try it today. The recipe is so easy, you can literally enjoy it in about 5 minutes! Oh, and before I forget to make everyone’s day… this works pretty much with any sliced cheese, including CHEDDAR… my other favorite cheese :-).
INGREDIENTS
5 slices of swiss cheese (Yep, that’s it!)
PREPARATION
Rip your cheese slice in half, and place it on a plate. Cook in microwave for 3 minutes. Once done, peel the cheese off the plate and place on a paper towel. Wait for it to cool and dry and enjoy your cheese chips. The longer they dry, the crispier they’ll get. You can also serve them with your favorite dip, although I prefer to eat the chips all by themselves!
· Posted in Appetizers, Back To School, Guilt Free Party Snacks, Low Carb, Recipes, Super Bowl ·
May 26th, 2014
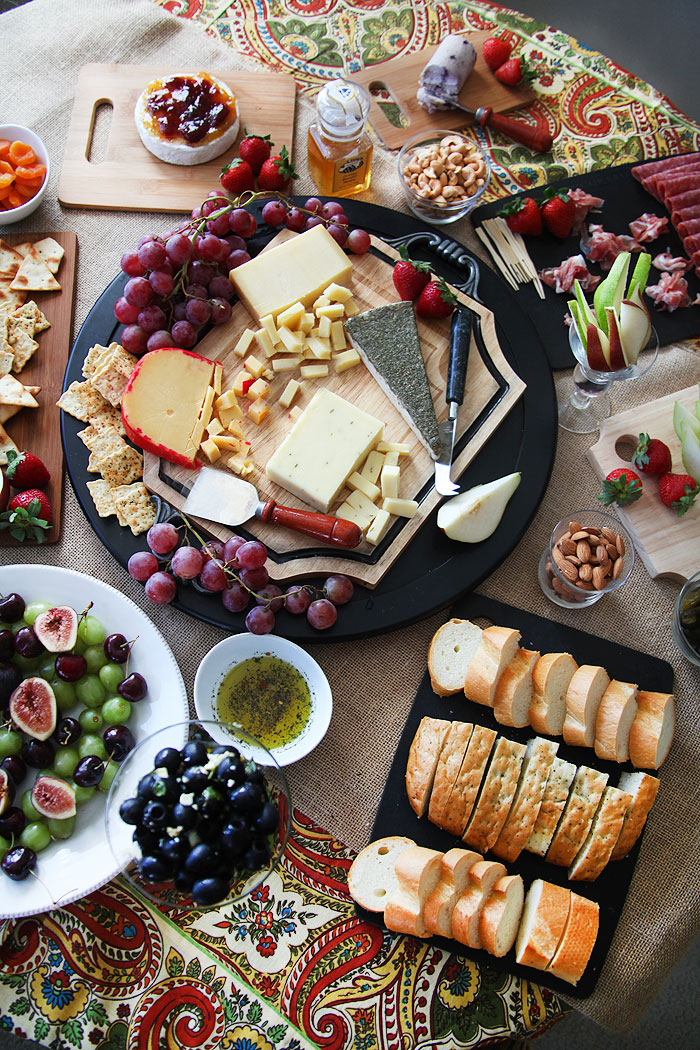
If you are one of those people who can’t seem to get out of the “cheese and crackers” plate, you will LOVE this article!
A few weeks ago, I invited one of my favorite couples to my place for an “ultimate” cheese experience. Knowing that cheese was their weakness, I thought… why bother with dinner, we’ll just make the appetizer our main meal… needless to say, my guests loved it!
Something I hear from many of my friends is that they can’t seem to get creative with the cheese plate. It seems like it’s always an after thought with the main meal taking most of the priority. Well, here is a cheat sheet of some of my favorite things to add to a cheese spread. Use all these ideas, or just a few. I guarantee these items will always be a success!
Marinated Olives
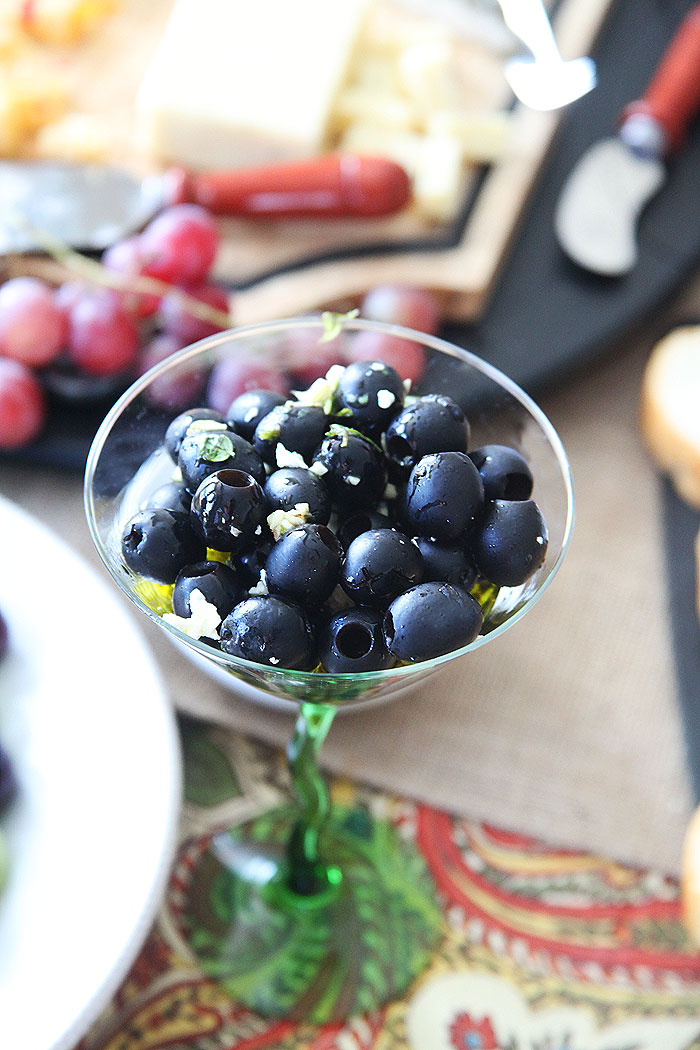
Olives are a staple on a cheese plate, however marinated olives are even better! Most supermarkets have a plethora marinated olives at their deli section and I love that you can buy them by the pound and choose the amount you would like to serve. However, they tend to be a bit pricey and if you are sticking to a budget, making your own is always a better option. I simply mix a little garlic (not too much) and my favorite spices (but not too spicy) in olive oil and pour over my favorite olives. Let them stand for an hour and you should have a great addition to your cheese plate.
A Variety of Cured Meats
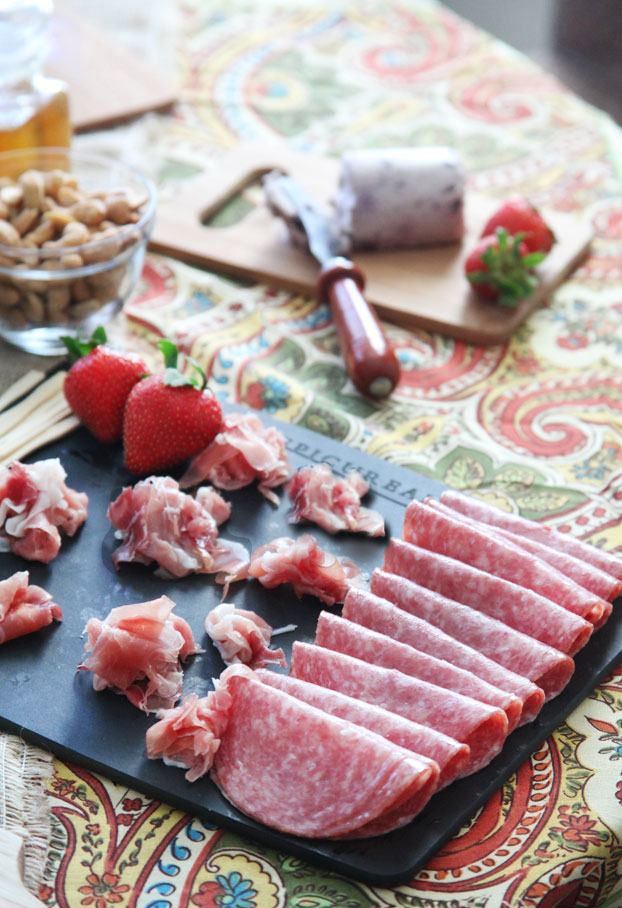
Whether you choose salami, prosciutto, or ham, cured meats are always a delicious addition to any cheese platter. If you don’t like cured meats, you could also serve deli meats, such as roast beef, turkey, or chicken slices. Your guests will love making their own combinations of cheese, crackers, and meats.
A Variety of Breads
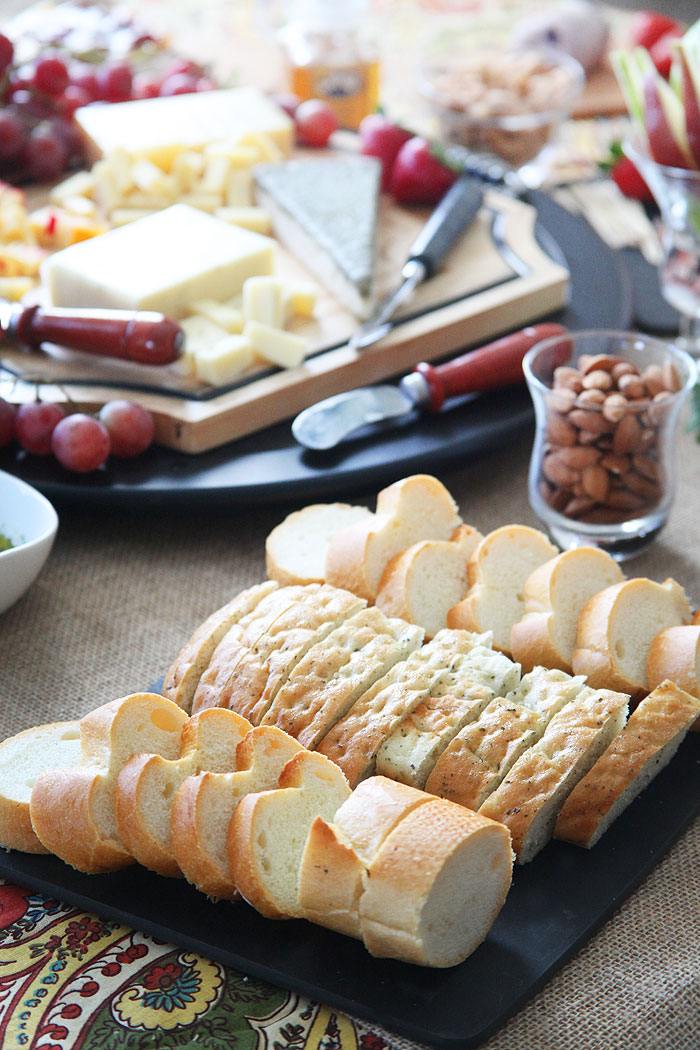
Most people opt for crackers with their cheese. And if you are serving a cheese plate as an appetizer, before a big meal, this will probably be a great option. However, if you would like the cheese spread to be your main meal (maybe for a wine tasting party), consider adding various kinds of breads to the table. Bread can fill up those hungry guests and adding additional bread accoutrements such as olive oil dip and soft cheeses will guarantee that no one walks away from your party hungry. Also, consider using breads that are “out of the box” and your guests would not normally consider purchasing, such as olive ciabatta any flavor challahs, egg breads, etc. Of course, have one “neutral” bread that everyone would like such as a french baguette.
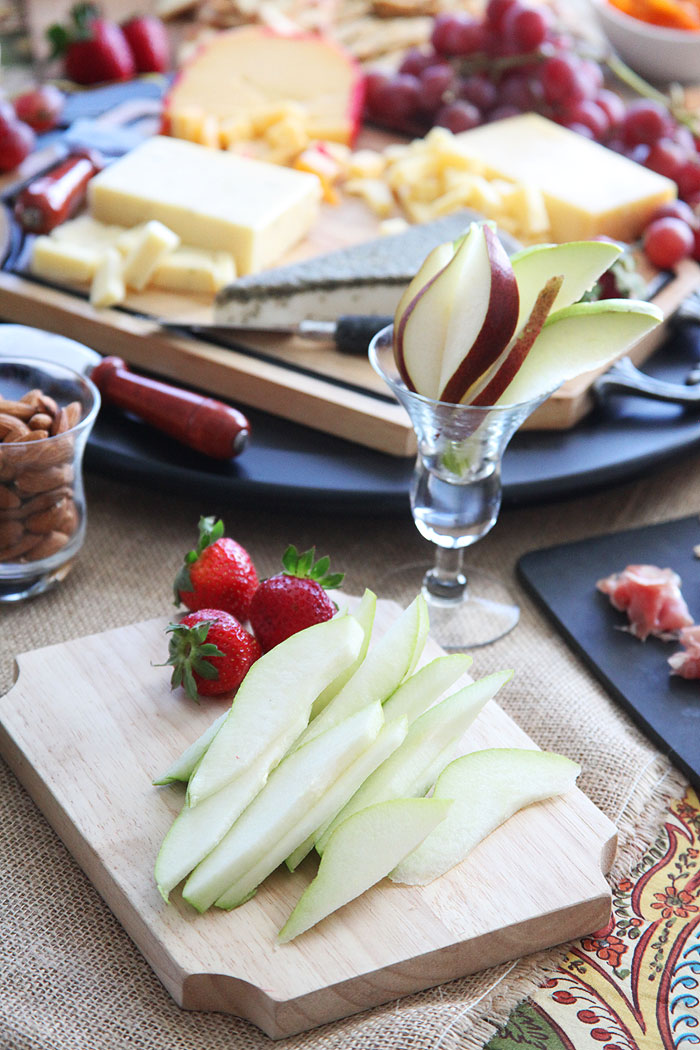
Fruit
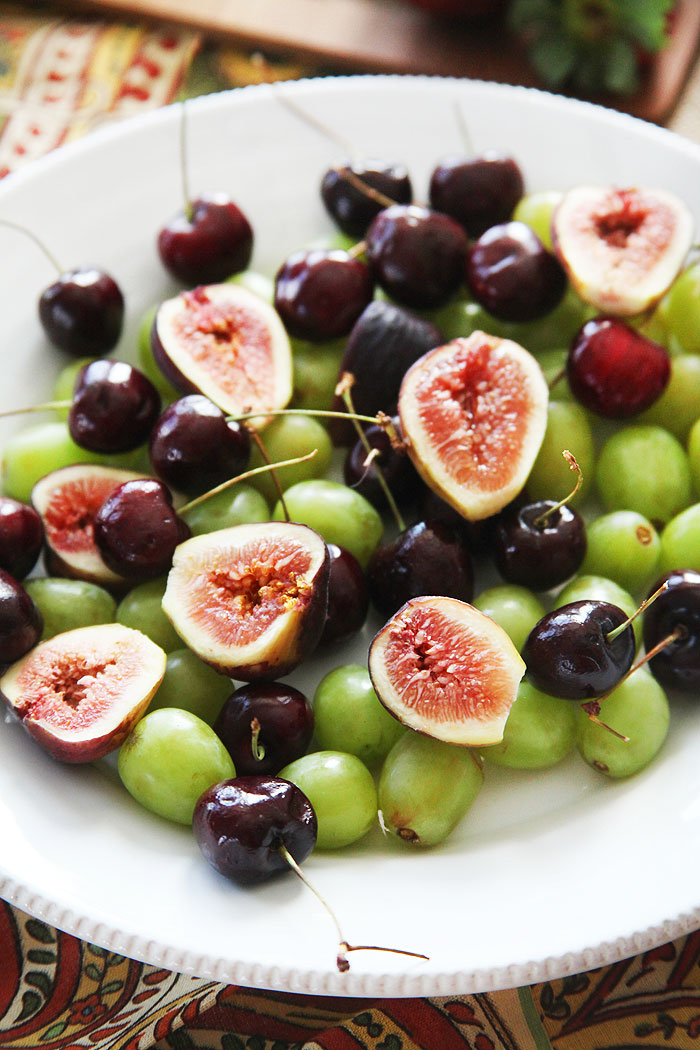
Fruit is a MUST!! Fruits are beautiful, delicious, and best of all, help the digestive process. Fruits have always complemented cheese and the best part of creating a cheese platter is adding fruit which may be out of the box a bit. Grapes are always great, but fruits such as figs, cherries, and strawberries look beautiful and taste great with cheese. Of course, doing a bit of research and checking to see which cheeses go with which fruit is always recommended. For example, stay away from any high acid or citrus fruit. But it’s not rocket science so don’t overthink it! And don’t forget, dried fruit is wonderful too!!
Honey
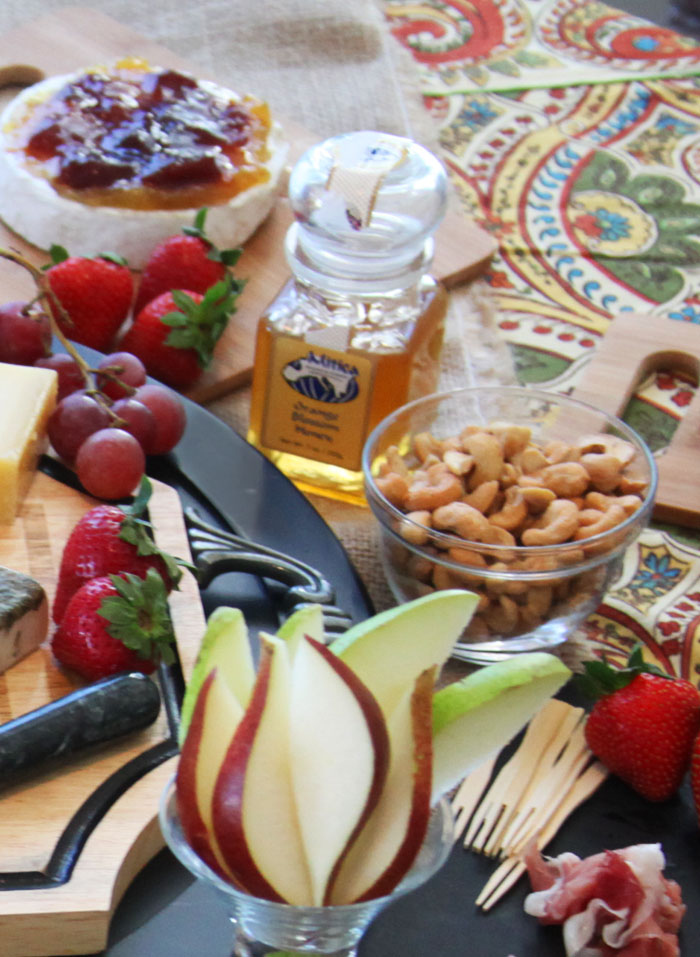
Honey is a wonderful addition to any cheese platter. It is the perfect juxtaposition of sweet and sour. Generally, I recommend you use varietal honey which is made from bees who pollinate on just one flower rather than bees that pollinate a bunch of different kinds of flowers. Also, just drizzle a little honey on the cheese, don’t soak it. A little goes a long way!
Honeys goes really well with aged cheeses that have a good amount of nuttiness. Parmigiano-Reggiano, a tangy Cheddar, or any of the alpine cheeses (Comté, Gruyère, Appenzeller). Other sweet and creamy cheeses like ricotta, goat cheese, or feta are wonderful with a citrus based honey. Don’t forget the blue cheeses which are spectacular with honey. For some, the spicier the better, but you may want to experiment to see what you and your guests like the best.
Other Wonderful Additions:
Pepperoni Chips – Simply place pepperoni slices in your oven at 375 degrees for 5-10 minutes or until they get crispy and serve!
Chocolate – Did you know that dark chocolate and Parmesan cheese have been scientifically proven to work well together. That’s right, scientists have actually proven that these two items are perfect for pairing. Here’s the link to the full article on HuffingtonPost Taste, it’s fascinating. And the good news is that your guests will be WOWed by your brilliance 🙂 Another cheese you may want to try with chocolate is mozzarella cheese. But don’t over do it, just a small amount will make a huge impression!
Fondue – So many of us think that we have to have wedge cheese on our cheese plate, but a hot delicious and creamy fondue will bring oohs and ahhs! Plus, they are very easy to make
Nuts – Don’t forget the nuts!! Almost any nut will look wonderful on your cheese plate. You can do a little research to see which nuts pair well with cheeses, but honestly, it’s hard to go wrong. My ultimate favorites are almonds and cashews. They work well with most cheeses.
Preserves – Fig preserves are incredible on top of a delicious brie! Other preserves such as plum, apricot, and even wild blueberry are unbelievable!! Stop in at your local supermarket or gourmet grocer and talk to the cheese monger about the best pairings for their cheeses. I find that the people behind the counter can answer all my questions and even teach me a thing or two! Also, if there is a special gourmet cheese section at your grocer, take a look around to see if other items are displayed. Many times, the cheese section has all you need to find the perfect preserves.
Things to avoid would be vegetables, spicy foods, heavy garlic flavored crackers and breads, citrus or high acid foods, and Tannic Red Wines.
· Posted in Appetizers, Cheese, Parties, Recipes ·
May 17th, 2014
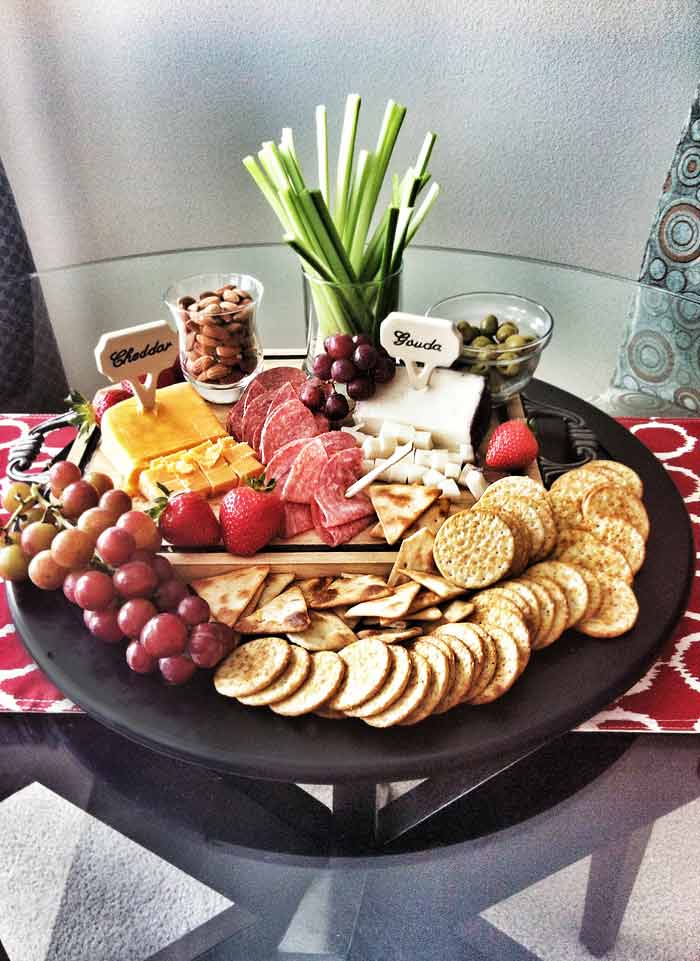
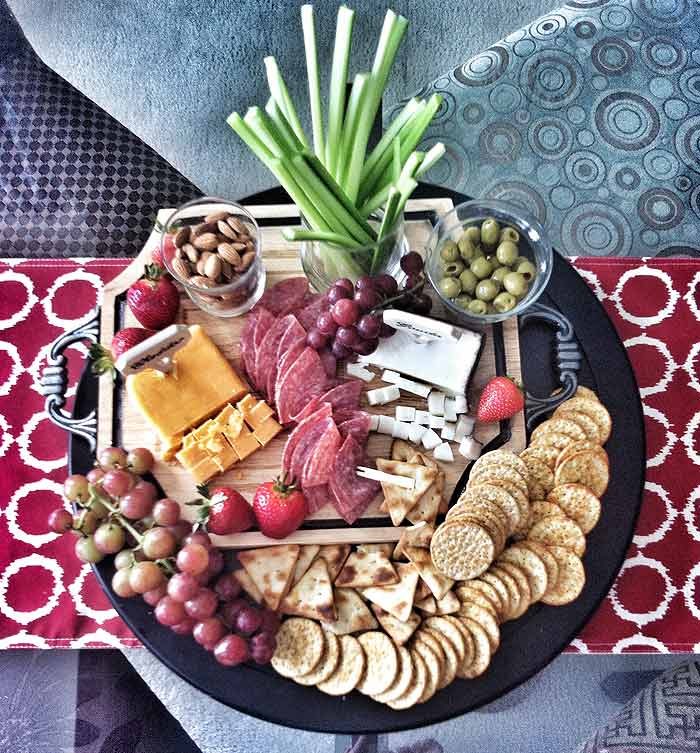
Last night was a wonderful night, which I desperately needed. We had our neighbors over for a dinner which was long overdue. They’ve invited us several times to their beautiful home and we enjoyed many laughs. I promised to have them over, but with my friend’s husband being a pilot, and our lives being crazy, we could not get our schedules synced! But yesterday was that magic Saturday when all the stars aligned… as well as our schedules! We had a wonderful evening filled with great food and conversation.
For an appetizer, I decided to create a cheese platter which would overflow with yumminess! I had a total of three platters, but the one pictured was the main platter which included gouda and cheddar cheeses, salami, almonds, celery, olives, crackers, and fruit. The other platters (not pictured) had a Brie with a combination of fig and cherry preserves and a cured meat platter with prosciutto and grapes. But I really loved how my main platter came out. Nothing fussy just easy and rustic. It was a big hit with our guests and I bet it would be a big hit with yours! And as you can see, it was very easy to put together.!
· Posted in Appetizers, Guilt Free Party Snacks, Parties, Recipes ·
March 31st, 2014
I am absolutely in love with this recipe! It is perfect in every way! I love that people who are watching their carbs can enjoy this. As a low carb eater, I find it hard, at some parties, to find items I can enjoy. However, now you can create a beautiful appetizer without having to worry about your carb count. If you don’t like endives, this recipe is great as a side dish as well!!!
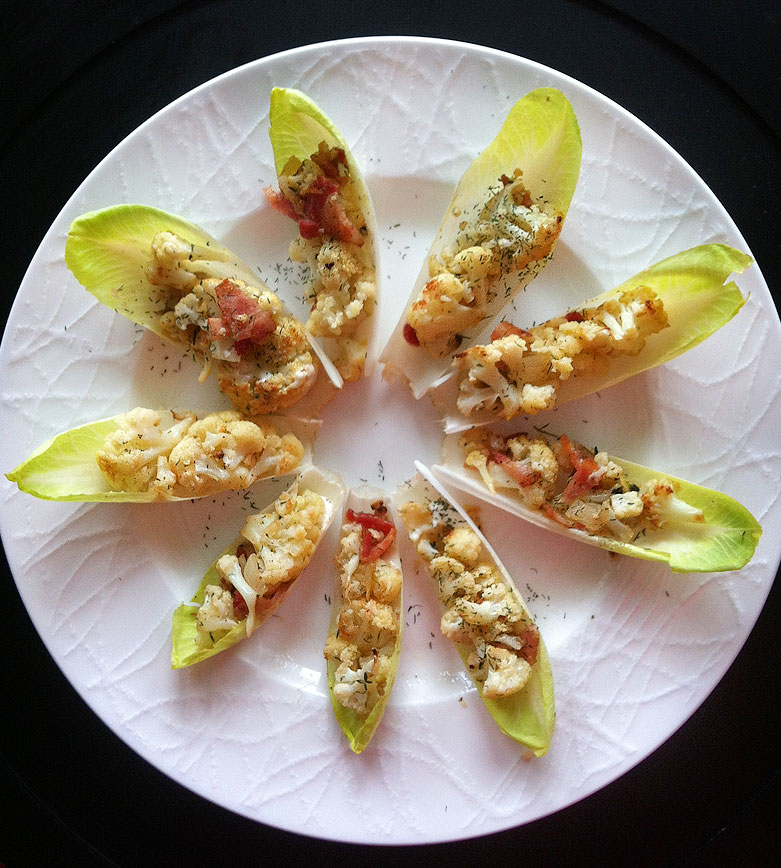
CAULIFLOWER AND BACON BOATS
1 Head of Cauliflower
5 Strips of Bacon
1/4 -1/2 cup of chopped onion
3 Garlic Cloves – chopped
1 Tbsp of your favorite fresh herbs
1 Tbsp nutmeg
1/2 stick of butter of 1/4 cup of olive oil
Juice of 2 lemons
1 Tsp of lemon zest
salt and pepper to taste
1 endive
2 Tbsp of your favorite salad dressing (I love ranch)
Cut the cauliflower into small pieces and toss with olive oil, salt and pepper. Arrange on a baking pan and roast in your oven for 15-20 minutes or until the cauliflower becomes tender. Once the cauliflower is done, heat butter or olive oil in a pan and saute the onions and garlic. Throw in the bacon and continue until its ready. For the last step, add the cauliflower to the mixture in the pan and add lemon juice, lemon zest, nutmeg, herbs, and salt and pepper. Arrange the endive leaves on a plate and add a drop or two of your favorite dressing. Fill with the cauliflower mixture. Sprinkle dried chives, or any herb you adore and serve immediately.
The cauliflower mixture can also be prepared a day ahead! Or served as a side dish without the endive boats.
· Posted in Appetizers, Guilt Free Party Snacks, Low Carb, Parties, Recipes ·
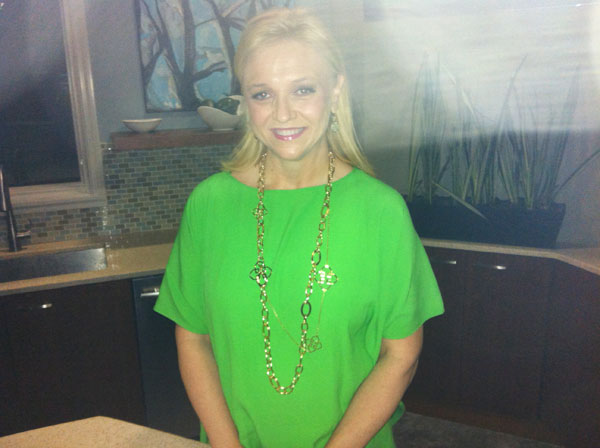
January 27th, 2014
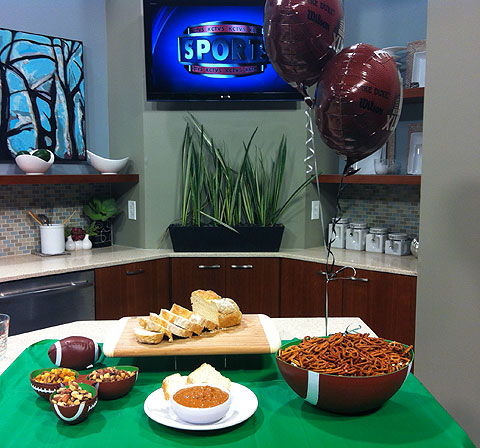
I had a blast today hanging out with Alexis and Dave from Better Kansas City Morning Show on Channel 4, here in Kansas City! I demoed three great “mobile” snacks to take to a Super Bowl party. Hot Wing Pretzels… Roasted Flavored Nuts… and Hot Wing Pretzels! All were super easy and with just a few ingredients!

BEER BREAD
3 cups of Self Rising (very important!) flour
3 tabspoons of sugar
12oz container of beer (any brand)
Pour beer into bowl. Then add flour and sugar. Mix until you have a dough
that is not sticking to the sides (you can add a little extra flour if you
like). You can place the dough directly in a well greased loaf pan. Or,
you can put the dough on a floured surface and knead it until you like the
consistency. Either way, your bread will be perfect (kneading or no
kneading).
Bake in the oven at 350 degrees for 55 minutes or until you see the top of
the bread get brown. Keep an eye on your bread because ovens can bake
differently. If you like, you can pour some melted button on the top of the
bread 10-15 minutes before it is done.
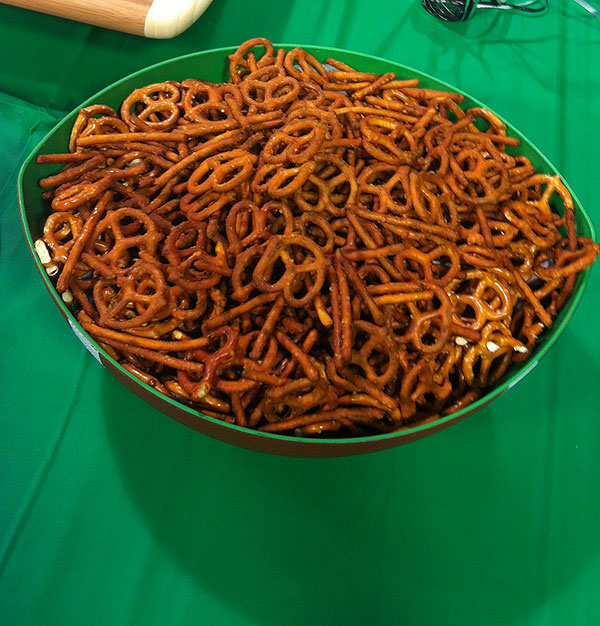
HOT WING PRETZELS
1 bag of pretzel sticks or regular pretzels. Do not use large pretzel
sticks.
1/2 cup of Butter
1/2 cup of Hot Wing Sauce
2 Tbsp of Worcestershire Sauce
2 tsp Garlic Salt
In a pot, heat up the sauces and garlic salt. Once everything is mixed and
well heated, place the pretzels in a bowl and coat with hot sauce mixture.
Make sure that you coat the pretzels little by little, you don’t want there
to be extra sauce on the bottom of the bowl or a puddle on your baking sheet. Mix the pretzel sticks so they are well coated. Then place on a baking pan and bake on 300 degrees for 30
minutes, stirring every 10 minutes.
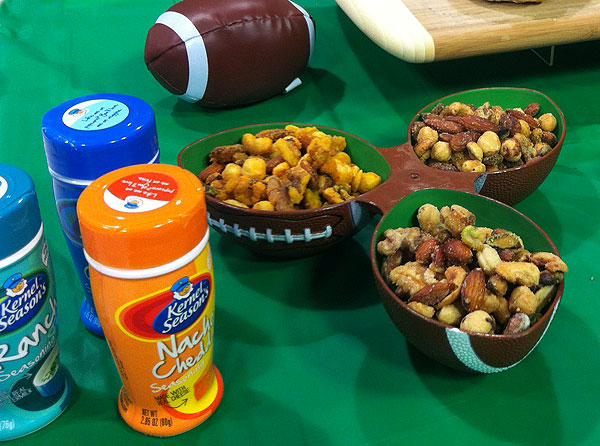
SEASONED NUTS
3 cups of any nuts or mixed nuts… make sure they are RAW!
1/4 – 1/2 cup of butter
Ranch, cheese, or any pop-corn seasoning. You can also use seasoning packs
made for salsas and dips.
Place your nuts in a bowl. Melt butter and pour it over nuts little by little. Mix well
until all nuts are coated. Then simply add your favorite seasoning… as
much as you like. Bake in the oven at 350 degrees for 7-10 minutes. KEEP
YOUR EYE ON THE NUTS SO THAT THEY DO NOT BURN!! After nuts are taken out of
the oven, sprinkle some more seasoning on them and wait for them to dry
fully 3-5 hours. Great to make a day in advance.
· Posted in Appetizers, Parties, Recipes, Super Bowl, TV Appearances, TV Spots, Uncategorized ·
September 29th, 2013
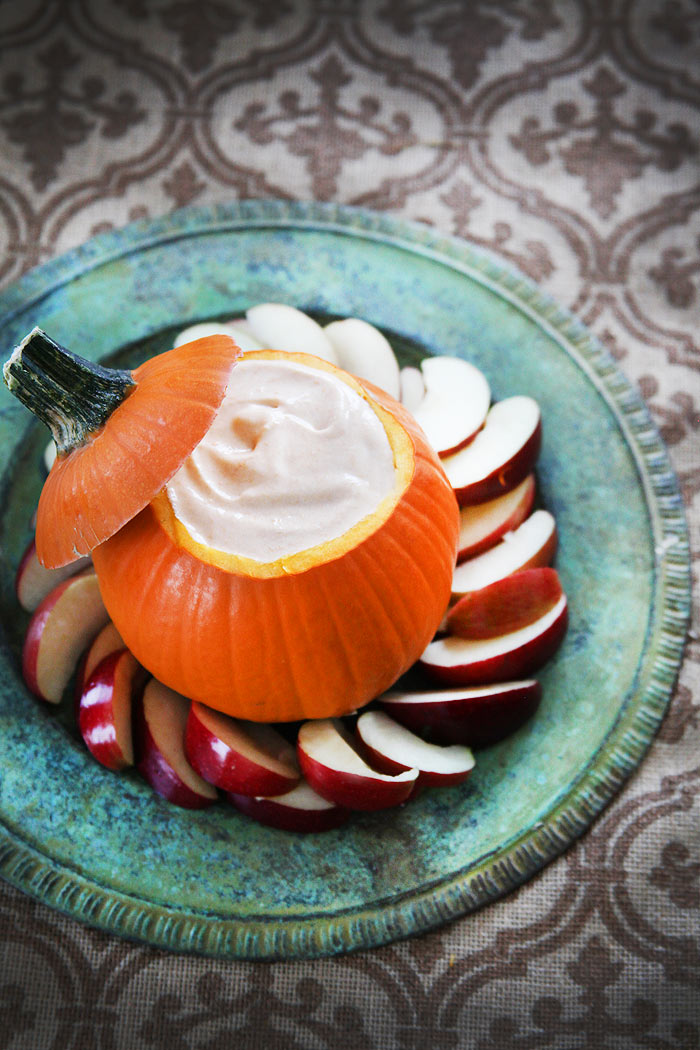
I LOVE this pumpkin dip… why? Because I can control how much sugar goes into it and customize it. So many recipes have multiple sweet ingredients which makes the sugar content difficult to gage. With this recipe, I can add as much or as little sugar as I want. Serve the dip with fruit, or even baked tortilla chips sprinkled with cinnamon and you’ve got yourself a winning party dish for any fall party… year after year. You’ll love it!
RECIPE
1/2 cup Canned Pumpkin (you can add less or more, depending on your preference)
1/2 large container of Light and Fit vanilla yogurt
2/3 container of Sugar Free Cool Whip (or any sugar free whipped topping)
1/2 cup of Sugar (this is the part that you can customize based on how sweet you would like it… you can use less or more)
1 tsp of Cinnamon (optional)
Combine all the ingredients and put in a bowl (or a hollowed out small pumpkin), I use sugar free and “light” varieties because I like to see how much sugar I’m putting in the dip. If this doesn’t matter to you, you can get the sugared varieties and skip adding your own sugar. Chill for at least 1 hour and serve with apples or sweet crackers.
· Posted in Appetizers, Fall Season, Guilt Free Party Snacks, Recipes, Thanksgiving ·
|
|
|